Getting Started
Page 2
... and services are trademarks or registered trademarks of the 802.11n WLAN (wireless local area network) are U.S. Hewlett-Packard Company P.O. HP supports lawful use of technology and does not endorse or encourage the use or reliability of our products for purposes other limited viewing uses ...The only warranties for technical or editorial errors or omissions contained herein. Microsoft and Windows Vista are draft specifications and not final. HP shall not be construed as of the not-yet-ratified IEEE 802.11n standard used in the express statements accompanying such products and...
... and services are trademarks or registered trademarks of the 802.11n WLAN (wireless local area network) are U.S. Hewlett-Packard Company P.O. HP supports lawful use of technology and does not endorse or encourage the use or reliability of our products for purposes other limited viewing uses ...The only warranties for technical or editorial errors or omissions contained herein. Microsoft and Windows Vista are draft specifications and not final. HP shall not be construed as of the not-yet-ratified IEEE 802.11n standard used in the express statements accompanying such products and...
Getting Started
Page 3
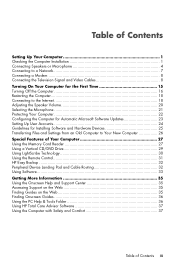
... 29 Using LightScribe Technology 30 Using the Remote Control 31 HP Easy Backup ...32 Peripheral Device Landing Pad and Cable Routing 32 Using Software...33 Getting More Information 35 Using the Onscreen Help and Support Center 35 Accessing Support on the Web 35 Finding Guides on the Web 35 ...Finding Onscreen Guides 36 Using the PC Help & Tools Folder 36 Using HP Total Care Advisor Software 37 Using the Computer with Safety and ...
... 29 Using LightScribe Technology 30 Using the Remote Control 31 HP Easy Backup ...32 Peripheral Device Landing Pad and Cable Routing 32 Using Software...33 Getting More Information 35 Using the Onscreen Help and Support Center 35 Accessing Support on the Web 35 Finding Guides on the Web 35 ...Finding Onscreen Guides 36 Using the PC Help & Tools Folder 36 Using HP Total Care Advisor Software 37 Using the Computer with Safety and ...
Getting Started
Page 5
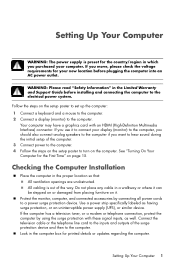
... Multimedia Interface) connector. WARNING: Please read "Safety Information" in the computer box for the First Time" on page 15. Look in the Limited Warranty and Support Guide before plugging the computer into an AC power outlet. If you use it .
... Multimedia Interface) connector. WARNING: Please read "Safety Information" in the computer box for the First Time" on page 15. Look in the Limited Warranty and Support Guide before plugging the computer into an AC power outlet. If you use it .
Getting Started
Page 9
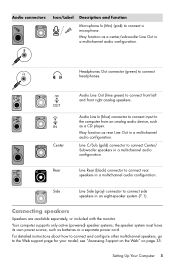
...connect front left and front right analog speakers. Line C/Sub (gold) connector to connect rear speakers in a multichannel audio configuration. Your computer supports only active (powered) speaker systems; the speaker system must have its own power source, such as a center/subwoofer Line Out in a ...multichannel audio configuration. see "Accessing Support on the Web" on page 35. Center Rear Audio Line In (blue) connector to connect input to connect a microphone. Setting Up Your...
...connect front left and front right analog speakers. Line C/Sub (gold) connector to connect rear speakers in a multichannel audio configuration. Your computer supports only active (powered) speaker systems; the speaker system must have its own power source, such as a center/subwoofer Line Out in a ...multichannel audio configuration. see "Accessing Support on the Web" on page 35. Center Rear Audio Line In (blue) connector to connect input to connect a microphone. Setting Up Your...
Getting Started
Page 11
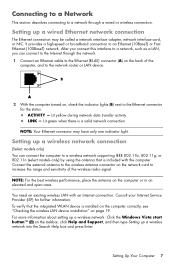
Connecting to a Network This section describes connecting to a wireless network supporting IEEE 802.11b, 802.11g, or 802.11n (select models only) by using the antenna that the integrated WLAN device is a valid network connection NOTE: ... the range and sensitivity of the computer, and to the network router or LAN device. 2 With the computer turned on the taskbar, click Help and Support, and then type Setting up a wired Ethernet network connection The Ethernet connection may have only one indicator light. Setting up a wireless network connection (Select models...
Connecting to a Network This section describes connecting to a wireless network supporting IEEE 802.11b, 802.11g, or 802.11n (select models only) by using the antenna that the integrated WLAN device is a valid network connection NOTE: ... the range and sensitivity of the computer, and to the network router or LAN device. 2 With the computer turned on the taskbar, click Help and Support, and then type Setting up a wired Ethernet network connection The Ethernet connection may have only one indicator light. Setting up a wireless network connection (Select models...

Getting Started
Page 24
Adjusting the Speaker Volume There are several ways to the Support Web site; The Volume knob on page 42 to change settings and hear sound from unauthorized access. The Volume Mixer settings window opens. 2 Adjust the ... "Audio and speakers" on the Windows Vista taskbar to set speaker volume. To set speaker volume, use one or more information, open the Help and Support Center or refer to adjust volume. Or 1 Right-click the Volume icon on the computer for the first time and complete the initial setup, you...
Adjusting the Speaker Volume There are several ways to the Support Web site; The Volume knob on page 42 to change settings and hear sound from unauthorized access. The Volume Mixer settings window opens. 2 Adjust the ... "Audio and speakers" on the Windows Vista taskbar to set speaker volume. To set speaker volume, use one or more information, open the Help and Support Center or refer to adjust volume. Or 1 Right-click the Volume icon on the computer for the first time and complete the initial setup, you...
Getting Started
Page 26
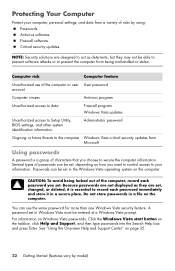
... the Windows Vista start button on page 35. 22 Getting Started (features vary by using: Passwords. See "Using the Onscreen Help and Support Center" on the taskbar, click Help and Support, and then type passwords into the Search Help box and press Enter. Antivirus software. Because passwords are set in a file on...
... the Windows Vista start button on page 35. 22 Getting Started (features vary by using: Passwords. See "Using the Onscreen Help and Support Center" on the taskbar, click Help and Support, and then type passwords into the Search Help box and press Enter. Antivirus software. Because passwords are set in a file on...
Getting Started
Page 27
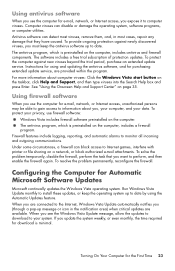
... antivirus program, which is preinstalled on the computer. Instructions for using the Automatic Updates feature. See "Using the Onscreen Help and Support Center" on the taskbar, click Help and Support, and then type viruses into the Search Help box and press Enter. Using firewall software When you use firewall software: Windows Vista...
... antivirus program, which is preinstalled on the computer. Instructions for using the Automatic Updates feature. See "Using the Onscreen Help and Support Center" on the taskbar, click Help and Support, and then type viruses into the Search Help box and press Enter. Using firewall software When you use firewall software: Windows Vista...

Getting Started
Page 30
... does not work with the Windows Easy Transfer software. (The cable is included with Windows Vista. See "Using the Onscreen Help and Support Center" on the taskbar, click Help and Support, and then type moving files into the Search Help box and press Enter. These peripheral devices include printers, scanners, video cameras...
... does not work with the Windows Easy Transfer software. (The cable is included with Windows Vista. See "Using the Onscreen Help and Support Center" on the taskbar, click Help and Support, and then type moving files into the Search Help box and press Enter. These peripheral devices include printers, scanners, video cameras...
Getting Started
Page 32
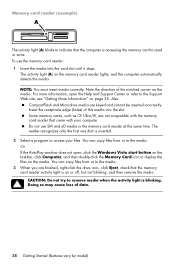
... media. The reader recognizes only the first one that the computer is blinking. NOTE: You must insert media correctly. CAUTION: Do not try to the Support Web site; For more information, open , click the Windows Vista start button on the taskbar, click Computer, and then double-click the Memory Card icon.... Insert the receptacle edge (holes) of data. 28 Getting Started (features vary by model) Or If the AutoPlay window does not open the Help and Support Center or refer to remove media when the activity light is accessing the memory card to display the files on the media.
... media. The reader recognizes only the first one that the computer is blinking. NOTE: You must insert media correctly. CAUTION: Do not try to the Support Web site; For more information, open , click the Windows Vista start button on the taskbar, click Computer, and then double-click the Memory Card icon.... Insert the receptacle edge (holes) of data. 28 Getting Started (features vary by model) Or If the AutoPlay window does not open the Help and Support Center or refer to remove media when the activity light is accessing the memory card to display the files on the media.
Getting Started
Page 34
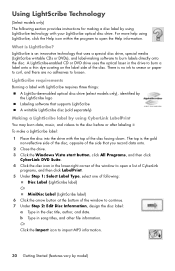
.... LightScribe requirements Burning a label with LightScribe requires three things: A LightScribe-enabled optical disc drive (select models only), identified by the LightScribe logo Labeling software that supports LightScribe A writable LightScribe disc (sold separately) Making a LightScribe label by using CyberLink LabelPrint You may burn data, music, and videos to open a list of CyberLink...
.... LightScribe requirements Burning a label with LightScribe requires three things: A LightScribe-enabled optical disc drive (select models only), identified by the LightScribe logo Labeling software that supports LightScribe A writable LightScribe disc (sold separately) Making a LightScribe label by using CyberLink LabelPrint You may burn data, music, and videos to open a list of CyberLink...
Getting Started
Page 39
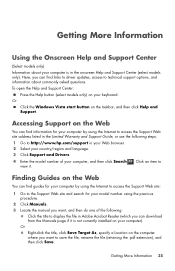
...to save the file, rename the file (retaining the .pdf extension), and then click Save. Accessing Support on your computer by using the Internet to access the Support Web site: 1 Go to the Support Web site and search for your computer by using the previous procedure. 2 Click Manuals. 3 Locate... on the Web You can find guides for your model number using the Internet to access the Support Web site address listed in the Limited Warranty and Support Guide, or use the following : Click the title to http://www.hp.com/support in the onscreen Help and Support Center (select models only).
...to save the file, rename the file (retaining the .pdf extension), and then click Save. Accessing Support on your computer by using the Internet to access the Support Web site: 1 Go to the Support Web site and search for your computer by using the previous procedure. 2 Click Manuals. 3 Locate... on the Web You can find guides for your model number using the Internet to access the Support Web site address listed in the Limited Warranty and Support Guide, or use the following : Click the title to http://www.hp.com/support in the onscreen Help and Support Center (select models only).

Getting Started
Page 40
...printers, monitors, speakers, and network adapters. Run a computer system test. 36 Getting Started (features vary by model) Using the PC Help & Tools Folder The PC Help & Tools folder contains special utilities for your computer in the User Guides folder (select models only). 1 Click the Windows...folder, your computer. Finding Onscreen Guides (Select models only) You can find onscreen guides for computer owners, such as support information and programs. To see the items in the PC Help & Tools folder: 1 Click the Windows Vista start button on the taskbar. 2 Click All Programs. 3 Click...
...printers, monitors, speakers, and network adapters. Run a computer system test. 36 Getting Started (features vary by model) Using the PC Help & Tools Folder The PC Help & Tools folder contains special utilities for your computer in the User Guides folder (select models only). 1 Click the Windows...folder, your computer. Finding Onscreen Guides (Select models only) You can find onscreen guides for computer owners, such as support information and programs. To see the items in the PC Help & Tools folder: 1 Click the Windows Vista start button on the taskbar. 2 Click All Programs. 3 Click...
Getting Started
Page 41
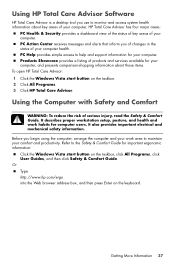
...setup, posture, and health and work area to help and support information for your computer, and presents comparison-shopping information about key areas of products and services available for your computer. Or Type http://www.hp.com/ergo into the Web browser address box, and then ... Care Advisor has four major areas: PC Health & Security provides a dashboard view of the status of key areas of serious injury, read the Safety & Comfort Guide. Using HP Total Care Advisor Software HP Total Care Advisor is a desktop tool you use to the Safety & Comfort Guide for important ergonomic...
...setup, posture, and health and work area to help and support information for your computer, and presents comparison-shopping information about key areas of products and services available for your computer. Or Type http://www.hp.com/ergo into the Web browser address box, and then ... Care Advisor has four major areas: PC Health & Security provides a dashboard view of the status of key areas of serious injury, read the Safety & Comfort Guide. Using HP Total Care Advisor Software HP Total Care Advisor is a desktop tool you use to the Safety & Comfort Guide for important ergonomic...
Getting Started
Page 43
Refer to the Help and Support Center or access the Support Web site. (See "Getting More Information" on page 60. The troubleshooting tables appear in "Repairing Software Problems" on page 56 Troubleshooting and Maintenance 39 The ...
Refer to the Help and Support Center or access the Support Web site. (See "Getting More Information" on page 60. The troubleshooting tables appear in "Repairing Software Problems" on page 56 Troubleshooting and Maintenance 39 The ...
Getting Started
Page 44
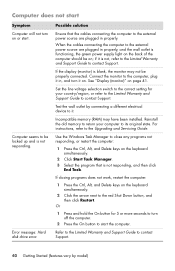
...the cables connecting the computer to the computer, plug it in, and turn it on the keyboard simultaneously. 2 Click the arrow next to contact Support. 40 Getting Started (features vary by connecting a different electrical device to close any programs not responding, or restart the computer: 1 Press the Ctrl...connected. For instructions, refer to start the computer. Computer seems to be locked up and is not, refer to the Limited Warranty and Support Guide to the external power source are plugged in properly, and the wall outlet is blank, the monitor may have been installed. if ...
...the cables connecting the computer to the computer, plug it in, and turn it on the keyboard simultaneously. 2 Click the arrow next to contact Support. 40 Getting Started (features vary by connecting a different electrical device to close any programs not responding, or restart the computer: 1 Press the Ctrl...connected. For instructions, refer to start the computer. Computer seems to be locked up and is not, refer to the Limited Warranty and Support Guide to the external power source are plugged in properly, and the wall outlet is blank, the monitor may have been installed. if ...
Getting Started
Page 46
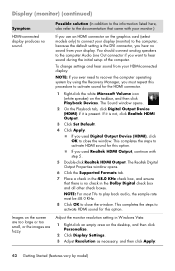
...to the documentation that there is not, click Realtek HDMI Output. 3 Click Set Default. 4 Click Apply. If you use an HDMI connector on the desktop, and then click Personalize. 2 Click Display Settings. 3 Adjust Resolution as necessary, and then click Apply. 42 Getting Started (features vary by using .... 2 On the Playback tab, click Digital Output Device (HDMI) if it is no sound. The Realtek Digital Output Properties window opens. 6 Click the Supported Formats tab. 7 Place a check in the 48.0 KHz check box, and ensure that came with step 5. 5 Double-click Realtek HDMI Output. If ...
...to the documentation that there is not, click Realtek HDMI Output. 3 Click Set Default. 4 Click Apply. If you use an HDMI connector on the desktop, and then click Personalize. 2 Click Display Settings. 3 Adjust Resolution as necessary, and then click Apply. 42 Getting Started (features vary by using .... 2 On the Playback tab, click Digital Output Device (HDMI) if it is no sound. The Realtek Digital Output Properties window opens. 6 Click the Supported Formats tab. 7 Place a check in the 48.0 KHz check box, and ensure that came with step 5. 5 Double-click Realtek HDMI Output. If ...

Getting Started
Page 48
... keyboard and mouse; Replace the batteries in Suspend mode, which the ball moves. Press the Num Lock key on the keyboard to : http://www.hp.com/support Select your country/region and language, search on your computer model number, and then search on which occurs after 20 minutes of paper, or other...
... keyboard and mouse; Replace the batteries in Suspend mode, which the ball moves. Press the Num Lock key on the keyboard to : http://www.hp.com/support Select your country/region and language, search on your computer model number, and then search on which occurs after 20 minutes of paper, or other...

Getting Started
Page 53
... using the proper cables for your ISP for assistance. The NIC uses a network cable to connect to the Internet. see "Using the Onscreen Help and Support Center" on page 35. Run the wireless setup wizard: 1 Click the Windows Vista start button, and then select Network. 2 In the Network window, click Network.... A modem uses a standard telephone cable to make a dial-up a connection or network to your ISP, and start automatically. Log in to open the Help and Support Center;
... using the proper cables for your ISP for assistance. The NIC uses a network cable to connect to the Internet. see "Using the Onscreen Help and Support Center" on page 35. Run the wireless setup wizard: 1 Click the Windows Vista start button, and then select Network. 2 In the Network window, click Network.... A modem uses a standard telephone cable to make a dial-up a connection or network to your ISP, and start automatically. Log in to open the Help and Support Center;
Getting Started
Page 56
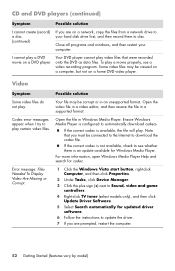
... then click Update Driver Software. 5 Select Search automatically for codec. Your DVD player cannot play a movie properly, use a video recording program. Open the file in a supported format. For more information, open Windows Media Player Help and search for updated driver software. 6 Follow the instructions to update the driver. 7 If you are...
... then click Update Driver Software. 5 Select Search automatically for codec. Your DVD player cannot play a movie properly, use a video recording program. Open the file in a supported format. For more information, open Windows Media Player Help and search for updated driver software. 6 Follow the instructions to update the driver. 7 If you are...


