Upgrade and Service
Page 6
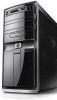
..., due to different manufacturers or models. Removing and Replacing the Front Panel Hewlett-Packard always provides quality parts that meet or exceed your original computer specifications. 1 Hold the front panel over the side of the computer with the front edge of the panel about 2.5 cm (1 inch) from the front of the...
..., due to different manufacturers or models. Removing and Replacing the Front Panel Hewlett-Packard always provides quality parts that meet or exceed your original computer specifications. 1 Hold the front panel over the side of the computer with the front edge of the panel about 2.5 cm (1 inch) from the front of the...

Upgrade and Service
Page 14
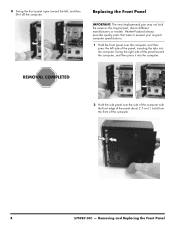
... panel about 2.5 cm (1 inch) from the front of the computer. 1 2 6 537501-001 - Hewlett-Packard always provides quality parts that meet or exceed your original computer specifications. 1 Insert the drive partway into the computer bay. 4 Push the drive completely into the computer, until the optical drive latch locks it into the computer...
... panel about 2.5 cm (1 inch) from the front of the computer. 1 2 6 537501-001 - Hewlett-Packard always provides quality parts that meet or exceed your original computer specifications. 1 Insert the drive partway into the computer bay. 4 Push the drive completely into the computer, until the optical drive latch locks it into the computer...
Upgrade and Service
Page 23
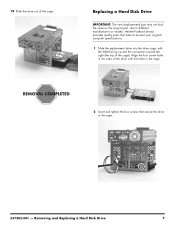
...-Packard always provides quality parts that secure the drive in the cage. 2 Insert and tighten the four screws that meet or exceed your original computer specifications. 1 Slide the replacement drive into the drive cage, with the label facing up and the connectors toward the right (the top of the cage. Removing...
...-Packard always provides quality parts that secure the drive in the cage. 2 Insert and tighten the four screws that meet or exceed your original computer specifications. 1 Slide the replacement drive into the drive cage, with the label facing up and the connectors toward the right (the top of the cage. Removing...
Upgrade and Service
Page 31
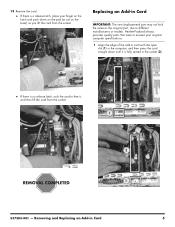
..., due to free it, and then lift the card from the socket. 13 Remove the card: If there is a release latch, place your original computer specifications. 1 Align the edge of the add-in card with the open slot (1) in the computer, and then press the card straight down on the pad...
..., due to free it, and then lift the card from the socket. 13 Remove the card: If there is a release latch, place your original computer specifications. 1 Align the edge of the add-in card with the open slot (1) in the computer, and then press the card straight down on the pad...

Upgrade and Service
Page 36
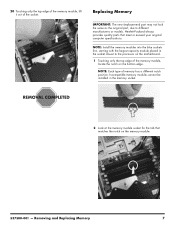
... can use a flathead screwdriver with the power cord attached or power applied. Removing and Replacing Memory 30-45 minutes Before You Begin Use the product specification for your model to find the correct type of DIMM (dual in-line memory module) for your computer or be needed. You may damage your...
... can use a flathead screwdriver with the power cord attached or power applied. Removing and Replacing Memory 30-45 minutes Before You Begin Use the product specification for your model to find the correct type of DIMM (dual in-line memory module) for your computer or be needed. You may damage your...
Upgrade and Service
Page 41
... the largest capacity module placed in the memory socket. 2 Look at the memory module socket for the tab that meet or exceed your original computer specifications.
... the largest capacity module placed in the memory socket. 2 Look at the memory module socket for the tab that meet or exceed your original computer specifications.
Getting Started
Page 2
... or translated to another language without notice. No part of HP. This product incorporates copyright protection technology that is prohibited. Wi-Fi CERTIFIED 802.1n based on equipment that is protected by copyright. The specifications of its software on Draft 2.0 Draft 2.0 refers to the ...version of June 2007. Reverse engineering or disassembly is protected by HP. Microsoft and Windows Vista are U.S. The Windows logo and Windows Vista...
... or translated to another language without notice. No part of HP. This product incorporates copyright protection technology that is prohibited. Wi-Fi CERTIFIED 802.1n based on equipment that is protected by copyright. The specifications of its software on Draft 2.0 Draft 2.0 refers to the ...version of June 2007. Reverse engineering or disassembly is protected by HP. Microsoft and Windows Vista are U.S. The Windows logo and Windows Vista...
Getting Started
Page 5
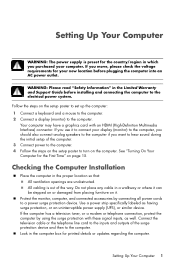
..., or an uninterruptible power supply (UPS), or similar device. See "Turning On Your Computer for printed details or updates regarding the computer. Use a power strip specifically labeled as well. If you purchased your computer. Setting Up Your Computer WARNING: The power supply is out of the way. Look in a walkway or...
..., or an uninterruptible power supply (UPS), or similar device. See "Turning On Your Computer for printed details or updates regarding the computer. Use a power strip specifically labeled as well. If you purchased your computer. Setting Up Your Computer WARNING: The power supply is out of the way. Look in a walkway or...

Getting Started
Page 8
Display video output Icon/Label Description and function NOTE: For specific information, see the documentation that may be included with the monitor (select models only). You may include audio connectors on the front of the computer. ...
Display video output Icon/Label Description and function NOTE: For specific information, see the documentation that may be included with the monitor (select models only). You may include audio connectors on the front of the computer. ...
Getting Started
Page 22
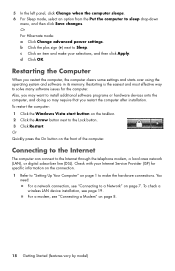
... left panel, click Change when the computer sleeps. 6 For Sleep mode, select an option from the Put the computer to solve many software issues for specific information on the connection. 1 Refer to "Setting Up Your Computer" on page 7. Or For Hibernate mode: a Click Change advanced power settings. Connecting to the Internet...
... left panel, click Change when the computer sleeps. 6 For Sleep mode, select an option from the Put the computer to solve many software issues for specific information on the connection. 1 Refer to "Setting Up Your Computer" on page 7. Or For Hibernate mode: a Click Change advanced power settings. Connecting to the Internet...

Getting Started
Page 30
... with Windows Vista. Windows Easy Transfer software guides you to copy files and settings to a storage device or across the Easy Transfer Cable connected to specifically connect two computers and work . See "Using the Onscreen Help and Support Center" on the taskbar, click Help and Support, and then type moving files...
... with Windows Vista. Windows Easy Transfer software guides you to copy files and settings to a storage device or across the Easy Transfer Cable connected to specifically connect two computers and work . See "Using the Onscreen Help and Support Center" on the taskbar, click Help and Support, and then type moving files...
Getting Started
Page 37
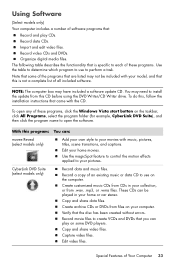
... drive. CyberLink DVD Suite (select models only) Record data and music files. Copy and share data files. Organize digital media files. To do this is specific to each of an existing music or data CD to use to use on the taskbar, click All Programs, select the program folder (for example...
... drive. CyberLink DVD Suite (select models only) Record data and music files. Copy and share data files. Organize digital media files. To do this is specific to each of an existing music or data CD to use to use on the taskbar, click All Programs, select the program folder (for example...
Getting Started
Page 43
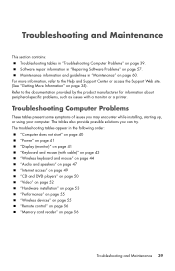
.... Maintenance information and guidelines in "Maintenance" on page 35). For more information, refer to the documentation provided by the product manufacturer for information about peripheral-specific problems, such as issues with cable)" on page 43 "Wireless keyboard and mouse" on page 44 "Audio and speakers" on page 47 "Internet access" on...
.... Maintenance information and guidelines in "Maintenance" on page 35). For more information, refer to the documentation provided by the product manufacturer for information about peripheral-specific problems, such as issues with cable)" on page 43 "Wireless keyboard and mouse" on page 44 "Audio and speakers" on page 47 "Internet access" on...

Getting Started
Page 62
.... If you experience a problem that you think may be due to software on your computer configuration to that time and date. 4 Double-click the specific item (for which you want to create a restore point. 6 Click Create. 7 Follow the onscreen instructions. To start a System Restore: 1 Close... Control Panel. 3 Click System and Maintenance, and then System. 4 Click System protection. 5 Under Automatic Restore Points, select the disk for example, HP DVD Writer 640b). 5 Click the Driver tab. 6 To update a driver, click Update Driver, and then follow the onscreen instructions. Or To revert...
.... If you experience a problem that you think may be due to software on your computer configuration to that time and date. 4 Double-click the specific item (for which you want to create a restore point. 6 Click Create. 7 Follow the onscreen instructions. To start a System Restore: 1 Close... Control Panel. 3 Click System and Maintenance, and then System. 4 Click System protection. 5 Under Automatic Restore Points, select the disk for example, HP DVD Writer 640b). 5 Click the Driver tab. 6 To update a driver, click Update Driver, and then follow the onscreen instructions. Or To revert...
Getting Started
Page 68
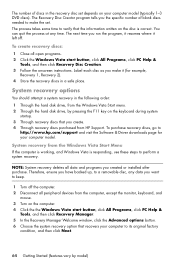
...computer model (typically 1-3 DVD discs). To create recovery discs: 1 Close all data and programs you the specific number of discs in the recovery disc set . To purchase recovery discs, go to keep. 1 Turn ... a system recovery in a safe place. The next time you want to http://www.hp.com/support and visit the Software & Driver downloads page for example, Recovery 1, Recovery ... System recovery deletes all open programs. 2 Click the Windows Vista start button, click All Programs, click PC Help & Tools, and then click Recovery Manager. 5 In the Recovery Manager Welcome window, click the ...
...computer model (typically 1-3 DVD discs). To create recovery discs: 1 Close all data and programs you the specific number of discs in the recovery disc set . To purchase recovery discs, go to keep. 1 Turn ... a system recovery in a safe place. The next time you want to http://www.hp.com/support and visit the Software & Driver downloads page for example, Recovery 1, Recovery ... System recovery deletes all open programs. 2 Click the Windows Vista start button, click All Programs, click PC Help & Tools, and then click Recovery Manager. 5 In the Recovery Manager Welcome window, click the ...

