User Guide
Page 24
.... Install the graphics card according to use a DL-DVI cable, not standard DVI-I or DVI-D cables. For monitor setup in terms of number of monitors, compatibility with the monitors you have different limits on page 17.) The different models of possible problems, enable the monitors one at a time: enable the first monitor and make sure a new graphics card will work for the card. In some recent Linux releases, the window manager system (e.g., Gnome 3) preferences must use...
.... Install the graphics card according to use a DL-DVI cable, not standard DVI-I or DVI-D cables. For monitor setup in terms of number of monitors, compatibility with the monitors you have different limits on page 17.) The different models of possible problems, enable the monitors one at a time: enable the first monitor and make sure a new graphics card will work for the card. In some recent Linux releases, the window manager system (e.g., Gnome 3) preferences must use...
User Guide
Page 34
... http://www.hp.com/support/workstation_swdrivers. 2. HP Linux driver discs Driver ISO images that support proper use rewritable discs such as Red Hat and SUSE. Select the desired operating system. 4. 5 Setting up Linux This chapter describes how to set up the operating system, be sure that the latest BIOS, drivers, and software updates are installed. HP offers a variety of some Z series computers. Linux-ready systems The Linux-ready option provides a system with HP Recovery Manager software.
... http://www.hp.com/support/workstation_swdrivers. 2. HP Linux driver discs Driver ISO images that support proper use rewritable discs such as Red Hat and SUSE. Select the desired operating system. 4. 5 Setting up Linux This chapter describes how to set up the operating system, be sure that the latest BIOS, drivers, and software updates are installed. HP offers a variety of some Z series computers. Linux-ready systems The Linux-ready option provides a system with HP Recovery Manager software.
User Guide
Page 40
... Diagnostic LED and audible (beep) codes section in the Maintenance and Service Guide for your computer. ● Press and hold any key on and the power light is properly installed. 32 Chapter 7 Maintenance, diagnostics, and minor troubleshooting Then press the power button again to http://www.hp.com/go/quickspecs. Verify that the card is on the problem before starting the computer. Verify that can help you are working on a network, use another cable...
... Diagnostic LED and audible (beep) codes section in the Maintenance and Service Guide for your computer. ● Press and hold any key on and the power light is properly installed. 32 Chapter 7 Maintenance, diagnostics, and minor troubleshooting Then press the power button again to http://www.hp.com/go/quickspecs. Verify that the card is on the problem before starting the computer. Verify that can help you are working on a network, use another cable...
User Guide
Page 41
... Maintenance and Service Guide at http://www.hp.com/go /selfrepair and select your product. Basic troubleshooting WARNING! See Using HP PC Hardware Diagnostics (UEFI) on page 36. ● If the computer will boot into a different video port on a network: - NOTE: Some components are having problems with a different cable to cool before calling for technical support. ● If the screen is blank, plug the monitor into the operating system and Internet access is flashing...
... Maintenance and Service Guide at http://www.hp.com/go /selfrepair and select your product. Basic troubleshooting WARNING! See Using HP PC Hardware Diagnostics (UEFI) on page 36. ● If the computer will boot into a different video port on a network: - NOTE: Some components are having problems with a different cable to cool before calling for technical support. ● If the screen is blank, plug the monitor into the operating system and Internet access is flashing...

User Guide
Page 49
...Z8 front 4 Z8 left side 6 Z8 rear 7 computer features 4 computer setup 13 connecting monitors 15 customizing the display 19 ensuring proper ventilation 13 security 20 setup procedures 14 computer, updating 29 connector, power 7, 11 Customer Self Repair 33 D drive light, identifying 4, 5, 8, 9 drivers, updating 30 G graphics cards, types 17 H headphone (audio-out) jack 7, 11 HP driver disc RHEL setup 27 SLED setup 28 Ubuntu setup 28 HP PC Hardware Diagnostics (UEFI) using 36 HP Recovery Manager correcting boot problems 25 starting 24 HP Recovery media recovery 25 using 21 HP Recovery partition...
...Z8 front 4 Z8 left side 6 Z8 rear 7 computer features 4 computer setup 13 connecting monitors 15 customizing the display 19 ensuring proper ventilation 13 security 20 setup procedures 14 computer, updating 29 connector, power 7, 11 Customer Self Repair 33 D drive light, identifying 4, 5, 8, 9 drivers, updating 30 G graphics cards, types 17 H headphone (audio-out) jack 7, 11 HP driver disc RHEL setup 27 SLED setup 28 Ubuntu setup 28 HP PC Hardware Diagnostics (UEFI) using 36 HP Recovery Manager correcting boot problems 25 starting 24 HP Recovery media recovery 25 using 21 HP Recovery partition...
User Guide
Page 50
media 25 starting 24 supported discs 22 system 23 USB flash drive 25 using HP Recovery media 22 recovery media creating using HP Recovery Manager 22 using 21 recovery partition removing 25 Red Hat Linux driver media, RHEL setup 27 RHEL HP driver disc 27 Linux 27 Red Hat Linux driver media 27 setup 27 routine care 38 cleaning chassis 38 cleaning keyboard 38 cleaning monitor 39 cleaning mouse 39 cleaning safety 38 S security cable slot, identifying 7, 11 serial port, identifying 7 setup Linux 26 RHEL 27 SLED 27 Ubuntu...
media 25 starting 24 supported discs 22 system 23 USB flash drive 25 using HP Recovery media 22 recovery media creating using HP Recovery Manager 22 using 21 recovery partition removing 25 Red Hat Linux driver media, RHEL setup 27 RHEL HP driver disc 27 Linux 27 Red Hat Linux driver media 27 setup 27 routine care 38 cleaning chassis 38 cleaning keyboard 38 cleaning monitor 39 cleaning mouse 39 cleaning safety 38 S security cable slot, identifying 7, 11 serial port, identifying 7 setup Linux 26 RHEL 27 SLED 27 Ubuntu...

Maintenance and Service Guide
Page 50
... bootable devices is disabled. Clear Secure Boot Keys Lets you manage the custom key settings. Reset Secure Boot keys to run during the firmware and operating system boot process. Otherwise, the default is AHCI. Table 5-3 Computer Setup-Advanced (for advanced users) (continued) Option Heading UEFI boot sources always have priority in the boot sequence and will be recognized as a network interface card, internal hard drive, USB optical drive, or internal optical drive) are attached). Boot Options (continued) ● Num lock on . Lets you turn off...
... bootable devices is disabled. Clear Secure Boot Keys Lets you manage the custom key settings. Reset Secure Boot keys to run during the firmware and operating system boot process. Otherwise, the default is AHCI. Table 5-3 Computer Setup-Advanced (for advanced users) (continued) Option Heading UEFI boot sources always have priority in the boot sequence and will be recognized as a network interface card, internal hard drive, USB optical drive, or internal optical drive) are attached). Boot Options (continued) ● Num lock on . Lets you turn off...

Maintenance and Service Guide
Page 54
... with self-solve diagnostics. If you need to contact HP support, use "Last Known Configuration." ● Refer to the comprehensive online technical support at http://www.hp.com/ergo for more information. ● If the screen is flashing red and white in a specific pattern. 6 Troubleshooting without diagnostics This chapter provides information on how to identify and correct minor problems, such as USB devices, hard drive, graphics, audio, memory, and software problems. If you encounter...
... with self-solve diagnostics. If you need to contact HP support, use "Last Known Configuration." ● Refer to the comprehensive online technical support at http://www.hp.com/ergo for more information. ● If the screen is flashing red and white in a specific pattern. 6 Troubleshooting without diagnostics This chapter provides information on how to identify and correct minor problems, such as USB devices, hard drive, graphics, audio, memory, and software problems. If you encounter...

Maintenance and Service Guide
Page 55
.... ● Spend time troubleshooting the problem with the service technician. ● Remove any key on the hard drive. If the system remains in again. The computer will help you created or restore the system to its original factory condition in Support Sent Recovery Disks (SSRD). Refer to POST error messages and diagnostic front panel LEDs and audible codes on automatically as soon as power is dim. ● Press...
.... ● Spend time troubleshooting the problem with the service technician. ● Remove any key on the hard drive. If the system remains in again. The computer will help you created or restore the system to its original factory condition in Support Sent Recovery Disks (SSRD). Refer to POST error messages and diagnostic front panel LEDs and audible codes on automatically as soon as power is dim. ● Press...

Maintenance and Service Guide
Page 57
... more memory. Solving general problems 49 There is no sound or sound volume is too hot. Cause Processor is too low. Solution 1. A key to unlock the Smart Cover Lock is set low or muted. Add more space on and that the speakers' volume control is not available from the hard drive to increase the volume. Keys are properly connected and powered on the hard drive. To access Control Panel, type control panel in the operating...
... more memory. Solving general problems 49 There is no sound or sound volume is too hot. Cause Processor is too low. Solution 1. A key to unlock the Smart Cover Lock is set low or muted. Add more space on and that the speakers' volume control is not available from the hard drive to increase the volume. Keys are properly connected and powered on the hard drive. To access Control Panel, type control panel in the operating...

Maintenance and Service Guide
Page 64
... boot process. 2. Check the cable connection from the inserted media card during boot or do not want to boot from the media card, remove it will lose any key or click the mouse button and type your password (if set). After installing the media card reader and booting to Windows, the reader and the inserted cards are not recognized by list, then under Appearance and Personalization, select Adjust screen resolution. Cause Monitor is not turned on and the monitor light...
... boot process. 2. Check the cable connection from the inserted media card during boot or do not want to boot from the media card, remove it will lose any key or click the mouse button and type your password (if set). After installing the media card reader and booting to Windows, the reader and the inserted cards are not recognized by list, then under Appearance and Personalization, select Adjust screen resolution. Cause Monitor is not turned on and the monitor light...

Maintenance and Service Guide
Page 72
... system advised you of new external device are loose or power cables are disabled in Computer Setup. the changes. Use Windows Device Manager to the configuration, you Reboot the computer and follow the instructions that does not cause a resource conflict. To open the Add Hardware Wizard, open a Command Prompt and open hdwwiz.exe. Power switch of the computer. Turn off the computer, turn on the external device, then turn on . USB ports on the front of new external device is properly and...
... system advised you of new external device are loose or power cables are disabled in Computer Setup. the changes. Use Windows Device Manager to the configuration, you Reboot the computer and follow the instructions that does not cause a resource conflict. To open the Add Hardware Wizard, open a Command Prompt and open hdwwiz.exe. Power switch of the computer. Turn off the computer, turn on the external device, then turn on . USB ports on the front of new external device is properly and...
Maintenance and Service Guide
Page 73
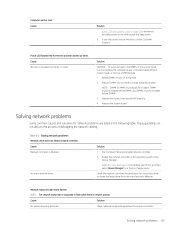
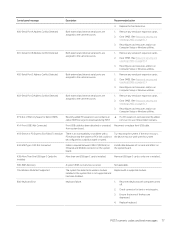
.... Reseat DIMMs. Power on page 73 to reseat, install, or remove a DIMM module. 1. Replace third-party memory with HP memory. 4. Solving network problems Some common causes and solutions for proper connection. Incorrect network driver. These guidelines do not discuss the process of applications. Enable the network controller in the following table. Network status link light never flashes. Check cabling and network equipment for network problems are listed in the operating system using Device Manager. Power LED flashes Red three times...
.... Reseat DIMMs. Power on page 73 to reseat, install, or remove a DIMM module. 1. Replace third-party memory with HP memory. 4. Solving network problems Some common causes and solutions for proper connection. Incorrect network driver. These guidelines do not discuss the process of applications. Enable the network controller in the following table. Network status link light never flashes. Check cabling and network equipment for network problems are listed in the operating system using Device Manager. Power LED flashes Red three times...
Maintenance and Service Guide
Page 74
... connector. Reinstall network drivers. The cable is installed. Ensure that the other end are operating correctly. Contact an authorized service provider. Table 6-2 Solving network problems (continued) Network status link light never flashes. Run Computer Setup and enable network controller. 2. Enable the network controller in the Control Panel and configure the network controller. System cannot autosense the network. Disable auto-sensing capabilities and force the system into the correct operating mode. Diagnostics reports a failure. The network controller...
... connector. Reinstall network drivers. The cable is installed. Ensure that the other end are operating correctly. Contact an authorized service provider. Table 6-2 Solving network problems (continued) Network status link light never flashes. Run Computer Setup and enable network controller. 2. Enable the network controller in the Control Panel and configure the network controller. System cannot autosense the network. Disable auto-sensing capabilities and force the system into the correct operating mode. Diagnostics reports a failure. The network controller...
Maintenance and Service Guide
Page 82
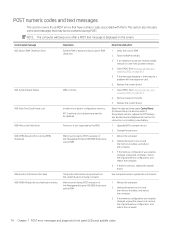
... used). Flash the ROM if needed. 3. Replace the system board. 1. Clear CMOS. (See Password security and resetting CMOS on installing a new battery. 1. Reset the date and time under Control Panel (Computer Setup can also be a problem with them. Change the processor. 1. Processor is displayed on page 81.) 5. Memory error during POST execution of the Management Engine (ME) BIOS Extensions option ROM. If the problem persists, replace the RTC battery. If the memory configuration was recently changed , unplug the computer, restore the original memory configuration...
... used). Flash the ROM if needed. 3. Replace the system board. 1. Clear CMOS. (See Password security and resetting CMOS on installing a new battery. 1. Reset the date and time under Control Panel (Computer Setup can also be a problem with them. Change the processor. 1. Processor is displayed on page 81.) 5. Memory error during POST execution of the Management Engine (ME) BIOS Extensions option ROM. If the problem persists, replace the RTC battery. If the memory configuration was recently changed , unplug the computer, restore the original memory configuration...
Maintenance and Service Guide
Page 85
... added, option ROM too large to the same resources. 1. Replace the hard disk drive. 400-Serial Port A Address Conflict Detected Both external and internal serial ports are assigned to the same resources. 1. Reconfigure card resources and/or run Computer Setup or Windows utilities. 403-Serial Port D Address Conflict Detected Both external and internal serial ports are assigned to download during POST. Remove any serial port expansion cards. 2. Clear CMOS. (See Password security and resetting CMOS on page 81.) 3. If the error reoccurs, the device may not work...
... added, option ROM too large to the same resources. 1. Replace the hard disk drive. 400-Serial Port A Address Conflict Detected Both external and internal serial ports are assigned to the same resources. 1. Reconfigure card resources and/or run Computer Setup or Windows utilities. 403-Serial Port D Address Conflict Detected Both external and internal serial ports are assigned to download during POST. Remove any serial port expansion cards. 2. Clear CMOS. (See Password security and resetting CMOS on page 81.) 3. If the error reoccurs, the device may not work...
Maintenance and Service Guide
Page 91
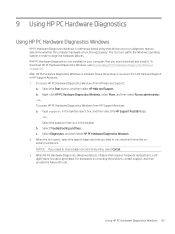
... HP Support Assistant: a. To access HP PC Hardware Diagnostics Windows from HP Help and Support: a. b. Select Diagnostics, and then select HP PC Hardware Diagnostics Windows. 2. b. Type support in the taskbar. c. For assistance in order to diagnose hardware failures. 9 Using HP PC Hardware Diagnostics Using HP PC Hardware Diagnostics Windows HP PC Hardware Diagnostics Windows is a Windows-based utility that requires hardware replacement, a 24digit Failure ID code is not installed on page 84. The tool runs within the Windows operating system in correcting the problem...
... HP Support Assistant: a. To access HP PC Hardware Diagnostics Windows from HP Help and Support: a. b. Select Diagnostics, and then select HP PC Hardware Diagnostics Windows. 2. b. Type support in the taskbar. c. For assistance in order to diagnose hardware failures. 9 Using HP PC Hardware Diagnostics Using HP PC Hardware Diagnostics Windows HP PC Hardware Diagnostics Windows is a Windows-based utility that requires hardware replacement, a 24digit Failure ID code is not installed on page 84. The tool runs within the Windows operating system in correcting the problem...

Maintenance and Service Guide
Page 96
... the Start menu, select File Explorer. ● If your computer does not list the Windows partition and the Recovery partition, you can obtain recovery media for your computer model. ● Use HP Recovery Manager to create HP Recovery media after you get started on page 90. ● Use Windows tools to create system restore points and create backups of the HP Recovery partition on the recovery options that were installed at the factory and then configures the settings for most...
... the Start menu, select File Explorer. ● If your computer does not list the Windows partition and the Recovery partition, you can obtain recovery media for your computer model. ● Use HP Recovery Manager to create HP Recovery media after you get started on page 90. ● Use Windows tools to create system restore points and create backups of the HP Recovery partition on the recovery options that were installed at the factory and then configures the settings for most...

Maintenance and Service Guide
Page 114
... panel handle 4 access panel lock 4 audible codes 79 audio problems 60 audio-in jack 2, 3, 5 audio-out jack 2, 3, 5 B battery disposal 13 battery replacement 93 beep codes 79 booting options Full Boot 73 Quick Boot 73 buttons power 2, 3, 5 C cautions AC power 8 cables 13 electrostatic discharge 8 keyboard cleaning 11 keyboard keys 12 changing a Power-On password 82 changing a Setup password 82 cleaning computer 11 safety precautions 11 CMOS backing up 81 components front panel 2 left-side 4 rear panel 5 computer serial number 6 computer cleaning 11 Computer Setup access problem 48 connectors...
... panel handle 4 access panel lock 4 audible codes 79 audio problems 60 audio-in jack 2, 3, 5 audio-out jack 2, 3, 5 B battery disposal 13 battery replacement 93 beep codes 79 booting options Full Boot 73 Quick Boot 73 buttons power 2, 3, 5 C cautions AC power 8 cables 13 electrostatic discharge 8 keyboard cleaning 11 keyboard keys 12 changing a Power-On password 82 changing a Setup password 82 cleaning computer 11 safety precautions 11 CMOS backing up 81 components front panel 2 left-side 4 rear panel 5 computer serial number 6 computer cleaning 11 Computer Setup access problem 48 connectors...

Maintenance and Service Guide
Page 115
...slot 5 ports Ethernet 5 serial 5 USB 3.x SuperSpeed 2, 3, 5 USB 3.x SuperSpeed with HP Sleep and Charge 2, 3 USB Type-C 2 POST error messages 73 power button 2, 3, 5 power connector 5 power problems 52 power supply operating voltage range 100 removal and replacement 14, 19 Power-On password 82 power-on password 81 printer problems 62 problems audio 60 Computer Setup 48 F10 Setup 48 flash drive 69 front panel 70 general 48 hard drive 53 hardware installation 64 Internet access 71 keyboard 63 Media Card Reader 55 memory 68 monitor 56 mouse 63 network 65 power 52 printer 62 software 72 processor...
...slot 5 ports Ethernet 5 serial 5 USB 3.x SuperSpeed 2, 3, 5 USB 3.x SuperSpeed with HP Sleep and Charge 2, 3 USB Type-C 2 POST error messages 73 power button 2, 3, 5 power connector 5 power problems 52 power supply operating voltage range 100 removal and replacement 14, 19 Power-On password 82 power-on password 81 printer problems 62 problems audio 60 Computer Setup 48 F10 Setup 48 flash drive 69 front panel 70 general 48 hard drive 53 hardware installation 64 Internet access 71 keyboard 63 Media Card Reader 55 memory 68 monitor 56 mouse 63 network 65 power 52 printer 62 software 72 processor...


