User Guide
Page 5
... the monitor ...9 Removing the monitor stand ...10 Mounting the display head ...10 Installing a security cable ...11 2 Using the monitor ...12 Software and utilities ...12 The Information file ...12 The Image Color Matching file ...12 Installing the .inf and .icm files ...12 Installing from the optical disc ...12 Downloading from the Web ...13 Using the On-screen display (OSD) menu ...13 Using Auto-Sleep Mode ...14 3 Support and troubleshooting ...15 Solving common problems ...15 Using the auto-adjustment function (analog input 16 Optimizing image performance (analog input 17 Button...
... the monitor ...9 Removing the monitor stand ...10 Mounting the display head ...10 Installing a security cable ...11 2 Using the monitor ...12 Software and utilities ...12 The Information file ...12 The Image Color Matching file ...12 Installing the .inf and .icm files ...12 Installing from the optical disc ...12 Downloading from the Web ...13 Using the On-screen display (OSD) menu ...13 Using Auto-Sleep Mode ...14 3 Support and troubleshooting ...15 Solving common problems ...15 Using the auto-adjustment function (analog input 16 Optimizing image performance (analog input 17 Button...

User Guide
Page 6
Cleaning the monitor ...20 Shipping the monitor ...20 Appendix A Technical specifications ...21 55 cm/21.5-inch ...21 Preset display resolutions ...21 55 cm/21.5-inch ...21 Entering user modes ...22 Energy saver feature ...22 Appendix B Accessibility ...23 Supported assistive technologies ...23 Contacting support ...23 vi
Cleaning the monitor ...20 Shipping the monitor ...20 Appendix A Technical specifications ...21 55 cm/21.5-inch ...21 Preset display resolutions ...21 55 cm/21.5-inch ...21 Entering user modes ...22 Energy saver feature ...22 Appendix B Accessibility ...23 Supported assistive technologies ...23 Contacting support ...23 vi
User Guide
Page 7
... grasping the plug firmly and pulling it on power cords or cables. WARNING! LCD monitors that the total ampere rating of the products connected to properly support your safety, do not place anything on an unstable surface. For your HP LCD monitor. the power strips must be pulled, grabbed, or tripped over and cause personal injury. Use a power strip whose manufacturer offers a Damage Replacement Policy so...
... grasping the plug firmly and pulling it on power cords or cables. WARNING! LCD monitors that the total ampere rating of the products connected to properly support your safety, do not place anything on an unstable surface. For your HP LCD monitor. the power strips must be pulled, grabbed, or tripped over and cause personal injury. Use a power strip whose manufacturer offers a Damage Replacement Policy so...
User Guide
Page 8
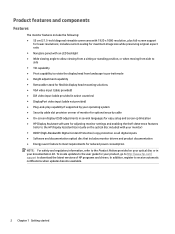
.../ support to the Product Notices provided on all digital inputs ● Software and documentation optical disc that includes monitor drivers and product documentation ● Energy saver feature to meet requirements for reduced power consumption NOTE: For safety and regulatory information, refer to download the latest versions of monitor for optional security cable ● On-screen display (OSD) adjustments in several languages for easy setup and screen optimization ● HP Display...
.../ support to the Product Notices provided on all digital inputs ● Software and documentation optical disc that includes monitor drivers and product documentation ● Energy saver feature to meet requirements for reduced power consumption NOTE: For safety and regulatory information, refer to download the latest versions of monitor for optional security cable ● On-screen display (OSD) adjustments in several languages for easy setup and screen optimization ● HP Display...
User Guide
Page 10
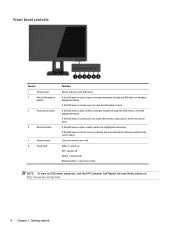
...adjustment levels. If the OSD menu is open, press to optimize the screen image. Front bezel controls Control 1 Menu button 2 Minus/Information button 3 Plus/source button 4 OK/auto button 5 Power button 6 Power LED Function Opens and closes the OSD menu. If the OSD menu is open the information menu. If the OSD menu is closed , press to navigate backward through the OSD menu or increase adjustment levels. White = system on or off Amber = sleep mode Blinking amber = sleep timer mode NOTE: To view an OSD menu simulator, visit the HP Customer Self Repair Services...
...adjustment levels. If the OSD menu is open, press to optimize the screen image. Front bezel controls Control 1 Menu button 2 Minus/Information button 3 Plus/source button 4 OK/auto button 5 Power button 6 Power LED Function Opens and closes the OSD menu. If the OSD menu is open the information menu. If the OSD menu is closed , press to navigate backward through the OSD menu or increase adjustment levels. White = system on or off Amber = sleep mode Blinking amber = sleep timer mode NOTE: To view an OSD menu simulator, visit the HP Customer Self Repair Services...

User Guide
Page 11
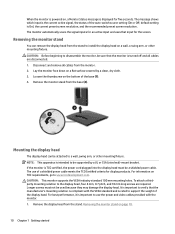
... the LCD panel. Setting up the monitor Installing the monitor stand CAUTION: Do not touch the surface of the base (2). Tighten the thumbscrew on the panel may cause non-uniformity of color or disorientation of the stand. 3. Before connecting the cables, route the cables through the cable routing hole in this occurs, the screen will not recover to the video input connector. Connect a video cable to its normal condition. 1. Connecting the cables NOTE: The monitor ships...
... the LCD panel. Setting up the monitor Installing the monitor stand CAUTION: Do not touch the surface of the base (2). Tighten the thumbscrew on the panel may cause non-uniformity of color or disorientation of the stand. 3. Before connecting the cables, route the cables through the cable routing hole in this occurs, the screen will not recover to the video input connector. Connect a video cable to its normal condition. 1. Connecting the cables NOTE: The monitor ships...

User Guide
Page 13
... monitor, and the other end to the DisplayPort connector on the source device. 4. Connect one may accidentally step on or trip over them so that is an important safety feature. WARNING! Setting up the monitor 7 ● Connect a DisplayPort cable to the DisplayPort IN connector on the rear of electric shock or damage to the equipment: Do not disable the power cord grounding plug...
... monitor, and the other end to the DisplayPort connector on the source device. 4. Connect one may accidentally step on or trip over them so that is an important safety feature. WARNING! Setting up the monitor 7 ● Connect a DisplayPort cable to the DisplayPort IN connector on the rear of electric shock or damage to the equipment: Do not disable the power cord grounding plug...

User Guide
Page 15
... feature, press and hold the monitor Power button for a prolonged period of time. Monitors with a "burned-in the OSD menu. NOTE: To view information on the screen in image damage on the monitor screen, you can install the HP Display Assistant software included on the software and documentation optical disc. The position of nonuse. Press the Power button on the front of the monitor, and then select Power Control > Power LED > Off. Setting up the monitor 9
... feature, press and hold the monitor Power button for a prolonged period of time. Monitors with a "burned-in the OSD menu. NOTE: To view information on the screen in image damage on the monitor screen, you can install the HP Display Assistant software included on the software and documentation optical disc. The position of nonuse. Press the Power button on the front of the monitor, and then select Power Control > Power LED > Off. Setting up the monitor 9
User Guide
Page 16
... remove the display head from the stand. CAUTION: This monitor supports the VESA industry standard 100 mm mounting holes. For best performance, it is intended to a wall, swing arm, or other mounting fixture. The use the power and video cables provided with the VESA standard and is rated to www.tcodevelopment.com. Longer screws must be a shielded power cable. To attach a thirdparty mounting solution to disassemble the monitor, be supported by a clean, dry cloth. 3. default setting...
... remove the display head from the stand. CAUTION: This monitor supports the VESA industry standard 100 mm mounting holes. For best performance, it is intended to a wall, swing arm, or other mounting fixture. The use the power and video cables provided with the VESA standard and is rated to www.tcodevelopment.com. Longer screws must be a shielded power cable. To attach a thirdparty mounting solution to disassemble the monitor, be supported by a clean, dry cloth. 3. default setting...

User Guide
Page 17
2. Setting up the monitor 11 Secure the mounting plate to a fixed object with the mounting plate. Installing a security cable You can secure the monitor to the wall or swing arm of your choice using the four screws included with an optional cable lock available from HP.
2. Setting up the monitor 11 Secure the mounting plate to a fixed object with the mounting plate. Installing a security cable You can secure the monitor to the wall or swing arm of your choice using the four screws included with an optional cable lock available from HP.
User Guide
Page 18
... the Windows Display control panel. Ensure that the proper resolution and refresh rates appear in the computer optical drive. NOTE: You may need to the HP Monitor Software Information file on -screen instructions. 5. The Image Color Matching file The .icm files are used by Microsoft Windows operating systems to install the digitally signed monitor .inf and .icm files manually from the optical disc in the event of an installation error. Monitor Plug and Play compatibility requires...
... the Windows Display control panel. Ensure that the proper resolution and refresh rates appear in the computer optical drive. NOTE: You may need to the HP Monitor Software Information file on -screen instructions. 5. The Image Color Matching file The .icm files are used by Microsoft Windows operating systems to install the digitally signed monitor .inf and .icm files manually from the optical disc in the event of an installation error. Monitor Plug and Play compatibility requires...
User Guide
Page 19
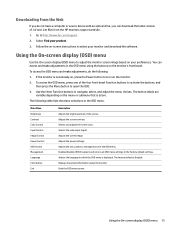
...the On-screen display (OSD) menu to adjust the monitor screen image based on -screen instructions to open the OSD. 3. Adjusts the screen contrast. Adjusts the screen image. Select Find your preferences. Use the three Function buttons to the factory default settings. Main Menu Brightness Contrast Color Control Input Control Image Control Power Control OSD Control Management Language Information Exit Description Adjusts the brightness level of the four front bezel Function buttons to activate the buttons, and then press the Menu button to select your monitor and download the software...
...the On-screen display (OSD) menu to adjust the monitor screen image based on -screen instructions to open the OSD. 3. Adjusts the screen contrast. Adjusts the screen image. Select Find your preferences. Use the three Function buttons to the factory default settings. Main Menu Brightness Contrast Color Control Input Control Image Control Power Control OSD Control Management Language Information Exit Description Adjusts the brightness level of the four front bezel Function buttons to activate the buttons, and then press the Menu button to select your monitor and download the software...

User Guide
Page 20
... to open the OSD. The monitor draws less than 0.5 W of either horizontal or vertical sync signal). Using Auto-Sleep Mode The monitor supports an OSD (On-screen display) menu option called Auto-Sleep Mode that allows you activate the mouse or keyboard). In the OSD menu select Power Control > AutoSleep Mode > Off. 14 Chapter 2 Using the monitor You can disable Auto-Sleep Mode in this reduced power state (sleep mode), the monitor screen is blanked, the backlight is enabled (enabled by default), the monitor will wake from the sleep mode when...
... to open the OSD. The monitor draws less than 0.5 W of either horizontal or vertical sync signal). Using Auto-Sleep Mode The monitor supports an OSD (On-screen display) menu option called Auto-Sleep Mode that allows you activate the mouse or keyboard). In the OSD menu select Power Control > AutoSleep Mode > Off. 14 Chapter 2 Using the monitor You can disable Auto-Sleep Mode in this reduced power state (sleep mode), the monitor screen is blanked, the backlight is enabled (enabled by default), the monitor will wake from the sleep mode when...
User Guide
Page 21
... displayed on screen. Video card is flashing. Set Auto-Switch Input to disable the OSD Lockout function. Brightness is disconnected. Monitor video cable is too low. Input Signal Out of each problem, and the recommended solutions. Video resolution and/or refresh rate are set auto-sleep to exit sleep mode. seconds to Off and manually select the input. 3 Support and troubleshooting Solving common problems The following table lists possible problems, the possible cause of Range is enabled. Power cord is Open the OSD menu and select Power Control > Auto-Sleep disabled...
... displayed on screen. Video card is flashing. Set Auto-Switch Input to disable the OSD Lockout function. Brightness is disconnected. Monitor video cable is too low. Input Signal Out of each problem, and the recommended solutions. Video resolution and/or refresh rate are set auto-sleep to exit sleep mode. seconds to Off and manually select the input. 3 Support and troubleshooting Solving common problems The following table lists possible problems, the possible cause of Range is enabled. Power cord is Open the OSD menu and select Power Control > Auto-Sleep disabled...
User Guide
Page 22
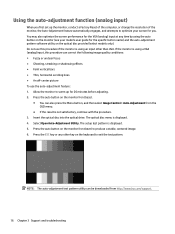
... monitor to optimize your model's user guide for 20 minutes before adjusting. 2. Select Open Auto-Adjustment Utility. Press the ESC key or any time by using an input other key on the monitor front bezel. ● You can be downloaded from the OSD menu. ● If the result is using the auto button on the monitor (see your screen for you first set up the monitor, conduct a Factory Reset of the computer, or change the resolution...
... monitor to optimize your model's user guide for 20 minutes before adjusting. 2. Select Open Auto-Adjustment Utility. Press the ESC key or any time by using an input other key on the monitor front bezel. ● You can be downloaded from the OSD menu. ● If the result is using the auto button on the monitor (see your screen for you first set up the monitor, conduct a Factory Reset of the computer, or change the resolution...

User Guide
Page 23
... or stripes visible on the monitor's front bezel to minimize video flickering or blurring. To eliminate vertical bars (Clock): 1. To correct screen position (Horizontal Position or Vertical Position): 1. NOTE: When using the controls, you do not miss the optimum adjustment point. 3. Press the buttons slowly so that display up and down arrow icons to open the OSD menu, and then select Image Position. To remove flickering or blurring (Phase): 1. Press the Function...
... or stripes visible on the monitor's front bezel to minimize video flickering or blurring. To eliminate vertical bars (Clock): 1. To correct screen position (Horizontal Position or Vertical Position): 1. NOTE: When using the controls, you do not miss the optimum adjustment point. 3. Press the buttons slowly so that display up and down arrow icons to open the OSD menu, and then select Image Position. To remove flickering or blurring (Phase): 1. Press the Function...
User Guide
Page 24
... the OSD is available in English. ● Locate an HP service center Preparing to call technical support If you cannot solve a problem using the troubleshooting tips in a particular language, it is not active. This functionality is only available when the monitor is powered on using 18 Chapter 3 Support and troubleshooting 2. Here you may need to call technical support. the Vertical Position shifts the image up and down the Power button or Menu button...
... the OSD is available in English. ● Locate an HP service center Preparing to call technical support If you cannot solve a problem using the troubleshooting tips in a particular language, it is not active. This functionality is only available when the monitor is powered on using 18 Chapter 3 Support and troubleshooting 2. Here you may need to call technical support. the Vertical Position shifts the image up and down the Power button or Menu button...

User Guide
Page 26
... an authorized HP dealer, reseller, or service provider. ● Use only a power source and connection appropriate for ventilation. 4 Maintaining the monitor Maintenance guidelines ● Do not open the monitor cabinet or attempt to gently wipe the screen surface. Never push objects of water and isopropyl alcohol. Turn off the monitor when not in the operating instructions. You may need it from excessive light, heat, or...
... an authorized HP dealer, reseller, or service provider. ● Use only a power source and connection appropriate for ventilation. 4 Maintaining the monitor Maintenance guidelines ● Do not open the monitor cabinet or attempt to gently wipe the screen surface. Never push objects of water and isopropyl alcohol. Turn off the monitor when not in the operating instructions. You may need it from excessive light, heat, or...
User Guide
Page 27
one DVI connector with cable included in the user guide might have changed between the time of manufacturing and delivery of your specific monitor model to find the model-specific QuickSpecs. 55 cm/21.5-inch Display Type Viewable Image Size Maximum Weight (Unpacked) Dimensions (include base) Height (highest position) Height (lowest position) Depth Width Maximum Graphic Resolution Optimum Graphic Resolution Environmental Requirements Temperature Operating Temperature Storage Temperature Power Source Input Terminal 55 cm wide screen TFT-LCD 55 cm diagonal...
one DVI connector with cable included in the user guide might have changed between the time of manufacturing and delivery of your specific monitor model to find the model-specific QuickSpecs. 55 cm/21.5-inch Display Type Viewable Image Size Maximum Weight (Unpacked) Dimensions (include base) Height (highest position) Height (lowest position) Depth Width Maximum Graphic Resolution Optimum Graphic Resolution Environmental Requirements Temperature Operating Temperature Storage Temperature Power Source Input Terminal 55 cm wide screen TFT-LCD 55 cm diagonal...
User Guide
Page 28
... monitor screen by using a preset mode. Refer to readjust the parameters of these signals, the monitor screen is blanked, the backlight is turned off, and the power light is in the monitor's Energy Saver utility, you may occasionally call for instructions on -screen display. It this occurs, you can be entered and stored. Energy saver feature The monitors support a reduced power state. By selecting the settings in the reduced power...
... monitor screen by using a preset mode. Refer to readjust the parameters of these signals, the monitor screen is blanked, the backlight is turned off, and the power light is in the monitor's Energy Saver utility, you may occasionally call for instructions on -screen display. It this occurs, you can be entered and stored. Energy saver feature The monitors support a reduced power state. By selecting the settings in the reduced power...


