Watching and Recording TV
Page 4
...the guide 24 Recording quality and hard disk drive storage space 25 Watching TV programs stored on the HP Media Drive 26 About recording TV to the HP Media Drive 27 Recording TV programs to the HP Media Drive 27 Changing the TV recording path to the HP Media Drive 28 Changing the TV recording ...path to the local hard disk drive 28 Add TV recording folder for Windows Media Center to find 29 Changing disk space for recording TV programs 29 Updating recorded TV list after removing the HP Media Drive 29 System requirements ...
...the guide 24 Recording quality and hard disk drive storage space 25 Watching TV programs stored on the HP Media Drive 26 About recording TV to the HP Media Drive 27 Recording TV programs to the HP Media Drive 27 Changing the TV recording path to the HP Media Drive 28 Changing the TV recording ...path to the local hard disk drive 28 Add TV recording folder for Windows Media Center to find 29 Changing disk space for recording TV programs 29 Updating recorded TV list after removing the HP Media Drive 29 System requirements ...
Watching and Recording TV
Page 30
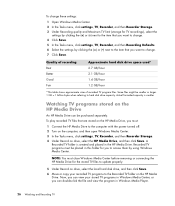
...click settings, TV, Recorder, and then Recorder Storage. 4 Under Record on the HP Media Drive An HP Media Drive can be smaller or larger. 1 GB = 1 billion bytes when referring to hard disk drive capacity. Actual formatted capacity is created and placed in Windows Media Player. 26 ...drive, select the local hard disk drive, and then click Save. 6 Move or copy your stored TV programs in this folder for you want to change . 7 Click Save. Recorded TV programs must be placed in Windows Media Center, or you must close Windows Media Center before removing or connecting the HP Media Drive...
...click settings, TV, Recorder, and then Recorder Storage. 4 Under Record on the HP Media Drive An HP Media Drive can be smaller or larger. 1 GB = 1 billion bytes when referring to hard disk drive capacity. Actual formatted capacity is created and placed in Windows Media Player. 26 ...drive, select the local hard disk drive, and then click Save. 6 Move or copy your stored TV programs in this folder for you want to change . 7 Click Save. Recorded TV programs must be placed in Windows Media Center, or you must close Windows Media Center before removing or connecting the HP Media Drive...
Watching and Recording TV
Page 31
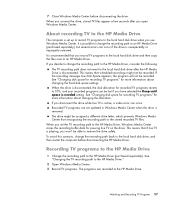
... from recognizing the recording path or the stored recorded TV files. Recorded TV programs are recorded to the HP Media Drive (purchased separately). It is unexpectedly or improperly removed. See "Changing disk space for recording TV programs" for more information about changing the allocation. If you...able to an HP Media Drive. When you won't be recorded. This means that you use Windows Media Center. It is removed. If you decide to change the recording path back to the local hard disk drive when you record TV programs to the local hard disk drive and then copy...
... from recognizing the recording path or the stored recorded TV files. Recorded TV programs are recorded to the HP Media Drive (purchased separately). It is unexpectedly or improperly removed. See "Changing disk space for recording TV programs" for more information about changing the allocation. If you...able to an HP Media Drive. When you won't be recorded. This means that you use Windows Media Center. It is removed. If you decide to change the recording path back to the local hard disk drive when you record TV programs to the local hard disk drive and then copy...
Warranty and Support Guide
Page 5
... OF YOUR RIGHTS. Exclusions HP does not warrant that is made in the servicing country/region. BEFORE RETURNING ANY UNIT FOR SERVICE, BE SURE TO BACK UP DATA AND REMOVE ANY CONFIDENTIAL, PROPRIETARY, OR PERSONAL INFORMATION. UNITS SENT IN FOR SERVICE MAY HAVE THE DATA ERASED FROM THE HARD DRIVE AND THE PROGRAMS RESTORED...
... OF YOUR RIGHTS. Exclusions HP does not warrant that is made in the servicing country/region. BEFORE RETURNING ANY UNIT FOR SERVICE, BE SURE TO BACK UP DATA AND REMOVE ANY CONFIDENTIAL, PROPRIETARY, OR PERSONAL INFORMATION. UNITS SENT IN FOR SERVICE MAY HAVE THE DATA ERASED FROM THE HARD DRIVE AND THE PROGRAMS RESTORED...

Warranty and Support Guide
Page 14
...drive" on CDs included in the computer accessory box, and software programs you installed after purchase. To uninstall a program: 1 Close all software programs and folders. 2 Uninstall the damaged program: 3 Click the Windows Vista start button, Control Panel. 14 4 Under Programs, click Uninstall a program. 5 Select the program you want to remove... used for data storage. Run the system recovery from the Recovery Manager. Or check that came with your hard disk drive, see the next section. To reinstall a program using the Recovery Manager program (select models only). System...
...drive" on CDs included in the computer accessory box, and software programs you installed after purchase. To uninstall a program: 1 Close all software programs and folders. 2 Uninstall the damaged program: 3 Click the Windows Vista start button, Control Panel. 14 4 Under Programs, click Uninstall a program. 5 Select the program you want to remove... used for data storage. Run the system recovery from the Recovery Manager. Or check that came with your hard disk drive, see the next section. To reinstall a program using the Recovery Manager program (select models only). System...

Warranty and Support Guide
Page 15
...on your discs may see error messages such as you have backed up to a removable disc any data that were originally installed on the disc is a very high verification standard for your hard disk drive. After creating the recovery discs, you can quit the process at the factory. ... recovery image until you make extra space available on your computer model. The program that you create. 4 Through recovery discs purchased from HP Support. The next time you have made recovery discs. NOTE: System Recovery deletes any time. You will need. Creating Recovery Discs Complete...
...on your discs may see error messages such as you have backed up to a removable disc any data that were originally installed on the disc is a very high verification standard for your hard disk drive. After creating the recovery discs, you can quit the process at the factory. ... recovery image until you make extra space available on your computer model. The program that you create. 4 Through recovery discs purchased from HP Support. The next time you have made recovery discs. NOTE: System Recovery deletes any time. You will need. Creating Recovery Discs Complete...
Warranty and Support Guide
Page 16
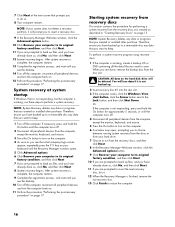
... up to save. When you are done, remove the backup disc from the computer, except the monitor, keyboard, and mouse. 3 Press the On button to turn on the computer. 4 As soon as described in "Creating Recovery Discs" on the hard disk drive will prompt you to insert a recovery disc....then click Next. 8 In the Recovery Manager Welcome window, click the Advanced options button. 9 Click Recover your hard drive. 7 Choose to run from the recovery discs you want to a removable disc any data that you created or installed after purchase. After system recovery is not responding, press and hold...
... up to save. When you are done, remove the backup disc from the computer, except the monitor, keyboard, and mouse. 3 Press the On button to turn on the computer. 4 As soon as described in "Creating Recovery Discs" on the hard disk drive will prompt you to insert a recovery disc....then click Next. 8 In the Recovery Manager Welcome window, click the Advanced options button. 9 Click Recover your hard drive. 7 Choose to run from the recovery discs you want to a removable disc any data that you created or installed after purchase. After system recovery is not responding, press and hold...

Upgrade and Service Guide
Page 3
Table of Contents Safety Information ...1 Before You Begin ...1 Locating Components of the HP TouchSmart PC 2 Opening the HP TouchSmart PC...3 Adding Memory...7 Before you begin...7 Removing a memory module...8 Installing a memory module ...10 Removing and Installing the Hard Disk Drive 12 Removing the hard disk drive 12 Installing a hard disk drive ...18 Closing the HP TouchSmart PC...23 Table of Contents iii
Table of Contents Safety Information ...1 Before You Begin ...1 Locating Components of the HP TouchSmart PC 2 Opening the HP TouchSmart PC...3 Adding Memory...7 Before you begin...7 Removing a memory module...8 Installing a memory module ...10 Removing and Installing the Hard Disk Drive 12 Removing the hard disk drive 12 Installing a hard disk drive ...18 Closing the HP TouchSmart PC...23 Table of Contents iii

Upgrade and Service Guide
Page 7
...system components to cool before touching them. 4 After the system has completely shut down, disconnect the power adapter (A) from the HP TouchSmart PC. 2 Disconnect any external devices that you are connected to the computer. Ensure that are discharged of static electricity by briefly ...Shut Down. Opening the HP TouchSmart PC To avoid injury and equipment damage, always complete the following steps in order, when opening the HP TouchSmart PC: 1 Remove any media (CD, DVD, memory cards, USB devices, and external hard disk drives) from the back of the HP TouchSmart PC. CAUTION: Static ...
...system components to cool before touching them. 4 After the system has completely shut down, disconnect the power adapter (A) from the HP TouchSmart PC. 2 Disconnect any external devices that you are connected to the computer. Ensure that are discharged of static electricity by briefly ...Shut Down. Opening the HP TouchSmart PC To avoid injury and equipment damage, always complete the following steps in order, when opening the HP TouchSmart PC: 1 Remove any media (CD, DVD, memory cards, USB devices, and external hard disk drives) from the back of the HP TouchSmart PC. CAUTION: Static ...
Upgrade and Service Guide
Page 10
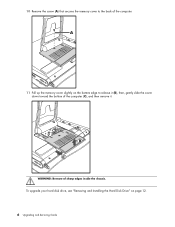
To upgrade your hard disk drive, see "Removing and Installing the Hard Disk Drive" on the bottom edge to the back of sharp edges inside the chassis. 10 Remove the screw (A) that secures the memory cover to release it (B), then, gently slide the cover down toward the bottom of the computer (C), and then remove it. B C WARNING: Beware of the computer. A 11 Pull up the memory cover slightly on page 12. 6 Upgrading and Servicing Guide
To upgrade your hard disk drive, see "Removing and Installing the Hard Disk Drive" on the bottom edge to the back of sharp edges inside the chassis. 10 Remove the screw (A) that secures the memory cover to release it (B), then, gently slide the cover down toward the bottom of the computer (C), and then remove it. B C WARNING: Beware of the computer. A 11 Pull up the memory cover slightly on page 12. 6 Upgrading and Servicing Guide
Upgrade and Service Guide
Page 16
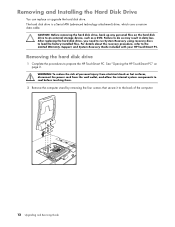
... screws that secure it to the Limited Warranty, Support, and System Recovery Guide included with your HP TouchSmart PC. CAUTION: Before removing the hard disk drive, back up any personal files on page 3. See "Opening the HP TouchSmart PC" on the hard disk drive to load the factory-installed files. WARNING: To reduce the risk of the computer. 12...
... screws that secure it to the Limited Warranty, Support, and System Recovery Guide included with your HP TouchSmart PC. CAUTION: Before removing the hard disk drive, back up any personal files on page 3. See "Opening the HP TouchSmart PC" on the hard disk drive to load the factory-installed files. WARNING: To reduce the risk of the computer. 12...
Upgrade and Service Guide
Page 19
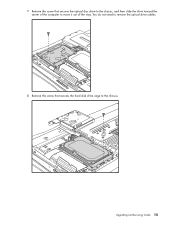
You do not need to remove the optical drive cables. 8 Remove the screw that secures the optical disc drive to the chassis, and then slide the drive toward the center of the way. Upgrading and Servicing Guide 15 7 Remove the screw that secures the hard disk drive cage to move it out of the computer to the chassis.
You do not need to remove the optical drive cables. 8 Remove the screw that secures the optical disc drive to the chassis, and then slide the drive toward the center of the way. Upgrading and Servicing Guide 15 7 Remove the screw that secures the hard disk drive cage to move it out of the computer to the chassis.
Upgrade and Service Guide
Page 20
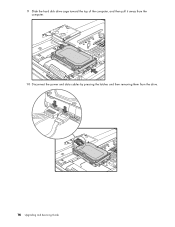
9 Slide the hard disk drive cage toward the top of the computer, and then pull it away from the computer. 10 Disconnect the power and data cables by pressing the latches and then removing them from the drive. 16 Upgrading and Servicing Guide
9 Slide the hard disk drive cage toward the top of the computer, and then pull it away from the computer. 10 Disconnect the power and data cables by pressing the latches and then removing them from the drive. 16 Upgrading and Servicing Guide
Upgrade and Service Guide
Page 21
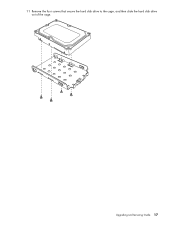
11 Remove the four screws that secure the hard disk drive to the cage, and then slide the hard disk drive out of the cage. Upgrading and Servicing Guide 17
11 Remove the four screws that secure the hard disk drive to the cage, and then slide the hard disk drive out of the cage. Upgrading and Servicing Guide 17
Upgrade and Service Guide
Page 22
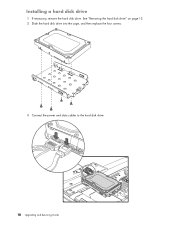
See "Removing the hard disk drive" on page 12. 2 Slide the hard disk drive into the cage, and then replace the four screws. 3 Connect the power and data cables to the hard disk drive. 18 Upgrading and Servicing Guide Installing a hard disk drive 1 If necessary, remove the hard disk drive.
See "Removing the hard disk drive" on page 12. 2 Slide the hard disk drive into the cage, and then replace the four screws. 3 Connect the power and data cables to the hard disk drive. 18 Upgrading and Servicing Guide Installing a hard disk drive 1 If necessary, remove the hard disk drive.
Getting Started Guide
Page 11
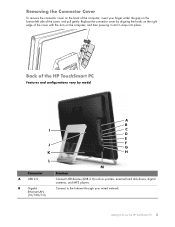
... Cover To remove the connector cover on the back of the computer, insert your wired network. Replace the connector cover by aligning the hooks on the right edge of the HP TouchSmart PC Features and configurations vary by model A B I C D E J F G K H L M Connector Function A USB 2.0 Connect USB devices (USB 2.0) such as printers, external hard disk drives, digital cameras...
... Cover To remove the connector cover on the back of the computer, insert your wired network. Replace the connector cover by aligning the hooks on the right edge of the HP TouchSmart PC Features and configurations vary by model A B I C D E J F G K H L M Connector Function A USB 2.0 Connect USB devices (USB 2.0) such as printers, external hard disk drives, digital cameras...

Getting Started Guide
Page 13
...from the back of the event reminder is inserted. The LED is flashing, do not remove your HP TouchSmart PC: LED What it does A Event Indicates an event reminder notification has been set from...drive Indicates hard disk drive activity. H Optical Disc Drive Activity Indicates Optical Disc Drive is included with select models only. E Memory card reader Indicates memory card reader activity. When the LED is working with no card is available in select software applications only. F Remote control IR receiver Indicates that your remote control to Know the HP TouchSmart...
...from the back of the event reminder is inserted. The LED is flashing, do not remove your HP TouchSmart PC: LED What it does A Event Indicates an event reminder notification has been set from...drive Indicates hard disk drive activity. H Optical Disc Drive Activity Indicates Optical Disc Drive is included with select models only. E Memory card reader Indicates memory card reader activity. When the LED is working with no card is available in select software applications only. F Remote control IR receiver Indicates that your remote control to Know the HP TouchSmart...
Getting Started Guide
Page 23
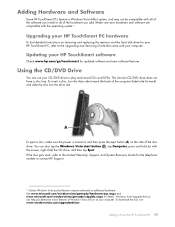
... eject button (A) on the side of Windows Vista will run on removing and replacing the memory and the hard disk drive for details. To download the tool, visit www.windowsvista.com/upgradeadvisor Getting to the Upgrading and Servicing Guide that came with your HP TouchSmart PC hardware To find detailed instructions on your CD/DVD...
... eject button (A) on the side of Windows Vista will run on removing and replacing the memory and the hard disk drive for details. To download the tool, visit www.windowsvista.com/upgradeadvisor Getting to the Upgrading and Servicing Guide that came with your HP TouchSmart PC hardware To find detailed instructions on your CD/DVD...
Getting Started Guide
Page 42
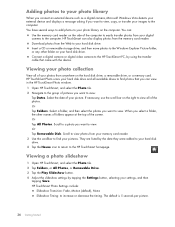
... are listed by using the transfer cable that you select a folder, the other folder on the hard disk drive, a removable drive, or a memory card. HP TouchSmart Photo Settings include: Slideshow Transition: Fade, Motion (default), None Slideshow Timing: to the HP TouchSmart PC, by the date they were added to your settings, and then tapping Save. The default is...
... are listed by using the transfer cable that you select a folder, the other folder on the hard disk drive, a removable drive, or a memory card. HP TouchSmart Photo Settings include: Slideshow Transition: Fade, Motion (default), None Slideshow Timing: to the HP TouchSmart PC, by the date they were added to your settings, and then tapping Save. The default is...


