
Maintenance and Service Guide: HP TouchSmart 9100 Business PC
Page 62
preparing to disassemble the TouchSmart PC 11 stand 15 system board 29 TV tuner module 26 WLAN module 24 removing hard drive 12 removing memory 16 repairing software problems 45 restoring ... 46 SPDIF 5 speakers 3 stand assembly 15 Stereo Audio In 5 system board, removing 29 system recovery options 52 T TouchSmart button 3 TV In 5 TV tuner module, removing 26 U updating drivers 45 USB 2.0 4, 5 V VESA wall mount assembly 10 volume 3 W wall mount assembly 10 webcam 3 webcam light 6 wireless keyboard and mouse 3, 6 wireless keyboard and mouse receiver light 6 wireless LAN...
preparing to disassemble the TouchSmart PC 11 stand 15 system board 29 TV tuner module 26 WLAN module 24 removing hard drive 12 removing memory 16 repairing software problems 45 restoring ... 46 SPDIF 5 speakers 3 stand assembly 15 Stereo Audio In 5 system board, removing 29 system recovery options 52 T TouchSmart button 3 TV In 5 TV tuner module, removing 26 U updating drivers 45 USB 2.0 4, 5 V VESA wall mount assembly 10 volume 3 W wall mount assembly 10 webcam 3 webcam light 6 wireless keyboard and mouse 3, 6 wireless keyboard and mouse receiver light 6 wireless LAN...

Preparing Your Computer for Wall-Mounting
Page 1
Preparing Your Computer for Wall-Mounting
Preparing Your Computer for Wall-Mounting
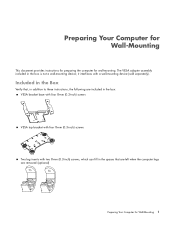
Preparing Your Computer for Wall-Mounting
Page 3
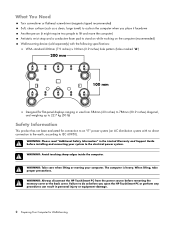
... with two 8-mm (0.3-inch) screws, which can fill in the box is not a wall-mounting device; Included in the Box Verify that are left when the computer legs are removed (optional) Preparing Your Computer for wall-mounting. The VESA adapter assembly included in the spaces that , in addition to these instructions, ... box: VESA bracket base with four 8-mm (0.3-inch) screws VESA top bracket with four 8-mm (0.3-inch) screws Two leg inserts with a wall-mounting device (sold separately). Preparing Your Computer for Wall-Mounting This document provides instructions for preparing the computer for...
... with two 8-mm (0.3-inch) screws, which can fill in the box is not a wall-mounting device; Included in the Box Verify that are left when the computer legs are removed (optional) Preparing Your Computer for wall-mounting. The VESA adapter assembly included in the spaces that , in addition to these instructions, ... box: VESA bracket base with four 8-mm (0.3-inch) screws VESA top bracket with four 8-mm (0.3-inch) screws Two leg inserts with a wall-mounting device (sold separately). Preparing Your Computer for Wall-Mounting This document provides instructions for preparing the computer for...
Preparing Your Computer for Wall-Mounting
Page 4
... require two people to lift and move the computer) Antistatic wrist strap and a conductive foam pad to stand on while working on the computer (recommended) Wall-mounting device (sold separately) with the following specifications: VESA standard 200mm (7.9 inches) x 100mm (3.9 inches) hole pattern (holes marked "A") 200 mm A B A B A...direct connection to the earth, according to IEC 60950). WARNING: Avoid touching sharp edges inside the computer. WARNING: Always disconnect the HP TouchSmart PC from 584mm (23 inches) to 786mm (30.9 inches) diagonal, and weighing up to 22.7 kg (50 lb) Safety ...
... require two people to lift and move the computer) Antistatic wrist strap and a conductive foam pad to stand on while working on the computer (recommended) Wall-mounting device (sold separately) with the following specifications: VESA standard 200mm (7.9 inches) x 100mm (3.9 inches) hole pattern (holes marked "A") 200 mm A B A B A...direct connection to the earth, according to IEC 60950). WARNING: Avoid touching sharp edges inside the computer. WARNING: Always disconnect the HP TouchSmart PC from 584mm (23 inches) to 786mm (30.9 inches) diagonal, and weighing up to 22.7 kg (50 lb) Safety ...
Preparing Your Computer for Wall-Mounting
Page 5
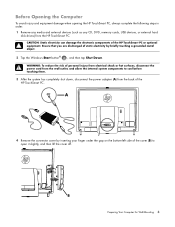
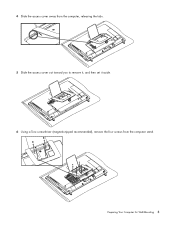
... has completely shut down, disconnect the power adapter (A) from the HP TouchSmart PC. WARNING: To reduce the risk of personal injury from electrical shock or hot surfaces, disconnect the power cord from the wall outlet, and allow the internal system components to open it slightly,...equipment damage when opening the HP TouchSmart PC, always complete the following steps in order: 1 Remove any media and external devices (such as any CD, DVD, memory cards, USB devices, or external hard disk drives) from the back of the HP TouchSmart PC. B Preparing Your Computer for Wall-Mounting 3
... has completely shut down, disconnect the power adapter (A) from the HP TouchSmart PC. WARNING: To reduce the risk of personal injury from electrical shock or hot surfaces, disconnect the power cord from the wall outlet, and allow the internal system components to open it slightly,...equipment damage when opening the HP TouchSmart PC, always complete the following steps in order: 1 Remove any media and external devices (such as any CD, DVD, memory cards, USB devices, or external hard disk drives) from the back of the HP TouchSmart PC. B Preparing Your Computer for Wall-Mounting 3

Preparing Your Computer for Wall-Mounting
Page 6
... other soft cloth to protect the touch screen surface from scratches or other attached cables from the back of the HP TouchSmart PC. Removing the Stand After completing the preceding steps, and before mounting the VESA adapter assembly to the back of the computer, remove the computer stand. 1 Place the computer facedown on a soft... the computer stand to an upright position. 3 Remove the screw that secures the access cover to the back of the computer. 4 Preparing Your Computer for Wall-Mounting
... other soft cloth to protect the touch screen surface from scratches or other attached cables from the back of the HP TouchSmart PC. Removing the Stand After completing the preceding steps, and before mounting the VESA adapter assembly to the back of the computer, remove the computer stand. 1 Place the computer facedown on a soft... the computer stand to an upright position. 3 Remove the screw that secures the access cover to the back of the computer. 4 Preparing Your Computer for Wall-Mounting
Preparing Your Computer for Wall-Mounting
Page 7
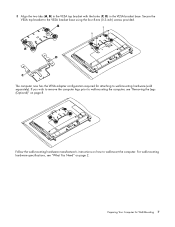
Preparing Your Computer for Wall-Mounting 5 4 Slide the access cover away from the computer, releasing the tabs. 5 Slide the access cover out toward you to remove it, and then set it aside. 6 Using a Torx screwdriver (magnetic-tipped recommended), remove the four screws from the computer stand.
Preparing Your Computer for Wall-Mounting 5 4 Slide the access cover away from the computer, releasing the tabs. 5 Slide the access cover out toward you to remove it, and then set it aside. 6 Using a Torx screwdriver (magnetic-tipped recommended), remove the four screws from the computer stand.

Preparing Your Computer for Wall-Mounting
Page 8
7 Lift off the computer stand and set it aside. Installing the VESA Adapter Assembly 1 Attach the VESA bracket base to the computer rear shield, aligning the tabs (A, B) to the holes in the same four holes that had attached the computer stand. Insert the four 8-mm (0.3-inch) screws provided in the shield so there is no gap between the parts. A A B B 2 Reattach the access cover by sliding the cover slots into the VESA base and replacing the access cover screw. 6 Preparing Your Computer for Wall-Mounting
7 Lift off the computer stand and set it aside. Installing the VESA Adapter Assembly 1 Attach the VESA bracket base to the computer rear shield, aligning the tabs (A, B) to the holes in the same four holes that had attached the computer stand. Insert the four 8-mm (0.3-inch) screws provided in the shield so there is no gap between the parts. A A B B 2 Reattach the access cover by sliding the cover slots into the VESA base and replacing the access cover screw. 6 Preparing Your Computer for Wall-Mounting
Preparing Your Computer for Wall-Mounting
Page 9
... using the four 8-mm (0.3-inch) screws provided. B A D C The computer now has the VESA adapter configuration required for Wall-Mounting 7 For wall-mounting hardware specifications, see "Removing the Legs (Optional)" on page 2. Preparing Your Computer for attaching to wall-mounting the computer, see "What You Need" on page 8. 3 Align the two tabs (A, B) in the VESA top bracket...
... using the four 8-mm (0.3-inch) screws provided. B A D C The computer now has the VESA adapter configuration required for Wall-Mounting 7 For wall-mounting hardware specifications, see "Removing the Legs (Optional)" on page 2. Preparing Your Computer for attaching to wall-mounting the computer, see "What You Need" on page 8. 3 Align the two tabs (A, B) in the VESA top bracket...
Preparing Your Computer for Wall-Mounting
Page 10
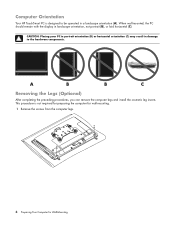
... (A). This procedure is designed to be operated in damage to the hardware components. Computer Orientation Your HP TouchSmart PC is not required for preparing the computer for wall-mounting. 1 Remove the screws from the computer legs. 8 Preparing Your Computer for Wall-Mounting A B B C Removing the Legs (Optional) After completing the preceding procedures, you can remove the computer legs...
... (A). This procedure is designed to be operated in damage to the hardware components. Computer Orientation Your HP TouchSmart PC is not required for preparing the computer for wall-mounting. 1 Remove the screws from the computer legs. 8 Preparing Your Computer for Wall-Mounting A B B C Removing the Legs (Optional) After completing the preceding procedures, you can remove the computer legs...
Preparing Your Computer for Wall-Mounting
Page 11
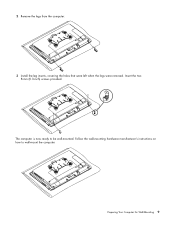
Follow the wall-mounting hardware manufacturer's instructions on how to be wall-mounted. Preparing Your Computer for Wall-Mounting 9 The computer is now ready to wall-mount the computer. 2 Remove the legs from the computer. 3 Install the leg inserts, covering the holes that were left when the legs were removed. Insert the two 8-mm (0.3-inch) screws provided.
Follow the wall-mounting hardware manufacturer's instructions on how to be wall-mounted. Preparing Your Computer for Wall-Mounting 9 The computer is now ready to wall-mount the computer. 2 Remove the legs from the computer. 3 Install the leg inserts, covering the holes that were left when the legs were removed. Insert the two 8-mm (0.3-inch) screws provided.
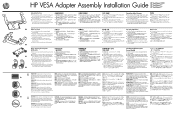
HP VESA Adapter Assembly Installation Guide
Page 1
...TouchSmart 9100 and the TouchSmart600 2. Soft, clean surface (such as a clean, large towel) to cushion the computer when you place it might required two people to lift and move the computer) !! Third-party wall-mounting... touching. WARNING! CAUTION: Static electricity can result in the Box 1. HP VESA Adapter Assembly Installation Guide Included in personal injury or equipment damage. WARNING... removed (optional) 1 What You Need !! Always disconnect the TouchSmart computer from the computer. Placing the PC in portrait (B) orientation or horizontal (C) orientation may result in ...
...TouchSmart 9100 and the TouchSmart600 2. Soft, clean surface (such as a clean, large towel) to cushion the computer when you place it might required two people to lift and move the computer) !! Third-party wall-mounting... touching. WARNING! CAUTION: Static electricity can result in the Box 1. HP VESA Adapter Assembly Installation Guide Included in personal injury or equipment damage. WARNING... removed (optional) 1 What You Need !! Always disconnect the TouchSmart computer from the computer. Placing the PC in portrait (B) orientation or horizontal (C) orientation may result in ...
HP VESA Adapter Assembly Installation Guide
Page 3
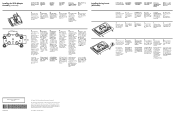
... then remove the legs. 2. party wall-mounting A B A B A device (sold separately) that you plan to be wall-mounted. Installing the Leg Inserts (All Models) Installing the Leg Inserts (All Models) NOTE: HP TouchSmart600 and HP TouchSmart 9100 models shown below. 1. Second Edition:... November 2009 To install the computer leg inserts before wall-mounting the computer, see "Installing the Leg Inserts." Remove the screws ...
... then remove the legs. 2. party wall-mounting A B A B A device (sold separately) that you plan to be wall-mounted. Installing the Leg Inserts (All Models) Installing the Leg Inserts (All Models) NOTE: HP TouchSmart600 and HP TouchSmart 9100 models shown below. 1. Second Edition:... November 2009 To install the computer leg inserts before wall-mounting the computer, see "Installing the Leg Inserts." Remove the screws ...
User Guide
Page 6
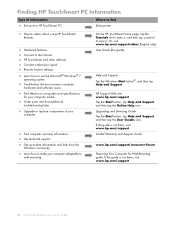
... and Support Tap the Windows Start button®, and then tap Help and Support. Finding HP TouchSmart PC Information Type of your computer. „ Find computer warranty information. „ Get technical support. „ Get up your computer adaptable to wall mounting. Upgrading and Servicing Guide Tap the Start button, tap Help and Support, and then...
... and Support Tap the Windows Start button®, and then tap Help and Support. Finding HP TouchSmart PC Information Type of your computer. „ Find computer warranty information. „ Get technical support. „ Get up your computer adaptable to wall mounting. Upgrading and Servicing Guide Tap the Start button, tap Help and Support, and then...
User Guide
Page 7
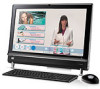
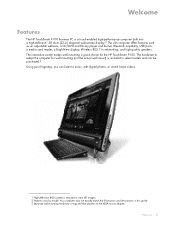
...wall mount) is included in ) diagonal widescreen display.2 The slim computer offers features such as an adjustable webcam, a CD/DVD and Blu-ray player and burner, Bluetooth capability, USB ports, a media card reader, a BrightView display, Wireless 802.11n networking, and high-quality speakers. Welcome 1 The hardware to adapt the computer for the HP TouchSmart 9100.... Welcome Features The HP TouchSmart 9100 Business PC is a touch-enabled high-performance computer built into a high-definition1 58...
...wall mount) is included in ) diagonal widescreen display.2 The slim computer offers features such as an adjustable webcam, a CD/DVD and Blu-ray player and burner, Bluetooth capability, USB ports, a media card reader, a BrightView display, Wireless 802.11n networking, and high-quality speakers. Welcome 1 The hardware to adapt the computer for the HP TouchSmart 9100.... Welcome Features The HP TouchSmart 9100 Business PC is a touch-enabled high-performance computer built into a high-definition1 58...
User Guide
Page 9
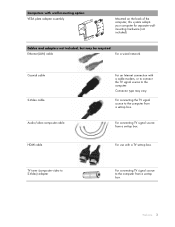
... the TV signal source to the computer from a set -top box. Welcome 3 Cables and adapters not included, but may vary. Computers with wall-mounting option VESA plate adapter assembly Mounted on the back of the computer, this system adapts your computer for separate wallmounting hardware (not included). For connecting TV signal source from...
... the TV signal source to the computer from a set -top box. Welcome 3 Cables and adapters not included, but may vary. Computers with wall-mounting option VESA plate adapter assembly Mounted on the back of the computer, this system adapts your computer for separate wallmounting hardware (not included). For connecting TV signal source from...


