
Getting Started
Page 17
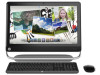
For help with getting started using your computer, see the Windows 7 desktop, the initial setup is complete. NOTE: If you skip some steps during the initial setup procedure or decline some options, you will be reminded to ...
For help with getting started using your computer, see the Windows 7 desktop, the initial setup is complete. NOTE: If you skip some steps during the initial setup procedure or decline some options, you will be reminded to ...
Getting Started
Page 19
... the Start button. b Click All Programs. c Click Online Services, and then click Get Online. Set up only, double-click the ISP-provided icon on the desktop, and then log in. 4 Open your Web browser and browse the Internet. If you did not set up with an ISP, skip this computer. If...
... the Start button. b Click All Programs. c Click Online Services, and then click Get Online. Set up only, double-click the ISP-provided icon on the desktop, and then log in. 4 Open your Web browser and browse the Internet. If you did not set up with an ISP, skip this computer. If...
Getting Started
Page 30
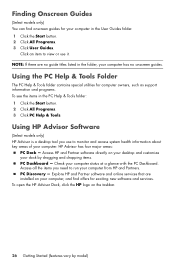
...and services. PC Discovery - Access HP and Partner software directly on your desktop and customize your computer status at a glance with the PC Dashboard. HP Advisor has four major areas: PC Dock - Using HP Advisor Software (Select models only) HP Advisor is a desktop tool you need to monitor and... access system health information about key areas of your computer from HP and Partners. Check your dock by...
...and services. PC Discovery - Access HP and Partner software directly on your desktop and customize your computer status at a glance with the PC Dashboard. HP Advisor has four major areas: PC Dock - Using HP Advisor Software (Select models only) HP Advisor is a desktop tool you need to monitor and... access system health information about key areas of your computer from HP and Partners. Check your dock by...
Getting Started
Page 56
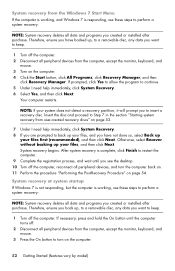
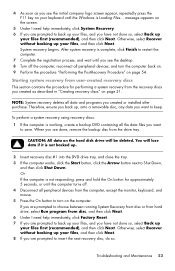
...: NOTE: System recovery deletes all data and programs you created or installed after purchase. NOTE: System recovery deletes all data and programs you see the desktop. 10 Turn off . 2 Disconnect all peripheral devices from the computer, except the monitor, keyboard, and mouse. 3 Press the On button to continue. 5 Under I need help...
...: NOTE: System recovery deletes all data and programs you created or installed after purchase. NOTE: System recovery deletes all data and programs you see the desktop. 10 Turn off . 2 Disconnect all peripheral devices from the computer, except the monitor, keyboard, and mouse. 3 Press the On button to continue. 5 Under I need help...
Getting Started
Page 57
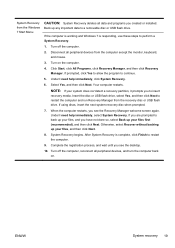
... This section contains the procedure for approximately 5 seconds, or until the Windows is working, create a backup DVD containing all the data files you see the desktop. 8 Turn off . 4 Disconnect all peripheral devices, and turn on the computer. 4 As soon as described in "Creating recovery discs" on page 51. message appears on...
... This section contains the procedure for approximately 5 seconds, or until the Windows is working, create a backup DVD containing all the data files you see the desktop. 8 Turn off . 4 Disconnect all peripheral devices, and turn on the computer. 4 As soon as described in "Creating recovery discs" on page 51. message appears on...
Getting Started Guide
Page 25
... 7 is complete, click Finish to restart the computer. 9. Under I need help immediately, select System Recovery. Complete the registration process, and wait until you see the desktop. 10. Turn on . If prompted, click Yes to allow the program to restart the computer and run Recovery Manager from the recovery disc or USB...
... 7 is complete, click Finish to restart the computer. 9. Under I need help immediately, select System Recovery. Complete the registration process, and wait until you see the desktop. 10. Turn on . If prompted, click Yes to allow the program to restart the computer and run Recovery Manager from the recovery disc or USB...
Getting Started Guide
Page 26
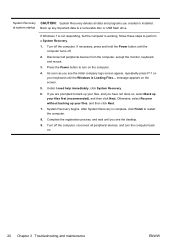
... the computer is working, follow these steps to turn the computer back on. 20 Chapter 3 Troubleshooting and maintenance ENWW As soon as you see the desktop. 9. message appears on the screen. 5. Otherwise, select Recover without backing up any important data to a removable disc or USB flash drive. Turn off . 2. Turn off...
... the computer is working, follow these steps to turn the computer back on. 20 Chapter 3 Troubleshooting and maintenance ENWW As soon as you see the desktop. 9. message appears on the screen. 5. Otherwise, select Recover without backing up any important data to a removable disc or USB flash drive. Turn off . 2. Turn off...
Getting Started Guide
Page 30
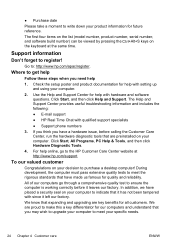
Go to purchase a desktop computer! Check the setup poster and product documentation for our computers ...The Help and Support Center provides useful troubleshooting information and includes the following: ● E-mail support ● HP Real Time Chat with since it leaves our factory. To our valued customer Congratulations on your computer to indicate that...computer must pass extensive quality tests to meet your specific needs. 24 Chapter 4 Customer care ENWW Where to the HP Customer Care Center website at the same time. If you think you need help with setting up and using your...
Go to purchase a desktop computer! Check the setup poster and product documentation for our computers ...The Help and Support Center provides useful troubleshooting information and includes the following: ● E-mail support ● HP Real Time Chat with since it leaves our factory. To our valued customer Congratulations on your computer to indicate that...computer must pass extensive quality tests to meet your specific needs. 24 Chapter 4 Customer care ENWW Where to the HP Customer Care Center website at the same time. If you think you need help with setting up and using your...
Getting Started Guide
Page 31
... up and using your new computer. Thank you for help , you attempted to upgrade your Windows desktop (to time. Next, try a little surfing! Be sure to also check the updates from HP that are confirming that the computer was working properly before attempting to upgrade your... desktop from information on the back of the Limited Warranty and Support Guide. If you suggestions on , immediately contact the HP Customer Care Center listed earlier in this guide, and a HP Customer Representative will give you have completely set...
... up and using your new computer. Thank you for help , you attempted to upgrade your Windows desktop (to time. Next, try a little surfing! Be sure to also check the updates from HP that are confirming that the computer was working properly before attempting to upgrade your... desktop from information on the back of the Limited Warranty and Support Guide. If you suggestions on , immediately contact the HP Customer Care Center listed earlier in this guide, and a HP Customer Representative will give you have completely set...

Troubleshooting & Maintenance Guide
Page 15
... all data and programs you see the Recovery Manager welcome screen again. If you are prompted to continue. 5. When the computer restarts, you see the desktop. 10. Turn off the computer. Under I need help immediately, click System Recovery. 6. Disconnect all peripheral devices from the recovery disc or USB flash drive...
... all data and programs you see the Recovery Manager welcome screen again. If you are prompted to continue. 5. When the computer restarts, you see the desktop. 10. Turn off the computer. Under I need help immediately, click System Recovery. 6. Disconnect all peripheral devices from the recovery disc or USB flash drive...

Troubleshooting & Maintenance Guide
Page 16
.... Recovery media Recovery media can be used only with this computer. You can be created on systems that device. 7. To create recovery media, see the desktop. 9. If using a recovery DVD, the computer automatically runs Recovery Manager from that are shipped without backing up any important data to turn the computer back...
.... Recovery media Recovery media can be used only with this computer. You can be created on systems that device. 7. To create recovery media, see the desktop. 9. If using a recovery DVD, the computer automatically runs Recovery Manager from that are shipped without backing up any important data to turn the computer back...

Getting Started (For Select TouchSmart Models Only)
Page 8
...the left and right, allowing you scroll to spread out your applications and documents. Select HP TouchSmart PC models can place on the desktop, or tap the Start button and then tap HP TouchSmart. ● The Magic Canvas The Magic Canvas is a touch-enabled high-performance computer ...built into view by model. To launch the software, tap the HP TouchSmart icon on the Magic Canvas. Magic Canvas provides an interactive desktop that expands to the left and right. You can create magnets from some TouchSmart applications. ◦ Drag content from an application (photos, music, ...
...the left and right, allowing you scroll to spread out your applications and documents. Select HP TouchSmart PC models can place on the desktop, or tap the Start button and then tap HP TouchSmart. ● The Magic Canvas The Magic Canvas is a touch-enabled high-performance computer ...built into view by model. To launch the software, tap the HP TouchSmart icon on the Magic Canvas. Magic Canvas provides an interactive desktop that expands to the left and right. You can create magnets from some TouchSmart applications. ◦ Drag content from an application (photos, music, ...

Getting Started (For Select TouchSmart Models Only)
Page 16
... used while your are in gaming mode, the following options: ● Tap the full screen to return to desktop ● Press ESC key to return to desktop ● Left click mouse to return to desktop ● Press the Ctrl+Alt+Del buttons simultaneously on the keyboard ● Press the Power/Sleep button on...
... used while your are in gaming mode, the following options: ● Tap the full screen to return to desktop ● Press ESC key to return to desktop ● Left click mouse to return to desktop ● Press the Ctrl+Alt+Del buttons simultaneously on the keyboard ● Press the Power/Sleep button on...
Getting Started (For Select TouchSmart Models Only)
Page 17
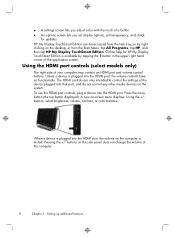
...you to the factory default, or optimized for HP My Display TouchSmart Edition is available by right-clicking on the desktop, or from the task tray, or by tapping the ? button in display mode; HP My Display TouchSmart Edition can close the Onscreen Display menu by ...● Viewing mode can be accessed from the Start Menu, tap All Programs, tap HP, and then tap HP My Display TouchSmart Edition. HP My Display TouchSmart Edition Select HP TouchSmart PC models only HP My Display TouchSmart Edition allows you want to the game console port, your system is no recording capability...
...you to the factory default, or optimized for HP My Display TouchSmart Edition is available by right-clicking on the desktop, or from the task tray, or by tapping the ? button in display mode; HP My Display TouchSmart Edition can close the Onscreen Display menu by ...● Viewing mode can be accessed from the Start Menu, tap All Programs, tap HP, and then tap HP My Display TouchSmart Edition. HP My Display TouchSmart Edition Select HP TouchSmart PC models only HP My Display TouchSmart Edition allows you want to the game console port, your system is no recording capability...
Getting Started (For Select TouchSmart Models Only)
Page 34
Turn off the computer, reconnect all data and programs you will see the desktop. 10. Turn on . Tap the Start button, tap All Programs, tap Recovery Manager, and then tap Recovery Manager. Tap Yes, and then tap Next. If ...
Turn off the computer, reconnect all data and programs you will see the desktop. 10. Turn on . Tap the Start button, tap All Programs, tap Recovery Manager, and then tap Recovery Manager. Tap Yes, and then tap Next. If ...
Getting Started (For Select TouchSmart Models Only)
Page 35
..., tap Back up your keyboard until the Windows is Loading Files... Back up any important data to back up your files, and you see the desktop. 9. ENWW System Recovery 31 Turn off the computer. Under I need help immediately, tap System Recovery. 6. message appears on page 32. Press the Power button to...
..., tap Back up your keyboard until the Windows is Loading Files... Back up any important data to back up your files, and you see the desktop. 9. ENWW System Recovery 31 Turn off the computer. Under I need help immediately, tap System Recovery. 6. message appears on page 32. Press the Power button to...

Quick Setup Guide
Page 10
...display. Make a left and right. 3 Setting up additional features To launch the software, tap the HP TouchSmart icon on the desktop, or tap the Start button and then tap HP TouchSmart. ● The Magic Canvas The Magic Canvas is an interactive background that you can create magnets from... some TouchSmart applications. ◦ Drag content from an application (photos, music, playlists, notes, calendars) onto the Magic...
...display. Make a left and right. 3 Setting up additional features To launch the software, tap the HP TouchSmart icon on the desktop, or tap the Start button and then tap HP TouchSmart. ● The Magic Canvas The Magic Canvas is an interactive background that you can create magnets from... some TouchSmart applications. ◦ Drag content from an application (photos, music, playlists, notes, calendars) onto the Magic...
Quick Setup Guide
Page 12
... options screen lets you set display options, set transparency, and check for HP My Display TouchSmart Edition is available by rightclicking on the desktop, or from the Start Menu, tap All Programs, tap HP, and then tap HP My Display TouchSmart Edition. HP My Display TouchSmart Edition can be accessed from the task tray, or by tapping the...
... options screen lets you set display options, set transparency, and check for HP My Display TouchSmart Edition is available by rightclicking on the desktop, or from the Start Menu, tap All Programs, tap HP, and then tap HP My Display TouchSmart Edition. HP My Display TouchSmart Edition can be accessed from the task tray, or by tapping the...
Wall Mounting Guide (For Select Models Only)
Page 5
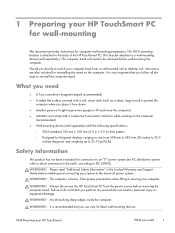
...Safety Information" in the Limited Warranty and Support Guide before wall-mounting the computer. WARNING! Always disconnect the HP TouchSmart PC from a wall-mounted unit to desktop unit, instructions are also included for connection to an "IT" power system (an AC distribution system with ... WARNING! WARNING! WARNING! WARNING! The computer is attached to stand on while working on the computer. 1 Preparing your HP TouchSmart PC for wall-mounting This document provides instructions for flat-panel displays ranging in personal injury or equipment damage. What you need...
...Safety Information" in the Limited Warranty and Support Guide before wall-mounting the computer. WARNING! Always disconnect the HP TouchSmart PC from a wall-mounted unit to desktop unit, instructions are also included for connection to an "IT" power system (an AC distribution system with ... WARNING! WARNING! WARNING! WARNING! The computer is attached to stand on while working on the computer. 1 Preparing your HP TouchSmart PC for wall-mounting This document provides instructions for flat-panel displays ranging in personal injury or equipment damage. What you need...

Wall Mounting Guide (For Select Models Only)
Page 10
Replace the back cover on the computer and install the three screws securing the cover to a desktop unit in Reinstalling the stand on your HP TouchSmart PC on the lower corners of the computer. 9. 8. NOTE: Save the computer stand and the eight screws, so that you can convert your HP TouchSmart To reinstall the stand, follow all the steps in the future. Snap the rings into place on page 8. 6 Chapter 1 Preparing your HP TouchSmart PC for wall-mounting Wall-Mounting your HP TouchSmart PC back to the computer.
Replace the back cover on the computer and install the three screws securing the cover to a desktop unit in Reinstalling the stand on your HP TouchSmart PC on the lower corners of the computer. 9. 8. NOTE: Save the computer stand and the eight screws, so that you can convert your HP TouchSmart To reinstall the stand, follow all the steps in the future. Snap the rings into place on page 8. 6 Chapter 1 Preparing your HP TouchSmart PC for wall-mounting Wall-Mounting your HP TouchSmart PC back to the computer.

