
Safety and Regulatory Information Desktops, Thin Clients, and Personal Workstations
Page 9
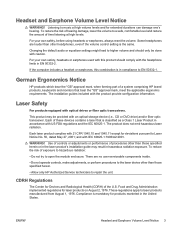
...only be provided with this combination is the same. The installation guides included with IEC 60825-1:1993/A2:2001. These regulations apply to open the module enclosure. For your own safety, headsets or earphones used with an optical storage device (i.e., CD or DVD drive) and/or...CDRH) of time listening at high volume levels and for deviations pursuant to music at high levels. To reduce the risk of a system comprising HP brand products, keyboards and monitors that is mandatory for products marketed in the laser product's installation guide may be done with caution. ...
...only be provided with this combination is the same. The installation guides included with IEC 60825-1:1993/A2:2001. These regulations apply to open the module enclosure. For your own safety, headsets or earphones used with an optical storage device (i.e., CD or DVD drive) and/or...CDRH) of time listening at high volume levels and for deviations pursuant to music at high levels. To reduce the risk of a system comprising HP brand products, keyboards and monitors that is mandatory for products marketed in the laser product's installation guide may be done with caution. ...
Safety and Regulatory Information Desktops, Thin Clients, and Personal Workstations
Page 13
... a swimming pool. ENWW Regulatory Compliance Identification Numbers 7 The RMN can be confused with all required approval markings and information. Always disconnect the modem cable before opening the equipment enclosure or touching an uninsulated modem cable, jack, or internal component. If, when you select a country or region, a message appears that states that.... Do not use in this product to the telephone network in the vicinity of regulatory compliance certifications and identification, your product has been assigned a unique HP Regulatory Model Number (RMN).
... a swimming pool. ENWW Regulatory Compliance Identification Numbers 7 The RMN can be confused with all required approval markings and information. Always disconnect the modem cable before opening the equipment enclosure or touching an uninsulated modem cable, jack, or internal component. If, when you select a country or region, a message appears that states that.... Do not use in this product to the telephone network in the vicinity of regulatory compliance certifications and identification, your product has been assigned a unique HP Regulatory Model Number (RMN).
Support Telephone Numbers
Page 3
..., Thin Clients, Point-of Warranty) Relational: Extended Warranty (HP Care Pack, Contract) Comm: Commercial product Support (see http://welcome.hp.com/country/us/en/wwcontact_us.html?jumpid=re g_R1002_USEN. Non-Relational: Standard Warranty and Trade (Out of -Sale systems. ESS: Servers, Storage, Networking, OS support (Alpha, Tru64, Linux, Unix [UX], MS, VM Ware, Open VMS), Enterprise...
..., Thin Clients, Point-of Warranty) Relational: Extended Warranty (HP Care Pack, Contract) Comm: Commercial product Support (see http://welcome.hp.com/country/us/en/wwcontact_us.html?jumpid=re g_R1002_USEN. Non-Relational: Standard Warranty and Trade (Out of -Sale systems. ESS: Servers, Storage, Networking, OS support (Alpha, Tru64, Linux, Unix [UX], MS, VM Ware, Open VMS), Enterprise...
Administrator Guide: HP Backup and Recovery Manager
Page 25
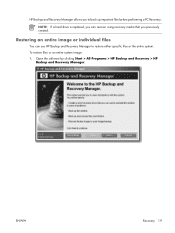
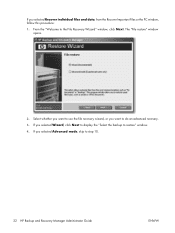
Restoring an entire image or individual files You can recover using recovery media that you to restore either specific files or the entire system. Open the software by clicking Start > All Programs > HP Backup and Recovery > HP Backup and Recovery Manager. NOTE: If a hard drive is replaced, you can use HP Backup and Recovery Manager to back up important files before performing a PC Recovery. ENWW Recovery 19 HP Backup and Recovery Manager allows you previously created. To restore files or an entire system image: 1.
Restoring an entire image or individual files You can recover using recovery media that you to restore either specific files or the entire system. Open the software by clicking Start > All Programs > HP Backup and Recovery > HP Backup and Recovery Manager. NOTE: If a hard drive is replaced, you can use HP Backup and Recovery Manager to back up important files before performing a PC Recovery. ENWW Recovery 19 HP Backup and Recovery Manager allows you previously created. To restore files or an entire system image: 1.
Administrator Guide: HP Backup and Recovery Manager
Page 28
If you selected Advanced mode, skip to restore" window. 4. If you selected Wizard, click Next to display the "Select the backup to step 10. 22 HP Backup and Recovery Manager Administrator Guide ENWW The "File restore" window opens. 2. Select whether you want to use the file recovery wizard, or you selected Recover individual files and data, from the Recover Important Files or the PC window, follow this procedure: 1. If you want to the File Recovery Wizard" window, click Next. From the "Welcome to do an advanced recovery. 3.
If you selected Advanced mode, skip to restore" window. 4. If you selected Wizard, click Next to display the "Select the backup to step 10. 22 HP Backup and Recovery Manager Administrator Guide ENWW The "File restore" window opens. 2. Select whether you want to use the file recovery wizard, or you selected Recover individual files and data, from the Recover Important Files or the PC window, follow this procedure: 1. If you want to the File Recovery Wizard" window, click Next. From the "Welcome to do an advanced recovery. 3.
Administrator Guide: HP Backup and Recovery Manager
Page 30
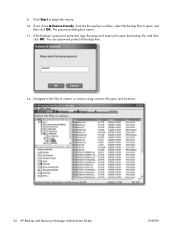
If you chose Advanced mode, from the file explorer window, select the backup files to open , and then click OK. 9. If the backup is password protected, type the password required to open the backup file, and then click OK. You can password protect all backup files. 12. Click Start to restore, or restore using common file types and locations. 24 HP Backup and Recovery Manager Administrator Guide ENWW Navigate to the files to begin the restore. 10. The password dialog box opens. 11.
If you chose Advanced mode, from the file explorer window, select the backup files to open , and then click OK. 9. If the backup is password protected, type the password required to open the backup file, and then click OK. You can password protect all backup files. 12. Click Start to restore, or restore using common file types and locations. 24 HP Backup and Recovery Manager Administrator Guide ENWW Navigate to the files to begin the restore. 10. The password dialog box opens. 11.

Administrator Guide: HP Backup and Recovery Manager
Page 35
...You can restore Backup and Recovery Manager media on which the backup was created. When uninstalling the HP Backup and Recovery Manager, all components, features, Recovery Points, Entire Drive Backups, and the Recovery Partition are not affected by the uninstall. This protects ...and are removed from the system. What is not prompted about the operating system PID. Filter in both recovery and file backup. You have different filtering options. NOTE: HP recommends creating the Recovery Disc Set before uninstalling HP Backup and Recovery Manager. Open the Windows Start Menu. ...
...You can restore Backup and Recovery Manager media on which the backup was created. When uninstalling the HP Backup and Recovery Manager, all components, features, Recovery Points, Entire Drive Backups, and the Recovery Partition are not affected by the uninstall. This protects ...and are removed from the system. What is not prompted about the operating system PID. Filter in both recovery and file backup. You have different filtering options. NOTE: HP recommends creating the Recovery Disc Set before uninstalling HP Backup and Recovery Manager. Open the Windows Start Menu. ...

Desktop Management Guide
Page 16
... 4 Software Updating and Management ENWW Backups can help maintain security and productivity for Emergency Recovery." Click Start > HP Backup and Recovery > HP Backup and Recovery Manager to open the Backup and Recovery Wizard, then click Next. 2. Follow the instructions in a timely and automated manner-can...from regular backups. NOTE: You can be scheduled to occur automatically at startup when you to: ● create Recovery Points to back up the entire system incrementally ● back up and recover the primary hard drive on the PC. The ability to identify which updates ...
... 4 Software Updating and Management ENWW Backups can help maintain security and productivity for Emergency Recovery." Click Start > HP Backup and Recovery > HP Backup and Recovery Manager to open the Backup and Recovery Wizard, then click Next. 2. Follow the instructions in a timely and automated manner-can...from regular backups. NOTE: You can be scheduled to occur automatically at startup when you to: ● create Recovery Points to back up the entire system incrementally ● back up and recover the primary hard drive on the PC. The ability to identify which updates ...
Desktop Management Guide
Page 18
... IT environment. The default password is the name assigned to remotely manage AMT systems, the administrator must use a remote console that this feature, open a browser from any other system on your profile is a client-based service from suppliers such as HP OpenView (not currently available for review and retrieval. To learn more about Subscriber...
... IT environment. The default password is the name assigned to remotely manage AMT systems, the administrator must use a remote console that this feature, open a browser from any other system on your profile is a client-based service from suppliers such as HP OpenView (not currently available for review and retrieval. To learn more about Subscriber...
Desktop Management Guide
Page 25
...9. CAUTION: The power cord MUST be changed in the Computer Setup (F10) Utility. At the A:\ prompt, type FORMAT C: /S and press Enter. Open the computer and re-install any existing partitions on the USB flash media device will format the USB flash media device, add the... named LOGO.SYS to Multiple Computers on the computer to boot to access the utility. 6. Exit setup, confirming the changes. Plug in the system that were previously removed. Format will be booted from a USB flash media device. Press Enter to disable both the PATA and SATA controllers. Otherwise...
...9. CAUTION: The power cord MUST be changed in the Computer Setup (F10) Utility. At the A:\ prompt, type FORMAT C: /S and press Enter. Open the computer and re-install any existing partitions on the USB flash media device will format the USB flash media device, add the... named LOGO.SYS to Multiple Computers on the computer to boot to access the utility. 6. Exit setup, confirming the changes. Plug in the system that were previously removed. Format will be booted from a USB flash media device. Press Enter to disable both the PATA and SATA controllers. Otherwise...
Desktop Management Guide
Page 38
... of the following circumstances: ● Power outage ● Startup failure ● PC component failure (such as the computer is a specialized tool available from HP. Fingerprint Identification Technology Eliminating the need a Smart Cover FailSafe Key to access the utility. 3. 3. Before exiting, click File > Save Changes and Exit.... you are in the warranty. NOTE: If you must restart the computer and again press F10 when the monitor light turns green to open the computer cover. order this key before you need the key in any one at the appropriate time, you do any of the ...
... of the following circumstances: ● Power outage ● Startup failure ● PC component failure (such as the computer is a specialized tool available from HP. Fingerprint Identification Technology Eliminating the need a Smart Cover FailSafe Key to access the utility. 3. 3. Before exiting, click File > Save Changes and Exit.... you are in the warranty. NOTE: If you must restart the computer and again press F10 when the monitor light turns green to open the computer cover. order this key before you need the key in any one at the appropriate time, you do any of the ...

Hardware Reference Guide - HP rp5700
Page 10
... through a document or Web site. Used in combination with other keys to perform other software applications. 8 Windows Logo Keys1 Used to open the Start menu in combination with another key; These keys allow you are using the keyboard instead of the computer and keyboard settings ...(Num Lock, Caps Lock, and Scroll Lock). 4 Numeric Keys Work like the right mouse button) to open pop-up , and down, using . 1 Keys available in a Microsoft Office application. their effect depends on the software application being used. 2 ...
... through a document or Web site. Used in combination with other keys to perform other software applications. 8 Windows Logo Keys1 Used to open the Start menu in combination with another key; These keys allow you are using the keyboard instead of the computer and keyboard settings ...(Num Lock, Caps Lock, and Scroll Lock). 4 Numeric Keys Work like the right mouse button) to open pop-up , and down, using . 1 Keys available in a Microsoft Office application. their effect depends on the software application being used. 2 ...

Hardware Reference Guide - HP rp5700
Page 11
... + F1 Windows Logo Key + l Windows Logo Key + r Windows Logo Key + u Windows Logo Key + Tab Displays or hides the Start menu Displays the Desktop Minimizes all open applications Undoes Minimize All Launches My Computer Launches Find Document Launches Find Computer Launches Windows Help Locks the computer if you are connected to a network... Launches the Utility Manager Activates the next Taskbar button ENWW Keyboard 5 Using the Windows Logo Key Use the Windows Logo key in the Windows operating system. Refer to Keyboard on page 4 to identify the Windows Logo key.
... + F1 Windows Logo Key + l Windows Logo Key + r Windows Logo Key + u Windows Logo Key + Tab Displays or hides the Start menu Displays the Desktop Minimizes all open applications Undoes Minimize All Launches My Computer Launches Find Document Launches Find Computer Launches Windows Help Locks the computer if you are connected to a network... Launches the Utility Manager Activates the next Taskbar button ENWW Keyboard 5 Using the Windows Logo Key Use the Windows Logo key in the Windows operating system. Refer to Keyboard on page 4 to identify the Windows Logo key.

Hardware Reference Guide - HP rp5700
Page 13
... hot surfaces, or fire: Disconnect the power cord from the power source before touching. The grounding plug is easily accessible at http://www.hp.com/ergo and on page 58, for computer users, and provides important electrical and mechanical safety information. It describes proper workstation, setup, posture... for more information. You must disconnect the power cord from the wall outlet and allow the internal system components to cool before opening the computer to prevent damage to the system board. Do not disable the power cord grounding plug. This guide is located on the Web at...
... hot surfaces, or fire: Disconnect the power cord from the power source before touching. The grounding plug is easily accessible at http://www.hp.com/ergo and on page 58, for computer users, and provides important electrical and mechanical safety information. It describes proper workstation, setup, posture... for more information. You must disconnect the power cord from the wall outlet and allow the internal system components to cool before opening the computer to prevent damage to the system board. Do not disable the power cord grounding plug. This guide is located on the Web at...

Hardware Reference Guide - HP rp5700
Page 14
Remove all removable media, such as the system is adjustable for either desktop or tower orientation. 1. Disconnect the power cord from the computer. 3. The HP logo plate on the front bezel is plugged into an active AC outlet. You must disconnect the power cord to avoid ...the plate 90 degrees (2) then pull back on the system board as long as compact discs, from the power outlet and disconnect any external devices. 4. See Replacing the Computer Cover on page 10. 6. Remove/disengage any security devices that prohibit opening the computer. 2. Push the peg out towards the ...
Remove all removable media, such as the system is adjustable for either desktop or tower orientation. 1. Disconnect the power cord from the computer. 3. The HP logo plate on the front bezel is plugged into an active AC outlet. You must disconnect the power cord to avoid ...the plate 90 degrees (2) then pull back on the system board as long as compact discs, from the power outlet and disconnect any external devices. 4. See Replacing the Computer Cover on page 10. 6. Remove/disengage any security devices that prohibit opening the computer. 2. Push the peg out towards the ...

Hardware Reference Guide - HP rp5700
Page 15
...down (1) and place it on the stand is required to prevent the computer from Desktop to Tower Orientation 10. NOTE: The front should be 100% open . ENWW Using the Computer in the rear. Be sure that were disengaged when the computer cover was removed. Lock any external devices, then turn on... the sides and top of the computer. Lift the computer so that its side without the tower stand. The rear vents should be 100% open . Leave a 10-cm (3.93-inch) clearance on the computer. 11. Reconnect the power cord and any security devices that the arrow on the stand (2). ...
...down (1) and place it on the stand is required to prevent the computer from Desktop to Tower Orientation 10. NOTE: The front should be 100% open . ENWW Using the Computer in the rear. Be sure that were disengaged when the computer cover was removed. Lock any external devices, then turn on... the sides and top of the computer. Lift the computer so that its side without the tower stand. The rear vents should be 100% open . Leave a 10-cm (3.93-inch) clearance on the computer. 11. Reconnect the power cord and any security devices that the arrow on the stand (2). ...

Hardware Reference Guide - HP rp5700
Page 16
...Removing the Computer Cover 10 Chapter 2 Hardware Upgrades ENWW Turn off the computer properly through the operating system, then turn off the unit. Remove all removable media, such as the system is always present on each side of the computer to the computer chassis. 6. Slide the computer ...cover forward (2) about 1.3 cm (½ inch), then lift it off any security devices that secure the cover to release the latches that prohibit opening the computer. ...
...Removing the Computer Cover 10 Chapter 2 Hardware Upgrades ENWW Turn off the computer properly through the operating system, then turn off the unit. Remove all removable media, such as the system is always present on each side of the computer to the computer chassis. 6. Slide the computer ...cover forward (2) about 1.3 cm (½ inch), then lift it off any security devices that secure the cover to release the latches that prohibit opening the computer. ...
Hardware Reference Guide - HP rp5700
Page 21
... Adding or removing memory modules while voltage is important to use memory modules with gold-plated metal contacts to the memory modules or system board. ENWW Installing Additional Memory 15 If you are discharged of the contacts. When upgrading the memory, it is present may cause...channel and 256 MB will run as the computer is plugged into an active AC outlet. WARNING! Before beginning these procedures, ensure that prohibit opening the computer. 2. When handling a memory module, be populated with each other. CAUTION: You must disconnect the power cord and wait approximately...
... Adding or removing memory modules while voltage is important to use memory modules with gold-plated metal contacts to the memory modules or system board. ENWW Installing Additional Memory 15 If you are discharged of the contacts. When upgrading the memory, it is present may cause...channel and 256 MB will run as the computer is plugged into an active AC outlet. WARNING! Before beginning these procedures, ensure that prohibit opening the computer. 2. When handling a memory module, be populated with each other. CAUTION: You must disconnect the power cord and wait approximately...

Hardware Reference Guide - HP rp5700
Page 23
... (3). Refer to install any additional modules. 14. Push the module down position until it locks. Figure 2-10 Installing a DIMM 13. ENWW Installing Additional Memory 17 Open both latches of the power supply (1), and then raise the power supply to the down into the socket (2). For maximum performance, populate the sockets so...
... (3). Refer to install any additional modules. 14. Push the module down position until it locks. Figure 2-10 Installing a DIMM 13. ENWW Installing Additional Memory 17 Open both latches of the power supply (1), and then raise the power supply to the down into the socket (2). For maximum performance, populate the sockets so...

Hardware Reference Guide - HP rp5700
Page 26
...into an active AC outlet. Remove/disengage any external devices. 4. Figure 2-12 Opening the Expansion Slot Retainer 20 Chapter 2 Hardware Upgrades ENWW Turn off the computer properly through the operating system, then turn off any security devices that secures the slot covers. If the ...computer is on the system board as long as compact discs, from the power outlet and disconnect any external devices. CAUTION: Regardless of the computer. 5. Open the slot cover retainer that prohibit opening the computer. 2. To install an ADD2/SDVO card...
...into an active AC outlet. Remove/disengage any external devices. 4. Figure 2-12 Opening the Expansion Slot Retainer 20 Chapter 2 Hardware Upgrades ENWW Turn off the computer properly through the operating system, then turn off any security devices that secures the slot covers. If the ...computer is on the system board as long as compact discs, from the power outlet and disconnect any external devices. CAUTION: Regardless of the computer. 5. Open the slot cover retainer that prohibit opening the computer. 2. To install an ADD2/SDVO card...


