
Hardware Reference Guide (2nd Edition)
Page 19
Hardware Upgrades 4. Disconnect all cables attached to remove it straight up to the expansion cards. 5. Removing the Expansion Card Cage To replace the expansion card cage, reverse the above procedure. ✎ Ensure that the riser card seats properly into the PCI connector on the system board when reinstalling the expansion card cage. Hardware Reference Guide www.hp.com 2-9 Grasp the expansion card cage by the green labels and pull it from the chassis.
Hardware Upgrades 4. Disconnect all cables attached to remove it straight up to the expansion cards. 5. Removing the Expansion Card Cage To replace the expansion card cage, reverse the above procedure. ✎ Ensure that the riser card seats properly into the PCI connector on the system board when reinstalling the expansion card cage. Hardware Reference Guide www.hp.com 2-9 Grasp the expansion card cage by the green labels and pull it from the chassis.

Hardware Reference Guide (2nd Edition)
Page 32
... 9. Replace the front bezel and computer access panel. Return the Easy Access drive bay to the rear of the optical drive. Improper cable placement can damage the computer. 2-22 www.hp.com Hardware Reference Guide Connect the power cable and flat ribbon cable to the down position. The system automatically ...servicing the computer, ensure that cables are placed in the chassis when lowering the Easy Access drive bay. 10. Be sure not to the system board. 8. Raise the Easy Access drive bay to the upright position and connect the flat ribbon cable and audio cable to pinch the cables in...
... 9. Replace the front bezel and computer access panel. Return the Easy Access drive bay to the rear of the optical drive. Improper cable placement can damage the computer. 2-22 www.hp.com Hardware Reference Guide Connect the power cable and flat ribbon cable to the down position. The system automatically ...servicing the computer, ensure that cables are placed in the chassis when lowering the Easy Access drive bay. 10. Be sure not to the system board. 8. Raise the Easy Access drive bay to the upright position and connect the flat ribbon cable and audio cable to pinch the cables in...

Hardware Reference Guide (2nd Edition)
Page 50
...Removing the Computer Access Panel and Front Bezel"). ✎ It may be necessary to remove an expansion card to gain access to replace the battery. Lift the battery out of the computer or optional equipment. Depending on the type of static electricity by briefly touching... a grounded metal object. 1. Locate the battery and battery holder on the system board, complete the following instructions to the battery. 2. Removing a Coin Cell Battery (Type 1) b. Type 1 a. D-2 www.hp.com Hardware Reference Guide Before beginning these procedures, ensure that you are discharged of ...
...Removing the Computer Access Panel and Front Bezel"). ✎ It may be necessary to remove an expansion card to gain access to replace the battery. Lift the battery out of the computer or optional equipment. Depending on the type of static electricity by briefly touching... a grounded metal object. 1. Locate the battery and battery holder on the system board, complete the following instructions to the battery. 2. Removing a Coin Cell Battery (Type 1) b. Type 1 a. D-2 www.hp.com Hardware Reference Guide Before beginning these procedures, ensure that you are discharged of ...

Getting Started (3rd Edition)
Page 18
... is plugged in and seated properly, but is plugged onto the system board header. If the processor fan is not spinning, make sure the fan's cable is not spinning, then replace the processor fan. 4. Contact an authorized reseller or service provider. 14 www.hp.com Getting Started Ensure the fan is running. 2. Getting Started...
... is plugged in and seated properly, but is plugged onto the system board header. If the processor fan is not spinning, make sure the fan's cable is not spinning, then replace the processor fan. 4. Contact an authorized reseller or service provider. 14 www.hp.com Getting Started Ensure the fan is running. 2. Getting Started...

Getting Started (3rd Edition)
Page 19
... Press and hold the power button for less than 4 seconds. Getting Started www.hp.com 15 If the hard drive LED does not turn on . 3. Solution Press and hold the power button for less than 4 seconds. Replace the system board. Open hood and check that the voltage selector, located on the rear of the...
... Press and hold the power button for less than 4 seconds. Getting Started www.hp.com 15 If the hard drive LED does not turn on . 3. Solution Press and hold the power button for less than 4 seconds. Replace the system board. Open hood and check that the voltage selector, located on the rear of the...

Getting Started (3rd Edition)
Page 20
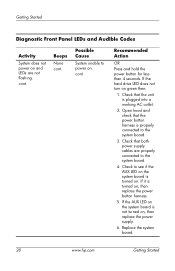
cont. Check to power on. Getting Started Solving General Problems (Continued) Problem System does not power on and the LEDs on , then replace the power button harness. 5. Solution 4. Replace the system board. 16 www.hp.com Getting Started cont. Cause System unable to see if the AUX LED on the system board is turned on , then replace the power supply. 6. If it is not turned on . If the AUX LED on the system board is turned on the front of the computer are not flashing.
cont. Check to power on. Getting Started Solving General Problems (Continued) Problem System does not power on and the LEDs on , then replace the power button harness. 5. Solution 4. Replace the system board. 16 www.hp.com Getting Started cont. Cause System unable to see if the AUX LED on the system board is turned on , then replace the power supply. 6. If it is not turned on . If the AUX LED on the system board is turned on the front of the computer are not flashing.

Getting Started (3rd Edition)
Page 23
... a time to make changes in the wrong location. 1. Getting Started www.hp.com 19 Observe the beeps and LED lights on page 21 to verify the proper installation. 2. Replace the system board. Reseat DIMMs. Power on the system. 2. Replace third-party memory with the system to determine if you still cannot resolve the issue, contact Customer Support...
... a time to make changes in the wrong location. 1. Getting Started www.hp.com 19 Observe the beeps and LED lights on page 21 to verify the proper installation. 2. Replace the system board. Reseat DIMMs. Power on the system. 2. Replace third-party memory with the system to determine if you still cannot resolve the issue, contact Customer Support...

Getting Started (3rd Edition)
Page 24
AGP graphics cards are not supported by a two-second pause, and the computer beeps six times. Replace the system board. Replace the graphics card with a PCI graphics card: 1. Power on the system. 2. Getting Started Solving Hardware Installation Problems (Continued) Problem Power LED flashes Red six times, once ... not meant for AGP cards. Reseat the graphics card. For systems with integrated graphics, replace the system board. 20 www.hp.com Getting Started Cause PCI video card is not seated properly or is bad, or system board is bad. ✎ The AGP slot is only used in...
AGP graphics cards are not supported by a two-second pause, and the computer beeps six times. Replace the system board. Replace the graphics card with a PCI graphics card: 1. Power on the system. 2. Getting Started Solving Hardware Installation Problems (Continued) Problem Power LED flashes Red six times, once ... not meant for AGP cards. Reseat the graphics card. For systems with integrated graphics, replace the system board. 20 www.hp.com Getting Started Cause PCI video card is not seated properly or is bad, or system board is bad. ✎ The AGP slot is only used in...

Getting Started (3rd Edition)
Page 26
...properly, but is properly attached. 5. Contact an authorized reseller or service provider. 22 www.hp.com Getting Started Open hood, press power button, and see if the processor fan spins....computer air vents are not blocked and the processor cooling fan is plugged onto the system board header. Getting Started Diagnostic Front Panel LEDs and Audible Codes Activity Computer powered off automatically... second, followed by a two-second pause. Ensure that the fan assembly is not spinning, then replace processor fan. 4. If the processor fan is not spinning, make sure the fan's cable is ...
...properly, but is properly attached. 5. Contact an authorized reseller or service provider. 22 www.hp.com Getting Started Open hood, press power button, and see if the processor fan spins....computer air vents are not blocked and the processor cooling fan is plugged onto the system board header. Getting Started Diagnostic Front Panel LEDs and Audible Codes Activity Computer powered off automatically... second, followed by a two-second pause. Ensure that the fan assembly is not spinning, then replace processor fan. 4. If the processor fan is not spinning, make sure the fan's cable is ...

Getting Started (3rd Edition)
Page 28
Check if a device is causing the problem by a two-second pause. Power on the system. Replace the device that is overloaded). Beeps None cont. Recommended Action 3. Replace the system board. 24 www.hp.com Getting Started Getting Started Diagnostic Front Panel LEDs and Audible Codes Activity Red Power LED flashes four times, once every second, followed by...
Check if a device is causing the problem by a two-second pause. Power on the system. Replace the device that is overloaded). Beeps None cont. Recommended Action 3. Replace the system board. 24 www.hp.com Getting Started Getting Started Diagnostic Front Panel LEDs and Audible Codes Activity Red Power LED flashes four times, once every second, followed by...

Getting Started (3rd Edition)
Page 29
... 1. Reseat DIMMs. Power on the system. 2. For systems with HP memory. 4. AGP graphics cards are not supported by a two-second pause. Replace third-party memory with a graphics card: 1. Replace the system board. Power on the system. 2. Possible Cause Pre-video memory ...hp.com 25 Getting Started Diagnostic Front Panel LEDs and Audible Codes Activity Red Power LED flashes five times, once every second, followed by a two-second pause. Replace the graphics card with integrated graphics, replace the system board. Reseat the graphics card. Replace the system board. Replace...
... 1. Reseat DIMMs. Power on the system. 2. For systems with HP memory. 4. AGP graphics cards are not supported by a two-second pause. Replace third-party memory with a graphics card: 1. Replace the system board. Power on the system. 2. Possible Cause Pre-video memory ...hp.com 25 Getting Started Diagnostic Front Panel LEDs and Audible Codes Activity Red Power LED flashes five times, once every second, followed by a two-second pause. Replace the graphics card with integrated graphics, replace the system board. Reseat the graphics card. Replace the system board. Replace...

Getting Started (3rd Edition)
Page 30
... (ROM detected failure prior to video). Invalid ROM based on the Documentation CD. 2. Reflash the ROM using a ROMPaq diskette. Replace the system board. 26 www.hp.com Getting Started Recommended Action Replace the system board. Getting Started Diagnostic Front Panel LEDs and Audible Codes Activity Red Power LED flashes seven times, once every second, followed by a two...
... (ROM detected failure prior to video). Invalid ROM based on the Documentation CD. 2. Reflash the ROM using a ROMPaq diskette. Replace the system board. 26 www.hp.com Getting Started Recommended Action Replace the system board. Getting Started Diagnostic Front Panel LEDs and Audible Codes Activity Red Power LED flashes seven times, once every second, followed by a two...

Getting Started (3rd Edition)
Page 31
Replace the system board. Proper voltage setting depends on the rear of the power supply, is set to power on . 3. Recommended Action Press and hold the power button for less than 4 seconds. Check that the voltage selector, located on your region. 2. Getting Started www.hp.com 27 Remove the expansion ...cards one at a time until the AUX LED on the system board turns on . If the hard drive LED turns green, then: 1. Beeps None Possible Cause...
Replace the system board. Proper voltage setting depends on the rear of the power supply, is set to power on . 3. Recommended Action Press and hold the power button for less than 4 seconds. Check that the voltage selector, located on your region. 2. Getting Started www.hp.com 27 Remove the expansion ...cards one at a time until the AUX LED on the system board turns on . If the hard drive LED turns green, then: 1. Beeps None Possible Cause...
Getting Started (3rd Edition)
Page 32
... and hold the power button for less than 4 seconds. Check that the power button harness is turned on . Replace the system board. 28 www.hp.com Getting Started Check to the system board. 4. If the AUX LED on the system board is not turned on and LEDs are properly connected to see if the AUX LED on the...
... and hold the power button for less than 4 seconds. Check that the power button harness is turned on . Replace the system board. 28 www.hp.com Getting Started Check to the system board. 4. If the AUX LED on the system board is not turned on and LEDs are properly connected to see if the AUX LED on the...

HP Point of Sale System rp5000 Illustrated Parts Map, 4th Edition
Page 1
...Requirement below Notes: ⌧ Original Spare Modified Spare REQUIREMENT: For customers in the U.S. HP Point of any kind and is subject to change without notice. EU, China, etc.) ...Sale System rp5000 Illustrated Parts Map Small Form Factor Chassis © 2003, 2004, 2006 Hewlett-Packard Development Company, L.P. All other countries. HP shall not be construed as the replacement... Speaker with housing 4 Heatsink with fan, thermal grease and alcohol pad 5 Chassis fan + System board tray with 2nd serial port + Mouse, 2-Button, PS/2 with the Original Spare number, please...
...Requirement below Notes: ⌧ Original Spare Modified Spare REQUIREMENT: For customers in the U.S. HP Point of any kind and is subject to change without notice. EU, China, etc.) ...Sale System rp5000 Illustrated Parts Map Small Form Factor Chassis © 2003, 2004, 2006 Hewlett-Packard Development Company, L.P. All other countries. HP shall not be construed as the replacement... Speaker with housing 4 Heatsink with fan, thermal grease and alcohol pad 5 Chassis fan + System board tray with 2nd serial port + Mouse, 2-Button, PS/2 with the Original Spare number, please...

HP Point of Sale System rp5000 Illustrated Parts Map, 4th Edition
Page 2
... configured for either 0V or +12V. Place the jumper over pin 2 only, in order to reconfigure the system. To re-enable the password features, repeat steps 1-3, then replace the jumper on front of computer) LED Color LED Activity Power Green On Power Green 1 blink every 1 ...RTS 8 CTS 9 RI Jumper Settings Direction Input Input Output Output Signal gnd Input Output Input Input Notes May be disconnected from the power outlet. 2. System Board Connectors and Jumpers (position of some untitled components may vary in location) AGP 1 BAT 1 C_FAN 1 COM 2 CONN1 DDR 1 DDR 2 FLOPPY ...
... configured for either 0V or +12V. Place the jumper over pin 2 only, in order to reconfigure the system. To re-enable the password features, repeat steps 1-3, then replace the jumper on front of computer) LED Color LED Activity Power Green On Power Green 1 blink every 1 ...RTS 8 CTS 9 RI Jumper Settings Direction Input Input Output Output Signal gnd Input Output Input Input Notes May be disconnected from the power outlet. 2. System Board Connectors and Jumpers (position of some untitled components may vary in location) AGP 1 BAT 1 C_FAN 1 COM 2 CONN1 DDR 1 DDR 2 FLOPPY ...

Troubleshooting Guide (2nd Edition)
Page 22
... assembly is fully/properly seated or installed. 3. Make sure the fans are not blocked and the processor cooling fan is plugged onto the system board header. Reset the two red serial port jumpers from "standard" to pins 1 and 2. Open hood, press power button, and see... "powered" serial port. Contact an authorized reseller or service provider. 2-6 www.hp.com Troubleshooting Guide The device does not have an external power source and the serial port is not spinning, then replace the processor fan. 4. OR The heatsink is installed properly. Serial peripheral device with...
... assembly is fully/properly seated or installed. 3. Make sure the fans are not blocked and the processor cooling fan is plugged onto the system board header. Reset the two red serial port jumpers from "standard" to pins 1 and 2. Open hood, press power button, and see... "powered" serial port. Contact an authorized reseller or service provider. 2-6 www.hp.com Troubleshooting Guide The device does not have an external power source and the serial port is not spinning, then replace the processor fan. 4. OR The heatsink is installed properly. Serial peripheral device with...

Troubleshooting Guide (2nd Edition)
Page 23
... on your region. 2. Check to see if the AUX LED light on the system board is turned on green then: 1. Replace the system board. Troubleshooting Guide www.hp.com 2-7 Troubleshooting Without Diagnostics Solving General Problems (Continued) Problem Cause System does not power on and the LEDs on the front of the power supply, is set to the...
... on your region. 2. Check to see if the AUX LED light on the system board is turned on green then: 1. Replace the system board. Troubleshooting Guide www.hp.com 2-7 Troubleshooting Without Diagnostics Solving General Problems (Continued) Problem Cause System does not power on and the LEDs on the front of the power supply, is set to the...

Troubleshooting Guide (2nd Edition)
Page 58
... with the chipset. Remove and replace the memory module(s) one at a time to the SPD standard. 1. Replace faulty memory module(s). 6. If error persists after replacing memory modules, replace the system board. If the processor does not respond, replace it. 1. Replace DIMM with matched sets. 1. ... code: XX, Memory Module Socket(s): XX Probable Cause RAM failure. Replace memory modules with a module conforming to isolate faulty module. 5. Try another memory socket. 3. A-4 www.hp.com Troubleshooting Guide POST Error Messages Numeric Codes and Text Messages (Continued...
... with the chipset. Remove and replace the memory module(s) one at a time to the SPD standard. 1. Replace faulty memory module(s). 6. If error persists after replacing memory modules, replace the system board. If the processor does not respond, replace it. 1. Replace DIMM with matched sets. 1. ... code: XX, Memory Module Socket(s): XX Probable Cause RAM failure. Replace memory modules with a module conforming to isolate faulty module. 5. Try another memory socket. 3. A-4 www.hp.com Troubleshooting Guide POST Error Messages Numeric Codes and Text Messages (Continued...

Troubleshooting Guide (2nd Edition)
Page 60
...Screen image has errors. Diskette in Drive A not bootable. Reseat the graphics card (if applicable). 2. Replace the graphics controller. Reseat fan cable. 2. Replace diskette drive. 5. Clear CMOS. (See Appendix B, "Password Security and Resetting CMOS.") 4. POST Error ...CMOS.") 3. Check and/or replace cables. 3. Verify monitor is not connected or may have malfunctioned. Install latest version of ROMPaq to restore image. 1. Replace the diskette. Recommended Action Reset the IRQ. Replace the system board. A-6 www.hp.com Troubleshooting Guide Graphics display ...
...Screen image has errors. Diskette in Drive A not bootable. Reseat the graphics card (if applicable). 2. Replace the graphics controller. Reseat fan cable. 2. Replace diskette drive. 5. Clear CMOS. (See Appendix B, "Password Security and Resetting CMOS.") 4. POST Error ...CMOS.") 3. Check and/or replace cables. 3. Verify monitor is not connected or may have malfunctioned. Install latest version of ROMPaq to restore image. 1. Replace the diskette. Recommended Action Reset the IRQ. Replace the system board. A-6 www.hp.com Troubleshooting Guide Graphics display ...


