
User Guide
Page 3
... and time 9 Install and format an optional memory card 10 Install the software 10 Using your camera 11 2 Taking pictures and recording video clips 13 Taking still pictures 13 Recording video clips 14 Instant Review...14 Auto focus and exposure 14 Focusing on the subject 14 Optimizing focus 15 Using Focus Lock... Menu 23 Using the Self-Timer settings 26 Using the Burst setting 27 Exposure Compensation 27 Adaptive Lighting 27 White Balance 28 ISO speed...28 HP Photosmart R967 Digital Camera 3
... and time 9 Install and format an optional memory card 10 Install the software 10 Using your camera 11 2 Taking pictures and recording video clips 13 Taking still pictures 13 Recording video clips 14 Instant Review...14 Auto focus and exposure 14 Focusing on the subject 14 Optimizing focus 15 Using Focus Lock... Menu 23 Using the Self-Timer settings 26 Using the Burst setting 27 Exposure Compensation 27 Adaptive Lighting 27 White Balance 28 ISO speed...28 HP Photosmart R967 Digital Camera 3

User Guide
Page 4
3 Reviewing images and video clips 29 Using Playback...29 Saving frames from video clips 30 Viewing thumbnails 30 Magnifying images 30 Using the Playback Menu 30 ... 36 5 Transferring and printing images 38 Transferring images with HP Photosmart Software 38 Transferring images without HP Photosmart Software 38 Connecting to the computer 39 Using a memory card reader 39 Printing images from the camera 39 Printing panoramas from the camera 40 6 Using HP Photosmart Express 41 Using the Photosmart Express Menu 41 Tagging images as Favorites 42 Marking...
3 Reviewing images and video clips 29 Using Playback...29 Saving frames from video clips 30 Viewing thumbnails 30 Magnifying images 30 Using the Playback Menu 30 ... 36 5 Transferring and printing images 38 Transferring images with HP Photosmart Software 38 Transferring images without HP Photosmart Software 38 Connecting to the computer 39 Using a memory card reader 39 Printing images from the camera 39 Printing panoramas from the camera 40 6 Using HP Photosmart Express 41 Using the Photosmart Express Menu 41 Tagging images as Favorites 42 Marking...

User Guide
Page 6
...-See Using the focus range settings on page 17. 4 Photosmart Express button-See Using HP Photosmart Express on page 41. 5 Live View/Playback button-Switches between Live View and Playback (see Taking pictures and recording video clips on page 13 and Reviewing images and video clips on page 29). 6 Power light.... page 30), and Magnify (see Magnifying images on page 30) functions. 11 Mode button-Press to get familiar with the camera controls, set up your digital camera for use, and begin taking pictures. 1 Getting started Use this section to access the Shooting Mode menu while in Live ...
...-See Using the focus range settings on page 17. 4 Photosmart Express button-See Using HP Photosmart Express on page 41. 5 Live View/Playback button-Switches between Live View and Playback (see Taking pictures and recording video clips on page 13 and Reviewing images and video clips on page 29). 6 Power light.... page 30), and Magnify (see Magnifying images on page 30) functions. 11 Mode button-Press to get familiar with the camera controls, set up your digital camera for use, and begin taking pictures. 1 Getting started Use this section to access the Shooting Mode menu while in Live ...

User Guide
Page 11
... installed. 1. See Tagging images as Favorites for printing, sending, and buying prints online. HP Photosmart R967 Digital Camera 11 Close all programs and temporarily disable any virus protection software. 2. For information on reviewing images and See Reviewing images and video clips video clips on the camera on page 42. - Windows If your Windows computer: ● Has a minimum of...
... installed. 1. See Tagging images as Favorites for printing, sending, and buying prints online. HP Photosmart R967 Digital Camera 11 Close all programs and temporarily disable any virus protection software. 2. For information on reviewing images and See Reviewing images and video clips video clips on the camera on page 42. - Windows If your Windows computer: ● Has a minimum of...

User Guide
Page 14
Press and release the Video button. 4. Instant Review After you have taken a still image or recorded a video clip, the camera displays it in Live View. 2. If you auto focus: ... page 30) for tips on page 15). Auto focus and exposure When you are in Instant Review. When you want to retake the scene and improve the image. If appears in the upper right..., press and release the Video button again. This indicates you press the Shutter button halfway down, the camera automatically measures and locks the focus and exposure. Frame the subject. 3. Press until appears briefly in the...
Press and release the Video button. 4. Instant Review After you have taken a still image or recorded a video clip, the camera displays it in Live View. 2. If you auto focus: ... page 30) for tips on page 15). Auto focus and exposure When you are in Instant Review. When you want to retake the scene and improve the image. If appears in the upper right..., press and release the Video button again. This indicates you press the Shutter button halfway down, the camera automatically measures and locks the focus and exposure. Frame the subject. 3. Press until appears briefly in the...

User Guide
Page 16
... good images, you press the Shutter button halfway down to take the picture, but it may be in proper focus or exposure when you review it is not in Image Advice to improve the image you do not have a tripod, set the proper exposure. Optimizing exposure When you ...problem for similar images in Playback, use Image Advice (see Steady Photo under Using the Capture Menu on a subject that is difficult to hold the camera still for your picture within the focus brackets. In low light or low contrast situations, frame a brighter or higher contrast object. 2. Other recommendations...
... good images, you press the Shutter button halfway down to take the picture, but it may be in proper focus or exposure when you review it is not in Image Advice to improve the image you do not have a tripod, set the proper exposure. Optimizing exposure When you ...problem for similar images in Playback, use Image Advice (see Steady Photo under Using the Capture Menu on a subject that is difficult to hold the camera still for your picture within the focus brackets. In low light or low contrast situations, frame a brighter or higher contrast object. 2. Other recommendations...

User Guide
Page 21
To change to take the second picture. While in the panoramic sequence. 3. HP Photosmart R967 Digital Camera 21 Manual-For specifying both F-number (aperture) and shutter speed. 1. Press the Shutter button to a different shooting mode, press until these items ... (see Using Manual shooting mode on page 10), you can stitch the sequence by pressing , selecting Entire Panoramic Sequence, then pressing . During Instant Review (see Recording audio on page 22). You can be stitched together to capture a scene too wide to align your computer. 1. Frame the subject ...
To change to take the second picture. While in the panoramic sequence. 3. HP Photosmart R967 Digital Camera 21 Manual-For specifying both F-number (aperture) and shutter speed. 1. Press the Shutter button to a different shooting mode, press until these items ... (see Using Manual shooting mode on page 10), you can stitch the sequence by pressing , selecting Entire Panoramic Sequence, then pressing . During Instant Review (see Recording audio on page 22). You can be stitched together to capture a scene too wide to align your computer. 1. Frame the subject ...

User Guide
Page 24
...sepia. On, Off (Default) White Balance-Balances color based on page 28. ● Auto (Default)-Corrects for images. Bracketing-Creates a set of resolution (10MP, 6MP, 3MP, VGA) and compression ( to specify a setting. and over-exposed by 5 in). ● QVGA -For capturing longer video clips or...for Exposure Compensation and under- Use to move between light and dark areas. For general picture taking two or more information, see Instant Review on page 27. ● Off (Default)-Processes the image as normal. ● Adaptive Lighting-Images created with Adaptive Lighting set to...
...sepia. On, Off (Default) White Balance-Balances color based on page 28. ● Auto (Default)-Corrects for images. Bracketing-Creates a set of resolution (10MP, 6MP, 3MP, VGA) and compression ( to specify a setting. and over-exposed by 5 in). ● QVGA -For capturing longer video clips or...for Exposure Compensation and under- Use to move between light and dark areas. For general picture taking two or more information, see Instant Review on page 27. ● Off (Default)-Processes the image as normal. ● Adaptive Lighting-Images created with Adaptive Lighting set to...

User Guide
Page 27
... without flash, but it . Tip To see Bracketing under Using the Capture Menu on a scene, try the Exposure option in Instant Review. HP Photosmart R967 Digital Camera 27 Exposure Compensation You can use flash photography (to soften or even out the effect of the flash) ● Backlit scenes where ...turn out gray without a flash or a tripod. Adaptive Lighting This setting balances the relationship between bright and dark areas in Instant Review (see Using the Capture Menu on page 31. Unlike the flash, Adaptive Lighting does not affect exposure settings, so brightened areas ...
... without flash, but it . Tip To see Bracketing under Using the Capture Menu on a scene, try the Exposure option in Instant Review. HP Photosmart R967 Digital Camera 27 Exposure Compensation You can use flash photography (to soften or even out the effect of the flash) ● Backlit scenes where ...turn out gray without a flash or a tripod. Adaptive Lighting This setting balances the relationship between bright and dark areas in Instant Review (see Using the Capture Menu on page 31. Unlike the flash, Adaptive Lighting does not affect exposure settings, so brightened areas ...

User Guide
Page 29
Press until appears briefly in the upper right corner of electronic Photosmart Share destinations (see Sharing images on page 43). 6 Image marked to Live View, press . During Playback, the Image Display also indicates additional information about...55). 3 Image position in a panoramic sequence. 4 Number of images to print (see Marking images for printing 3 on page 42). 5 1 Number of the Image Display. 2. HP Photosmart R967 Digital Camera 29 3 Reviewing images and video clips You can review and manipulate images and video clips in Playback as Favorites on page 42).
Press until appears briefly in the upper right corner of electronic Photosmart Share destinations (see Sharing images on page 43). 6 Image marked to Live View, press . During Playback, the Image Display also indicates additional information about...55). 3 Image position in a panoramic sequence. 4 Number of images to print (see Marking images for printing 3 on page 42). 5 1 Number of the Image Display. 2. HP Photosmart R967 Digital Camera 29 3 Reviewing images and video clips You can review and manipulate images and video clips in Playback as Favorites on page 42).
User Guide
Page 45
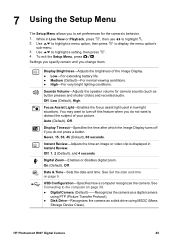
...), Off. HP Photosmart R967 Digital Camera 45 Use to highlight a menu option, then press to set preferences for camera sounds (such as a disk drive using PTP (Picture Transfer Protocol). ● Disk Drive-Recognizes the camera as button presses and shutter clicks) and recorded audio. Focus Assist Light-Enables the focus assist light used in Instant Review. Use to...
...), Off. HP Photosmart R967 Digital Camera 45 Use to highlight a menu option, then press to set preferences for camera sounds (such as a disk drive using PTP (Picture Transfer Protocol). ● Disk Drive-Recognizes the camera as button presses and shutter clicks) and recorded audio. Focus Assist Light-Enables the focus assist light used in Instant Review. Use to...

User Guide
Page 50
... error message when transferring images to the touch. This is off the camera when not using. Close the HP Photosmart Transfer Software, remove the camera from the dock, and allow the camera to review images. The camera responds sluggishly when trying to cool. Then examine the camera and the battery for cards marked High Performance, Pro, Ultra, or...
... error message when transferring images to the touch. This is off the camera when not using. Close the HP Photosmart Transfer Software, remove the camera from the dock, and allow the camera to review images. The camera responds sluggishly when trying to cool. Then examine the camera and the battery for cards marked High Performance, Pro, Ultra, or...

User Guide
Page 52
... subscriptions, driver and software updates, purchase HP supplies and accessories www.hp.com www.hp.com/photosmart (English only) Customers with disabilities www.hp.com/hpinfo/community/accessibility (English only) HP Total Care, driver and www.hp.com/support software updates, support information Getting assistance To get the best from your digital camera, including links to helpful websites and...
... subscriptions, driver and software updates, purchase HP supplies and accessories www.hp.com www.hp.com/photosmart (English only) Customers with disabilities www.hp.com/hpinfo/community/accessibility (English only) HP Total Care, driver and www.hp.com/support software updates, support information Getting assistance To get the best from your digital camera, including links to helpful websites and...

User Guide
Page 55
... changes color or shape, or appears abnormal in Playback and use the menus. Dispose of Shots Average 140 CIPA 160 HP Photosmart R967 Digital Camera 55 Battery is operating on the camera. Minimum 90 Maximum 190 Number of used batteries according to the eye. Rinse well with water and immediately seek medical care.... Power indicators The power indicators are most accurate after a few minutes of use of shots that it the next time you can still review images in any other way. ● In the event the battery leaks and the fluid gets into one's eye, do not rub the...
... changes color or shape, or appears abnormal in Playback and use the menus. Dispose of Shots Average 140 CIPA 160 HP Photosmart R967 Digital Camera 55 Battery is operating on the camera. Minimum 90 Maximum 190 Number of used batteries according to the eye. Rinse well with water and immediately seek medical care.... Power indicators The power indicators are most accurate after a few minutes of use of shots that it the next time you can still review images in any other way. ● In the event the battery leaks and the fluid gets into one's eye, do not rub the...

User Guide
Page 61
... Sharpness 25 shooting modes 19 transfer to computer 38 White Balance 24 Infinity focus 17 install memory card 10 install software 10 Instant Review 14, 21, 27, 45 interfaces 59 internal memory 13, 60 ISO Speed 25, 28 L Landscape mode 20 Language 9, 46 LEDs 6, 7... on camera 6, 7 Lithium Ion battery 54, 56 Live View/Playback button 6 M Macro focus 15, 17 Magnify control 6 magnifying images 30 Manual focus 17 Manual mode 21 memory capacity 60 card 13 card door 7 memory card 10, 59 Menu/OK button 6 menus Capture 23 Design Gallery 34 Photosmart Express 41 HP Photosmart R967 Digital Camera 61
... Sharpness 25 shooting modes 19 transfer to computer 38 White Balance 24 Infinity focus 17 install memory card 10 install software 10 Instant Review 14, 21, 27, 45 interfaces 59 internal memory 13, 60 ISO Speed 25, 28 L Landscape mode 20 Language 9, 46 LEDs 6, 7... on camera 6, 7 Lithium Ion battery 54, 56 Live View/Playback button 6 M Macro focus 15, 17 Magnify control 6 magnifying images 30 Manual focus 17 Manual mode 21 memory capacity 60 card 13 card door 7 memory card 10, 59 Menu/OK button 6 menus Capture 23 Design Gallery 34 Photosmart Express 41 HP Photosmart R967 Digital Camera 61

User Guide
Page 62
... 60 O on/off 9 ON/OFF button 6 online destinations 43 print buying 43 optical zoom 18 P Panorama mode 20, 21, 33 parts of camera 6, 7, 8 Photosmart Express Menu buying prints online 43 marking images for printing 42 sharing images 43 tagging images as Favorites 42 pictures 13, 26 Playback 29 Playback...video clips 14 62 red-eye removal 19, 23, 36 Region 9 remaining pictures count 13 removing red eyes 23, 36 reset camera 47 Reset Settings 46 resolution 58 reviewing images 29 S safety precautions for batteries 54, 56 Saturation 25 Saved Settings, My Mode 22 selecting images for destinations 43, ...
... 60 O on/off 9 ON/OFF button 6 online destinations 43 print buying 43 optical zoom 18 P Panorama mode 20, 21, 33 parts of camera 6, 7, 8 Photosmart Express Menu buying prints online 43 marking images for printing 42 sharing images 43 tagging images as Favorites 42 pictures 13, 26 Playback 29 Playback...video clips 14 62 red-eye removal 19, 23, 36 Region 9 remaining pictures count 13 removing red eyes 23, 36 reset camera 47 Reset Settings 46 resolution 58 reviewing images 29 S safety precautions for batteries 54, 56 Saturation 25 Saved Settings, My Mode 22 selecting images for destinations 43, ...

