
User Guide
Page 3
...pictures...5 Install the battery...5 Charge the battery...6 Turn on the camera...6 Choose the language...6 Set the region...6 Set the date and time...7 Install and format an optional memory card 7 Install the software...8 Using your camera...8 Using the Touch Screen interface 8 Related information...9 2 Taking... video clips Taking pictures...12 Recording video clips...12 Instant Review...12 Auto focus and exposure...12 Optimizing focus...13 Using Focus Lock...13 Optimizing exposure...14 Using zoom...14 Optical zoom...14 Digital zoom...15 3 Setting options for taking pictures and recording ...
...pictures...5 Install the battery...5 Charge the battery...6 Turn on the camera...6 Choose the language...6 Set the region...6 Set the date and time...7 Install and format an optional memory card 7 Install the software...8 Using your camera...8 Using the Touch Screen interface 8 Related information...9 2 Taking... video clips Taking pictures...12 Recording video clips...12 Instant Review...12 Auto focus and exposure...12 Optimizing focus...13 Using Focus Lock...13 Optimizing exposure...14 Using zoom...14 Optical zoom...14 Digital zoom...15 3 Setting options for taking pictures and recording ...
User Guide
Page 4
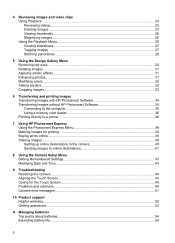
... video clips Using Playback...24 Reviewing videos...25 Deleting images...25 Viewing thumbnails...26 Magnifying images...26 Using the Playback Menu...26 Viewing slideshows...27 Tagging images ...27 Stitching panoramas...29 5 ... reader 36 Printing directly to a printer...36 7 Using HP Photosmart Express Using the Photosmart Express Menu 38 Marking images for printing...39 Buying prints online...39 Sharing images...40 Setting up online destinations in the camera 40 Sending images to online destinations 41 8 Using the Camera Setup Menu Setting Remembered Settings 43 Modifying Date and...
... video clips Using Playback...24 Reviewing videos...25 Deleting images...25 Viewing thumbnails...26 Magnifying images...26 Using the Playback Menu...26 Viewing slideshows...27 Tagging images ...27 Stitching panoramas...29 5 ... reader 36 Printing directly to a printer...36 7 Using HP Photosmart Express Using the Photosmart Express Menu 38 Marking images for printing...39 Buying prints online...39 Sharing images...40 Setting up online destinations in the camera 40 Sending images to online destinations 41 8 Using the Camera Setup Menu Setting Remembered Settings 43 Modifying Date and...

User Guide
Page 6
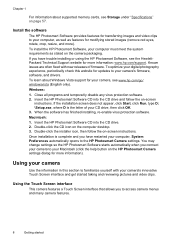
... Picture Capture or Video Record, reviews images when in Playback, and provides a Touch Screen interface for camera operations (see "Using the Touch Screen interface" on page 8). 4 Getting started Use this section to get familiar with the camera controls, set up your digital camera for use, and begin taking pictures. 1 Getting started Camera top, side, and back...
... Picture Capture or Video Record, reviews images when in Playback, and provides a Touch Screen interface for camera operations (see "Using the Touch Screen interface" on page 8). 4 Getting started Use this section to get familiar with the camera controls, set up your digital camera for use, and begin taking pictures. 1 Getting started Camera top, side, and back...
User Guide
Page 10
...digital photography experience, periodically check this section to your camera's firmware, software, and drivers. Double-click the CD icon on -screen instructions. Using your camera Use the information in this website for updates to familiarize yourself with new releases of your camera's innovative Touch Screen interface and get started Windows: 1. Insert the HP Photosmart... automatically opens to access camera menus and many camera features. 8 Getting started taking and reviewing pictures and video clips. Install the software The HP Photosmart Software provides features for ...
...digital photography experience, periodically check this section to your camera's firmware, software, and drivers. Double-click the CD icon on -screen instructions. Using your camera Use the information in this website for updates to familiarize yourself with new releases of your camera's innovative Touch Screen interface and get started Windows: 1. Insert the HP Photosmart... automatically opens to access camera menus and many camera features. 8 Getting started taking and reviewing pictures and video clips. Install the software The HP Photosmart Software provides features for ...

User Guide
Page 11
...(as shown) or menu item on the Touch Screen. For information on enhancing your camera to turn off the Touch Screen overlay to a printer" on page 36. Press to a computer See "Transferring images with HP Photosmart Software" on page 34. For information on taking pictures" on page 5), you may...(shown above) to make Touch Screen selections. For example, touching exits the current screen or menu. • Whenever you can take and review pictures and video clips. For information on printing images See "Printing directly to view the display more clearly. NOTE: Overlay items on the ...
...(as shown) or menu item on the Touch Screen. For information on enhancing your camera to turn off the Touch Screen overlay to a printer" on page 36. Press to a computer See "Transferring images with HP Photosmart Software" on page 34. For information on taking pictures" on page 5), you may...(shown above) to make Touch Screen selections. For example, touching exits the current screen or menu. • Whenever you can take and review pictures and video clips. For information on printing images See "Printing directly to view the display more clearly. NOTE: Overlay items on the ...
User Guide
Page 14
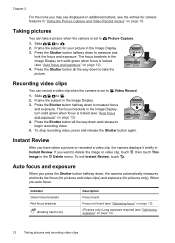
... to measure focus and exposure. Frame the subject for your picture in Instant Review. Recording video clips You can take the picture. Instant Review After you have taken a picture or recorded a video clip, the camera displays it briefly in the Image Display. 3. Press the Shutter button all... Picture Capture and Video Record menus" on page 18. To exit Instant Review, touch . Frame the subject in the Image Display. 3. Auto focus and exposure When you press the Shutter button halfway down, the camera automatically measures and locks the focus (for pictures and video clips) and...
... to measure focus and exposure. Frame the subject for your picture in Instant Review. Recording video clips You can take the picture. Instant Review After you have taken a picture or recorded a video clip, the camera displays it briefly in the Image Display. 3. Press the Shutter button all... Picture Capture and Video Record menus" on page 18. To exit Instant Review, touch . Frame the subject in the Image Display. 3. Auto focus and exposure When you press the Shutter button halfway down, the camera automatically measures and locks the focus (for pictures and video clips) and...

User Guide
Page 20
...the second picture. Unless otherwise noted, the setting remains in the panoramic sequence. 3. Touch or to Picture Capture. 2. During Instant Review (see "Setting Remembered Settings" on page 43). 18 Setting options for taking pictures while the Video Record Menu displays only features ...Entire Panoramic Sequence. Chapter 3 software" on page 8), you can also stitch panoramas automatically as you specified when you turn off the camera (see "Instant Review" on page 12), each image in Picture Capture, touch the icon corresponding to display the option's menu. 3. When the last...
...the second picture. Unless otherwise noted, the setting remains in the panoramic sequence. 3. Touch or to Picture Capture. 2. During Instant Review (see "Setting Remembered Settings" on page 43). 18 Setting options for taking pictures while the Video Record Menu displays only features ...Entire Panoramic Sequence. Chapter 3 software" on page 8), you can also stitch panoramas automatically as you specified when you turn off the camera (see "Instant Review" on page 12), each image in Picture Capture, touch the icon corresponding to display the option's menu. 3. When the last...
User Guide
Page 22
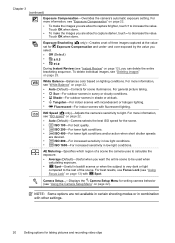
... Balance" on page 12), you are about to capture brighter, touch + to increase the value. Chapter 3 (continued) Exposure Compensation-Overrides the camera's automatic exposure setting. For more information, see "Instant Review" on page 22. • Auto (Default)-Corrects for scene illuminance. For general picture taking pictures and recording video clips For best...
... Balance" on page 12), you are about to capture brighter, touch + to increase the value. Chapter 3 (continued) Exposure Compensation-Overrides the camera's automatic exposure setting. For more information, see "Instant Review" on page 22. • Auto (Default)-Corrects for scene illuminance. For general picture taking pictures and recording video clips For best...
User Guide
Page 23
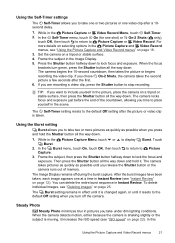
... button to Picture Capture. 3. Using the Burst setting Burst allows you to take one or two pictures or one at a time in Instant Review (see "Instant Review" on page 22). Then press the Shutter button all the way down and hold the Shutter button all the way down . 1. You can... the Picture Capture Menu, touch or to place yourself in the scene. Steady Photo Steady Photo minimizes blur in pictures you chose On-2 Shots, the camera takes the second picture a few seconds after a 10second delay. 1. Press the Shutter button halfway down to lock focus and exposure. To delete individual ...
... button to Picture Capture. 3. Using the Burst setting Burst allows you to take one or two pictures or one at a time in Instant Review (see "Instant Review" on page 22). Then press the Shutter button all the way down and hold the Shutter button all the way down . 1. You can... the Picture Capture Menu, touch or to place yourself in the scene. Steady Photo Steady Photo minimizes blur in pictures you chose On-2 Shots, the camera takes the second picture a few seconds after a 10second delay. 1. Press the Shutter button halfway down to lock focus and exposure. To delete individual ...
User Guide
Page 26
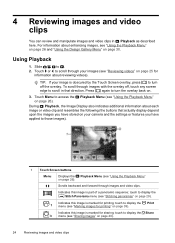
... (see "Marking images for sharing; Using Playback 1. touch to display the Print 1 menu (see "Stitching panoramas" on page 29). 4 Reviewing images and video clips You can review and manipulate images and video clips in that actually display depend upon the images you have applied to access the Playback Menu... (see "Using the Playback Menu" on page 26 and "Using the Design Gallery Menu" on page 30. TIP: If your camera and the ...
... (see "Marking images for sharing; Using Playback 1. touch to display the Print 1 menu (see "Stitching panoramas" on page 29). 4 Reviewing images and video clips You can review and manipulate images and video clips in that actually display depend upon the images you have applied to access the Playback Menu... (see "Using the Playback Menu" on page 26 and "Using the Design Gallery Menu" on page 30. TIP: If your camera and the ...
User Guide
Page 27
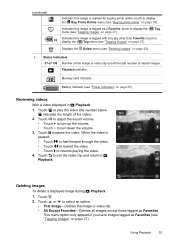
... image is marked for buying prints online; Displays the Delete menu (see "Tagging images" on page 55). Deleting images To delete a displayed image during Playback: 1. Reviewing videos With a video displayed in Playback: 1. touch to display the Tag menu (see "Deleting images" on page 39). Indicates this image or video clip out...
... image is marked for buying prints online; Displays the Delete menu (see "Tagging images" on page 55). Deleting images To delete a displayed image during Playback: 1. Reviewing videos With a video displayed in Playback: 1. touch to display the Tag menu (see "Deleting images" on page 39). Indicates this image or video clip out...

User Guide
Page 28
...Playback Menu 1. Touch an image to use and follow the on the Zoom lever). Once in Playback, press Thumbnails (same as Zoom In on -camera instructions. 2. Use and to Playback. Touch to return to change the magnification. 4. While in Thumbnails view, you want to exit Thumbnails and ... press (same as Zoom Out on that date. 4. Touch repeatedly to return to scroll through the thumbnails. 5. Touch or to Playback. 26 Reviewing images and video clips Touch any option to select the option, or touch to exit without deleting and return to adjust your view. Touch a ...
...Playback Menu 1. Touch an image to use and follow the on the Zoom lever). Once in Playback, press Thumbnails (same as Zoom In on -camera instructions. 2. Use and to Playback. Touch to return to change the magnification. 4. While in Thumbnails view, you want to exit Thumbnails and ... press (same as Zoom Out on that date. 4. Touch repeatedly to return to scroll through the thumbnails. 5. Touch or to Playback. 26 Reviewing images and video clips Touch any option to select the option, or touch to exit without deleting and return to adjust your view. Touch a ...
User Guide
Page 30
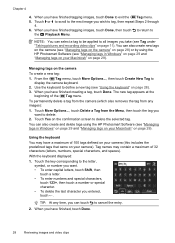
...return to define a new tag (see Tag under "Taking pictures and recording video clips" on your camera). To permanently delete a tag from the camera (which also removes the tag from the Menu, then touch the tag you wish to delete. ... "Managing tags on page 11). You can also create new tags on the camera (see "Managing tags on the camera" on page 28) or by using the HP Photosmart Software (see "Managing tags in Windows" on page 29 and "Managing tags on... character. • To delete the last character you have finished, touch Done. 28 Reviewing images and video clips Chapter 4 4.
...return to define a new tag (see Tag under "Taking pictures and recording video clips" on your camera). To permanently delete a tag from the camera (which also removes the tag from the Menu, then touch the tag you wish to delete. ... "Managing tags on page 11). You can also create new tags on the camera (see "Managing tags on the camera" on page 28) or by using the HP Photosmart Software (see "Managing tags in Windows" on page 29 and "Managing tags on... character. • To delete the last character you have finished, touch Done. 28 Reviewing images and video clips Chapter 4 4.
User Guide
Page 36
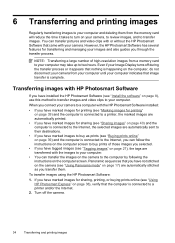
... selected. • If you have installed the HP Photosmart Software (see "Tagging images" on page 27), the tags are transferred with the images to your computer. • You can transfer the images on the camera to the computer by following the instructions on your camera, to review images, and to transfer images. You can follow...
... selected. • If you have installed the HP Photosmart Software (see "Tagging images" on page 27), the tags are transferred with the images to your computer. • You can transfer the images on the camera to the computer by following the instructions on your camera, to review images, and to transfer images. You can follow...

User Guide
Page 48
..."Install and format an optional memory card" on page 44). • Replace or recharge the battery. Chapter 9 It takes the camera a long time to turn on. • Your camera may be slower to turn on if you have a high capacity (4GB or larger) memory card inserted. • Having a ... if the camera works, replace the memory card. • Format the internal memory and/or the memory card (see "Resetting the camera" on . Press to a computer. • Replace or recharge the battery. • Reset the camera (see "Install and format an optional memory card" on page 34) and review them there.
..."Install and format an optional memory card" on page 44). • Replace or recharge the battery. Chapter 9 It takes the camera a long time to turn on. • Your camera may be slower to turn on if you have a high capacity (4GB or larger) memory card inserted. • Having a ... if the camera works, replace the memory card. • Format the internal memory and/or the memory card (see "Resetting the camera" on . Press to a computer. • Replace or recharge the battery. • Reset the camera (see "Install and format an optional memory card" on page 34) and review them there.
User Guide
Page 51
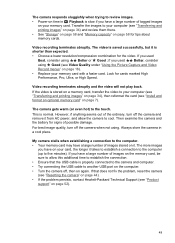
... Playback is slow if you have a large number of tagged images on your memory card. The camera responds sluggishly when trying to the touch. The camera gets warm (or even hot) to review images. • Power-on again. This is shorter than expected. • Choose a lower resolution/compression...Hewlett-Packard Technical Support (see Video Quality under "Using the Picture Capture and Video Record menus" on the computer. • Turn the camera off the camera when not using Good (see "Product support" on page 58 for cards marked High Performance, Pro, Ultra, or High Speed. Look ...
... Playback is slow if you have a large number of tagged images on your memory card. The camera responds sluggishly when trying to the touch. The camera gets warm (or even hot) to review images. • Power-on again. This is shorter than expected. • Choose a lower resolution/compression...Hewlett-Packard Technical Support (see Video Quality under "Using the Picture Capture and Video Record menus" on the computer. • Turn the camera off the camera when not using Good (see "Product support" on page 58 for cards marked High Performance, Pro, Ultra, or High Speed. Look ...
User Guide
Page 54
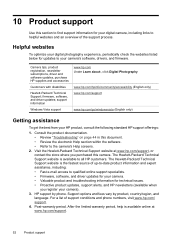
... limited warranty period, help is available online at www.hp.com/support, or contact the store where you register your camera). 3. 10 Product support Use this section to find support information for your digital camera, including links to helpful websites and an overview of... Technical Support website is available to the camera's Help screens. 2. Consult the product documentation. • Review "Troubleshooting" on page 44 in this document. • Review the electronic Help section within the software. • Refer to all HP customers. Post-warranty period. For a list...
... limited warranty period, help is available online at www.hp.com/support, or contact the store where you register your camera). 3. 10 Product support Use this section to find support information for your digital camera, including links to helpful websites and an overview of... Technical Support website is available to the camera's Help screens. 2. Consult the product documentation. • Review "Troubleshooting" on page 44 in this document. • Review the electronic Help section within the software. • Refer to all HP customers. Post-warranty period. For a list...
User Guide
Page 57
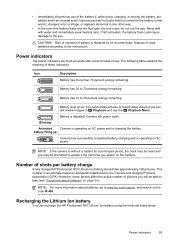
...Camera is operating on the code R-400. Power indicators 55 Number of shots per battery charge A fully charged HP Photosmart... video clips but you can recharge the HP Photosmart R07 Lithium Ion battery using , charging,...Camera will be prompted to www.hp.com/support, and search on AC power and is replaced by the Camera and Imaging Products Association (CIPA). NOTE: If the camera.... Battery is low. battery filling up Camera has successfully completed battery charging and is ...indicators. This number is operating on the camera. However, many factors affect the actual ...
...Camera is operating on the code R-400. Power indicators 55 Number of shots per battery charge A fully charged HP Photosmart... video clips but you can recharge the HP Photosmart R07 Lithium Ion battery using , charging,...Camera will be prompted to www.hp.com/support, and search on AC power and is replaced by the Camera and Imaging Products Association (CIPA). NOTE: If the camera.... Battery is low. battery filling up Camera has successfully completed battery charging and is ...indicators. This number is operating on the camera. However, many factors affect the actual ...
User Guide
Page 62
...Camera Setup Menu 42 Camera Sounds 42 caring for the Touch Screen 44 Close-up mode 17 color depth 57 colors 32 compression format 58 computer, connect to 34, 35 correcting images 31 D Date & Time 7, 42 Date & Time Imprint 19 deleting images 25 Design Gallery 30 digital...34 install memory card 7 install software 8 Instant Review 12, 18, 21 internal memory 11, 58 ISO...HP Photosmart Software 8 I Image Display 4 Image Quality 19, 58 images correcting 31 Date & Time Imprint 19 deleting 25 Image Quality 19, 58 magnifying 26 number remaining 11 L Landscape mode 17 Language 6, 42 LEDs 4 lights on camera...
...Camera Setup Menu 42 Camera Sounds 42 caring for the Touch Screen 44 Close-up mode 17 color depth 57 colors 32 compression format 58 computer, connect to 34, 35 correcting images 31 D Date & Time 7, 42 Date & Time Imprint 19 deleting images 25 Design Gallery 30 digital...34 install memory card 7 install software 8 Instant Review 12, 18, 21 internal memory 11, 58 ISO...HP Photosmart Software 8 I Image Display 4 Image Quality 19, 58 images correcting 31 Date & Time Imprint 19 deleting 25 Image Quality 19, 58 magnifying 26 number remaining 11 L Landscape mode 17 Language 6, 42 LEDs 4 lights on camera...

User Guide
Page 63
Index O on/off 6 online destinations 40 print buying 39 optical zoom 14 P Panorama mode 17, 29 parts of camera 4, 5 Photosmart Express Menu buying prints online 39 marking images for printing 39 sharing images 40 Picture Capture Menu 18 pictures 12, 21 Playback 24 ... record video clips 12 red-eye removal 16, 30 Region 6 remaining pictures count 11 Remembered Settings 42 removing red eyes 30 reset camera 44 resolution 57 reviewing images 24 reviewing videos 25 rotating images 31 S safety precautions for batteries 54, 56 selecting images for destinations 40, 41 selecting images for printing 39 ...
Index O on/off 6 online destinations 40 print buying 39 optical zoom 14 P Panorama mode 17, 29 parts of camera 4, 5 Photosmart Express Menu buying prints online 39 marking images for printing 39 sharing images 40 Picture Capture Menu 18 pictures 12, 21 Playback 24 ... record video clips 12 red-eye removal 16, 30 Region 6 remaining pictures count 11 Remembered Settings 42 removing red eyes 30 reset camera 44 resolution 57 reviewing images 24 reviewing videos 25 rotating images 31 S safety precautions for batteries 54, 56 selecting images for destinations 40, 41 selecting images for printing 39 ...
