Quick Start Guide
Page 5
...Turn on the camera 10 Choose the language 10 Set the region 11 Set the date and time 11 Install and format an optional memory card 12 Install the software 13 3 Taking pictures and recording video clips 15 Take a still picture 15 Record a video clip 15 4 Reviewing and deleting images... and video clips 17 Review images and video clips 17 Delete an image 17 5 Transferring and printing images 18 Transfer images 18 Print images from the...
...Turn on the camera 10 Choose the language 10 Set the region 11 Set the date and time 11 Install and format an optional memory card 12 Install the software 13 3 Taking pictures and recording video clips 15 Take a still picture 15 Record a video clip 15 4 Reviewing and deleting images... and video clips 17 Review images and video clips 17 Delete an image 17 5 Transferring and printing images 18 Transfer images 18 Print images from the...

Quick Start Guide
Page 19
Slide to scroll through your images and video clips. To play a video clip, press once the first screen of the clip appears on the Image Display. Delete an image You can review images and video clips in Playback. 1. Use to . 2. 4 Reviewing and deleting images and video clips Review images and video clips You can delete individual images during Playback: 1. Press to select an image or video clip. 3. Reviewing and deleting images and video clips 17 Use to display the Delete sub-menu. 4. Slide to select This Image, then press . Use to . 2.
Slide to scroll through your images and video clips. To play a video clip, press once the first screen of the clip appears on the Image Display. Delete an image You can review images and video clips in Playback. 1. Use to . 2. 4 Reviewing and deleting images and video clips Review images and video clips You can delete individual images during Playback: 1. Press to select an image or video clip. 3. Reviewing and deleting images and video clips 17 Use to display the Delete sub-menu. 4. Slide to select This Image, then press . Use to . 2.
Quick Start Guide
Page 22
... Playback, slide to specific selections. ● To exit the menu, press at any time. You can select from the following options: ● Self-Timer 20 HP Photosmart R837 Digital Camera Camera Menus Menus allow you review and delete images and video clips. To access this chapter as a quick reference to , then press...
... Playback, slide to specific selections. ● To exit the menu, press at any time. You can select from the following options: ● Self-Timer 20 HP Photosmart R837 Digital Camera Camera Menus Menus allow you review and delete images and video clips. To access this chapter as a quick reference to , then press...
Quick Start Guide
Page 25
menu, press from the following options: ● Top Ten Tips ● Camera Accessories ● Camera Buttons ● Using Shooting Modes ● Using Design Gallery ● Using Photosmart Express ● Printing Images ● Recording Video Clips ● Reviewing Pictures and Video ● Tagging Images ● Deleting Images ● Transferring Images ● Managing Batteries ● Getting Assistance ● Tour Camera Features ● Camera Shortcuts ● About Camera quick reference 23 You can select from , , or , then select Camera Help.
menu, press from the following options: ● Top Ten Tips ● Camera Accessories ● Camera Buttons ● Using Shooting Modes ● Using Design Gallery ● Using Photosmart Express ● Printing Images ● Recording Video Clips ● Reviewing Pictures and Video ● Tagging Images ● Deleting Images ● Transferring Images ● Managing Batteries ● Getting Assistance ● Tour Camera Features ● Camera Shortcuts ● About Camera quick reference 23 You can select from , , or , then select Camera Help.
User Guide
Page 3
... 8 Set the date and time 8 Install and format an optional memory card 9 Install the software 9 Using your camera 10 2 Taking pictures and recording video clips 11 Taking pictures...11 Recording video clips 12 Instant Review...12 Auto focus and exposure 12 Focusing on the subject 12 Optimizing focus 13 Using Focus Lock... menus 18 Using the Self-Timer settings 21 Using the Burst setting 21 Adaptive Lighting 22 Exposure Compensation 22 White Balance 22 ISO speed...22 HP Photosmart R837 Digital Camera 3
... 8 Set the date and time 8 Install and format an optional memory card 9 Install the software 9 Using your camera 10 2 Taking pictures and recording video clips 11 Taking pictures...11 Recording video clips 12 Instant Review...12 Auto focus and exposure 12 Focusing on the subject 12 Optimizing focus 13 Using Focus Lock... menus 18 Using the Self-Timer settings 21 Using the Burst setting 21 Adaptive Lighting 22 Exposure Compensation 22 White Balance 22 ISO speed...22 HP Photosmart R837 Digital Camera 3
User Guide
Page 4
4 Reviewing images and video clips 24 Using Playback...24 Deleting images 25 Viewing thumbnails 25 Magnifying images 25 Using the Playback Menu 26 Tagging images 26 ... card reader 33 Printing directly to a printer 33 7 Using HP Photosmart Express 36 Using the Photosmart Express Menu 36 Marking images for printing 36 Buying prints online 37 Sharing images...37 Setting up online destinations in the camera 38 Sending images to online destinations 38 8 Using the Camera Setup Menu 39 9 Troubleshooting 41 Resetting the...
4 Reviewing images and video clips 24 Using Playback...24 Deleting images 25 Viewing thumbnails 25 Magnifying images 25 Using the Playback Menu 26 Tagging images 26 ... card reader 33 Printing directly to a printer 33 7 Using HP Photosmart Express 36 Using the Photosmart Express Menu 36 Marking images for printing 36 Buying prints online 37 Sharing images...37 Setting up online destinations in the camera 38 Sending images to online destinations 38 8 Using the Camera Setup Menu 39 9 Troubleshooting 41 Resetting the...
User Guide
Page 5
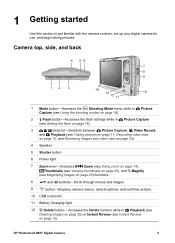
HP Photosmart R837 Digital Camera 5 Camera top, side, and back 4 56 7 8 9 12 3 14 13 12 11 10 1 Mode button-Accesses the Shooting Mode menu while in Picture Capture (see Using the shooting modes on page 16). 2 Flash button-Accesses the flash settings while in Playback (see Deleting images on page 25) or Instant Review (see Magnifying images on...
HP Photosmart R837 Digital Camera 5 Camera top, side, and back 4 56 7 8 9 12 3 14 13 12 11 10 1 Mode button-Accesses the Shooting Mode menu while in Picture Capture (see Using the shooting modes on page 16). 2 Flash button-Accesses the flash settings while in Playback (see Deleting images on page 25) or Instant Review (see Magnifying images on...

User Guide
Page 10
... and Recording video clips on page 32. Chapter 1 About the HP Photosmart Software The CD that you've completed setup, you can take and review pictures and video clips. For information on reviewing images and See Reviewing images and video clips video clips on the camera on page 33. Tip To switch between Picture Capture, Video...
... and Recording video clips on page 32. Chapter 1 About the HP Photosmart Software The CD that you've completed setup, you can take and review pictures and video clips. For information on reviewing images and See Reviewing images and video clips video clips on the camera on page 33. Tip To switch between Picture Capture, Video...

User Guide
Page 12
... stop recording video, press and release the Shutter button again. If you press the Shutter button halfway down , the camera searches for focus within the focus brackets. Instant Review After you follow the suggestions for pictures only). Focus not found . Press the Shutter button halfway down and release to...video clip, press , select This Image from the Delete sub-menu, then press . When you press the Shutter button halfway down , the camera automatically measures and locks the focus (for pictures and video clips) and exposure (for focus and exposure and your subject, use Focus Lock (...
... stop recording video, press and release the Shutter button again. If you press the Shutter button halfway down , the camera searches for focus within the focus brackets. Instant Review After you follow the suggestions for pictures only). Focus not found . Press the Shutter button halfway down and release to...video clip, press , select This Image from the Delete sub-menu, then press . When you press the Shutter button halfway down , the camera automatically measures and locks the focus (for pictures and video clips) and exposure (for focus and exposure and your subject, use Focus Lock (...
User Guide
Page 18
... option, then press to or , then press . 2. in Picture Capture, press Mode, use sub-menu, then press . During Instant Review (see Instant Review on page 9), you can also stitch panoramas automatically as you transfer them to take the second picture. to take the second picture. 5. ...Position the camera to left), then press . 2. The Picture Capture Menu displays only those features available for taking pictures ...
... option, then press to or , then press . 2. in Picture Capture, press Mode, use sub-menu, then press . During Instant Review (see Instant Review on page 9), you can also stitch panoramas automatically as you transfer them to take the second picture. to take the second picture. 5. ...Position the camera to left), then press . 2. The Picture Capture Menu displays only those features available for taking pictures ...

User Guide
Page 20
..., even when you select using . ● Off (Default) ● ± 0.5 ● ±1.0 During Instant Review (see Deleting images on page 12), you are desired. Exposure Compensation-Overrides the camera's automatic exposure setting. To delete individual images, see Instant Review on page 25. For general picture taking. ● Sun-For outdoor scenes in sunny...
..., even when you select using . ● Off (Default) ● ± 0.5 ● ±1.0 During Instant Review (see Deleting images on page 12), you are desired. Exposure Compensation-Overrides the camera's automatic exposure setting. To delete individual images, see Instant Review on page 25. For general picture taking. ● Sun-For outdoor scenes in sunny...
User Guide
Page 21
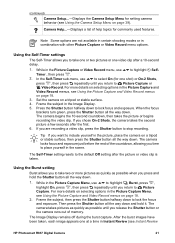
... press the Shutter button all the way down . If you return to place yourself in the Picture Capture Menu, see Instant Review HP Photosmart R837 Digital Camera 21 Frame the subject in combination with other Picture Capture or Video Record menu options. The Image Display remains off during the ...menu, use to highlight Burst, press , highlight On, press , then press repeatedly until you time to Picture Capture. While in Instant Review (see Using the Picture Capture and Video Record menus on a tripod or stable surface. 4. Frame the subject, then press the Shutter ...
... press the Shutter button all the way down . If you return to place yourself in the Picture Capture Menu, see Instant Review HP Photosmart R837 Digital Camera 21 Frame the subject in combination with other Picture Capture or Video Record menu options. The Image Display remains off during the ...menu, use to highlight Burst, press , highlight On, press , then press repeatedly until you time to Picture Capture. While in Instant Review (see Using the Picture Capture and Video Record menus on a tripod or stable surface. 4. Frame the subject, then press the Shutter ...
User Guide
Page 22
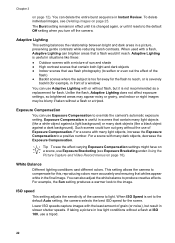
...speed This setting adjusts the sensitivity of Exposure Compensation. If taking a picture in Instant Review. When used with a flash, Adaptive Lighting can use Exposure Compensation to light. Such scenes could turn off the camera. Lower ISO speeds capture images with the least amount of a window) You can use...noisy or grainy, and indoor or night images may be blurry if taken without a flash at ISO 100, use of the camera to override the camera's automatic exposure setting. Tip To see Exposure Bracketing under Using the Picture Capture and Video Record menus on page 18). This ...
...speed This setting adjusts the sensitivity of Exposure Compensation. If taking a picture in Instant Review. When used with a flash, Adaptive Lighting can use Exposure Compensation to light. Such scenes could turn off the camera. Lower ISO speeds capture images with the least amount of a window) You can use...noisy or grainy, and indoor or night images may be blurry if taken without a flash at ISO 100, use of the camera to override the camera's automatic exposure setting. Tip To see Exposure Bracketing under Using the Picture Capture and Video Record menus on page 18). This ...

User Guide
Page 24
..., use to play video clips; press to resume playing the video. If tagged as described here. press to pause a clip. Use to . 2. 4 Reviewing images and video clips You can review and manipulate images and video clips in a panoramic sequence. 6 Tagged image (see Using the Playback Menu on page 26 and Using the...
..., use to play video clips; press to resume playing the video. If tagged as described here. press to pause a clip. Use to . 2. 4 Reviewing images and video clips You can review and manipulate images and video clips in a panoramic sequence. 6 Tagged image (see Using the Playback Menu on page 26 and Using the...
User Guide
Page 44
...Install and format an optional memory card on page 9). ● If your memory cards are not images or videos recognized by the camera. A new type of High Capacity Secure Digital (marked SDHC) memory card is stored on a memory card, transfer the video to your memory card in internal memory. If you... remove it does not show the expected capacity, consider replacing the memory card. The camera gets warm (or even hot) to review images. This is stored in the camera and it from AC power, and allow the camera to Card under Using the Picture Capture and Video Record menus on page 18). &#...
...Install and format an optional memory card on page 9). ● If your memory cards are not images or videos recognized by the camera. A new type of High Capacity Secure Digital (marked SDHC) memory card is stored on a memory card, transfer the video to your memory card in internal memory. If you... remove it does not show the expected capacity, consider replacing the memory card. The camera gets warm (or even hot) to review images. This is stored in the camera and it from AC power, and allow the camera to Card under Using the Picture Capture and Video Record menus on page 18). &#...

User Guide
Page 46
... digital camera, including links to find support information for your HP product, consult the following standard HP support offerings: 1. support information www.hp.com/support Getting assistance To get the best from your camera. - Visit the Hewlett-Packard Technical Support website at www.hp.com/support. 46 Software and driver updates for your camera's software, drivers, and firmware. Review...
... digital camera, including links to find support information for your HP product, consult the following standard HP support offerings: 1. support information www.hp.com/support Getting assistance To get the best from your camera. - Visit the Hewlett-Packard Technical Support website at www.hp.com/support. 46 Software and driver updates for your camera's software, drivers, and firmware. Review...
User Guide
Page 49
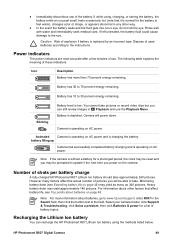
...battery leaks and the fluid gets into one's eye, do not rub the eye. Note For more than 70 percent energy remaining. HP Photosmart R837 Digital Camera 49 Select your camera model, click Support & Troubleshooting, click Solve a problem, then click Batteries & power for a prolonged period, the clock may be...AC power and is operating on AC power. Recharging the Lithium Ion battery You can still review images in Playback and use the Playback Menu. battery filling up Camera has successfully completed battery charging and is charging the battery. Number of these indicators. Power ...
...battery leaks and the fluid gets into one's eye, do not rub the eye. Note For more than 70 percent energy remaining. HP Photosmart R837 Digital Camera 49 Select your camera model, click Support & Troubleshooting, click Solve a problem, then click Batteries & power for a prolonged period, the clock may be...AC power and is operating on AC power. Recharging the Lithium Ion battery You can still review images in Playback and use the Playback Menu. battery filling up Camera has successfully completed battery charging and is charging the battery. Number of these indicators. Power ...
User Guide
Page 55
...tagging 26 transfer to computer 32 install memory card 9 install software 9 Instant Review 12, 18, 22 interfaces 53 internal memory 11, 53 ISO Speed 20, 22 L Landscape mode 17 Language 8, 40 LEDs 5 lens 6 lights on camera 5 Lithium Ion battery 48, 50 M Magnify control 5 magnifying images 25... 53 card 11 card door 6 memory card 9, 53 Menu/OK button 5 menus Camera Setup 39 Design Gallery 28 Photosmart Express 36 Picture Capture 18 Playback 26 Video Record 18 microphone 6 modifying colors 30 Move Images to Card 26 N Night Portrait mode 17 number of pictures 54 HP Photosmart R837 Digital Camera 55
...tagging 26 transfer to computer 32 install memory card 9 install software 9 Instant Review 12, 18, 22 interfaces 53 internal memory 11, 53 ISO Speed 20, 22 L Landscape mode 17 Language 8, 40 LEDs 5 lens 6 lights on camera 5 Lithium Ion battery 48, 50 M Magnify control 5 magnifying images 25... 53 card 11 card door 6 memory card 9, 53 Menu/OK button 5 menus Camera Setup 39 Design Gallery 28 Photosmart Express 36 Picture Capture 18 Playback 26 Video Record 18 microphone 6 modifying colors 30 Move Images to Card 26 N Night Portrait mode 17 number of pictures 54 HP Photosmart R837 Digital Camera 55
User Guide
Page 56
... remaining 11 O on/off 7 online destinations 37, 38 print buying 37 optical zoom 14 P Panorama mode 17, 27 parts of camera 5, 6 Photosmart Express Menu buying prints online 37 marking images for printing 36 sharing images 37 Picture Capture Menu 18 pictures 11, 21 Playback 24 Playback...41 product support 46 R record video clips 12 red-eye removal 16, 28 Region 8 remaining pictures count 11 removing red eyes 28 reset camera 41 resolution 52 reviewing images 24 S safety precautions for batteries 48, 50 selecting images for destinations 37, 38 selecting images for printing 36 Self-Timer light 6 ...
... remaining 11 O on/off 7 online destinations 37, 38 print buying 37 optical zoom 14 P Panorama mode 17, 27 parts of camera 5, 6 Photosmart Express Menu buying prints online 37 marking images for printing 36 sharing images 37 Picture Capture Menu 18 pictures 11, 21 Playback 24 Playback...41 product support 46 R record video clips 12 red-eye removal 16, 28 Region 8 remaining pictures count 11 removing red eyes 28 reset camera 41 resolution 52 reviewing images 24 S safety precautions for batteries 48, 50 selecting images for destinations 37, 38 selecting images for printing 36 Self-Timer light 6 ...

