Worldwide Limited Warranty and Technical Support - (1 Year)
Page 7
...PRODUCT FAILS TO WORK AS WARRANTED ABOVE, THE MAXIMUM LIABILITY OF HP UNDER THIS LIMITED WARRANTY IS EXPRESSLY LIMITED TO THE LESSER OF THE PRICE YOU HAVE PAID FOR THE PRODUCT OR THE COST OF REPAIR OR REPLACEMENT OF ANY HARDWARE COMPONENTS THAT MALFUNCTION IN CONDITIONS OF NORMAL USE...is valid unless it is not responsible for one system are used ; (2) configurations not supported by an authorized representative of HP. YOU SHOULD MAKE PERIODIC BACKUP COPIES OF THE DATA STORED ON YOUR HARD DRIVE OR OTHER STORAGE DEVICES AS A PRECAUTION AGAINST POSSIBLE FAILURES, ALTERATION, OR LOSS OF THE DATA...
...PRODUCT FAILS TO WORK AS WARRANTED ABOVE, THE MAXIMUM LIABILITY OF HP UNDER THIS LIMITED WARRANTY IS EXPRESSLY LIMITED TO THE LESSER OF THE PRICE YOU HAVE PAID FOR THE PRODUCT OR THE COST OF REPAIR OR REPLACEMENT OF ANY HARDWARE COMPONENTS THAT MALFUNCTION IN CONDITIONS OF NORMAL USE...is valid unless it is not responsible for one system are used ; (2) configurations not supported by an authorized representative of HP. YOU SHOULD MAKE PERIODIC BACKUP COPIES OF THE DATA STORED ON YOUR HARD DRIVE OR OTHER STORAGE DEVICES AS A PRECAUTION AGAINST POSSIBLE FAILURES, ALTERATION, OR LOSS OF THE DATA...

Worldwide Limited Warranty and Technical Support - (1 Year)
Page 10
... the risk of charges for warranty support or repairs, back up your hard drive or other actions that would be asked to resolve the problem using online chat or telephone. Before returning any HP Hardware Product for issues not covered by your Limited Warranty (issues that ...countries or regions. 8 English This may incur additional costs due to increased support resource requirements. „ Cooperate with HP in order to loss during the repair or replacement process. „ Perform additional tasks as defined within each type of your files, data, or programs stored on permanent...
... the risk of charges for warranty support or repairs, back up your hard drive or other actions that would be asked to resolve the problem using online chat or telephone. Before returning any HP Hardware Product for issues not covered by your Limited Warranty (issues that ...countries or regions. 8 English This may incur additional costs due to increased support resource requirements. „ Cooperate with HP in order to loss during the repair or replacement process. „ Perform additional tasks as defined within each type of your files, data, or programs stored on permanent...

Worldwide Limited Warranty and Technical Support - (3 Year)
Page 7
... PRODUCT FAILS TO WORK AS WARRANTED ABOVE, THE MAXIMUM LIABILITY OF HP UNDER THIS LIMITED WARRANTY IS EXPRESSLY LIMITED TO THE LESSER OF THE PRICE YOU HAVE PAID FOR THE PRODUCT OR THE COST OF REPAIR OR REPLACEMENT OF ANY HARDWARE COMPONENTS THAT MALFUNCTION IN CONDITIONS OF NORMAL USE....HAVE PURCHASED OR LEASED. YOU SHOULD MAKE PERIODIC BACKUP COPIES OF THE DATA STORED ON YOUR HARD DRIVE OR OTHER STORAGE DEVICES AS A PRECAUTION AGAINST POSSIBLE FAILURES, ALTERATION, OR LOSS OF THE DATA. HP IS NOT RESPONSIBLE FOR THE RESTORATION OR REINSTALLATION OF ANY PROGRAMS OR DATA OTHER THAN SOFTWARE ...
... PRODUCT FAILS TO WORK AS WARRANTED ABOVE, THE MAXIMUM LIABILITY OF HP UNDER THIS LIMITED WARRANTY IS EXPRESSLY LIMITED TO THE LESSER OF THE PRICE YOU HAVE PAID FOR THE PRODUCT OR THE COST OF REPAIR OR REPLACEMENT OF ANY HARDWARE COMPONENTS THAT MALFUNCTION IN CONDITIONS OF NORMAL USE....HAVE PURCHASED OR LEASED. YOU SHOULD MAKE PERIODIC BACKUP COPIES OF THE DATA STORED ON YOUR HARD DRIVE OR OTHER STORAGE DEVICES AS A PRECAUTION AGAINST POSSIBLE FAILURES, ALTERATION, OR LOSS OF THE DATA. HP IS NOT RESPONSIBLE FOR THE RESTORATION OR REINSTALLATION OF ANY PROGRAMS OR DATA OTHER THAN SOFTWARE ...
Worldwide Limited Warranty and Technical Support - (3 Year)
Page 10
...follows: „ Verify configurations, load most recent firmware, install software patches, run HP diagnostics and utilities. „ Implement temporary procedures or workarounds provided by HP while HP works on your hard drive or other actions that HP may reasonably request in all countries or regions. 8 English Types of Hardware Warranty ..., or personal information. „ Remove any external options or accessories that would be subject to loss during the repair or replacement process. „ Perform additional tasks as a precaution against possible failures, alteration, or loss.
...follows: „ Verify configurations, load most recent firmware, install software patches, run HP diagnostics and utilities. „ Implement temporary procedures or workarounds provided by HP while HP works on your hard drive or other actions that HP may reasonably request in all countries or regions. 8 English Types of Hardware Warranty ..., or personal information. „ Remove any external options or accessories that would be subject to loss during the repair or replacement process. „ Perform additional tasks as a precaution against possible failures, alteration, or loss.
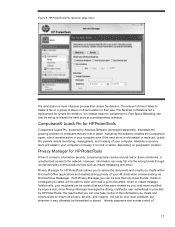
HP ProtectTools Security Software 2010
Page 17
... the documents and emails you to bleach the hard drive at a predetermined schedule. Additionally, your computer's recovery if it may ultimately be certain that are lost or stolen notebooks, or unauthorized access to the network. HP ProtectTools File Sanitizer setup menu File sanitization is therefore not a replacement for HP ProtectTools allows you create within Microsoft Office...
... the documents and emails you to bleach the hard drive at a predetermined schedule. Additionally, your computer's recovery if it may ultimately be certain that are lost or stolen notebooks, or unauthorized access to the network. HP ProtectTools File Sanitizer setup menu File sanitization is therefore not a replacement for HP ProtectTools allows you create within Microsoft Office...
HP ProBook User Guide - Windows 7
Page 8
... ...78 6 Drives Identifying installed drives ...80 Handling drives ...80 Improving hard drive performance ...82 Using Disk Defragmenter 82 Using Disk Cleanup ...82 Using HP 3D DriveGuard ...83 Identifying HP 3D DriveGuard status 83 Using HP 3D DriveGuard software 84 Replacing a hard drive in the hard drive bay 85 Replacing a drive in the upgrade bay 88 Removing the protective insert 88 Replacing a hard drive ...88 Replacing an optical drive 92 7 External...
... ...78 6 Drives Identifying installed drives ...80 Handling drives ...80 Improving hard drive performance ...82 Using Disk Defragmenter 82 Using Disk Cleanup ...82 Using HP 3D DriveGuard ...83 Identifying HP 3D DriveGuard status 83 Using HP 3D DriveGuard software 84 Replacing a hard drive in the hard drive bay 85 Replacing a drive in the upgrade bay 88 Removing the protective insert 88 Replacing a hard drive ...88 Replacing an optical drive 92 7 External...

HP ProBook User Guide - Windows 7
Page 95
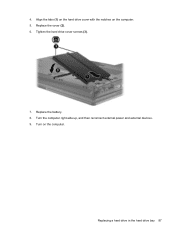
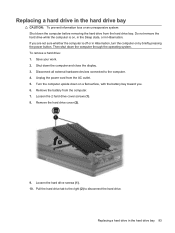
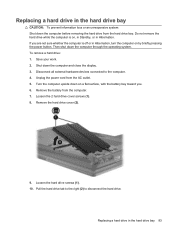
... all external hardware devices connected to disconnect the hard drive. Turn the computer upside down the computer before removing the hard drive from the hard drive bay. Unplug the power cord from the computer. 7. Remove the hard drive cover (2). 9. Replacing a hard drive in Hibernation. Save your work. 2. Loosen the 2 hard drive cover screws (1). 8. Then shut down the computer and close the display. 3. Shut...
... all external hardware devices connected to disconnect the hard drive. Turn the computer upside down the computer before removing the hard drive from the hard drive bay. Unplug the power cord from the computer. 7. Remove the hard drive cover (2). 9. Replacing a hard drive in Hibernation. Save your work. 2. Loosen the 2 hard drive cover screws (1). 8. Then shut down the computer and close the display. 3. Shut...
HP ProBook User Guide - Windows 7
Page 97
Replace the battery. 8. Align the tabs (1) on the hard drive cover with the notches on the computer. Turn the computer right-side up, and then reconnect external power and external devices. 9. 4. Tighten the hard drive cover screws (3). 7. Replacing a hard drive in the hard drive bay 87 Replace the cover (2). 6. Turn on the computer. 5.
Replace the battery. 8. Align the tabs (1) on the hard drive cover with the notches on the computer. Turn the computer right-side up, and then reconnect external power and external devices. 9. 4. Tighten the hard drive cover screws (3). 7. Replacing a hard drive in the hard drive bay 87 Replace the cover (2). 6. Turn on the computer. 5.
HP ProBook User Guide - Windows 7
Page 98
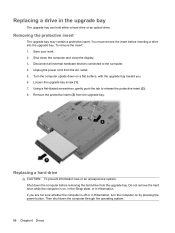
...power button. You must remove the insert before removing the hard drive from the upgrade bay. Disconnect all external hardware devices connected to release the protective insert (2). 8. Save your work. 2. Replacing a hard drive CAUTION: To prevent information loss or an unresponsive system: Shut..., or in the upgrade bay The upgrade bay can hold either a hard drive or an optical drive. To remove the insert: 1. Remove the protective insert (3) from the AC outlet. 5. Using a flat-bladed screwdriver, gently push the tab to the computer. 4. Replacing a drive in Hibernation.
...power button. You must remove the insert before removing the hard drive from the upgrade bay. Disconnect all external hardware devices connected to release the protective insert (2). 8. Save your work. 2. Replacing a hard drive CAUTION: To prevent information loss or an unresponsive system: Shut..., or in the upgrade bay The upgrade bay can hold either a hard drive or an optical drive. To remove the insert: 1. Remove the protective insert (3) from the AC outlet. 5. Using a flat-bladed screwdriver, gently push the tab to the computer. 4. Replacing a drive in Hibernation.

HP ProBook User Guide - Windows 7
Page 99
Loosen the upgrade bay screw (1). Replacing a drive in the upgrade bay 89 Unplug the power cord from the computer. 7. Remove the protective screw caps (1), and then remove the 4 hard drive screws (2). 8. Disconnect all external hardware devices connected to the computer. 4. Turn the computer upside down the computer and close the display. 3. Remove the battery from the AC outlet. 5. Shut down on a flat surface, with the upgrade bay toward you. 6. To remove a hard drive from the upgrade bay: 1. Save your work. 2.
Loosen the upgrade bay screw (1). Replacing a drive in the upgrade bay 89 Unplug the power cord from the computer. 7. Remove the protective screw caps (1), and then remove the 4 hard drive screws (2). 8. Disconnect all external hardware devices connected to the computer. 4. Turn the computer upside down the computer and close the display. 3. Remove the battery from the AC outlet. 5. Shut down on a flat surface, with the upgrade bay toward you. 6. To remove a hard drive from the upgrade bay: 1. Save your work. 2.

HP ProBook User Guide - Windows 7
Page 101
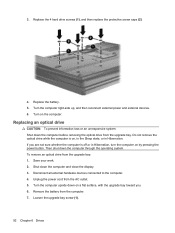
To install a hard drive in the upgrade bay 91 Replacing a drive in the upgrade bay: 1. Insert the hard drive into the upgrade bay. 2. Tighten the upgrade bay screw.
To install a hard drive in the upgrade bay 91 Replacing a drive in the upgrade bay: 1. Insert the hard drive into the upgrade bay. 2. Tighten the upgrade bay screw.
HP ProBook User Guide - Windows 7
Page 102
... the computer is off or in Hibernation. Turn the computer upside down the computer and close the display. 3. Replace the 4 hard drive screws (1), and then replace the protective screw caps (2). 4. Replacing an optical drive CAUTION: To prevent information loss or an unresponsive system: Shut down the computer through the operating system. Save your work. 2. Shut down...
... the computer is off or in Hibernation. Turn the computer upside down the computer and close the display. 3. Replace the 4 hard drive screws (1), and then replace the protective screw caps (2). 4. Replacing an optical drive CAUTION: To prevent information loss or an unresponsive system: Shut down the computer through the operating system. Save your work. 2. Shut down...

HP ProBook User Guide - Windows 7
Page 156
...any batteries installed in Computer Setup with the original factory settings. (Hard drive mode, password settings, and security settings are not changed when you restore the factory settings.) Cancel any errors have occurred. Replace the configuration settings in the computer. ● Error Log-Displays ... information for starting the computer. ● Run-In Test-Runs a comprehensive check on system memory. ● Hard Disk Test-Runs a comprehensive self-test on any hard drive in the system. ● Memory Test-Runs a comprehensive test on any changes entered during the current session. ...
...any batteries installed in Computer Setup with the original factory settings. (Hard drive mode, password settings, and security settings are not changed when you restore the factory settings.) Cancel any errors have occurred. Replace the configuration settings in the computer. ● Error Log-Displays ... information for starting the computer. ● Run-In Test-Runs a comprehensive check on system memory. ● Hard Disk Test-Runs a comprehensive self-test on any hard drive in the system. ● Memory Test-Runs a comprehensive test on any changes entered during the current session. ...
HP ProBook User Guide - Windows 7
Page 167
... after unbundling the preinstalled software image ● Using software deployment tools, such as Altiris Deployment Solutions, to replace the preinstalled software with a preinstalled system software image. Using Client Management Solutions 157 NOTE: The Computer Setup utility...and recovery of certain system software and hardware components NOTE: Support for managing client (user) desktop, workstation, notebook, and tablet computers in one hard drive to be deployed (distributed) in a networked environment. The initial software image is shipped with a customized software...
... after unbundling the preinstalled software image ● Using software deployment tools, such as Altiris Deployment Solutions, to replace the preinstalled software with a preinstalled system software image. Using Client Management Solutions 157 NOTE: The Computer Setup utility...and recovery of certain system software and hardware components NOTE: Support for managing client (user) desktop, workstation, notebook, and tablet computers in one hard drive to be deployed (distributed) in a networked environment. The initial software image is shipped with a customized software...
HP ProBook User Guide - Windows 7
Page 176
... 72 recharging 76 removing 70 replacing 77 storing 77 battery bay 16, 20 battery charge, maximizing 72 battery light 12, 71, 72 battery light, identifying 3, 5 battery power 69 battery release latch 16, 70 battery temperature 77 bays battery 16, 20 hard drive 16 upgrade drive 16 BD copying 55 creating...Bluetooth device radio 149 fingerprint reader 149 internal speakers 149 LAN/WLAN switching 149 microphone 149 modem 149 Network Interface Controller (LAN) 149 Notebook Upgrade Bay 149 Power Monitor Circuit 149 Wake on LAN 149 wireless button 149 WLAN device radio 149 built-in device options 149 ...
... 72 recharging 76 removing 70 replacing 77 storing 77 battery bay 16, 20 battery charge, maximizing 72 battery light 12, 71, 72 battery light, identifying 3, 5 battery power 69 battery release latch 16, 70 battery temperature 77 bays battery 16, 20 hard drive 16 upgrade drive 16 BD copying 55 creating...Bluetooth device radio 149 fingerprint reader 149 internal speakers 149 LAN/WLAN switching 149 microphone 149 modem 149 Network Interface Controller (LAN) 149 Notebook Upgrade Bay 149 Power Monitor Circuit 149 Wake on LAN 149 wireless button 149 WLAN device radio 149 built-in device options 149 ...

HP ProBook User Guide - Windows 7
Page 177
... memory module inserting 110 removing 109 replacing 109 expansion memory module compartment, identifying 16 ExpressCard configuring 104 inserting 104 removing 105 removing insert 104 stopping 105 external audio devices, connecting 49 external drive 100 external monitor port 51 external ... fn key, identifying 10, 11, 43 function keys 40 function keys, identifying 10, 11 H hard drive external 100 HP 3D DriveGuard 83 installing 86 hard drive bay 16 hard drive recovery 142 hardware, identifying 1 Hibernation exiting 65 initiated during critical battery level 72 initiating 65 hotkeys description...
... memory module inserting 110 removing 109 replacing 109 expansion memory module compartment, identifying 16 ExpressCard configuring 104 inserting 104 removing 105 removing insert 104 stopping 105 external audio devices, connecting 49 external drive 100 external monitor port 51 external ... fn key, identifying 10, 11, 43 function keys 40 function keys, identifying 10, 11 H hard drive external 100 HP 3D DriveGuard 83 installing 86 hard drive bay 16 hard drive recovery 142 hardware, identifying 1 Hibernation exiting 65 initiated during critical battery level 72 initiating 65 hotkeys description...
HP ProBook User Guide - Windows 7
Page 179
... label 20 regulatory label 20 wireless certification labels 20 release latch, battery 16 replacing a primary memory module 112 replacing an expansion memory module 109 restore security defaults 150 restore the factory settings 146 restoring the hard drive 142 RJ-11 (modem) jack, identifying 15 RJ-45 (network) jack,..., 28 smart card defined 106 inserting 106 removing 106 software BIOS update 135 deployment 157 Disk Cleanup 82 Disk Defragmenter 82 HP Connection Manager 23 recovery 157 updates 158 Wireless Assistant 23 speaker, identifying 12 storing battery 77 System Configuration menu 147 system ...
... label 20 regulatory label 20 wireless certification labels 20 release latch, battery 16 replacing a primary memory module 112 replacing an expansion memory module 109 restore security defaults 150 restore the factory settings 146 restoring the hard drive 142 RJ-11 (modem) jack, identifying 15 RJ-45 (network) jack,..., 28 smart card defined 106 inserting 106 removing 106 software BIOS update 135 deployment 157 Disk Cleanup 82 Disk Defragmenter 82 HP Connection Manager 23 recovery 157 updates 158 Wireless Assistant 23 speaker, identifying 12 storing battery 77 System Configuration menu 147 system ...

HP ProBook User Guide - Windows 7
Page 180
...HP device drivers 60 Microsoft device drivers 60 movie play 59 optical disc tray 56 optical drive detection 57 troubleshooting modem 38 turning off the computer 78 TXT (Intel Trusted Execution Technology) 149 U Unified Extensible Firmware Interface (UEFI) mode 148 unresponsive system 78 updates, software 158 upgrade bay identifying 13 replacing a hard drive 88 replacing... an optical drive 92 USB cable, connecting 95 USB devices connecting 95 description 95 removing 96 USB ...
...HP device drivers 60 Microsoft device drivers 60 movie play 59 optical disc tray 56 optical drive detection 57 troubleshooting modem 38 turning off the computer 78 TXT (Intel Trusted Execution Technology) 149 U Unified Extensible Firmware Interface (UEFI) mode 148 unresponsive system 78 updates, software 158 upgrade bay identifying 13 replacing a hard drive 88 replacing... an optical drive 92 USB cable, connecting 95 USB devices connecting 95 description 95 removing 96 USB ...
HP ProBook User Guide - Windows Vista
Page 93
... computer is on by briefly pressing the power button. Remove the battery from the hard drive bay. Remove the hard drive cover (2). 9. Replacing a hard drive in the hard drive bay CAUTION: To prevent information loss or an unresponsive system: Shut down the computer before removing the hard drive from the computer. 7. If you . 6. Turn the computer upside down the computer through...
... computer is on by briefly pressing the power button. Remove the battery from the hard drive bay. Remove the hard drive cover (2). 9. Replacing a hard drive in the hard drive bay CAUTION: To prevent information loss or an unresponsive system: Shut down the computer before removing the hard drive from the computer. 7. If you . 6. Turn the computer upside down the computer through...
HP ProBook User Guide - Windows XP
Page 93
...to the computer. 4. Save your work. 2. Unplug the power cord from the computer. 7. Remove the hard drive cover (2). 9. Replacing a hard drive in the hard drive bay 83 Do not remove the hard drive while the computer is off or in Hibernation, turn the computer on , in Standby, or in Hibernation....down the computer and close the display. 3. Turn the computer upside down the computer before removing the hard drive from the hard drive bay. Replacing a hard drive in the hard drive bay CAUTION: To prevent information loss or an unresponsive system: Shut down on a flat surface, with ...
...to the computer. 4. Save your work. 2. Unplug the power cord from the computer. 7. Remove the hard drive cover (2). 9. Replacing a hard drive in the hard drive bay 83 Do not remove the hard drive while the computer is off or in Hibernation, turn the computer on , in Standby, or in Hibernation....down the computer and close the display. 3. Turn the computer upside down the computer before removing the hard drive from the hard drive bay. Replacing a hard drive in the hard drive bay CAUTION: To prevent information loss or an unresponsive system: Shut down on a flat surface, with ...


