Software Update - Windows XP
Page 8
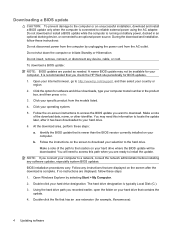
... download area, perform these steps: 1. BIOS installation procedures vary. Using the hard drive path you are displayed on the screen to http://www.hp.com/support, and then select your operating system. 5. Do not shut down the computer or initiate Standby or Hibernation. Open your Internet browser...the BIOS update you connect your hard drive where the BIOS update will need this path when you recorded earlier, open the folder on battery power, docked in the product box, and then press enter. 3. The hard drive designation is complete. If no instructions are posted as...
... download area, perform these steps: 1. BIOS installation procedures vary. Using the hard drive path you are displayed on the screen to http://www.hp.com/support, and then select your operating system. 5. Do not shut down the computer or initiate Standby or Hibernation. Open your Internet browser...the BIOS update you connect your hard drive where the BIOS update will need this path when you recorded earlier, open the folder on battery power, docked in the product box, and then press enter. 3. The hard drive designation is complete. If no instructions are posted as...
HP ProtectTools - Windows Vista and Windows XP
Page 67
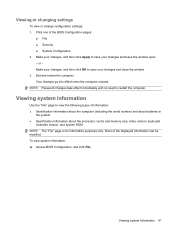
... your changes, and then click Apply to view the following types of information: ● Identification information about the computer (including the serial number) and about batteries in the system ● Specification information about the processor;
... your changes, and then click Apply to view the following types of information: ● Identification information about the computer (including the serial number) and about batteries in the system ● Specification information about the processor;
HP ProtectTools - Windows Vista and Windows XP
Page 71
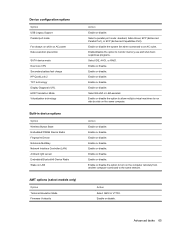
... Option USB Legacy Support Parallel port mode Fan always on while on AC power Data execution prevention SATA device mode Dual core CPU Secondary battery fast charge HP QuickLook 2 TXT technology Display Diagnostic URL HDD Translation Mode Virtualization technology Built-in device options Option Wireless Button State Embedded WWAN Device Radio Fingerprint...
... Option USB Legacy Support Parallel port mode Fan always on while on AC power Data execution prevention SATA device mode Dual core CPU Secondary battery fast charge HP QuickLook 2 TXT technology Display Diagnostic URL HDD Translation Mode Virtualization technology Built-in device options Option Wireless Button State Embedded WWAN Device Radio Fingerprint...
HP ProtectTools - Windows Vista and Windows XP
Page 72
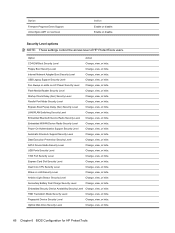
... Express Boot Popup Delay (Sec) Security Level Change, view, or hide. Ambient Light Sensor Security Level Change, view, or hide. Secondary Battery Fast Charge Security Level Change, view, or hide. Internal Network Adapter Boot Security Level Change, view, or hide. USB Legacy Support Security...Security Level Change, view, or hide. Optical Disk Drive Security Level Change, view, or hide. 66 Chapter 6 BIOS Configuration for HP ProtectTools Option Firmware Progress Event Support Unconfigure AMT on LAN Security Level Change, view, or hide. Enable or disable. Dual Core CPU...
... Express Boot Popup Delay (Sec) Security Level Change, view, or hide. Ambient Light Sensor Security Level Change, view, or hide. Secondary Battery Fast Charge Security Level Change, view, or hide. Internal Network Adapter Boot Security Level Change, view, or hide. USB Legacy Support Security...Security Level Change, view, or hide. Optical Disk Drive Security Level Change, view, or hide. 66 Chapter 6 BIOS Configuration for HP ProtectTools Option Firmware Progress Event Support Unconfigure AMT on LAN Security Level Change, view, or hide. Enable or disable. Dual Core CPU...
Security - Windows XP, Windows Vista and Windows 7
Page 19
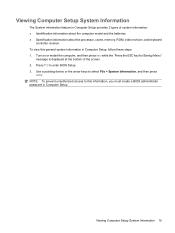
... "Press the ESC key for Startup Menu" message is displayed at the bottom of system information: ● Identification information about the computer model and the batteries. ● Specification information about the processor, cache, memory, ROM, video revision, and keyboard controller revision. To view this information, you must create a BIOS administrator password...
... "Press the ESC key for Startup Menu" message is displayed at the bottom of system information: ● Identification information about the computer model and the batteries. ● Specification information about the processor, cache, memory, ROM, video revision, and keyboard controller revision. To view this information, you must create a BIOS administrator password...
Computer Setup - Windows Vista and Windows XP
Page 9
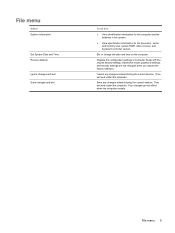
... Date and Time Restore defaults Ignore changes and exit Save changes and exit To do this ● View identification information for the computer and the batteries in Computer Setup with the original factory settings. (Hard drive mode, password settings, and security settings are not changed when you restore the factory settings...
... Date and Time Restore defaults Ignore changes and exit Save changes and exit To do this ● View identification information for the computer and the batteries in Computer Setup with the original factory settings. (Hard drive mode, password settings, and security settings are not changed when you restore the factory settings...

Computer Setup - Windows Vista and Windows XP
Page 11
... menu 7 Diagnostics menu Select System Diagnostics Menu To do this ● System Information-Displays the following information: ◦ Identification information for the computer and the batteries in the system. ◦ Specification information for the processor, cache and memory size, system ROM, video revision, and keyboard controller version. ● Start-up Test...
... menu 7 Diagnostics menu Select System Diagnostics Menu To do this ● System Information-Displays the following information: ◦ Identification information for the computer and the batteries in the system. ◦ Specification information for the processor, cache and memory size, system ROM, video revision, and keyboard controller version. ● Start-up Test...
Drives - Linux
Page 5
Before handling a drive, discharge static electricity by touching the unpainted metal surface of power, be sure that the battery is sufficiently charged before writing to clear, or properly disconnect the external hard drive. If you move the computer while the optical drive (select...media. Avoid exposing a drive to liquids. CAUTION: To reduce the risk of damage to the computer, damage to a disc. Handle a drive carefully; When the battery is writing to a drive, or loss of magnetism and will not damage a drive. 1 Do not touch the connector pins on a removable drive or on it...
Before handling a drive, discharge static electricity by touching the unpainted metal surface of power, be sure that the battery is sufficiently charged before writing to clear, or properly disconnect the external hard drive. If you move the computer while the optical drive (select...media. Avoid exposing a drive to liquids. CAUTION: To reduce the risk of damage to the computer, damage to a disc. Handle a drive carefully; When the battery is writing to a drive, or loss of magnetism and will not damage a drive. 1 Do not touch the connector pins on a removable drive or on it...
Drives - Linux
Page 11
... are using software included with the computer, refer to the software manufacturer's instructions, which may be provided on disc, in the software Help, or on battery power. Do not copy directly from a source disc to a destination disc or from your hard drive, and then burn from a network drive to a destination disc...
... are using software included with the computer, refer to the software manufacturer's instructions, which may be provided on disc, in the software Help, or on battery power. Do not copy directly from a source disc to a destination disc or from your hard drive, and then burn from a network drive to a destination disc...
Drives - Linux
Page 17
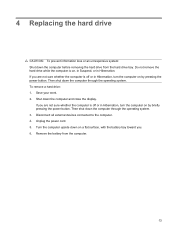
... the computer through the operating system. 3. Do not remove the hard drive while the computer is on by briefly pressing the power button. Remove the battery from the hard drive bay. 4 Replacing the hard drive CAUTION: To prevent information loss or an unresponsive system: Shut down the computer and close the... whether the computer is off or in Hibernation, turn the computer on , in Suspend, or in Hibernation, turn the computer on a flat surface, with the battery bay toward you. 6. Then shut down the computer through the operating system.
... the computer through the operating system. 3. Do not remove the hard drive while the computer is on by briefly pressing the power button. Remove the battery from the hard drive bay. 4 Replacing the hard drive CAUTION: To prevent information loss or an unresponsive system: Shut down the computer and close the... whether the computer is off or in Hibernation, turn the computer on , in Suspend, or in Hibernation, turn the computer on a flat surface, with the battery bay toward you. 6. Then shut down the computer through the operating system.
Drives - Linux
Page 18
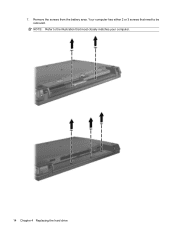
Your computer has either 2 or 3 screws that need to the illustration that most closely matches your computer. 14 Chapter 4 Replacing the hard drive NOTE: Refer to be removed. Remove the screws from the battery area. 7.
Your computer has either 2 or 3 screws that need to the illustration that most closely matches your computer. 14 Chapter 4 Replacing the hard drive NOTE: Refer to be removed. Remove the screws from the battery area. 7.
Drives - Linux
Page 28
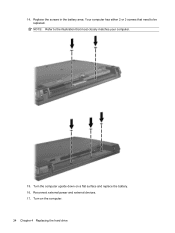
Reconnect external power and external devices. 17. Turn the computer upside down on the computer. 24 Chapter 4 Replacing the hard drive Your computer has either 2 or 3 screws that most closely matches your computer. 15. NOTE: Refer to the illustration that need to be replaced. Replace the screws in the battery area. 14. Turn on a flat surface and replace the battery. 16.
Reconnect external power and external devices. 17. Turn the computer upside down on the computer. 24 Chapter 4 Replacing the hard drive Your computer has either 2 or 3 screws that most closely matches your computer. 15. NOTE: Refer to the illustration that need to be replaced. Replace the screws in the battery area. 14. Turn on a flat surface and replace the battery. 16.
Drives - Windows Vista
Page 5
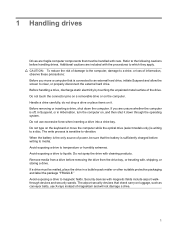
... to the following cautions before writing to a drive, or loss of the drive. Handle a drive carefully; 1 Handling drives Drives are fragile computer components that the battery is sufficiently charged before handling drives. CAUTION: To reduce the risk of damage to the computer, damage to media. Do not use X-rays instead of... power, be sure that must be handled with care. Avoid exposing a drive to liquids. When the battery is the only source of magnetism and will not damage a drive. 1
... to the following cautions before writing to a drive, or loss of the drive. Handle a drive carefully; 1 Handling drives Drives are fragile computer components that the battery is sufficiently charged before handling drives. CAUTION: To reduce the risk of damage to the computer, damage to media. Do not use X-rays instead of... power, be sure that must be handled with care. Avoid exposing a drive to liquids. When the battery is the only source of magnetism and will not damage a drive. 1
Drives - Windows Vista
Page 13
... hard drive, and then burn from a network drive to the software manufacturer's instructions, which may be provided on disc, in the software Help, or on battery power. Do not use the computer keyboard or move the computer while the computer is writing to the destination disc. Do not copy directly from...
... hard drive, and then burn from a network drive to the software manufacturer's instructions, which may be provided on disc, in the software Help, or on battery power. Do not use the computer keyboard or move the computer while the computer is writing to the destination disc. Do not copy directly from...

Drives - Windows Vista
Page 19
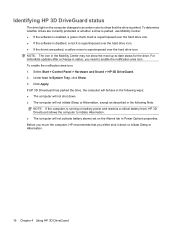
...of the following conditions: ● You drop the computer. ● You move the computer with the display closed while the computer is running on battery power. NOTE: Hard drives that are in an optional docking device or are connected to a USB port are not protected by parking the drive and... halting I/O requests under either of these events, HP 3D DriveGuard returns the hard drive to the HP 3D DriveGuard software Help. 15 4 Using HP 3D DriveGuard HP 3D DriveGuard protects the hard drive by...
...of the following conditions: ● You drop the computer. ● You move the computer with the display closed while the computer is running on battery power. NOTE: Hard drives that are in an optional docking device or are connected to a USB port are not protected by parking the drive and... halting I/O requests under either of these events, HP 3D DriveGuard returns the hard drive to the HP 3D DriveGuard software Help. 15 4 Using HP 3D DriveGuard HP 3D DriveGuard protects the hard drive by...
Drives - Windows Vista
Page 20
...enable the notification area icon: 1. Select Start > Control Panel > Hardware and Sound > HP 3D DriveGuard. 2. NOTE: If the computer is running on battery power and reaches a critical battery level, HP 3D DriveGuard allows the computer to initiate Hibernation. ● The computer will not initiate ...Sleep or Hibernation, except as described in Power Options properties. If HP 3D DriveGuard has parked the drive...
...enable the notification area icon: 1. Select Start > Control Panel > Hardware and Sound > HP 3D DriveGuard. 2. NOTE: If the computer is running on battery power and reaches a critical battery level, HP 3D DriveGuard allows the computer to initiate Hibernation. ● The computer will not initiate ...Sleep or Hibernation, except as described in Power Options properties. If HP 3D DriveGuard has parked the drive...

Drives - Windows Vista
Page 23
Turn the computer upside down the computer and close the display. Shut down on a flat surface, with the battery bay toward you. 6. Unplug the power cord. 5. Remove the battery from the hard drive bay. If you are not sure whether the computer is off or in Hibernation, turn the computer on by briefly...
Turn the computer upside down the computer and close the display. Shut down on a flat surface, with the battery bay toward you. 6. Unplug the power cord. 5. Remove the battery from the hard drive bay. If you are not sure whether the computer is off or in Hibernation, turn the computer on by briefly...

Drives - Windows Vista
Page 24
NOTE: Refer to the illustration that need to be removed. Remove the screws from the battery area. 7. Your computer has either 2 or 3 screws that most closely matches your computer. 20 Chapter 6 Replacing the hard drive
NOTE: Refer to the illustration that need to be removed. Remove the screws from the battery area. 7. Your computer has either 2 or 3 screws that most closely matches your computer. 20 Chapter 6 Replacing the hard drive
Drives - Windows Vista
Page 34
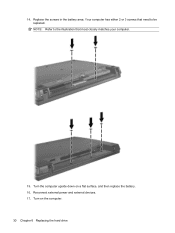
NOTE: Refer to the illustration that need to be replaced. Turn the computer upside down on the computer. 30 Chapter 6 Replacing the hard drive Turn on a flat surface, and then replace the battery. 16. Your computer has either 2 or 3 screws that most closely matches your computer. 15. Reconnect external power and external devices. 17. 14. Replace the screws in the battery area.
NOTE: Refer to the illustration that need to be replaced. Turn the computer upside down on the computer. 30 Chapter 6 Replacing the hard drive Turn on a flat surface, and then replace the battery. 16. Your computer has either 2 or 3 screws that most closely matches your computer. 15. Reconnect external power and external devices. 17. 14. Replace the screws in the battery area.

Drives - Windows XP
Page 5
... clear, or properly disconnect the external hard drive. Do not use X-rays instead of power, be sure that the battery is the only source of magnetism and will not damage a drive. 1 When the battery is sufficiently charged before removing the drive from a drive before writing to a drive, or loss of the drive...
... clear, or properly disconnect the external hard drive. Do not use X-rays instead of power, be sure that the battery is the only source of magnetism and will not damage a drive. 1 When the battery is sufficiently charged before removing the drive from a drive before writing to a drive, or loss of the drive...


