Backup and Recovery - Windows Vista
Page 8
... system and software to factory settings in a safe place. The recovery discs are not compatible with double-layer support discs (purchased separately). Follow the on battery power, you have finished creating the recovery discs. Click Advanced Options.
... system and software to factory settings in a safe place. The recovery discs are not compatible with double-layer support discs (purchased separately). Follow the on battery power, you have finished creating the recovery discs. Click Advanced Options.
Drives - Windows Vista
Page 5
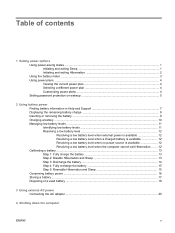
Table of contents 1 Identifying installed drives 2 Handling drives 3 Using an optical drive Inserting an optical disc ...5 Removing an optical disc when running on battery or external power 6 Removing an optical disc when no computer power is available 7 4 Improving hard drive performance Using Disk Defragmenter ...8 Using Disk Cleanup ...8 5 Replacing the hard drive Index ...12 v
Table of contents 1 Identifying installed drives 2 Handling drives 3 Using an optical drive Inserting an optical disc ...5 Removing an optical disc when running on battery or external power 6 Removing an optical disc when no computer power is available 7 4 Improving hard drive performance Using Disk Defragmenter ...8 Using Disk Cleanup ...8 5 Replacing the hard drive Index ...12 v
Drives - Windows Vista
Page 8
... Do not type on , and then shut it . The write process is sufficiently charged before writing to media. The airport security devices that the battery is sensitive to vibration. do not drop a drive or place items on luggage, such as conveyor belts, use excessive force when inserting a drive ...from the drive bay, or traveling with care. Do not touch the connector pins on a removable drive or on the computer. When the battery is writing to a disc. Security devices with cleaning products. Avoid exposing a drive to the following cautions before removing the drive from one ...
... Do not type on , and then shut it . The write process is sufficiently charged before writing to media. The airport security devices that the battery is sensitive to vibration. do not drop a drive or place items on luggage, such as conveyor belts, use excessive force when inserting a drive ...from the drive bay, or traveling with care. Do not touch the connector pins on a removable drive or on the computer. When the battery is writing to a disc. Security devices with cleaning products. Avoid exposing a drive to the following cautions before removing the drive from one ...
Drives - Windows Vista
Page 12
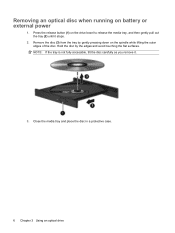
Remove the disc (3) from the tray by the edges and avoid touching the flat surfaces. Press the release button (1) on battery or external power 1. Hold the disc by gently pressing down on the spindle while lifting the outer edges of the disc. Close the media tray and place the disc in a protective case. 6 Chapter 3 Using an optical drive NOTE: If the tray is not fully accessible, tilt the disc carefully as you remove it stops. 2. Removing an optical disc when running on the drive bezel to release the media tray, and then gently pull out the tray (2) until it . 3.
Remove the disc (3) from the tray by the edges and avoid touching the flat surfaces. Press the release button (1) on battery or external power 1. Hold the disc by gently pressing down on the spindle while lifting the outer edges of the disc. Close the media tray and place the disc in a protective case. 6 Chapter 3 Using an optical drive NOTE: If the tray is not fully accessible, tilt the disc carefully as you remove it stops. 2. Removing an optical disc when running on the drive bezel to release the media tray, and then gently pull out the tray (2) until it . 3.
Drives - Windows Vista
Page 16
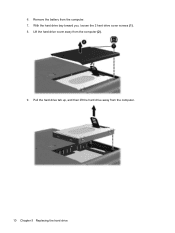
Lift the hard drive cover away from the computer. 10 Chapter 5 Replacing the hard drive Pull the hard drive tab up, and then lift the hard drive away from the computer (2). 9. With the hard drive bay toward you, loosen the 2 hard drive cover screws (1). 8. 6. Remove the battery from the computer. 7.
Lift the hard drive cover away from the computer. 10 Chapter 5 Replacing the hard drive Pull the hard drive tab up, and then lift the hard drive away from the computer (2). 9. With the hard drive bay toward you, loosen the 2 hard drive cover screws (1). 8. 6. Remove the battery from the computer. 7.

Memory Modules - Windows Vista
Page 7
WARNING! Click Start, click the arrow next to the equipment, unplug the power cord and remove all batteries before shutdown is in the Sleep state or in Hibernation, you are discharged of the computer can damage electronic components. The memory capacity of...the Lock button, and then click Shut Down. 3. Save your work and close all external devices connected to the computer. 5. Close the display. 4. Remove the battery from the AC outlet. 6. Then shut down on a flat surface. 7. Replacing a memory module The computer has one memory module compartment, which is located on...
WARNING! Click Start, click the arrow next to the equipment, unplug the power cord and remove all batteries before shutdown is in the Sleep state or in Hibernation, you are discharged of the computer can damage electronic components. The memory capacity of...the Lock button, and then click Shut Down. 3. Save your work and close all external devices connected to the computer. 5. Close the display. 4. Remove the battery from the AC outlet. 6. Then shut down on a flat surface. 7. Replacing a memory module The computer has one memory module compartment, which is located on...
Memory Modules - Windows Vista
Page 9
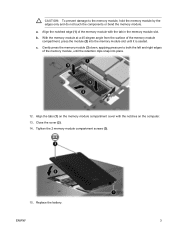
..., press the module (2) into the memory module slot until the retention clips snap into place. 12. c. Tighten the 2 memory module compartment screws (3). 15. Replace the battery. b. Gently press the memory module (3) down, applying pressure to the memory module, hold the memory module by the edges only and do not touch the...
..., press the module (2) into the memory module slot until the retention clips snap into place. 12. c. Tighten the 2 memory module compartment screws (3). 15. Replace the battery. b. Gently press the memory module (3) down, applying pressure to the memory module, hold the memory module by the edges only and do not touch the...

Software Updates - Windows Vista
Page 8
Determining the BIOS version To determine whether available BIOS updates contain later BIOS versions than the BIOS version currently installed on battery power, docked in an optional docking device, or connected to an optional power source. BIOS version information (also known as ROM date and ...Exit Discarding Changes, and then press enter. Do not download or install a BIOS update while the computer is later than those currently installed on the HP Web site that is running on your computer: Select Start > Help and Support, and then select the software and drivers update. 2. If the Setup...
Determining the BIOS version To determine whether available BIOS updates contain later BIOS versions than the BIOS version currently installed on battery power, docked in an optional docking device, or connected to an optional power source. BIOS version information (also known as ROM date and ...Exit Discarding Changes, and then press enter. Do not download or install a BIOS update while the computer is later than those currently installed on the HP Web site that is running on your computer: Select Start > Help and Support, and then select the software and drivers update. 2. If the Setup...

Multimedia - Windows Vista
Page 5
... an optical drive ...11 Identifying the installed optical drive 11 Inserting an optical disc (CD or DVD 11 Removing an optical disc when running on battery or external power 12 Removing an optical disc when no computer power is available 13 Using the media activity functions ...14 Using the media activity...
... an optical drive ...11 Identifying the installed optical drive 11 Inserting an optical disc (CD or DVD 11 Removing an optical disc when running on battery or external power 12 Removing an optical disc when no computer power is available 13 Using the media activity functions ...14 Using the media activity...

Multimedia - Windows Vista
Page 18
NOTE: If the tray is not fully accessible, tilt the disc carefully as you remove it stops. 2. Remove the disc (3) from the tray by the edges and avoid touching the flat surfaces. Close the media tray and place the disc in a protective case. 12 Chapter 1 Using multimedia hardware Press the release button (1) on the drive bezel to release the media tray, and then gently pull out the tray (2) until it . 3. Hold the disc by gently pressing down on battery or external power 1. Removing an optical disc when running on the spindle while lifting the outer edges of the disc.
NOTE: If the tray is not fully accessible, tilt the disc carefully as you remove it stops. 2. Remove the disc (3) from the tray by the edges and avoid touching the flat surfaces. Close the media tray and place the disc in a protective case. 12 Chapter 1 Using multimedia hardware Press the release button (1) on the drive bezel to release the media tray, and then gently pull out the tray (2) until it . 3. Hold the disc by gently pressing down on battery or external power 1. Removing an optical disc when running on the spindle while lifting the outer edges of the disc.
Multimedia - Windows Vista
Page 23
... while the computer is running on an optical disc. The write process is writing to a disc. Some computer models also include additional multimedia software on battery power. Instead, copy from a source disc or network drive to your hard drive, and then copy from a network drive to the destination disc. Do not...
... while the computer is running on an optical disc. The write process is writing to a disc. Some computer models also include additional multimedia software on battery power. Instead, copy from a source disc or network drive to your hard drive, and then copy from a network drive to the destination disc. Do not...
Power Management - Windows Vista
Page 5
... plan 4 Customizing power plans ...4 Setting password protection on wakeup 5 2 Using battery power Finding battery information in Help and Support 7 Displaying the remaining battery charge 8 Inserting or removing the battery ...9 Charging a battery ...10 Managing low battery levels ...11 Identifying low battery levels 11 Resolving a low battery level 12 Resolving a low battery level when external power is available 12 Resolving a low...
... plan 4 Customizing power plans ...4 Setting password protection on wakeup 5 2 Using battery power Finding battery information in Help and Support 7 Displaying the remaining battery charge 8 Inserting or removing the battery ...9 Charging a battery ...10 Managing low battery levels ...11 Identifying low battery levels 11 Resolving a low battery level 12 Resolving a low battery level when external power is available 12 Resolving a low...
Power Management - Windows Vista
Page 7
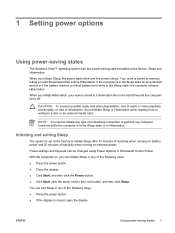
...Sleep. ENWW Using power-saving states 1 When you exit Sleep faster than exiting Hibernation. If the computer is saved to a hibernation file on battery power and 25 minutes of the following ways: ● Press the power button. ● If the display is set at the factory: Sleep... is saved to memory, letting you initiate Hibernation, your work is in the Sleep state for an extended period or if the battery reaches a critical battery level while in Hibernation. CAUTION: To prevent possible audio and video degradation, loss of audio or video playback functionality, or loss of...
...Sleep. ENWW Using power-saving states 1 When you exit Sleep faster than exiting Hibernation. If the computer is saved to a hibernation file on battery power and 25 minutes of the following ways: ● Press the power button. ● If the display is set at the factory: Sleep... is saved to memory, letting you initiate Hibernation, your work is in the Sleep state for an extended period or if the battery reaches a critical battery level while in Hibernation. CAUTION: To prevent possible audio and video degradation, loss of audio or video playback functionality, or loss of...

Power Management - Windows Vista
Page 8
... - To exit Hibernation: ▲ Press the power button. b. When the computer exits Sleep, the power lights turn on external power, or when the battery reaches a critical battery level. a. Click Hibernate. NOTE: If you have set a password to initiate Hibernation after 120 minutes of inactivity when running on... battery power, 1080 minutes (18 hours) of inactivity when running on and your work returns to the screen. ● Press a key on the ...
... - To exit Hibernation: ▲ Press the power button. b. When the computer exits Sleep, the power lights turn on external power, or when the battery reaches a critical battery level. a. Click Hibernate. NOTE: If you have set a password to initiate Hibernation after 120 minutes of inactivity when running on... battery power, 1080 minutes (18 hours) of inactivity when running on and your work returns to the screen. ● Press a key on the ...

Power Management - Windows Vista
Page 9
... icon. ● To access Power Options, or to display the battery meter icon. 4. Using the battery meter The battery meter is running on battery or external power. The battery meter allows you to quickly access power settings, view remaining battery charge, and select a different power plan. ● To display the percentage of the taskbar. Right-click...
... icon. ● To access Power Options, or to display the battery meter icon. 4. Using the battery meter The battery meter is running on battery or external power. The battery meter allows you to quickly access power settings, view remaining battery charge, and select a different power plan. ● To display the percentage of the taskbar. Right-click...
Power Management - Windows Vista
Page 10
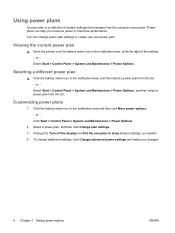
... additional settings, click Change advanced power settings and make your own power plan. Viewing the current power plan ▲ Move the pointer over the battery meter icon in the notification area, and then select a power plan from the list. Select Start > Control Panel > System and Maintenance > Power... 2. To change power plan settings or create your changes. 4 Chapter 1 Setting power options ENWW or - Selecting a different power plan ▲ Click the battery meter icon in the notification area, at the far right of system settings that manages how the computer uses power. Click the...
... additional settings, click Change advanced power settings and make your own power plan. Viewing the current power plan ▲ Move the pointer over the battery meter icon in the notification area, and then select a power plan from the list. Select Start > Control Panel > System and Maintenance > Power... 2. To change power plan settings or create your changes. 4 Chapter 1 Setting power options ENWW or - Selecting a different power plan ▲ Click the battery meter icon in the notification area, at the far right of system settings that manages how the computer uses power. Click the...
Power Management - Windows Vista
Page 12
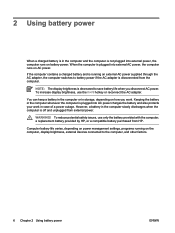
... devices connected to the computer, and other factors. 6 Chapter 2 Using battery power ENWW To increase display brightness, use only the battery provided with the computer, a replacement battery provided by HP, or a compatible battery purchased from external power. NOTE: The display brightness is decreased to battery power if the AC adapter is disconnected from the computer. However...
... devices connected to the computer, and other factors. 6 Chapter 2 Using battery power ENWW To increase display brightness, use only the battery provided with the computer, a replacement battery provided by HP, or a compatible battery purchased from external power. NOTE: The display brightness is decreased to battery power if the AC adapter is disconnected from the computer. However...

Power Management - Windows Vista
Page 13
ENWW Finding battery information in Help and Support The Battery information section of the Help and Support Learning Center provides the following tools and information: ● Battery Check tool to test battery performance ● Information on calibration, power management, and proper care and storage to maximize battery life ● Information on battery types, specifications, life cycles, and capacity To access Battery information: ▲ Select Start > Help and Support > Learning Center > Battery information. Finding battery information in Help and Support 7
ENWW Finding battery information in Help and Support The Battery information section of the Help and Support Learning Center provides the following tools and information: ● Battery Check tool to test battery performance ● Information on calibration, power management, and proper care and storage to maximize battery life ● Information on battery types, specifications, life cycles, and capacity To access Battery information: ▲ Select Start > Help and Support > Learning Center > Battery information. Finding battery information in Help and Support 7
Power Management - Windows Vista
Page 14
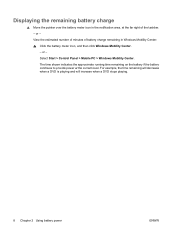
or - Select Start > Control Panel > Mobile PC > Windows Mobility Center. Displaying the remaining battery charge ▲ Move the pointer over the battery meter icon in Windows Mobility Center: ▲ Click the battery meter icon, and then click Windows Mobility Center. - For example, the time remaining will decrease ...when a DVD is playing and will increase when a DVD stops playing. 8 Chapter 2 Using battery power ENWW View the estimated number of minutes of the taskbar. - or - The time shown indicates the approximate running time remaining on the...
or - Select Start > Control Panel > Mobile PC > Windows Mobility Center. Displaying the remaining battery charge ▲ Move the pointer over the battery meter icon in Windows Mobility Center: ▲ Click the battery meter icon, and then click Windows Mobility Center. - For example, the time remaining will decrease ...when a DVD is playing and will increase when a DVD stops playing. 8 Chapter 2 Using battery power ENWW View the estimated number of minutes of the taskbar. - or - The time shown indicates the approximate running time remaining on the...

Power Management - Windows Vista
Page 15
Insert the battery into place. CAUTION: Removing a battery that is seated (2). To remove the battery: 1. Slide the battery release latch (1) to release the battery. 3. The battery release latch (3) automatically locks the battery into the battery bay (1) and rotate it downward until it from the computer...information, initiate Hibernation or shut down on a flat surface, with the battery bay away from you . 2. Pivot the battery (2) away from the computer (3). ENWW Inserting or removing the battery 9 To prevent loss of information. Turn the computer upside down on ...
Insert the battery into place. CAUTION: Removing a battery that is seated (2). To remove the battery: 1. Slide the battery release latch (1) to release the battery. 3. The battery release latch (3) automatically locks the battery into the battery bay (1) and rotate it downward until it from the computer...information, initiate Hibernation or shut down on a flat surface, with the battery bay away from you . 2. Pivot the battery (2) away from the computer (3). ENWW Inserting or removing the battery 9 To prevent loss of information. Turn the computer upside down on ...


