
HP USB Digital Drive
Page 9
Disconnecting the Digital Drive ✎ Do not attempt to Remove Hardware" message appears on your screen. 3. Gently unplug the Digital Drive from the USB port. ✎ If the USB connector cable is flashing. 1. Select the Digital Drive and wait until the "Safe to remove the Digital Drive when the status light on the Digital Drive is in the extended position, return it on its track for safe storage. 8 User Guide Select the "Safely Remove Hardware" icon on your taskbar. A dialog box displays a list of connected devices. 2.
Disconnecting the Digital Drive ✎ Do not attempt to Remove Hardware" message appears on your screen. 3. Gently unplug the Digital Drive from the USB port. ✎ If the USB connector cable is flashing. 1. Select the Digital Drive and wait until the "Safe to remove the Digital Drive when the status light on the Digital Drive is in the extended position, return it on its track for safe storage. 8 User Guide Select the "Safely Remove Hardware" icon on your taskbar. A dialog box displays a list of connected devices. 2.
Using LightScribe (Select Models Only)
Page 3
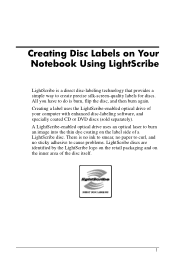
... uses the LightScribe-enabled optical drive of a LightScribe disc. There is a direct disc-labeling technology that provides a simple way to create precise silk-screen-quality labels for discs. A LightScribe-enabled optical drive uses an optical laser to burn an image into the thin dye coating on the inner area ...of the disc itself. 1 Creating Disc Labels on Your Notebook Using LightScribe LightScribe is no ink to smear, no paper to curl, and no sticky adhesive to cause problems. LightScribe discs are identified by...
... uses the LightScribe-enabled optical drive of a LightScribe disc. There is a direct disc-labeling technology that provides a simple way to create precise silk-screen-quality labels for discs. A LightScribe-enabled optical drive uses an optical laser to burn an image into the thin dye coating on the inner area ...of the disc itself. 1 Creating Disc Labels on Your Notebook Using LightScribe LightScribe is no ink to smear, no paper to curl, and no sticky adhesive to cause problems. LightScribe discs are identified by...
Using LightScribe (Select Models Only)
Page 7
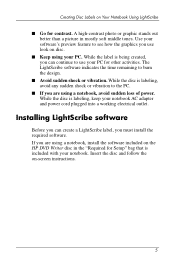
...you are using a notebook, avoid sudden loss of power. If you are using a notebook, install the software included on the HP DVD Writer disc in mostly soft middle tones. The LightScribe software indicates the time remaining to the PC. ■ If you use your notebook. Use your software's...feature to use look on disc. ■ Keep using your notebook AC adapter and power cord plugged into a working electrical outlet. Insert the disc and follow the on-screen instructions. 5 While the disc is labeling, keep your PC. A high-contrast photo or graphic stands out better than ...
...you are using a notebook, avoid sudden loss of power. If you are using a notebook, install the software included on the HP DVD Writer disc in mostly soft middle tones. The LightScribe software indicates the time remaining to the PC. ■ If you use your notebook. Use your software's...feature to use look on disc. ■ Keep using your notebook AC adapter and power cord plugged into a working electrical outlet. Insert the disc and follow the on-screen instructions. 5 While the disc is labeling, keep your PC. A high-contrast photo or graphic stands out better than ...
Using LightScribe (Select Models Only)
Page 10
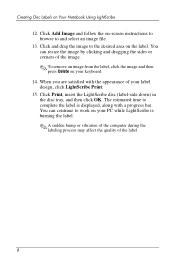
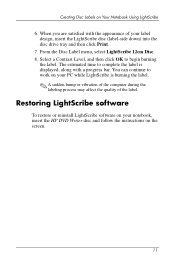
Click Add Image and follow the on-screen instructions to browse to work on the label. You can continue to and select an image file. 13. Click Print, insert the... sides or corners of the label. 8 When you are satisfied with a progress bar. The estimated time to the desired area on your PC while LightScribe is displayed, along with the appearance of your keyboard. 14. Click and drag the image to complete the label is burning the... quality of the image. ✎ To remove an image from the label, click the image and then press Delete on Your Notebook Using LightScribe 12.
Click Add Image and follow the on-screen instructions to browse to work on the label. You can continue to and select an image file. 13. Click Print, insert the... sides or corners of the label. 8 When you are satisfied with a progress bar. The estimated time to the desired area on your PC while LightScribe is displayed, along with the appearance of your keyboard. 14. Click and drag the image to complete the label is burning the... quality of the image. ✎ To remove an image from the label, click the image and then press Delete on Your Notebook Using LightScribe 12.
Using LightScribe (Select Models Only)
Page 13
... OK to work on your notebook, insert the HP DVD Writer disc and follow the instructions on Your Notebook Using LightScribe 6. Restoring LightScribe software To restore or reinstall LightScribe software on your PC while LightScribe is displayed, along with the appearance of the label. Creating Disc Labels on the screen. 11 You can continue to...
... OK to work on your notebook, insert the HP DVD Writer disc and follow the instructions on Your Notebook Using LightScribe 6. Restoring LightScribe software To restore or reinstall LightScribe software on your PC while LightScribe is displayed, along with the appearance of the label. Creating Disc Labels on the screen. 11 You can continue to...
Wireless Setup Guide
Page 4
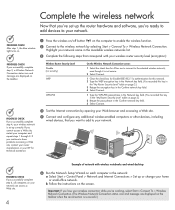
...to your network. Highlight your network name in the Available wireless networks list. 3 Complete the following steps that correspond with wireless notebooks and wired desktop PROGRESS CHECK If you successfully complete step 3, a Wireless Network Connection status icon and message are displayed on ... repeat steps 1 through 3. PROGRESS CHECK After step 1, the blue wireless light turns on. 1 Press the wireless on/off button on the screen. If you 're working, select Start > Connect To > Wireless Network Connection. (The Wireless Network Connection status icon and message are displayed ...
...to your network. Highlight your network name in the Available wireless networks list. 3 Complete the following steps that correspond with wireless notebooks and wired desktop PROGRESS CHECK If you successfully complete step 3, a Wireless Network Connection status icon and message are displayed on ... repeat steps 1 through 3. PROGRESS CHECK After step 1, the blue wireless light turns on. 1 Press the wireless on/off button on the screen. If you 're working, select Start > Connect To > Wireless Network Connection. (The Wireless Network Connection status icon and message are displayed ...
HP Pavilion dv4000 Notebook PC and Compaq Presario V4000 Notebook PC - Maintenance and Service Guide
Page 23
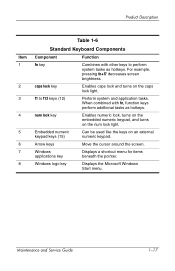
... numeric keypad. When combined with other keys to f12 keys (12) Perform system and application tasks. Arrow keys Move the cursor around the screen. Maintenance and Service Guide 1-17 Windows logo key Displays the Microsoft Windows Start menu. For example, pressing fn+f7 decreases... screen brightness. num lock key Enables numeric lock, turns on the embedded numeric keypad, and turns on the num lock light. Windows applications key Displays ...
... numeric keypad. When combined with other keys to f12 keys (12) Perform system and application tasks. Arrow keys Move the cursor around the screen. Maintenance and Service Guide 1-17 Windows logo key Displays the Microsoft Windows Start menu. For example, pressing fn+f7 decreases... screen brightness. num lock key Enables numeric lock, turns on the embedded numeric keypad, and turns on the num lock light. Windows applications key Displays ...
HP Pavilion dv4000 Notebook PC and Compaq Presario V4000 Notebook PC - Maintenance and Service Guide
Page 34
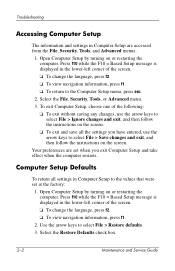
... File, Security, Tools, or Advanced menu. 3. Open Computer Setup by turning on or restarting the computer. To exit Computer Setup, choose one of the screen. ❏ To change the language, press f2. ❏ To view navigation information, press f1. ❏ To return to the Computer Setup menu, ...press esc. 2. Press f10 while the F10 = Based Setup message is displayed in the lower-left corner of the screen. ❏ To change the language, press f2. ❏ To view navigation information, press f1. 2. Select the Restore Defaults check box. 2-2 ...
... File, Security, Tools, or Advanced menu. 3. Open Computer Setup by turning on or restarting the computer. To exit Computer Setup, choose one of the screen. ❏ To change the language, press f2. ❏ To view navigation information, press f1. ❏ To return to the Computer Setup menu, ...press esc. 2. Press f10 while the F10 = Based Setup message is displayed in the lower-left corner of the screen. ❏ To change the language, press f2. ❏ To view navigation information, press f1. 2. Select the Restore Defaults check box. 2-2 ...

HP Pavilion dv4000 Notebook PC and Compaq Presario V4000 Notebook PC - Maintenance and Service Guide
Page 35
Select File > Save changes and exit, and then follow the instructions on the screen. Replace configuration settings in Computer Setup with factory default settings. (Identification information is saved. Save changes entered during the current session. Then exit and restart ...
Select File > Save changes and exit, and then follow the instructions on the screen. Replace configuration settings in Computer Setup with factory default settings. (Identification information is saved. Save changes entered during the current session. Then exit and restart ...

Hardware and Software Guide
Page 11
Component ID Component Description 3 fn key* Combines with other keys to "Hotkeys" in Chapter 3, "Keyboard and TouchPad." 1-2 Hardware and Software Guide For example, pressing fn+f7 decreases screen brightness. 4 Embedded numeric keypad keys (15) Can be used like the keys on an external numeric keypad. 5 Windows applications key Displays a shortcut menu for items beneath the pointer. *For more information about hotkeys, refer to perform system tasks as hotkeys.
Component ID Component Description 3 fn key* Combines with other keys to "Hotkeys" in Chapter 3, "Keyboard and TouchPad." 1-2 Hardware and Software Guide For example, pressing fn+f7 decreases screen brightness. 4 Embedded numeric keypad keys (15) Can be used like the keys on an external numeric keypad. 5 Windows applications key Displays a shortcut menu for items beneath the pointer. *For more information about hotkeys, refer to perform system tasks as hotkeys.

Hardware and Software Guide
Page 27
... travel internationally with all of these applications. ■ The software packaged in the "Required for Later" bag is preinstalled or preloaded on your screen, select Start > Help and Support. ■ Microsoft Certificate of Authenticity-Contains the Microsoft Windows Product Key. You might want to the inside ...of the battery bay. 1-18 Hardware and Software Guide Labels The labels affixed to the notebook provide information you might need the product number and the serial number when you might need when you ever need the Product Key to...
... travel internationally with all of these applications. ■ The software packaged in the "Required for Later" bag is preinstalled or preloaded on your screen, select Start > Help and Support. ■ Microsoft Certificate of Authenticity-Contains the Microsoft Windows Product Key. You might want to the inside ...of the battery bay. 1-18 Hardware and Software Guide Labels The labels affixed to the notebook provide information you might need the product number and the serial number when you might need when you ever need the Product Key to...

Hardware and Software Guide
Page 31
.... When you resume from standby, your work before initiating standby is not usually necessary, but is a recommended precaution. ■ When the notebook is cleared. Power Standby and Hibernation Standby and hibernation are not in use each setting, refer to an external power source. Standby Ä... your work is saved in random access memory (RAM) and the screen is in standby for extended periods. They can be initiated by the system. Hardware and Software Guide 2-3 When standby is initiated, your notebook in standby, the power/standby lights on the power/standby button and...
.... When you resume from standby, your work before initiating standby is not usually necessary, but is a recommended precaution. ■ When the notebook is cleared. Power Standby and Hibernation Standby and hibernation are not in use each setting, refer to an external power source. Standby Ä... your work is saved in random access memory (RAM) and the screen is in standby for extended periods. They can be initiated by the system. Hardware and Software Guide 2-3 When standby is initiated, your notebook in standby, the power/standby lights on the power/standby button and...

Hardware and Software Guide
Page 32
...■ Do not connect or disconnect external devices. ■ Do not insert or remove a PC Card, ExpressCard, or a digital card, such as a Secure Digital (SD) Card. You must...selected. 2-4 Hardware and Software Guide When you restore from hibernation, your work returns to the screen where you left off. Select Start > Control Panel > Performance and Maintenance > Power Options >...when standby has been initiated. Power Hibernation Ä CAUTION: If the configuration of the notebook is changed during hibernation, resuming from hibernation may not be entered to restore from hibernation....
...■ Do not connect or disconnect external devices. ■ Do not insert or remove a PC Card, ExpressCard, or a digital card, such as a Secure Digital (SD) Card. You must...selected. 2-4 Hardware and Software Guide When you restore from hibernation, your work returns to the screen where you left off. Select Start > Control Panel > Performance and Maintenance > Power Options >...when standby has been initiated. Power Hibernation Ä CAUTION: If the configuration of the notebook is changed during hibernation, resuming from hibernation may not be entered to restore from hibernation....

Hardware and Software Guide
Page 33
... and uses much less power than leaving the notebook on battery pack storage, refer to an external power supply. If the battery pack fails, hibernation saves your work returns instantly to the screen when you are operating the notebook on battery power and do one of the battery... pack when the notebook will be disconnected from standby. ■ Initiating hibernation clears the screen, saves your work to a hibernation file and shuts down...
... and uses much less power than leaving the notebook on battery pack storage, refer to an external power supply. If the battery pack fails, hibernation saves your work returns instantly to the screen when you are operating the notebook on battery power and do one of the battery... pack when the notebook will be disconnected from standby. ■ Initiating hibernation clears the screen, saves your work to a hibernation file and shuts down...

Hardware and Software Guide
Page 36
...the keyboard. ■ Open the display if standby was initiated by closing the notebook. 2-8 Hardware and Software Guide Use one of inactivity while running on battery power. No action is cleared. the screen. ■ Use the TouchPad or press a TouchPad button. ■ Press any...to initiate standby. Allow the system to button. Resume from Standby Task Procedure Result Initiate standby With the notebook on, use one of inactivity ■ The screen is while running on external power. The system ■ The power/standby initiates standby light blinks. &#...
...the keyboard. ■ Open the display if standby was initiated by closing the notebook. 2-8 Hardware and Software Guide Use one of inactivity while running on battery power. No action is cleared. the screen. ■ Use the TouchPad or press a TouchPad button. ■ Press any...to initiate standby. Allow the system to button. Resume from Standby Task Procedure Result Initiate standby With the notebook on, use one of inactivity ■ The screen is while running on external power. The system ■ The power/standby initiates standby light blinks. &#...

Hardware and Software Guide
Page 37
... is not displayed, press and hold shift.) ■ The power/standby light is turned off . ■ The screen is cleared. ✎ If the notebook is returned to external power, the system does not initiate hibernation. Hardware and Software Guide 2-9 No action is cleared.... Procedure Result With the notebook on . ■ Your work is connected to the screen. Use one of notebook inactivity or when the battery pack reaches a critical low-battery condition. ■ The power...
... is not displayed, press and hold shift.) ■ The power/standby light is turned off . ■ The screen is cleared. ✎ If the notebook is returned to external power, the system does not initiate hibernation. Hardware and Software Guide 2-9 No action is cleared.... Procedure Result With the notebook on . ■ Your work is connected to the screen. Use one of notebook inactivity or when the battery pack reaches a critical low-battery condition. ■ The power...

Hardware and Software Guide
Page 38
... Shut Down > Turn Off. ■ Press and hold the power/standby button for at least 5 seconds. ■ Disconnect the notebook from external power and remove the battery pack. For more information about removing and storing the battery pack, refer to the "Storing a...sequence provided: ■ Press ctrl+alt+delete. Power Options Using Power Schemes A power scheme controls the amount of power the notebook uses while running on external power or on the screen. 2-10 Hardware and Software Guide To select a preset power scheme or create a custom power scheme: 1. Power Emergency Shutdown...
... Shut Down > Turn Off. ■ Press and hold the power/standby button for at least 5 seconds. ■ Disconnect the notebook from external power and remove the battery pack. For more information about removing and storing the battery pack, refer to the "Storing a...sequence provided: ■ Press ctrl+alt+delete. Power Options Using Power Schemes A power scheme controls the amount of power the notebook uses while running on external power or on the screen. 2-10 Hardware and Software Guide To select a preset power scheme or create a custom power scheme: 1. Power Emergency Shutdown...

Hardware and Software Guide
Page 44
Select the Always show icon on the screen in Windows, use before charging it. ■ When you charge a battery pack, charge it . For information about 10 percent of simply charging it fully. To ...
Select the Always show icon on the screen in Windows, use before charging it. ■ When you charge a battery pack, charge it . For information about 10 percent of simply charging it fully. To ...

Hardware and Software Guide
Page 51
... as You Work To conserve power as you work , initiate standby or hibernation, or shut down the notebook. Volume can be adjusted with the volume buttons. ■ Minimize screen brightness. When you must use settings. For example: ❏ Turn off wireless connections and exit modem ...10063; Stop or remove an inserted PC Card or ExpressCard. ❏ Disable or remove an inserted digital card. ❏ Turn off a device connected to "Using Power Schemes," earlier in Windows: ■ Select a short wait for the screen saver and select a screen saver with low-power-use the internal...
... as You Work To conserve power as you work , initiate standby or hibernation, or shut down the notebook. Volume can be adjusted with the volume buttons. ■ Minimize screen brightness. When you must use settings. For example: ❏ Turn off wireless connections and exit modem ...10063; Stop or remove an inserted PC Card or ExpressCard. ❏ Disable or remove an inserted digital card. ❏ Turn off a device connected to "Using Power Schemes," earlier in Windows: ■ Select a short wait for the screen saver and select a screen saver with low-power-use the internal...

Hardware and Software Guide
Page 61
...+f10 fn+f11 fn+f12 fn+backspace fn+enter fn+esc 3-6 Hardware and Software Guide Increases screen brightness. For instructions, refer to "Setting Other Power Preferences" in an application Selects an option on the screen. Decreases screen brightness. Default Function Opens Help and Support Center. Opens default Internet browser. Plays the next track...
...+f10 fn+f11 fn+f12 fn+backspace fn+enter fn+esc 3-6 Hardware and Software Guide Increases screen brightness. For instructions, refer to "Setting Other Power Preferences" in an application Selects an option on the screen. Decreases screen brightness. Default Function Opens Help and Support Center. Opens default Internet browser. Plays the next track...


