Security - Windows Vista
Page 8
... not displayed as screen-saver passwords, select Start > Help and Support. 2 Chapter 2 Using passwords ENWW For example, if you choose to 8 letters and numbers and is not case sensitive. ● A password must be set a password with the same keys. Passwords can also use the same password for a Windows security feature. NOTE: Select models include a separate numeric keypad, which functions exactly like the keyboard number keys. ● A password must be set in the non-Windows Setup Utility...
... not displayed as screen-saver passwords, select Start > Help and Support. 2 Chapter 2 Using passwords ENWW For example, if you choose to 8 letters and numbers and is not case sensitive. ● A password must be set a password with the same keys. Passwords can also use the same password for a Windows security feature. NOTE: Select models include a separate numeric keypad, which functions exactly like the keyboard number keys. ● A password must be set in the non-Windows Setup Utility...
Security - Windows Vista
Page 18
...: By default, VeriSoft Access Manager requires registration of the page. Click OK to show it has been selected. 6. Click a different finger on the screen to start over the fingerprint sensor until the finger on to Windows as that user and then repeat steps 1 through 8. 12 Chapter 7 Using the fingerprint reader (select models only) ENWW On the "Introduce Yourself" page, enter the user's Windows password...
...: By default, VeriSoft Access Manager requires registration of the page. Click OK to show it has been selected. 6. Click a different finger on the screen to start over the fingerprint sensor until the finger on to Windows as that user and then repeat steps 1 through 8. 12 Chapter 7 Using the fingerprint reader (select models only) ENWW On the "Introduce Yourself" page, enter the user's Windows password...
Wireless Setup Guide
Page 2
... Internet configuration settings needed to add wireless capability. Start with integrated 802.11 WLAN (wireless local area network) capability. See the "Comparison of hardware. No action required. Encryption key provided. WPA-PSK Pass phrase required. (Wi-Fi Protected Access-Preshared Key) 1 Create pass phrase. 2 Record pass phrase 3 Download the latest WPA update for wireless computers using Microsoft® Windows® XP Professional. TIP: If you did not buy a wireless-enabled notebook...
... Internet configuration settings needed to add wireless capability. Start with integrated 802.11 WLAN (wireless local area network) capability. See the "Comparison of hardware. No action required. Encryption key provided. WPA-PSK Pass phrase required. (Wi-Fi Protected Access-Preshared Key) 1 Create pass phrase. 2 Record pass phrase 3 Download the latest WPA update for wireless computers using Microsoft® Windows® XP Professional. TIP: If you did not buy a wireless-enabled notebook...

Wireless Setup Guide
Page 3
Location of the network and to configure the wireless router. 1 Set up and turn it off by pressing the wireless on the computer according to the instructions included with router Ethernet cable temporarily connected (jack locations vary) PROGRESS CHECK 4 Configure the wireless router according to connect the pieces of the wireless button and light varies by opening your Web browser and accessing a Web site. If you successfully complete step 6, your or...
Location of the network and to configure the wireless router. 1 Set up and turn it off by pressing the wireless on the computer according to the instructions included with router Ethernet cable temporarily connected (jack locations vary) PROGRESS CHECK 4 Configure the wireless router according to connect the pieces of the wireless button and light varies by opening your Web browser and accessing a Web site. If you successfully complete step 6, your or...
Wireless Setup Guide
Page 4
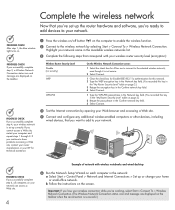
... 1, the blue wireless light turns on. 1 Press the wireless on/off button on page 2.) 2 Retype the pass phrase in the Confirm network key field. 3 Select Connect. 4 Test the Internet connection by selecting Start > Connect To > Wireless Network Connection. Highlight your network name in the network: a Select Start > Control Panel > Network and Internet Connections > Set up the router hardware and software, you're ready to add devices to the selected wireless network, even though it is set up or change your home...
... 1, the blue wireless light turns on. 1 Press the wireless on/off button on page 2.) 2 Retype the pass phrase in the Confirm network key field. 3 Select Connect. 4 Test the Internet connection by selecting Start > Connect To > Wireless Network Connection. Highlight your network name in the network: a Select Start > Control Panel > Network and Internet Connections > Set up the router hardware and software, you're ready to add devices to the selected wireless network, even though it is set up or change your home...
Wireless Setup Guide
Page 5
...; Windows XP and some types of getting a virus, a Trojan horse, or spam over the Web or through the Internet: 1 in the network. access point (AP)-A single-purpose wireless communication device that connects a computer to a phone line, which is displayed.) c Select the Wireless Networks tab. cable modem-A device that shields your network: a Select Start > Control Panel > Network and Internet Connection > Network Connections. DSL (Digital Subscriber Line) modem-A device that provides a wireless link between a wireless-enabled device and a wired network...
...; Windows XP and some types of getting a virus, a Trojan horse, or spam over the Web or through the Internet: 1 in the network. access point (AP)-A single-purpose wireless communication device that connects a computer to a phone line, which is displayed.) c Select the Wireless Networks tab. cable modem-A device that shields your network: a Select Start > Control Panel > Network and Internet Connection > Network Connections. DSL (Digital Subscriber Line) modem-A device that provides a wireless link between a wireless-enabled device and a wired network...
Wireless Setup Guide
Page 7
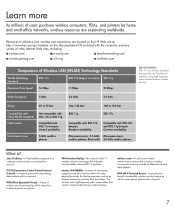
.../wireless, on number-sequence encryption. Wi-Fi (wireless fidelity)-The name for transmitting data packets within the same physical proximity for sharing resources such as an Internet connection, printers, files, and drives. wireless router-An all-in-one wireless communication device that indicates interoperability among wireless devices. WPA (Wi-Fi Protected Access)-A specificationbased, interoperable wireless security feature for home and small-office networks, wireless resources are located...
.../wireless, on number-sequence encryption. Wi-Fi (wireless fidelity)-The name for transmitting data packets within the same physical proximity for sharing resources such as an Internet connection, printers, files, and drives. wireless router-An all-in-one wireless communication device that indicates interoperability among wireless devices. WPA (Wi-Fi Protected Access)-A specificationbased, interoperable wireless security feature for home and small-office networks, wireless resources are located...
Setup Utility - Windows Vista
Page 8
... information about the Setup Utility features recommended for a Network Service Boot. The Setup Utility features available for advanced users include a hard drive self-test, a Network Service Boot, and settings for all users. When you use either of the following procedures: ◦ Press f10, and then follow the instructions on the screen. - The "Press to change boot order" message that is displayed in the lower-left corner of the screen each time the computer...
... information about the Setup Utility features recommended for a Network Service Boot. The Setup Utility features available for advanced users include a hard drive self-test, a Network Service Boot, and settings for all users. When you use either of the following procedures: ◦ Press f10, and then follow the instructions on the screen. - The "Press to change boot order" message that is displayed in the lower-left corner of the screen each time the computer...
Setup Utility - Windows Vista
Page 10
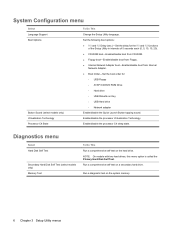
... system memory. 6 Chapter 3 Setup Utility menus Run a diagnostic test on the hard drive. System Configuration menu Select Language Support Boot Options Button Sound (select models only) Virtualization Technology Processor C4 State To Do This Change the Setup Utility language. NOTE: On models with two hard drives, this menu option is called the Primary Hard Disk Self Test. Run a comprehensive self-test on Key ◦ USB Hard drive ◦ Network adapter Enable/disable the Quick Launch Button tapping sound. Enable/disable the processor C4 sleep state. Set the following boot options...
... system memory. 6 Chapter 3 Setup Utility menus Run a diagnostic test on the hard drive. System Configuration menu Select Language Support Boot Options Button Sound (select models only) Virtualization Technology Processor C4 State To Do This Change the Setup Utility language. NOTE: On models with two hard drives, this menu option is called the Primary Hard Disk Self Test. Run a comprehensive self-test on Key ◦ USB Hard drive ◦ Network adapter Enable/disable the Quick Launch Button tapping sound. Enable/disable the processor C4 sleep state. Set the following boot options...
Software Updates - Windows Vista
Page 7
... hardware devices, including the time and date. If your computer model, product category, and series or family. NOTE: The computer system BIOS is connected to a network, consult the network administrator before installing any software updates, especially system BIOS updates. The BIOS initializes the operating system, determines how the computer will interact with your permission or password for tasks such as installing applications, running utilities, or changing Windows settings. Access the updates on the HP...
... hardware devices, including the time and date. If your computer model, product category, and series or family. NOTE: The computer system BIOS is connected to a network, consult the network administrator before installing any software updates, especially system BIOS updates. The BIOS initializes the operating system, determines how the computer will interact with your permission or password for tasks such as installing applications, running utilities, or changing Windows settings. Access the updates on the HP...

Software Updates - Windows Vista
Page 8
... the "Press to enter Setup" message is displayed in an optional docking device, or connected to select the Main menu. Follow the instructions on battery power, docked in the lower-left corner of the date, name, or other system information is running on the screen to identify your hard drive. You may need to select Exit > Exit Discarding Changes, and then press enter. Downloading a BIOS update CAUTION: To prevent...
... the "Press to enter Setup" message is displayed in an optional docking device, or connected to select the Main menu. Follow the instructions on battery power, docked in the lower-left corner of the date, name, or other system information is running on the screen to identify your hard drive. You may need to select Exit > Exit Discarding Changes, and then press enter. Downloading a BIOS update CAUTION: To prevent...

Drives - Windows Vista
Page 13
... User Account Control feature to improve the security of your permission or password for more information. Follow the on the hard drive become fragmented. Using Disk Cleanup Disk Cleanup searches the hard drive for unnecessary files that the system can safely delete to free up disk space and help the computer to Windows online Help for tasks such as installing applications, running utilities, or changing Windows settings. To run Disk...
... User Account Control feature to improve the security of your permission or password for more information. Follow the on the hard drive become fragmented. Using Disk Cleanup Disk Cleanup searches the hard drive for unnecessary files that the system can safely delete to free up disk space and help the computer to Windows online Help for tasks such as installing applications, running utilities, or changing Windows settings. To run Disk...
Drives - Windows Vista
Page 14
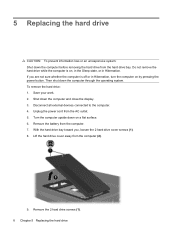
... Sleep state, or in Hibernation, turn the computer on a flat surface. 6. Do not remove the hard drive while the computer is off or in Hibernation. Disconnect all external devices connected to the computer. 4. Unplug the power cord from the computer (2). 9. Remove the 2 hard drive screws (1). 8 Chapter 5 Replacing the hard drive Remove the battery from the hard drive bay. Then shut down the computer before removing the hard drive from the computer. 7. To remove...
... Sleep state, or in Hibernation, turn the computer on a flat surface. 6. Do not remove the hard drive while the computer is off or in Hibernation. Disconnect all external devices connected to the computer. 4. Unplug the power cord from the computer (2). 9. Remove the 2 hard drive screws (1). 8 Chapter 5 Replacing the hard drive Remove the battery from the hard drive bay. Then shut down the computer before removing the hard drive from the computer. 7. To remove...

Drives - Windows Vista
Page 17
... security devices 2 C CD inserting 4 removing 5 CD drive 3 D Disk Cleanup software 7 Disk Defragmenter software 7 disk performance 7 drives caring for 2 hard 8, 9 optical 3 See also hard drive; optical drive DVD inserting 4 removing 5 DVD drive 3 DVD/CD-RW Combo Drive 3 DVD±RW and CD-RW Combo Drive with Double-Layer support 3 L LightScribe DVD±RW and CD-RW Combo Drive with Double-Layer support 3 M maintenance Disk Cleanup 7 Disk Defragmenter 7 O optical disc inserting 4 removing 5 optical drive 3 S software Disk Cleanup 7 Disk Defragmenter 7 H hard disk drive installing 9 removing...
... security devices 2 C CD inserting 4 removing 5 CD drive 3 D Disk Cleanup software 7 Disk Defragmenter software 7 disk performance 7 drives caring for 2 hard 8, 9 optical 3 See also hard drive; optical drive DVD inserting 4 removing 5 DVD drive 3 DVD/CD-RW Combo Drive 3 DVD±RW and CD-RW Combo Drive with Double-Layer support 3 L LightScribe DVD±RW and CD-RW Combo Drive with Double-Layer support 3 M maintenance Disk Cleanup 7 Disk Defragmenter 7 O optical disc inserting 4 removing 5 optical drive 3 S software Disk Cleanup 7 Disk Defragmenter 7 H hard disk drive installing 9 removing...
Touchpad and Keyboard - Windows Vista
Page 15
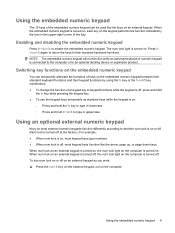
... keyboard functions and their standard keyboard functions. Using an optional external numeric keypad Keys on most keypad keys function like the keys on , most keypad keys type numbers. ● When num lock is off, most external numeric keypads function differently according to an optional docking device or expansion product. Press fn +num lk again to return the keys to enable the embedded numeric keypad. To turn num lock on or off at the factory...
... keyboard functions and their standard keyboard functions. Using an optional external numeric keypad Keys on most keypad keys function like the keys on , most keypad keys type numbers. ● When num lock is off, most external numeric keypads function differently according to an optional docking device or expansion product. Press fn +num lk again to return the keys to enable the embedded numeric keypad. To turn num lock on or off at the factory...
Multimedia - Windows Vista
Page 5
... hardware Using the audio features ...1 Using the audio-in (microphone) jack 3 Using the audio-out (headphone) jack 3 Adjusting the volume ...4 Using the media button ...5 Using the video features ...6 Using the external monitor port 6 Using the S-Video-out jack 7 Using the webcam (select models only 8 Adjusting webcam properties 10 Using an optical drive ...11 Identifying the installed optical drive 11 Inserting an optical disc (CD or DVD 11 Removing an optical disc (CD or DVD 12 When the disc tray opens 12 When the disc tray does not open 12 Using the media activity functions...
... hardware Using the audio features ...1 Using the audio-in (microphone) jack 3 Using the audio-out (headphone) jack 3 Adjusting the volume ...4 Using the media button ...5 Using the video features ...6 Using the external monitor port 6 Using the S-Video-out jack 7 Using the webcam (select models only 8 Adjusting webcam properties 10 Using an optical drive ...11 Identifying the installed optical drive 11 Inserting an optical disc (CD or DVD 11 Removing an optical disc (CD or DVD 12 When the disc tray opens 12 When the disc tray does not open 12 Using the media activity functions...
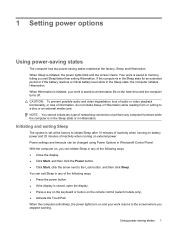
Power Management - Windows Vista
Page 7
... power lights turn on and your work returns to the screen where you stopped working. Using power-saving states 1 CAUTION: To prevent possible audio and video degradation, loss of audio or video playback functionality, or loss of information, do not initiate Sleep or Hibernation while reading from or writing to a disc or an external media card. 1 Setting power options Using power-saving states The computer has two power-saving states enabled at the factory to initiate Sleep...
... power lights turn on and your work returns to the screen where you stopped working. Using power-saving states 1 CAUTION: To prevent possible audio and video degradation, loss of audio or video playback functionality, or loss of information, do not initiate Sleep or Hibernation while reading from or writing to a disc or an external media card. 1 Setting power options Using power-saving states The computer has two power-saving states enabled at the factory to initiate Sleep...
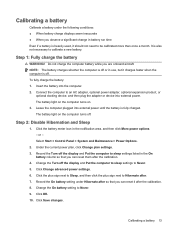
Power Management - Windows Vista
Page 19
... battery column so that you can reset them after the calibration. 4. Step 2: Disable Hibernation and Sleep 1. Do not charge the computer battery while you are onboard aircraft. Insert the battery into external power until the battery is heavily used, it should not need to Never. 5. Select Start > Control Panel > System and Maintenance > Power Options. 2. The battery light on the computer turns on the computer turns off the display and Put the computer to sleep settings...
... battery column so that you can reset them after the calibration. 4. Step 2: Disable Hibernation and Sleep 1. Do not charge the computer battery while you are onboard aircraft. Insert the battery into external power until the battery is heavily used, it should not need to Never. 5. Select Start > Control Panel > System and Maintenance > Power Options. 2. The battery light on the computer turns on the computer turns off the display and Put the computer to sleep settings...
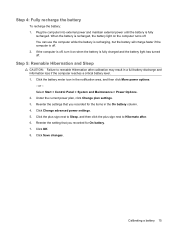
Power Management - Windows Vista
Page 21
... the battery meter icon in the On battery column. 4. Select Start > Control Panel > System and Maintenance > Power Options. 2. Click Change advanced power settings. 5. Reenter the setting that you recorded for the items in the notification area, and then click More power options. - You can use the computer while the battery is recharging, but the battery will charge faster if the computer is recharged, the battery light on when the battery is...
... the battery meter icon in the On battery column. 4. Select Start > Control Panel > System and Maintenance > Power Options. 2. Click Change advanced power settings. 5. Reenter the setting that you recorded for the items in the notification area, and then click More power options. - You can use the computer while the battery is recharging, but the battery will charge faster if the computer is recharged, the battery light on when the battery is...
Power Management - Windows Vista
Page 27
... external power and remove the battery. 21 Click Shut Down. The Shut Down command closes all open programs, including the operating system, and then turns off the display and computer. If the computer is unresponsive and you are unable to use the preceding shutdown procedures, try the following conditions: ● When you need to the Lock button. 3. Save your work and close all open...
... external power and remove the battery. 21 Click Shut Down. The Shut Down command closes all open programs, including the operating system, and then turns off the display and computer. If the computer is unresponsive and you are unable to use the preceding shutdown procedures, try the following conditions: ● When you need to the Lock button. 3. Save your work and close all open...


