
End User License Agreement
Page 1
...be governed DOWNLOADING, OR b. GRANT OF LICENSE. You do not have Software Product into Your Computer's AGREE TO ALL TERMS AND temporary memory (RAM) for CONDITIONS OF THIS EULA. Notwithstanding the terms and conditions of the Software Product for use the Software Product only on those ... the Software PRODUCT ARE OFFERED ONLY Product. BY purposes of the HP Product. You may make archival or back-up purposes. Other software may load the Software ON THE CONDITION THAT YOU Product into the local memory or storage device of using the Software INSTALLING, COPYING, Product. ...
...be governed DOWNLOADING, OR b. GRANT OF LICENSE. You do not have Software Product into Your Computer's AGREE TO ALL TERMS AND temporary memory (RAM) for CONDITIONS OF THIS EULA. Notwithstanding the terms and conditions of the Software Product for use the Software Product only on those ... the Software PRODUCT ARE OFFERED ONLY Product. BY purposes of the HP Product. You may make archival or back-up purposes. Other software may load the Software ON THE CONDITION THAT YOU Product into the local memory or storage device of using the Software INSTALLING, COPYING, Product. ...

HP USB Digital Drive
Page 2
You can be included. The HP USB Digital Drive 1 is running Microsoft Windows XP Home, Windows XP Pro, or Windows 2000. User Guide 1 However, you will need an SD memory card to operate the Digital Drive. An SD memory card 2 may not be used with any HP authorized reseller. The Digital Drive can purchase one (in various storage capacities) from any computer that is a pocket-sized SD (Secure Digital) memory drive for storing and transferring files such as digital pictures, music, video, and data.
You can be included. The HP USB Digital Drive 1 is running Microsoft Windows XP Home, Windows XP Pro, or Windows 2000. User Guide 1 However, you will need an SD memory card to operate the Digital Drive. An SD memory card 2 may not be used with any HP authorized reseller. The Digital Drive can purchase one (in various storage capacities) from any computer that is a pocket-sized SD (Secure Digital) memory drive for storing and transferring files such as digital pictures, music, video, and data.

HP USB Digital Drive
Page 3
Remove the cap 1 of the Digital Drive. 2. Installing the SD Memory Card 1. Insert the SD memory card into the SD slot 2 with the notched corner positioned on the lower left as shown. If the SD memory card does not slide in properly, gently pull it out and reinsert it. 2 User Guide
Remove the cap 1 of the Digital Drive. 2. Installing the SD Memory Card 1. Insert the SD memory card into the SD slot 2 with the notched corner positioned on the lower left as shown. If the SD memory card does not slide in properly, gently pull it out and reinsert it. 2 User Guide
HP USB Digital Drive
Page 10
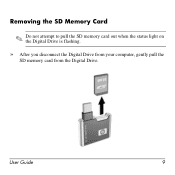
User Guide 9 Removing the SD Memory Card ✎ Do not attempt to pull the SD memory card out when the status light on the Digital Drive is flashing. » After you disconnect the Digital Drive from your computer, gently pull the SD memory card from the Digital Drive.
User Guide 9 Removing the SD Memory Card ✎ Do not attempt to pull the SD memory card out when the status light on the Digital Drive is flashing. » After you disconnect the Digital Drive from your computer, gently pull the SD memory card from the Digital Drive.
External Media Cards
Page 3
Table of contents 1 Memory Reader cards (select models only) Inserting a digital card ...2 Stopping or removing a digital card ...3 2 ExpressCards Configuring an ExpressCard ...5 Inserting an ExpressCard ...6 Stopping or removing an ExpressCard 8 Index ...9 ENWW iii
Table of contents 1 Memory Reader cards (select models only) Inserting a digital card ...2 Stopping or removing a digital card ...3 2 ExpressCards Configuring an ExpressCard ...5 Inserting an ExpressCard ...6 Stopping or removing an ExpressCard 8 Index ...9 ENWW iii
External Media Cards
Page 5
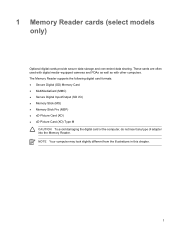
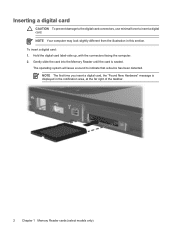
... supports the following digital card formats: ● Secure Digital (SD) Memory Card ● MultiMediaCard (MMC) ● Secure Digital Input/Output (SD I/O) ● Memory Stick (MS) ● Memory Stick Pro (MSP) ● xD-Picture Card (XD) ● xD Picture Card (XD) Type M CAUTION To avoid damaging the ...digital card or the computer, do not insert any type of adapter into the Memory Reader. NOTE Your computer may look slightly different from the illustrations in this chapter. ENWW 1 These cards are often used with digital media...
... supports the following digital card formats: ● Secure Digital (SD) Memory Card ● MultiMediaCard (MMC) ● Secure Digital Input/Output (SD I/O) ● Memory Stick (MS) ● Memory Stick Pro (MSP) ● xD-Picture Card (XD) ● xD Picture Card (XD) Type M CAUTION To avoid damaging the ...digital card or the computer, do not insert any type of adapter into the Memory Reader. NOTE Your computer may look slightly different from the illustrations in this chapter. ENWW 1 These cards are often used with digital media...
External Media Cards
Page 6
Gently slide the card into the Memory Reader until the card is displayed in this section. To insert a digital card: 1. NOTE The first time you insert a digital card, the "Found New Hardware" ... facing the computer. 2. NOTE Your computer may look slightly different from the illustration in the notification area, at the far right of the taskbar. 2 Chapter 1 Memory Reader cards (select models only) ENWW Inserting a digital card CAUTION To prevent damage to the digital card connectors, use minimal force to indicate that a device...
Gently slide the card into the Memory Reader until the card is displayed in this section. To insert a digital card: 1. NOTE The first time you insert a digital card, the "Found New Hardware" ... facing the computer. 2. NOTE Your computer may look slightly different from the illustration in the notification area, at the far right of the taskbar. 2 Chapter 1 Memory Reader cards (select models only) ENWW Inserting a digital card CAUTION To prevent damage to the digital card connectors, use minimal force to indicate that a device...

External Media Cards
Page 8
4 Chapter 1 Memory Reader cards (select models only) ENWW
4 Chapter 1 Memory Reader cards (select models only) ENWW
External Media Cards
Page 9
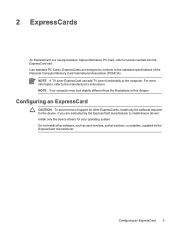
... software required for your operating system. ENWW Configuring an ExpressCard 5 2 ExpressCards An ExpressCard is a next-generation, high-performance PC Card, which must be inserted into the ExpressCard slot. NOTE Your computer may look slightly different from the illustrations in this ...chapter. Configuring an ExpressCard CAUTION To prevent loss of the Personal Computer Memory Card International Association (PCMCIA). Like standard PC Cards, ExpressCards are instructed by the ExpressCard manufacturer. If you are designed to conform to install ...
... software required for your operating system. ENWW Configuring an ExpressCard 5 2 ExpressCards An ExpressCard is a next-generation, high-performance PC Card, which must be inserted into the ExpressCard slot. NOTE Your computer may look slightly different from the illustrations in this ...chapter. Configuring an ExpressCard CAUTION To prevent loss of the Personal Computer Memory Card International Association (PCMCIA). Like standard PC Cards, ExpressCards are instructed by the ExpressCard manufacturer. If you are designed to conform to install ...

Memory Modules
Page 3
Table of contents 1 Replacing a memory module 2 Effects of increasing memory Index ...9 ENWW iii
Table of contents 1 Replacing a memory module 2 Effects of increasing memory Index ...9 ENWW iii
Memory Modules
Page 5
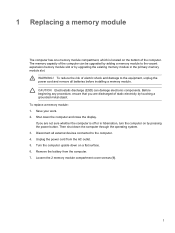
... Before beginning any procedure, ensure that you are discharged of the computer can damage electronic components. ENWW 1 The memory capacity of static electricity by upgrading the existing memory module in hibernation, turn the computer on a flat surface. 6. Unplug the power cord from the computer. ...7. CAUTION Electrostatic discharge (ESD) can be upgraded by adding a memory module to the computer. 4. Shut down the computer through the operating system. 3. If you are not sure whether the computer is located...
... Before beginning any procedure, ensure that you are discharged of the computer can damage electronic components. ENWW 1 The memory capacity of static electricity by upgrading the existing memory module in hibernation, turn the computer on a flat surface. 6. Unplug the power cord from the computer. ...7. CAUTION Electrostatic discharge (ESD) can be upgraded by adding a memory module to the computer. 4. Shut down the computer through the operating system. 3. If you are not sure whether the computer is located...
Memory Modules
Page 6
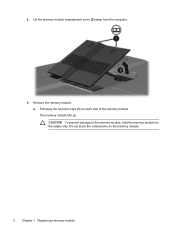
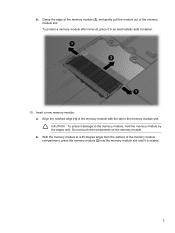
The memory module tilts up. 8. Remove the memory module: a. Pull away the retention clips (1) on the memory module. 2 Chapter 1 Replacing a memory module ENWW Do not touch the components on each side of the memory module. Lift the memory module compartment cover (2) away from the computer. 9. CAUTION To prevent damage to the memory module, hold the memory module by the edges only.
The memory module tilts up. 8. Remove the memory module: a. Pull away the retention clips (1) on the memory module. 2 Chapter 1 Replacing a memory module ENWW Do not touch the components on each side of the memory module. Lift the memory module compartment cover (2) away from the computer. 9. CAUTION To prevent damage to the memory module, hold the memory module by the edges only.
Memory Modules
Page 7
... the components on the memory module. CAUTION To prevent damage to the memory module, hold the memory module by the edges only. b. Insert a new memory module: a. With the memory module at a 45-degree angle from the surface of the memory module compartment, press the memory module (2) into the memory module slot until it in the memory module slot. Grasp...
... the components on the memory module. CAUTION To prevent damage to the memory module, hold the memory module by the edges only. b. Insert a new memory module: a. With the memory module at a 45-degree angle from the surface of the memory module compartment, press the memory module (2) into the memory module slot until it in the memory module slot. Grasp...
Memory Modules
Page 8
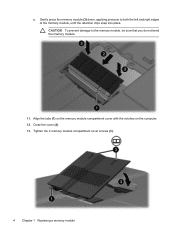
CAUTION To prevent damage to both the left and right edges of the memory module, until the retention clips snap into place. Tighten the 2 memory module compartment cover screws (3). 4 Chapter 1 Replacing a memory module ENWW Close the cover (2). 13. c. Gently press the memory module (3) down, applying pressure to the memory module, be sure that you do not bend the memory module. 11. Align the tabs (1) on the memory module compartment cover with the notches on the computer. 12.
CAUTION To prevent damage to both the left and right edges of the memory module, until the retention clips snap into place. Tighten the 2 memory module compartment cover screws (3). 4 Chapter 1 Replacing a memory module ENWW Close the cover (2). 13. c. Gently press the memory module (3) down, applying pressure to the memory module, be sure that you do not bend the memory module. 11. Align the tabs (1) on the memory module compartment cover with the notches on the computer. 12.

Memory Modules
Page 10
6 Chapter 1 Replacing a memory module ENWW
6 Chapter 1 Replacing a memory module ENWW
Memory Modules
Page 11
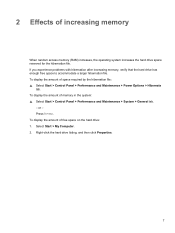
... System > General tab. - Right-click the hard drive listing, and then click Properties. If you experience problems with hibernation after increasing memory, verify that the hard drive has enough free space to accommodate a larger hibernation file. To display the amount of free space on the... hard drive: 1. Select Start > My Computer. 2. ENWW 7 To display the amount of increasing memory When random access memory (RAM) increases, the operating system increases the hard drive space reserved for the hibernation file. 2 Effects of space required by the ...
... System > General tab. - Right-click the hard drive listing, and then click Properties. If you experience problems with hibernation after increasing memory, verify that the hard drive has enough free space to accommodate a larger hibernation file. To display the amount of free space on the... hard drive: 1. Select Start > My Computer. 2. ENWW 7 To display the amount of increasing memory When random access memory (RAM) increases, the operating system increases the hard drive space reserved for the hibernation file. 2 Effects of space required by the ...

Memory Modules
Page 12
8 Chapter 2 Effects of increasing memory ENWW
8 Chapter 2 Effects of increasing memory ENWW
Memory Modules
Page 13
Index H hard disk drive space 7 hard drive space 7 hibernation file 7 M memory displaying free space 7 increasing 7 replacing memory modules 1 memory module inserting 3 removing 2 replacing 1 memory module compartment cover removing 2 replacing 4 ENWW Index 9
Index H hard disk drive space 7 hard drive space 7 hibernation file 7 M memory displaying free space 7 increasing 7 replacing memory modules 1 memory module inserting 3 removing 2 replacing 1 memory module compartment cover removing 2 replacing 4 ENWW Index 9
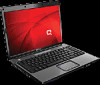
Notebook Tour Guide
Page 14
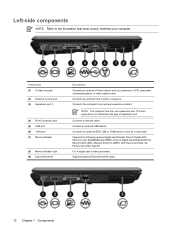
...-out jack (2) External monitor port (3) Expansion port 3 (4) RJ-45 (network) jack (5) USB port (6) 1394 port (7) Memory Reader (8) Memory Reader light (9) ExpressCard slot Description Connects an optional S-Video device such as a camcorder. Connects the computer to the illustration that... The computer has only one expansion port. Supports the following optional digital card formats: Secure Digital (SD) Memory Card, MultiMediaCard (MMC), Secure Digital Input/Output (SD I/O), Memory Stick (MS), Memory Stick Pro (MSP), xD-Picture Card (XD), xDPicture Card (XD) Type M. The term expansion port ...
...-out jack (2) External monitor port (3) Expansion port 3 (4) RJ-45 (network) jack (5) USB port (6) 1394 port (7) Memory Reader (8) Memory Reader light (9) ExpressCard slot Description Connects an optional S-Video device such as a camcorder. Connects the computer to the illustration that... The computer has only one expansion port. Supports the following optional digital card formats: Secure Digital (SD) Memory Card, MultiMediaCard (MMC), Secure Digital Input/Output (SD I/O), Memory Stick (MS), Memory Stick Pro (MSP), xD-Picture Card (XD), xDPicture Card (XD) Type M. The term expansion port ...
Notebook Tour Guide
Page 16
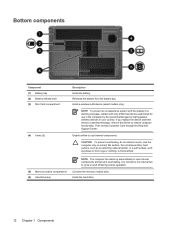
...Description Holds the battery. If you replace the device and then receive a warning message, remove the device to cool internal components. Contains the memory module slots. Do not allow another hard surface, such as an adjoining optional printer, or a soft surface, such as pillows or thick rugs... or clothing, to block airflow. (5) Memory module compartment (6) Hard drive bay NOTE The computer fan starts up automatically to cycle on a hard, flat surface. Then contact Customer Care through...
...Description Holds the battery. If you replace the device and then receive a warning message, remove the device to cool internal components. Contains the memory module slots. Do not allow another hard surface, such as an adjoining optional printer, or a soft surface, such as pillows or thick rugs... or clothing, to block airflow. (5) Memory module compartment (6) Hard drive bay NOTE The computer fan starts up automatically to cycle on a hard, flat surface. Then contact Customer Care through...


