Wireless Setup Guide
Page 2
... Wireless LAN (WLAN) Technology Standards" table on page 7. Encryption key provided. Start with the modem, Internet service, and the broadband Internet configuration settings needed to set up your wireless router. Use the table below to record router security level. See the "Comparison of hardware. WPA-PSK Pass phrase required. (Wi-Fi Protected Access-Preshared Key) 1 Create pass phrase. 2 Record pass phrase 3 Download the latest WPA update for "WPA." 2 The instructions...
... Wireless LAN (WLAN) Technology Standards" table on page 7. Encryption key provided. Start with the modem, Internet service, and the broadband Internet configuration settings needed to set up your wireless router. Use the table below to record router security level. See the "Comparison of hardware. WPA-PSK Pass phrase required. (Wi-Fi Protected Access-Preshared Key) 1 Create pass phrase. 2 Record pass phrase 3 Download the latest WPA update for "WPA." 2 The instructions...
Wireless Setup Guide
Page 4
... step 1, the blue wireless light turns on. 1 Press the wireless on/off button on page 2.) 2 Retype the pass phrase in the network: a Select Start > Control Panel > Network and Internet Connections > Set up correctly. PROGRESS CHECK If you successfully complete step 4, your wireless network is not secure. 2 Select Connect. 1 Clear the check box for Enable IEEE 802.11x authentication for this network. 2 Type the WEP encryption key in the Network key field. (You recorded...
... step 1, the blue wireless light turns on. 1 Press the wireless on/off button on page 2.) 2 Retype the pass phrase in the network: a Select Start > Control Panel > Network and Internet Connections > Set up correctly. PROGRESS CHECK If you successfully complete step 4, your wireless network is not secure. 2 Select Connect. 1 Clear the check box for Enable IEEE 802.11x authentication for this network. 2 Type the WEP encryption key in the Network key field. (You recorded...
Wireless Setup Guide
Page 5
... have not already enabled security encryption, follow the router manufacturer's instructions to set the highest level of security on the router. Setting the highest level of security provided by a wireless router, gateway, or other emerging Internet threats. ■ Set security on your network: a Select Start > Control Panel > Network and Internet Connection > Network Connections. A unique key is displayed.) c Select the Wireless Networks tab. Ethernet-The most common LAN technology (using one . Refer to...
... have not already enabled security encryption, follow the router manufacturer's instructions to set the highest level of security on the router. Setting the highest level of security provided by a wireless router, gateway, or other emerging Internet threats. ■ Set security on your network: a Select Start > Control Panel > Network and Internet Connection > Network Connections. A unique key is displayed.) c Select the Wireless Networks tab. Ethernet-The most common LAN technology (using one . Refer to...
Wireless Setup Guide
Page 7
... feet 802.11g 100 to a network. WEP (Wired Equivalent Privacy)-A type of connecting computers and other features. wireless router-An all-in-one wireless communication device that indicates interoperability among wireless devices. Learn more As millions of users purchase wireless computers, PDAs, and printers for sharing resources such as an Internet connection, printers, files, and drives. wireless LAN (WLAN)-A system of wireless security provided by Wi-Fi...
... feet 802.11g 100 to a network. WEP (Wired Equivalent Privacy)-A type of connecting computers and other features. wireless router-An all-in-one wireless communication device that indicates interoperability among wireless devices. Learn more As millions of users purchase wireless computers, PDAs, and printers for sharing resources such as an Internet connection, printers, files, and drives. wireless LAN (WLAN)-A system of wireless security provided by Wi-Fi...

Limited Warranty and Technical Support
Page 5
... OTHER THAN SOFTWARE INSTALLED BY COMPAQ WHEN THE PRODUCT IS MANUFACTURED. YOU SHOULD MAKE PERIODIC BACKUP COPIES OF THE DATA STORED ON YOUR HARD DRIVE OR OTHER STORAGE DEVICES AS A PRECAUTION AGAINST POSSIBLE FAILURES, ALTERATION, OR LOSS OF THE DATA. COMPAQ IS NOT RESPONSIBLE FOR DAMAGE TO OR LOSS OF ANY PROGRAMS, DATA, OR REMOVABLE STORAGE MEDIA. These terms...
... OTHER THAN SOFTWARE INSTALLED BY COMPAQ WHEN THE PRODUCT IS MANUFACTURED. YOU SHOULD MAKE PERIODIC BACKUP COPIES OF THE DATA STORED ON YOUR HARD DRIVE OR OTHER STORAGE DEVICES AS A PRECAUTION AGAINST POSSIBLE FAILURES, ALTERATION, OR LOSS OF THE DATA. COMPAQ IS NOT RESPONSIBLE FOR DAMAGE TO OR LOSS OF ANY PROGRAMS, DATA, OR REMOVABLE STORAGE MEDIA. These terms...

Limited Warranty and Technical Support
Page 8
... a Compaq Support Specialist: If you find a variety of users. Join the Customer Communities: Where novices to technical experts collaborate to drivers and product documentation: Find original product drivers, latest updates and software fixes, Limited Warranty information, and product documentation. Open an online service event with your needs: ! Participate in existing product discussions, review commonly asked questions, and answer or post new questions...
... a Compaq Support Specialist: If you find a variety of users. Join the Customer Communities: Where novices to technical experts collaborate to drivers and product documentation: Find original product drivers, latest updates and software fixes, Limited Warranty information, and product documentation. Open an online service event with your needs: ! Participate in existing product discussions, review commonly asked questions, and answer or post new questions...

Hardware-Software Guide
Page 6
... 5-13 Turning Off and Disabling the Devices 5-14 6 Security Security Features 6-1 QuickLock 6-3 Setup Utility and Windows Passwords 6-4 Coordinating Passwords 6-6 Choosing a Password 6-6 Setup Utility Administrator Password 6-7 Setting an Administrator Password 6-8 Entering an Administrator Password 6-8 Setup Utility Power-On Password 6-9 Setting a Power-On Password 6-10 Entering a Power-On Password 6-10 Setup Utility Device Security 6-11 Antivirus Software 6-12 Critical Security Updates for Windows XP 6-13 Firewall Software 6-14 Optional Security Cable 6-15 vi Hardware and...
... 5-13 Turning Off and Disabling the Devices 5-14 6 Security Security Features 6-1 QuickLock 6-3 Setup Utility and Windows Passwords 6-4 Coordinating Passwords 6-6 Choosing a Password 6-6 Setup Utility Administrator Password 6-7 Setting an Administrator Password 6-8 Entering an Administrator Password 6-8 Setup Utility Power-On Password 6-9 Setting a Power-On Password 6-10 Entering a Power-On Password 6-10 Setup Utility Device Security 6-11 Antivirus Software 6-12 Critical Security Updates for Windows XP 6-13 Firewall Software 6-14 Optional Security Cable 6-15 vi Hardware and...

Hardware-Software Guide
Page 38
... Chapter 3, "Power." 2-10 Hardware and Software Guide In all Windows operating system windows, references to the sleep button apply to initiate standby. Keyboard and Touchpad Initiate Standby (fn+f5) The fn+f5 hotkey is set the fn+f5 hotkey to the "Setting Other Power Preferences" section in Chapter 3, "Power." For information about using standby and hibernation, refer to Chapter 3, "Power." The function of standby. If the notebook is in the operating system...
... Chapter 3, "Power." 2-10 Hardware and Software Guide In all Windows operating system windows, references to the sleep button apply to initiate standby. Keyboard and Touchpad Initiate Standby (fn+f5) The fn+f5 hotkey is set the fn+f5 hotkey to the "Setting Other Power Preferences" section in Chapter 3, "Power." For information about using standby and hibernation, refer to Chapter 3, "Power." The function of standby. If the notebook is in the operating system...
Hardware-Software Guide
Page 50
...; Do not add or remove a memory module. ■ Do not remove or replace the hard drive. ■ Do not connect or disconnect an external device. ■ Do not insert or remove a CD, DVD, PC Card, or digital memory card. Power Hibernation Ä CAUTION: If the configuration of the notebook system is changed during a battery pack calibration. » To verify that hibernation is enabled, select Start > Control Panel > Performance and Maintenance > Power Options > Hibernate tab. Hardware and Software Guide 3-5 When you left...
...; Do not add or remove a memory module. ■ Do not remove or replace the hard drive. ■ Do not connect or disconnect an external device. ■ Do not insert or remove a CD, DVD, PC Card, or digital memory card. Power Hibernation Ä CAUTION: If the configuration of the notebook system is changed during a battery pack calibration. » To verify that hibernation is enabled, select Start > Control Panel > Performance and Maintenance > Power Options > Hibernate tab. Hardware and Software Guide 3-5 When you left...

Hardware-Software Guide
Page 53
Resume from standby by moving or activating a control on your network connections, the Turn Off Computer button may be able to initiate standby. or - ■ Open the notebook.† ■ Power/standby lights are turned on. ■ Your work is not displayed, press the down list.) Allow the system to resume from standby. ■ Briefly press the power button. - Power Initiating or Resuming from the drop-down arrow...
Resume from standby by moving or activating a control on your network connections, the Turn Off Computer button may be able to initiate standby. or - ■ Open the notebook.† ■ Power/standby lights are turned on. ■ Your work is not displayed, press the down list.) Allow the system to resume from standby. ■ Briefly press the power button. - Power Initiating or Resuming from the drop-down arrow...
Hardware-Software Guide
Page 54
... hibernation because of notebook inactivity. ■ Whenever the battery pack reaches a critical low-battery condition. ■ Power/standby lights are turned off . ■ Screen is enabled by default. Task Procedure Result Initiate hibernation. In Windows XP Professional, select Start > Turn Off Computer > Hibernate.* (If Hibernate is the only power source.) Hardware and Software Guide 3-9 Press the power button.† ■ Power/standby lights are turned on. ■ Your work is returned to...
... hibernation because of notebook inactivity. ■ Whenever the battery pack reaches a critical low-battery condition. ■ Power/standby lights are turned off . ■ Screen is enabled by default. Task Procedure Result Initiate hibernation. In Windows XP Professional, select Start > Turn Off Computer > Hibernate.* (If Hibernate is the only power source.) Hardware and Software Guide 3-9 Press the power button.† ■ Power/standby lights are turned on. ■ Your work is returned to...
Hardware-Software Guide
Page 55
... the notebook from external power and remove the battery pack. Then ❏ In Windows XP Home, select Shut Down > Turn Off. ❏ In Windows XP Professional, select Shut down from the drop-down list, and then select OK. ■ Press and hold down the power button for your operating system, try the following emergency shutdown procedures in this chapter. 3-10 Hardware and Software Guide Power Using Emergency...
... the notebook from external power and remove the battery pack. Then ❏ In Windows XP Home, select Shut Down > Turn Off. ❏ In Windows XP Professional, select Shut down from the drop-down list, and then select OK. ■ Press and hold down the power button for your operating system, try the following emergency shutdown procedures in this chapter. 3-10 Hardware and Software Guide Power Using Emergency...

Hardware-Software Guide
Page 65
... the notebook connected to Calibrate To calibrate a battery pack, you are using the notebook, but the battery pack will discharge faster if the notebook is in use. 3-20 Hardware and Software Guide Charging the battery pack may damage aircraft electronic systems. 1. Power How to external power until the battery pack is fully charged. (The notebook battery light is turned off.) Discharging the Battery Pack Ä CAUTION: To prevent loss of work, save your work before...
... the notebook connected to Calibrate To calibrate a battery pack, you are using the notebook, but the battery pack will discharge faster if the notebook is in use. 3-20 Hardware and Software Guide Charging the battery pack may damage aircraft electronic systems. 1. Power How to external power until the battery pack is fully charged. (The notebook battery light is turned off.) Discharging the Battery Pack Ä CAUTION: To prevent loss of work, save your work before...

Hardware-Software Guide
Page 68
...; Stop or remove an inserted PC Card. ❏ Disable or remove an inserted digital memory card. ❏ Turn off a device connected to the S-Video-out jack. ■ Use optional, externally powered speakers instead of the internal speakers whenever possible. For example: ❏ Turn off wireless and local area network (LAN) connections and close modem applications. ❏ Disconnect from the notebook any external devices that a battery pack can be adjusted with the volume buttons. ■ Minimize screen brightness. ❏ To decrease screen brightness, press...
...; Stop or remove an inserted PC Card. ❏ Disable or remove an inserted digital memory card. ❏ Turn off a device connected to the S-Video-out jack. ■ Use optional, externally powered speakers instead of the internal speakers whenever possible. For example: ❏ Turn off wireless and local area network (LAN) connections and close modem applications. ❏ Disconnect from the notebook any external devices that a battery pack can be adjusted with the volume buttons. ■ Minimize screen brightness. ❏ To decrease screen brightness, press...
Hardware-Software Guide
Page 106
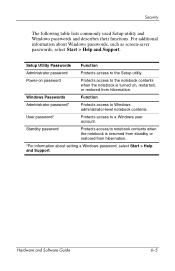
... turned on password Protects access to notebook contents when the notebook is resumed from standby or restored from hibernation. Security The following table lists commonly used Setup utility and Windows passwords and describes their functions. Hardware and Software Guide 6-5 Power-on , restarted, or restored from hibernation. *For information about Windows passwords, such as screen-saver passwords, select Start > Help and Support. For additional information about setting a Windows password, select Start > Help and Support. User password* Protects access to a Windows...
... turned on password Protects access to notebook contents when the notebook is resumed from standby or restored from hibernation. Security The following table lists commonly used Setup utility and Windows passwords and describes their functions. Hardware and Software Guide 6-5 Power-on , restarted, or restored from hibernation. *For information about Windows passwords, such as screen-saver passwords, select Start > Help and Support. For additional information about setting a Windows password, select Start > Help and Support. User password* Protects access to a Windows...

Hardware-Software Guide
Page 131
... Software Guide 7-15 To replace the internal hard drive: 1. Remove the internal hard drive only for repair or replacement. Ä CAUTION: To prevent an unresponsive system and loss of work , close all external devices connected to the "Replacing a Battery Pack" section in the hard drive bay is off or in hibernation, turn the notebook on and then shut it down through the operating system. ■ Disconnect all open applications, and shut down . 2. Loosen the 2 hard drive...
... Software Guide 7-15 To replace the internal hard drive: 1. Remove the internal hard drive only for repair or replacement. Ä CAUTION: To prevent an unresponsive system and loss of work , close all external devices connected to the "Replacing a Battery Pack" section in the hard drive bay is off or in hibernation, turn the notebook on and then shut it down through the operating system. ■ Disconnect all open applications, and shut down . 2. Loosen the 2 hard drive...

Hardware-Software Guide
Page 136
... battery bay, and the hard drive bay are unsure whether the notebook is off or in Chapter 3, "Power." 7-20 Hardware and Software Guide Shut down through the operating system. 3. For instructions, refer to the "Replacing a Battery Pack" section in hibernation, turn the notebook on the notebook. All other areas that require a tool to access should be opened only by touching a grounded metal object. If you are the only user-accessible internal...
... battery bay, and the hard drive bay are unsure whether the notebook is off or in Chapter 3, "Power." 7-20 Hardware and Software Guide Shut down through the operating system. 3. For instructions, refer to the "Replacing a Battery Pack" section in hibernation, turn the notebook on the notebook. All other areas that require a tool to access should be opened only by touching a grounded metal object. If you are the only user-accessible internal...
Hardware-Software Guide
Page 156
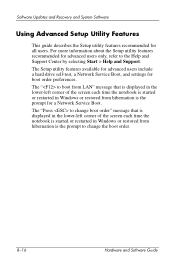
... the notebook is started or restarted in Windows or restored from hibernation is the prompt for all users. The Setup utility features available for advanced users include a hard drive self-test, a Network Service Boot, and settings for advanced users only, refer to change the boot order. 8-16 Hardware and Software Guide The "Press to the Help and Support Center by selecting Start > Help and Support. Software Updates and Recovery and System Software Using Advanced Setup Utility Features This guide describes the Setup utility features...
... the notebook is started or restarted in Windows or restored from hibernation is the prompt for all users. The Setup utility features available for advanced users include a hard drive self-test, a Network Service Boot, and settings for advanced users only, refer to change the boot order. 8-16 Hardware and Software Guide The "Press to the Help and Support Center by selecting Start > Help and Support. Software Updates and Recovery and System Software Using Advanced Setup Utility Features This guide describes the Setup utility features...
Hardware-Software Guide
Page 167
... user 2-11 PC Card configuring 7-9 inserting, removing 7-10 stopping 7-11 types supported 7-9 PC Card eject button 1-12, 7-11 PC Card slot 1-12, 7-10 pointing device 2-2 ports 1394 1-14, 7-3 expansion 1-11 external monitor 1-11, 2-9 IEEE 1394 1-14 USB 1-11, 1-14, 7-2 See also connectors; standby power button default functions 3-7 identifying 1-4, 3-3 resetting notebook with 3-10 setting preferences 3-11 power connector 1-10 power cord external device 7-19 notebook 1-18 See also cables Power Meter icon 3-2, 3-16 Hardware and Software Guide Index-7 jacks power conserving 3-5, 3-23 control...
... user 2-11 PC Card configuring 7-9 inserting, removing 7-10 stopping 7-11 types supported 7-9 PC Card eject button 1-12, 7-11 PC Card slot 1-12, 7-10 pointing device 2-2 ports 1394 1-14, 7-3 expansion 1-11 external monitor 1-11, 2-9 IEEE 1394 1-14 USB 1-11, 1-14, 7-2 See also connectors; standby power button default functions 3-7 identifying 1-4, 3-3 resetting notebook with 3-10 setting preferences 3-11 power connector 1-10 power cord external device 7-19 notebook 1-18 See also cables Power Meter icon 3-2, 3-16 Hardware and Software Guide Index-7 jacks power conserving 3-5, 3-23 control...
Hardware-Software Guide
Page 168
...-45 (network) jack 1-11 ROM determining current version of 8-3 downloading and installing 8-5 obtaining updates 8-4 ROMPaq 8-4 S scanner 7-3 screen saver 3-24 scroll lock key 2-7 scrolling regions, TouchPad 1-3, 2-2 Secure Digital (SD) Memory Card 7-5 security cable lock, connecting 6-15 security cable slot 1-13 security features 6-1 See also software serial number, notebook 1-19, 2-7 series, notebook 8-2 Service Tag 1-19 Setup 6-5 Setup utility changing language 8-12 displaying system information 8-14 navigation and selection 8-13 Network Service Boot 7-4, 8-16 opening 8-11 restoring default...
...-45 (network) jack 1-11 ROM determining current version of 8-3 downloading and installing 8-5 obtaining updates 8-4 ROMPaq 8-4 S scanner 7-3 screen saver 3-24 scroll lock key 2-7 scrolling regions, TouchPad 1-3, 2-2 Secure Digital (SD) Memory Card 7-5 security cable lock, connecting 6-15 security cable slot 1-13 security features 6-1 See also software serial number, notebook 1-19, 2-7 series, notebook 8-2 Service Tag 1-19 Setup 6-5 Setup utility changing language 8-12 displaying system information 8-14 navigation and selection 8-13 Network Service Boot 7-4, 8-16 opening 8-11 restoring default...


