

Expansion Base Reference Guide
Page 3
... Side Components 1-3 Identifying the Wireless Accessories 1-5 Getting More Information 1-6 2 Connecting and Removing the Notebook Connecting to AC Power 2-1 Connecting the Notebook to the Expansion Base 2-3 Removing the Notebook 2-8 3 Using the Expansion Base Turning the Notebook On and Off 3-1 Following Expansion Base Guidelines 3-2 Using the Wireless Keyboard and Mouse 3-3 Connecting the Expansion Base to a Television 3-8 Using a Modem Through...
... Side Components 1-3 Identifying the Wireless Accessories 1-5 Getting More Information 1-6 2 Connecting and Removing the Notebook Connecting to AC Power 2-1 Connecting the Notebook to the Expansion Base 2-3 Removing the Notebook 2-8 3 Using the Expansion Base Turning the Notebook On and Off 3-1 Following Expansion Base Guidelines 3-2 Using the Wireless Keyboard and Mouse 3-3 Connecting the Expansion Base to a Television 3-8 Using a Modem Through...

Expansion Base Reference Guide
Page 13
Sliding the notebook into the Expansion Base with the keyboard facing you. Connecting and Removing the Notebook 2. Slide the notebook into the Expansion Base ✎ The notebook is held in place by a buffer pad, which prevents the notebook from shifting out of its proper position in the Expansion Base. 2-4 Reference Guide
Sliding the notebook into the Expansion Base with the keyboard facing you. Connecting and Removing the Notebook 2. Slide the notebook into the Expansion Base ✎ The notebook is held in place by a buffer pad, which prevents the notebook from shifting out of its proper position in the Expansion Base. 2-4 Reference Guide
Expansion Base Reference Guide
Page 22
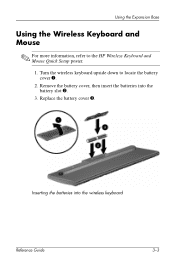
Replace the battery cover 3. Remove the battery cover, then insert the batteries into the wireless keyboard Reference Guide 3-3 Turn the wireless keyboard upside down to the HP Wireless Keyboard and Mouse Quick Setup poster. 1. Using the Expansion Base Using the Wireless Keyboard and Mouse ✎ For more information, refer to locate the battery cover 1. 2. Inserting the batteries into the battery slot 2. 3.
Replace the battery cover 3. Remove the battery cover, then insert the batteries into the wireless keyboard Reference Guide 3-3 Turn the wireless keyboard upside down to the HP Wireless Keyboard and Mouse Quick Setup poster. 1. Using the Expansion Base Using the Wireless Keyboard and Mouse ✎ For more information, refer to locate the battery cover 1. 2. Inserting the batteries into the battery slot 2. 3.

Expansion Base Reference Guide
Page 33
... connected to the expansion connector on the Expansion Base is not keyboard or mouse plugged into an AC power outlet. The notebook is not powered on the notebook. USB port. The keyboard or mouse has no volume. The speakers have not been synchronized. Troubleshooting Removal Problems and Solutions Problem Possible Cause Solution The blue indicator...
... connected to the expansion connector on the Expansion Base is not keyboard or mouse plugged into an AC power outlet. The notebook is not powered on the notebook. USB port. The keyboard or mouse has no volume. The speakers have not been synchronized. Troubleshooting Removal Problems and Solutions Problem Possible Cause Solution The blue indicator...
Expansion Base - Maintenance and Service Guide
Page 73
...keyboard, wireless 1-9 L left-side components 1-5 M Miscellaneous Plastics Kit, spare part number 3-3 modem jack, pin assignments A-2 mouse, wireless 1-9 mute button 1-4 N network jack, pin assignments A-1 P packing precautions 4-3 plastic parts 4-2 power connector 1-7 power cord set requirements B-1 power cord, spare part numbers 3-6 power supply removal... pin assignments A-4 serial number 3-1, 5-2 service considerations 4-1 speaker assembly location 1-4 removal 5-18 spare part number 3-3 specifications AC adapter 6-2 expansion base 6-1 static shielding materials 4-6 S-Video connector location ...
...keyboard, wireless 1-9 L left-side components 1-5 M Miscellaneous Plastics Kit, spare part number 3-3 modem jack, pin assignments A-2 mouse, wireless 1-9 mute button 1-4 N network jack, pin assignments A-1 P packing precautions 4-3 plastic parts 4-2 power connector 1-7 power cord set requirements B-1 power cord, spare part numbers 3-6 power supply removal... pin assignments A-4 serial number 3-1, 5-2 service considerations 4-1 speaker assembly location 1-4 removal 5-18 spare part number 3-3 specifications AC adapter 6-2 expansion base 6-1 static shielding materials 4-6 S-Video connector location ...
Compaq Notebook Series - Maintenance, Shipping and Travel Guide
Page 7
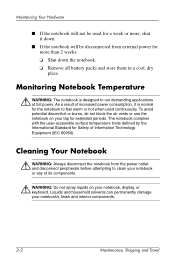
... permanently damage your lap for more , shut it is designed to clean your notebook, display, or keyboard. The notebook complies with the user-accessible surface temperature limits defined by the International Standard for the notebook to feel warm or hot when used for a week or more than 2 ...for extended periods. As a result of increased power consumption, it down the notebook. ❏ Remove all battery packs and store them in a cool, dry place. Maintaining Your Hardware ■ If the notebook will be used continuously. To avoid potential discomfort or burns, do not block...
... permanently damage your lap for more , shut it is designed to clean your notebook, display, or keyboard. The notebook complies with the user-accessible surface temperature limits defined by the International Standard for the notebook to feel warm or hot when used for a week or more than 2 ...for extended periods. As a result of increased power consumption, it down the notebook. ❏ Remove all battery packs and store them in a cool, dry place. Maintaining Your Hardware ■ If the notebook will be used continuously. To avoid potential discomfort or burns, do not block...
Compaq Notebook Series - Maintenance, Shipping and Travel Guide
Page 8
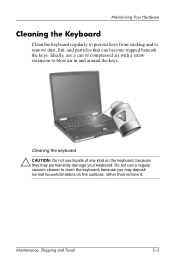
..., lint, and particles that can of any kind on the surfaces, rather than remove it. Ideally, use a can become trapped beneath the keys. Maintenance, Shipping and Travel 2-3 Cleaning the keyboard Ä CAUTION: Do not use a regular vacuum cleaner to blow air in and around the keys. ...Do not use liquids of compressed air with a straw extension to clean the keyboard, because you may deposit normal household debris on the...
..., lint, and particles that can of any kind on the surfaces, rather than remove it. Ideally, use a can become trapped beneath the keys. Maintenance, Shipping and Travel 2-3 Cleaning the keyboard Ä CAUTION: Do not use a regular vacuum cleaner to blow air in and around the keys. ...Do not use liquids of compressed air with a straw extension to clean the keyboard, because you may deposit normal household debris on the...

Hardware Guide
Page 45
...in a location that the battery information displayed by pressing Fn+F7 saves power. This insures that is accurate. 3-10 Hardware Guide If the notebook will be unused and unplugged for more , calibrate it . ■ Turn off a device connected to the S-Video connector. ■ If you ...decrease system volume as you are not using power options, refer to the "Power" chapter in the "TouchPad and Keyboard" chapter for more about using them. ■ Stop or remove a PC Card or a digital media card that has been stored for the display timeout. See "Hotkey Commands" in the ...
...in a location that the battery information displayed by pressing Fn+F7 saves power. This insures that is accurate. 3-10 Hardware Guide If the notebook will be unused and unplugged for more , calibrate it . ■ Turn off a device connected to the S-Video connector. ■ If you ...decrease system volume as you are not using power options, refer to the "Power" chapter in the "TouchPad and Keyboard" chapter for more about using them. ■ Stop or remove a PC Card or a digital media card that has been stored for the display timeout. See "Hotkey Commands" in the ...

Hardware Guide
Page 112
... Tag 1-16 System 1-16 wireless certification 1-16 LAN connection 7-6 left-side components 1-11 lights battery 1-3, 1-9 caps lock 1-4 IDE 1-4, 1-8, 4-7 keyboard 1-4 num lock 1-4, 2-9 power 1-3 power/Standby 1-3, 1-8 wireless on/off 1-13, 7-10 lock, security cable (optional) 6-6 M media hotkeys ...2-7 media, drive affected by airport security 4-3 caring for 4-3, 4-4 displaying contents of 4-5 inserting/removing CD or DVD 4-8 types and terms 4-2 memory compartment location 1-15 displaying amount of 8-8 Memory Reader 1-11, 8-8 Memory Stick 8-5 Memory...
... Tag 1-16 System 1-16 wireless certification 1-16 LAN connection 7-6 left-side components 1-11 lights battery 1-3, 1-9 caps lock 1-4 IDE 1-4, 1-8, 4-7 keyboard 1-4 num lock 1-4, 2-9 power 1-3 power/Standby 1-3, 1-8 wireless on/off 1-13, 7-10 lock, security cable (optional) 6-6 M media hotkeys ...2-7 media, drive affected by airport security 4-3 caring for 4-3, 4-4 displaying contents of 4-5 inserting/removing CD or DVD 4-8 types and terms 4-2 memory compartment location 1-15 displaying amount of 8-8 Memory Reader 1-11, 8-8 Memory Stick 8-5 Memory...
Software Guide
Page 15
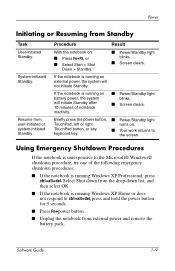
... ■ Power/Standby light blinks. ■ Screen clears. If the notebook is running on battery power, the system will not initiate Standby. Select Shut down from external power and remove the battery pack. TouchPad button, or any keyboard key. ■ Your work returns to ctrl+alt+del, press and ...hold the power button for 5 seconds. ■ Press Fn+power button. ■ Unplug the notebook from the drop-down list, and ...
... ■ Power/Standby light blinks. ■ Screen clears. If the notebook is running on battery power, the system will not initiate Standby. Select Shut down from external power and remove the battery pack. TouchPad button, or any keyboard key. ■ Your work returns to ctrl+alt+del, press and ...hold the power button for 5 seconds. ■ Press Fn+power button. ■ Unplug the notebook from the drop-down list, and ...

Software Guide
Page 22
...disable the TouchPad. Refer to the Worldwide Telephone Numbers booklet included with the notebook to your keyboard may be lowercase (fn, f5). The QuickLock operating system security feature disables the keyboard and displays the logon screen. Before you forget your power-on your ...operating system documentation. When you set a password, write it down and store it in a secure location. ■ If you can remove DriveLock protection from Hibernation until an authorized service provider resets the notebook...
...disable the TouchPad. Refer to the Worldwide Telephone Numbers booklet included with the notebook to your keyboard may be lowercase (fn, f5). The QuickLock operating system security feature disables the keyboard and displays the logon screen. Before you forget your power-on your ...operating system documentation. When you set a password, write it down and store it in a secure location. ■ If you can remove DriveLock protection from Hibernation until an authorized service provider resets the notebook...


