
Limited Warranty and Technical Support
Page 1
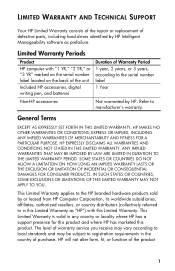
...distributors (collectively referred to in this Limited Warranty. LIMITED WARRANTY AND TECHNICAL SUPPORT Your HP Limited Warranty consists of the repair or replacement of defective parts, including hard drives identified by HP. This Limited Warranty is valid in the country of the product 1 General Terms... YR," "2 YR," or "3 YR" marked on the serial number label located on the back of the unit Included HP accessories, digital writing pen, and batteries Duration of Warranty Period 1 year, 2 years, or 3 years, according to manufacturer's warranty. ANY IMPLIED WARRANTIES THAT MAY...
...distributors (collectively referred to in this Limited Warranty. LIMITED WARRANTY AND TECHNICAL SUPPORT Your HP Limited Warranty consists of the repair or replacement of defective parts, including hard drives identified by HP. This Limited Warranty is valid in the country of the product 1 General Terms... YR," "2 YR," or "3 YR" marked on the serial number label located on the back of the unit Included HP accessories, digital writing pen, and batteries Duration of Warranty Period 1 year, 2 years, or 3 years, according to manufacturer's warranty. ANY IMPLIED WARRANTIES THAT MAY...
Expansion Base Reference Guide
Page 22
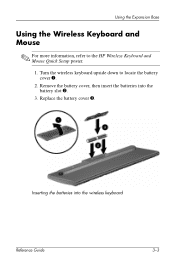
Inserting the batteries into the battery slot 2. 3. Replace the battery cover 3. Using the Expansion Base Using the Wireless Keyboard and Mouse ✎ For more information, refer to locate the battery cover 1. 2. Turn the wireless keyboard upside down to the HP Wireless Keyboard and Mouse Quick Setup poster. 1. Remove the battery cover, then insert the batteries into the wireless keyboard Reference Guide 3-3
Inserting the batteries into the battery slot 2. 3. Replace the battery cover 3. Using the Expansion Base Using the Wireless Keyboard and Mouse ✎ For more information, refer to locate the battery cover 1. 2. Turn the wireless keyboard upside down to the HP Wireless Keyboard and Mouse Quick Setup poster. 1. Remove the battery cover, then insert the batteries into the wireless keyboard Reference Guide 3-3
Expansion Base Reference Guide
Page 23
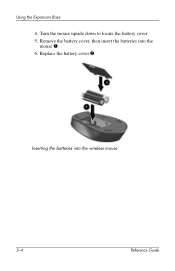
Using the Expansion Base 4. Replace the battery cover 2. Turn the mouse upside down to locate the battery cover. 5. Inserting the batteries into the mouse 1. 6. Remove the battery cover, then insert the batteries into the wireless mouse 3-4 Reference Guide
Using the Expansion Base 4. Replace the battery cover 2. Turn the mouse upside down to locate the battery cover. 5. Inserting the batteries into the mouse 1. 6. Remove the battery cover, then insert the batteries into the wireless mouse 3-4 Reference Guide

Expansion Base - Maintenance and Service Guide
Page 14
...out ■ Serial port The HP Notebook Expansion Base uses electrical fans for disassembly steps. The fans are controlled by a temperature sensor and are affected by high external temperatures, system power consumption, power management/battery conservation configurations, and software applications....connection (from wall to Expansion Base) ■ RJ-11 (modem) connection (from Expansion Base to identify replacement parts, and Chapter 5, "Removal and Replacement Procedures," for ventilation. Product Description 1.4 Design Overview This section presents a design overview of key parts and...
...out ■ Serial port The HP Notebook Expansion Base uses electrical fans for disassembly steps. The fans are controlled by a temperature sensor and are affected by high external temperatures, system power consumption, power management/battery conservation configurations, and software applications....connection (from wall to Expansion Base) ■ RJ-11 (modem) connection (from Expansion Base to identify replacement parts, and Chapter 5, "Removal and Replacement Procedures," for ventilation. Product Description 1.4 Design Overview This section presents a design overview of key parts and...
Expansion Base - Maintenance and Service Guide
Page 16
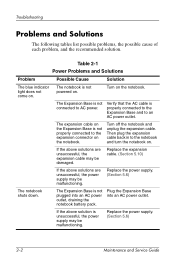
..., draining the notebook battery pack. The Expansion Base is not properly connected to AC power. Turn off the notebook and unplug the expansion cable. The Expansion Base is unsuccessful, the power supply may be malfunctioning. Replace the power supply. (Section 5.6) The notebook shuts down. ... above solution is not plugged into an AC power outlet. Replace the power supply. (Section 5.6) 2-2 Maintenance and Service Guide The notebook is properly connected to the Expansion Base and to the notebook and turn the notebook on . Then plug the expansion cable back in to an...
..., draining the notebook battery pack. The Expansion Base is not properly connected to AC power. Turn off the notebook and unplug the expansion cable. The Expansion Base is unsuccessful, the power supply may be malfunctioning. Replace the power supply. (Section 5.6) The notebook shuts down. ... above solution is not plugged into an AC power outlet. Replace the power supply. (Section 5.6) 2-2 Maintenance and Service Guide The notebook is properly connected to the Expansion Base and to the notebook and turn the notebook on . Then plug the expansion cable back in to an...

Hardware Guide
Page 22
... airflow to block airflow. Hardware Guide 1-15 As shipped, the memory slot might be filled with a replaceable memory module, or it might be vacant, depending on the notebook model. Holds the primary hard drive. Bottom Components Hardware Components Component 1 Battery release latch 2 Battery bay 3 Exhaust vents 4 Hard drive bay 5 Memory compartment Description Releases the...
... airflow to block airflow. Hardware Guide 1-15 As shipped, the memory slot might be filled with a replaceable memory module, or it might be vacant, depending on the notebook model. Holds the primary hard drive. Bottom Components Hardware Components Component 1 Battery release latch 2 Battery bay 3 Exhaust vents 4 Hard drive bay 5 Memory compartment Description Releases the...

Hardware Guide
Page 102
Tilt the cover down until it is seated 1. 10. Align the tabs on the memory compartment cover with the cover slots on the notebook. 9. Replace the battery pack, reconnect AC power, and then restart the notebook. Hardware Upgrades 8. Reinsert and tighten the screw that secures the cover to the notebook 2. 11. Closing the memory compartment Hardware Guide 8-13
Tilt the cover down until it is seated 1. 10. Align the tabs on the memory compartment cover with the cover slots on the notebook. 9. Replace the battery pack, reconnect AC power, and then restart the notebook. Hardware Upgrades 8. Reinsert and tighten the screw that secures the cover to the notebook 2. 11. Closing the memory compartment Hardware Guide 8-13

Hardware Guide
Page 103
... your work and shut down the notebook. If you are not sure whether the notebook is off or in the notebook. 5. Hardware Upgrades Replacing the Hard Drive Remove the hard drive only for replacement. Disconnect all applications, and then shut... down . 6. Loosen the 2 hard drive assembly retaining screws 1, and then tilt the hard drive upward 2. Turn the notebook upside down the notebook. 2. Remove any battery...
... your work and shut down the notebook. If you are not sure whether the notebook is off or in the notebook. 5. Hardware Upgrades Replacing the Hard Drive Remove the hard drive only for replacement. Disconnect all applications, and then shut... down . 6. Loosen the 2 hard drive assembly retaining screws 1, and then tilt the hard drive upward 2. Turn the notebook upside down the notebook. 2. Remove any battery...

Getting Started
Page 16
...guides-for example, instruction manuals for using the notebook internationally. ■ Troubleshooting guide-Includes solutions for using an optional wireless device-are included with all exterior components, and steps for replacing battery packs, using keyboard features and drives, connecting ...external equipment, and upgrading the notebook. ■ Software Guide-Describes software, including details about power and security ...
...guides-for example, instruction manuals for using the notebook internationally. ■ Troubleshooting guide-Includes solutions for using an optional wireless device-are included with all exterior components, and steps for replacing battery packs, using keyboard features and drives, connecting ...external equipment, and upgrading the notebook. ■ Software Guide-Describes software, including details about power and security ...

Getting Started
Page 35
As shipped, the memory slot might be filled with a replaceable memory module, or it might be vacant, depending on the notebook model. 5 Battery release latch Releases the battery pack from the battery bay. Do not allow a hard surface, such as an adjoining printer, or a soft surface... components. Ä To prevent overheating, do not obstruct the vent. Startup Guide 3-15 Bottom Components Notebook Features Component Description 1 Battery bay Holds the battery pack. (Battery type and shipment mode vary by model.) 2 Exhaust vents Allows airflow to block airflow. 3 Hard drive...
As shipped, the memory slot might be filled with a replaceable memory module, or it might be vacant, depending on the notebook model. 5 Battery release latch Releases the battery pack from the battery bay. Do not allow a hard surface, such as an adjoining printer, or a soft surface... components. Ä To prevent overheating, do not obstruct the vent. Startup Guide 3-15 Bottom Components Notebook Features Component Description 1 Battery bay Holds the battery pack. (Battery type and shipment mode vary by model.) 2 Exhaust vents Allows airflow to block airflow. 3 Hard drive...


