Resolving Start Up and No Boot Problems Checklist
Page 1
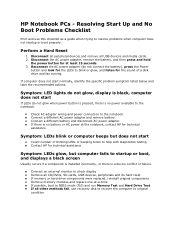
... a disk drive and fan turning. Connect an external monitor to resolve problems when computer does not startup or boot properly. Resolving Start Up and No Boot Problems Checklist Print and use recovery disk to recover the computer to help with diagnostics testing Contact HP for technical assistance. Connect a different battery and disconnect AC power adapter. Disconnect all peripheral devices and remove all CD/DVDs, SD cards, USB devices, peripherals and do hard reset If memory or hard drive components were replaced, reinstall original components Remove memory modules...
... a disk drive and fan turning. Connect an external monitor to resolve problems when computer does not startup or boot properly. Resolving Start Up and No Boot Problems Checklist Print and use recovery disk to recover the computer to help with diagnostics testing Contact HP for technical assistance. Connect a different battery and disconnect AC power adapter. Disconnect all peripheral devices and remove all CD/DVDs, SD cards, USB devices, peripherals and do hard reset If memory or hard drive components were replaced, reinstall original components Remove memory modules...
Resolving Start Up and No Boot Problems Checklist
Page 2
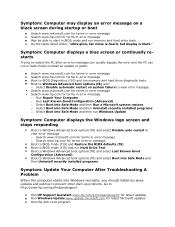
... the error and the PC can run in error message Boot to BIOS mode (f10) and Restore the BIOS defaults (f9) Boot to BIOS mode (f10) and run Hard Drive Test Boot to Windows Advanced boot options (f8) and select Last Known Good Configuration (Advanced) Boot to Windows Advanced boot options (f8) and select Boot into Safe Mode and then Uninstall recently installed programs Symptom: Update Your Computer After Troubleshooting A Problem When the computer starts into Windows normally, you should install the latest updates...
... the error and the PC can run in error message Boot to BIOS mode (f10) and Restore the BIOS defaults (f9) Boot to BIOS mode (f10) and run Hard Drive Test Boot to Windows Advanced boot options (f8) and select Last Known Good Configuration (Advanced) Boot to Windows Advanced boot options (f8) and select Boot into Safe Mode and then Uninstall recently installed programs Symptom: Update Your Computer After Troubleshooting A Problem When the computer starts into Windows normally, you should install the latest updates...

Notebook Essentials - Windows 7
Page 20
... external power and remove the battery. Sleep and Hibernation can be displayed on the computer screen or the external display, or on both devices simultaneously. But if the computer feels unusually warm, it is in the loss of the screen, click the Shut down button, and then clicking Restart. Chapter 3: Troubleshooting The computer screen is blank If the screen is blank but you have not turned...
... external power and remove the battery. Sleep and Hibernation can be displayed on the computer screen or the external display, or on both devices simultaneously. But if the computer feels unusually warm, it is in the loss of the screen, click the Shut down button, and then clicking Restart. Chapter 3: Troubleshooting The computer screen is blank If the screen is blank but you have not turned...

Notebook Essentials - Windows 7
Page 21
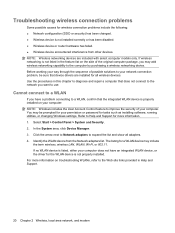
... clothing, during operation. The wireless network connection is not working If a wireless network connection is not working Follow these suggestions: ✎ If you are connecting to a corporate network, contact the IT administrator. ■ Select Start, click Control Panel, click Network and Internet, click Network and Sharing Center, click Troubleshoot problems, and then follow these suggestions if an external device does not function as expected: ■ Turn on the device according to the manufacturer's instructions. ■...
... clothing, during operation. The wireless network connection is not working If a wireless network connection is not working Follow these suggestions: ✎ If you are connecting to a corporate network, contact the IT administrator. ■ Select Start, click Control Panel, click Network and Internet, click Network and Sharing Center, click Troubleshoot problems, and then follow these suggestions if an external device does not function as expected: ■ Turn on the device according to the manufacturer's instructions. ■...

Notebook Essentials - Windows 7
Page 33
... window, toolbar, and menu bar settings 18 backup suggestions 18 blank screen, troubleshooting 14 broadband Internet access 6 C cables and cords modem 6 power 26 cleaning the display 25 cleaning the keyboard 25 cleaning the TouchPad 25 computer turning off 12 turning on 13 computer viruses 3 Connect to the Internet wizard 6, 7 connecting to a wired network 10 connecting to an existing wireless network 7 cord, power 26 customer support Help and Support 1 user guides 1 D devices, external, troubleshooting 15 dial-up Internet access 6 display cleaning 25 switching image 14 Notebook...
... window, toolbar, and menu bar settings 18 backup suggestions 18 blank screen, troubleshooting 14 broadband Internet access 6 C cables and cords modem 6 power 26 cleaning the display 25 cleaning the keyboard 25 cleaning the TouchPad 25 computer turning off 12 turning on 13 computer viruses 3 Connect to the Internet wizard 6, 7 connecting to a wired network 10 connecting to an existing wireless network 7 cord, power 26 customer support Help and Support 1 user guides 1 D devices, external, troubleshooting 15 dial-up Internet access 6 display cleaning 25 switching image 14 Notebook...

Compaq Presario CQ62 Notebook PC and HP G62 Notebook PC - Maintenance and Service Guide
Page 7
...major components 3-2 Display assembly components 3-9 Plastics Kit 3-11 Mass storage devices 3-12 Miscellaneous parts 3-13 Sequential part number listing 3-14 4 Removal and replacement procedures Preliminary replacement requirements 4-1 Tools required 4-1 Service considerations 4-1 Grounding guidelines 4-2 Component replacement procedures 4-5 Service tag 4-5 Computer feet 4-6 Battery 4-7 Hard drive 4-8 Memory module 4-10 Wireless module 4-12 Optical drive 4-14 Keyboard 4-17 Top cover 4-20 Power button board 4-23 Touchpad button board 4-24 Maintenance and Service Guide iv
...major components 3-2 Display assembly components 3-9 Plastics Kit 3-11 Mass storage devices 3-12 Miscellaneous parts 3-13 Sequential part number listing 3-14 4 Removal and replacement procedures Preliminary replacement requirements 4-1 Tools required 4-1 Service considerations 4-1 Grounding guidelines 4-2 Component replacement procedures 4-5 Service tag 4-5 Computer feet 4-6 Battery 4-7 Hard drive 4-8 Memory module 4-10 Wireless module 4-12 Optical drive 4-14 Keyboard 4-17 Top cover 4-20 Power button board 4-23 Touchpad button board 4-24 Maintenance and Service Guide iv
Compaq Presario CQ62 Notebook PC and HP G62 Notebook PC - Maintenance and Service Guide
Page 13
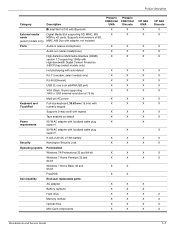
... Serviceability End-user replaceable parts: AC adapter X X Battery (system) X X Hard drive X X Memory module X X Optical drive X X Mini Card components X X HP G62 UMA X X X X X X X X X X X X X X X X X X X X X X X X X HP G62 Discrete X X X X X X X X X X X X X X X X X X X X X X X Maintenance and Service Guide 1-3 Supports mini versions of SD, (select models only) MMC, MS Duo with adapter, not included Ports Audio-in ) with X X TouchPad numeric keypad Supports 2-way scroll with legend X X Taps enabled as default X X Power 65-W AC adapter with localized cable...
... Serviceability End-user replaceable parts: AC adapter X X Battery (system) X X Hard drive X X Memory module X X Optical drive X X Mini Card components X X HP G62 UMA X X X X X X X X X X X X X X X X X X X X X X X X X HP G62 Discrete X X X X X X X X X X X X X X X X X X X X X X X Maintenance and Service Guide 1-3 Supports mini versions of SD, (select models only) MMC, MS Duo with adapter, not included Ports Audio-in ) with X X TouchPad numeric keypad Supports 2-way scroll with legend X X Taps enabled as default X X Power 65-W AC adapter with localized cable...
Compaq Presario CQ62 Notebook PC and HP G62 Notebook PC - Maintenance and Service Guide
Page 19
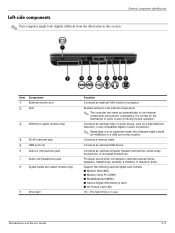
... cable. Produces sound when connected to cool internal components and prevent overheating. It is in this location. Connects an optional video or audio device, such as a high-definition television, or any compatible digital or audio component. ✎ Depending on and off during routine operation. External component identification Item Component 1 External monitor port 2 Vent 3 HDMI port (select models only) 4 RJ-45 (network) jack 5 USB ports (2) 6 Audio-in (microphone) jack 7 Audio-out (headphone) jack 8 Digital media slot (select models only) 9 Drive light Function...
... cable. Produces sound when connected to cool internal components and prevent overheating. It is in this location. Connects an optional video or audio device, such as a high-definition television, or any compatible digital or audio component. ✎ Depending on and off during routine operation. External component identification Item Component 1 External monitor port 2 Vent 3 HDMI port (select models only) 4 RJ-45 (network) jack 5 USB ports (2) 6 Audio-in (microphone) jack 7 Audio-out (headphone) jack 8 Digital media slot (select models only) 9 Drive light Function...
Compaq Presario CQ62 Notebook PC and HP G62 Notebook PC - Maintenance and Service Guide
Page 74
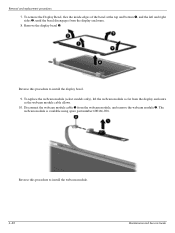
... install the webcam module. 4-30 Maintenance and Service Guide To remove the Display Bezel, flex the inside edges of the bezel at the top and bottom 1, and the left and right sides 2, until the bezel disengages from the display enclosure as the webcam module cable allows. 10. Removal and replacement procedures 7. To replace the webcam module (select models only), lift the webcam module as far from the display enclosure. 8. Disconnect the webcam module cable...
... install the webcam module. 4-30 Maintenance and Service Guide To remove the Display Bezel, flex the inside edges of the bezel at the top and bottom 1, and the left and right sides 2, until the bezel disengages from the display enclosure as the webcam module cable allows. 10. Removal and replacement procedures 7. To replace the webcam module (select models only), lift the webcam module as far from the display enclosure. 8. Disconnect the webcam module cable...
Compaq Presario CQ62 Notebook PC and HP G62 Notebook PC - Maintenance and Service Guide
Page 76
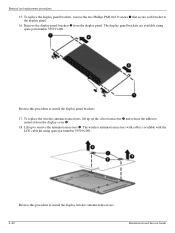
... to install the display wireless antenna transceivers. 4-32 Maintenance and Service Guide The display panel brackets are available using spare part number 595196-001. Reverse this procedure to the display panel. 16. To replace the display panel brackets, remove the two Phillips PM2.0×3.0 screws 1 that secure each bracket to install the display panel brackets. 17. Removal and replacement procedures 15. The wireless antenna transceivers with cable is available with the LCD cable kit using spare part number 595195...
... to install the display wireless antenna transceivers. 4-32 Maintenance and Service Guide The display panel brackets are available using spare part number 595196-001. Reverse this procedure to the display panel. 16. To replace the display panel brackets, remove the two Phillips PM2.0×3.0 screws 1 that secure each bracket to install the display panel brackets. 17. Removal and replacement procedures 15. The wireless antenna transceivers with cable is available with the LCD cable kit using spare part number 595195...
Compaq Presario CQ62 Notebook PC and HP G62 Notebook PC - Maintenance and Service Guide
Page 77
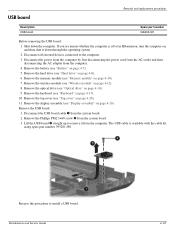
...3. Remove the memory module (see "Top cover" on , and then shut it from the system board. 2. Remove the USB board: 1. USB board Removal and replacement procedures Description USB board Spare part number 595205-001 Before removing the USB board: 1. Remove the keyboard (see "Hard drive" on page 4-17). 10. Shut down through the operating system. 2. Disconnect the USB board cable 1 from the computer. Remove the hard drive (see "Keyboard" on page 4-8). 6. Remove the wireless module (see "Display assembly" on page 4-12). 8. Disconnect all external devices connected...
...3. Remove the memory module (see "Top cover" on , and then shut it from the system board. 2. Remove the USB board: 1. USB board Removal and replacement procedures Description USB board Spare part number 595205-001 Before removing the USB board: 1. Remove the keyboard (see "Hard drive" on page 4-17). 10. Shut down through the operating system. 2. Disconnect the USB board cable 1 from the computer. Remove the hard drive (see "Keyboard" on page 4-8). 6. Remove the wireless module (see "Display assembly" on page 4-12). 8. Disconnect all external devices connected...

Compaq Presario CQ62 Notebook PC and HP G62 Notebook PC - Maintenance and Service Guide
Page 131
... 1-1 removal 4-46 spare part number 3-4, 4-45, 4-47 product description audio 1-2 cable lock 1-3 chipset 1-1 Ethernet 1-2 external media cards 1-3 graphics 1-1 hard drives 1-2 keyboard 1-3 memory module 1-1 microphone 1-2 modem module 1-2 operating system 1-3 optical drives 1-2 panel 1-1 ports 1-3 power requirements 1-3 product name 1-1 serviceability 1-3 TouchPad 2-1 video 2-5 webcam 1-2 wireless module 1-2 product name 1-1 R recovery methods f11 recovery 8-4 recovery discs 8-4 Recovery Manager 8-4 Maintenance and Service Guide Index recovery partition 8-4 removal/replacement preliminaries...
... 1-1 removal 4-46 spare part number 3-4, 4-45, 4-47 product description audio 1-2 cable lock 1-3 chipset 1-1 Ethernet 1-2 external media cards 1-3 graphics 1-1 hard drives 1-2 keyboard 1-3 memory module 1-1 microphone 1-2 modem module 1-2 operating system 1-3 optical drives 1-2 panel 1-1 ports 1-3 power requirements 1-3 product name 1-1 serviceability 1-3 TouchPad 2-1 video 2-5 webcam 1-2 wireless module 1-2 product name 1-1 R recovery methods f11 recovery 8-4 recovery discs 8-4 Recovery Manager 8-4 Maintenance and Service Guide Index recovery partition 8-4 removal/replacement preliminaries...
Notebook PC User Guide - Windows 7
Page 30
... the list and show all wireless devices. Select Start > Control Panel > System and Security. 2. Identify the WLAN device from other devices. If no WLAN device is listed, either your computer. Cannot connect to the computer by purchasing a wireless networking device. Troubleshooting wireless connection problems Some possible causes for wireless connection problems include the following: ● Network configuration (SSID or security) has been changed. ● Wireless device is not installed correctly or has been disabled. ● Wireless device or router hardware has...
... the list and show all wireless devices. Select Start > Control Panel > System and Security. 2. Identify the WLAN device from other devices. If no WLAN device is listed, either your computer. Cannot connect to the computer by purchasing a wireless networking device. Troubleshooting wireless connection problems Some possible causes for wireless connection problems include the following: ● Network configuration (SSID or security) has been changed. ● Wireless device is not installed correctly or has been disabled. ● Wireless device or router hardware has...
Notebook PC User Guide - Windows 7
Page 86
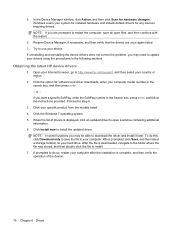
... HP device drivers 1. Proceed to install the updated driver. To do so, restart your system for installed hardware and installs default drivers for any devices requiring drivers. NOTE: If you may be able to use your specific product from the models listed. 4. Try to download the driver and install it later. Click the option for hardware changes. Click the Windows 7 operating system. 5. If uninstalling and reinstalling the device drivers does not correct the problem, you are once again listed. 7. Windows...
... HP device drivers 1. Proceed to install the updated driver. To do so, restart your system for installed hardware and installs default drivers for any devices requiring drivers. NOTE: If you may be able to use your specific product from the models listed. 4. Try to download the driver and install it later. Click the option for hardware changes. Click the Windows 7 operating system. 5. If uninstalling and reinstalling the device drivers does not correct the problem, you are once again listed. 7. Windows...
Notebook PC User Guide - Windows 7
Page 111
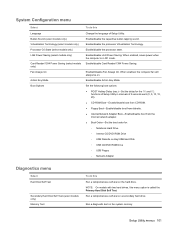
... memory. Enable/disable the processor state. Set the following boot options: ● POST Hotkey Delay (sec.)―Set the delay for the f10 and f12 functions of Setup Utility. Run a diagnostic test on a secondary hard drive. Setup Utility menus 101 Enable/disable LAN Power Saving. Enable/disable Action Key Mode. When enabled, the computer fan will always be on. System Configuration menu Select Language Button Sound (select models only) Virtualization Technology (select models only) Processor C6 State (select models only) LAN Power Saving (select models...
... memory. Enable/disable the processor state. Set the following boot options: ● POST Hotkey Delay (sec.)―Set the delay for the f10 and f12 functions of Setup Utility. Run a diagnostic test on a secondary hard drive. Setup Utility menus 101 Enable/disable LAN Power Saving. Enable/disable Action Key Mode. When enabled, the computer fan will always be on. System Configuration menu Select Language Button Sound (select models only) Virtualization Technology (select models only) Processor C6 State (select models only) LAN Power Saving (select models...
Notebook PC User Guide - Windows 7
Page 112
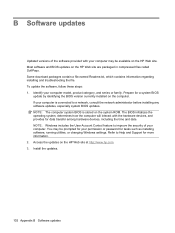
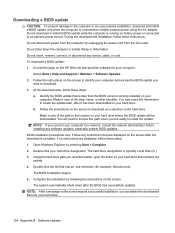
... steps: 1. Identify your computer. NOTE: Windows includes the User Account Control feature to improve the security of the software provided with the hardware devices, and provides for tasks such as installing software, running utilities, or changing Windows settings. Prepare for more information. 2. If your computer is stored on the system ROM. Access the updates on the computer. The BIOS initializes the operating system, determines how the computer...
... steps: 1. Identify your computer. NOTE: Windows includes the User Account Control feature to improve the security of the software provided with the hardware devices, and provides for tasks such as installing software, running utilities, or changing Windows settings. Prepare for more information. 2. If your computer is stored on the system ROM. Access the updates on the computer. The BIOS initializes the operating system, determines how the computer...
Notebook PC User Guide - Windows 7
Page 114
..., remove, connect, or disconnect any instructions that contains the update. 4. Follow any device, cable, or cord. The BIOS installation begins. 5. Complete the installation by following the instructions on battery power or connected to download. 3. During the download and installation, follow these steps: 1. Follow the instructions on your computer. If no instructions are ready to the hard drive. Using the hard drive path you recorded earlier, open the folder on the screen to the location on the HP...
..., remove, connect, or disconnect any instructions that contains the update. 4. Follow any device, cable, or cord. The BIOS installation begins. 5. Complete the installation by following the instructions on battery power or connected to download. 3. During the download and installation, follow these steps: 1. Follow the instructions on your computer. If no instructions are ready to the hard drive. Using the hard drive path you recorded earlier, open the folder on the screen to the location on the HP...

Notebook PC User Guide - Windows 7
Page 115
... file to download the driver and install it later. Proceed to install the updated driver. When the list of the device. To do so, restart your computer model number in the Search box, press enter, and then follow these steps: To use the HP Web site: 1. Updating programs and drivers 105 Open your web browser, go to install. 7. NOTE: In some locations you want a specific SoftPaq, enter the SoftPaq number in...
... file to download the driver and install it later. Proceed to install the updated driver. When the list of the device. To do so, restart your computer model number in the Search box, press enter, and then follow these steps: To use the HP Web site: 1. Updating programs and drivers 105 Open your web browser, go to install. 7. NOTE: In some locations you want a specific SoftPaq, enter the SoftPaq number in...

Notebook PC User Guide - Windows 7
Page 122
... boot options 101 112 Index boot order 101 button sound 101 buttons power 4 TouchPad 2 TouchPad off indicator 28 TouchPad right/left 28 C cables LAN 27 modem 23 security 96 USB 84 calibrating battery 57 caps lock light, identifying 3 Card Reader Power Saving 101 CD burning 72 copying 71 playing 68 removing 73 CD drive 78 Certificate of Authenticity label 12 changing the language of Setup Utility 98 charging batteries 55, 57 checking audio functions 40 compartments memory module 8 components additional hardware 11 bottom 8 display...
... boot options 101 112 Index boot order 101 button sound 101 buttons power 4 TouchPad 2 TouchPad off indicator 28 TouchPad right/left 28 C cables LAN 27 modem 23 security 96 USB 84 calibrating battery 57 caps lock light, identifying 3 Card Reader Power Saving 101 CD burning 72 copying 71 playing 68 removing 73 CD drive 78 Certificate of Authenticity label 12 changing the language of Setup Utility 98 charging batteries 55, 57 checking audio functions 40 compartments memory module 8 components additional hardware 11 bottom 8 display...
Notebook PC User Guide - Windows 7
Page 123
... WLAN connection 18 country-specific modem cable adapter 24 critical battery level 56 critical updates, software 96 CyberLink PowerDVD 39 D device drivers HP drivers 76 Windows drivers 77 Diagnostics menu 101 digital card defined 86 inserting 86 removing 87 stopping 87 digital dual array microphone, identifying 36 Digital Media Slot, identifying 7 Disk Cleanup software 79 Disk Defragmenter software 79 disk drive 78 disk performance 79 displaying system information 99 drive media 46 drives boot order 101 caring for 64 DVD burning 72 changing region setting...
... WLAN connection 18 country-specific modem cable adapter 24 critical battery level 56 critical updates, software 96 CyberLink PowerDVD 39 D device drivers HP drivers 76 Windows drivers 77 Diagnostics menu 101 digital card defined 86 inserting 86 removing 87 stopping 87 digital dual array microphone, identifying 36 Digital Media Slot, identifying 7 Disk Cleanup software 79 Disk Defragmenter software 79 disk drive 78 disk performance 79 displaying system information 99 drive media 46 drives boot order 101 caring for 64 DVD burning 72 changing region setting...


