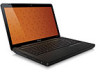
Wireless Setup Guide
Page 3
... setup. 2 Make sure that the blue wireless light next to the instructions included with the computer. Web site. 3 Ensure that the computer is off button. If the light is on, turn on /off . If you cannot access a Web site, repeat steps 1 5 During router configuration, check whether... router. 1 Set up and turn it off by pressing the wireless on the computer according to the wireless icon is connected to AC power during the router setup, contact your router manufacturer for technical assistance. 6 Test the Internet connection by model. 3 Connect the wireless router ...
Compaq Presario CQ62 Notebook PC and HP G62 Notebook PC - Maintenance and Service Guide
Page 4
Contents 1 Product description 2 External component identification Top components 2-1 TouchPad 2-1 Lights 2-2 Buttons 2-3 Keys 2-4 2-4 Left-side components 2-5 Right-side components 2-6 Bottom components 2-7 Display components 2-8 Wireless antennas 2-9 Additional hardware components 2-10 3 Illustrated parts catalog Service tag ... 4-5 Service tag 4-5 Computer feet 4-6 Battery 4-7 Hard drive 4-8 Memory module 4-10 Wireless module 4-12 Optical drive 4-14 Keyboard 4-16 Top cover 4-19 Power button board 4-22 Touchpad button board 4-23 Maintenance and Service Guide iv
Compaq Presario CQ62 Notebook PC and HP G62 Notebook PC - Maintenance and Service Guide
Page 12
... Two integrated speakers produce sound. 2 Power button* ■ When the computer is in Hibernation, press the button to exit Hibernation. Maintenance and Service Guide 2-3 If the computer has stopped responding and Windows shutdown procedures are ineffective, press and hold the power button for at least 5 seconds to turn... off , press the button to turn on the computer. ■ When the computer is on, press the button to initiate Sleep. ■ When the computer is in Help...
Compaq Presario CQ62 Notebook PC and HP G62 Notebook PC - Maintenance and Service Guide
Page 22
...) display assembly for use in: HP G62 biscotti computer models 595185-001 HP G62 biscotti computer models with webcam 595186-001 Presario CQ62 biscotti computer models 602170-001 Presario CQ62 biscotti computer models with webcam 602171-001 Presario CQ62 matte black computer models 595187-001 Presario CQ62 matte black computer models with webcam 595188-001 Power button board 595204-001 Keyboard (includes...
Compaq Presario CQ62 Notebook PC and HP G62 Notebook PC - Maintenance and Service Guide
Page 31
...: 65-W AC adapter 90-W AC adapter Cable Kit Hard drive connector cable Optical drive connector cable Power button cable RJ-11 cable TouchPad button board cable TouchPad cable USB cable Power cord (for use with both HP G62 and Presario CQ 62 computer models) for use in: Argentina Australia Brazil Denmark Europe India Israel Italy Japan...
Compaq Presario CQ62 Notebook PC and HP G62 Notebook PC - Maintenance and Service Guide
Page 35
...-DJ1 Keyboard for use in Greece (includes keyboard cable) 595200-001 Plastics kit 595201-001 Cable kit 595202-001 Screw kit 595203-001 Touchpad button board 595204-001 Power button board 595205-001 USB board 595206-001 Top cover (includes TouchPad board) for use in biscotti computer models 595207-001 Top cover (includes...
Compaq Presario CQ62 Notebook PC and HP G62 Notebook PC - Maintenance and Service Guide
Page 56
Release the power button ZIF connector 1, speaker cable 2, touchpad ZIF connector 3, and touchpad button ZIF connector 4. 4-20 Maintenance and Service Guide Remove the Phillips PM2.5×6.0 screw that secures the switch cover to the computer. 6. Removal and replacement procedures 5.
Compaq Presario CQ62 Notebook PC and HP G62 Notebook PC - Maintenance and Service Guide
Page 58
.... 2. Remove the memory module (see "Top cover" on page 4-16). 10. Remove the power button board: 1. Disconnect the power from the computer by first disconnecting the power cord from the AC outlet and then disconnecting the AC adapter from the computer. 4. Remove the ...Phillips PM2.0×3.0 screw 1 that secures the power button board to the computer. 3. Reverse this procedure to install the power button board. 4-22 Maintenance and Service Guide Shut down through the operating system. 2. Remove the battery (see...
Compaq Presario CQ62 Notebook PC and HP G62 Notebook PC - Maintenance and Service Guide
Page 59
... the computer by first disconnecting the power cord from the AC outlet and then disconnecting the AC adapter from the computer. 4. Remove the memory module (see "Top cover" on page 4-10). 7. Remove the touchpad button board: 1. Remove the top cover (see "Memory module" on page... the battery (see "Wireless module" on page 4-14). 9. Remove the two Phillips PM2.0×3.0 screws 1 that secure the touchpad button board to install the touchpad button board. Remove the hard drive (see "Optical drive" on page 4-12). 8. Maintenance and Service Guide 4-23 Shut down through the...
Compaq Presario CQ62 Notebook PC and HP G62 Notebook PC - Maintenance and Service Guide
Page 88
... in DC mode. Enable/disable the capacitive button tapping sound. Enable/disable the processor C6 sleep state. Enable/disable the processor Virtualization Technology. When enabled, saves power when the computer is on. When enabled, saves power when the computer is called the Primary Hard...mode. Setup Utility System Configuration menu Select Language Support Button Sound (select models only) Virtualization Technology (select models only) Processor C6 State (select models only) LAN Power Saving (select models only) Card Reader/1394 Power Saving (select models only) Fan Always On Boot...
Compaq Presario CQ62 Notebook PC and HP G62 Notebook PC - Maintenance and Service Guide
Page 115
... with LightScribe DVD±RW SuperMulti Double-Layer drive removal 4-14 specifications 6-5 boot options 5-4 boot order 5-4 bottom components 2-7 built-in device Bluetooth device radio 2-7 modem 1-2 buttons power 2-3 C cable lock, product description 1-3 cables, service consideration 4-1 chipset, product description 1-1 components antenna 2-9 bottom 2-7 left-side 2-5 right-side 2-6 top 2-1 TouchPad 2-1 computer feet, locations 4-6 computer specifications 6-1 connectors...
Compaq Presario CQ62 Notebook PC and HP G62 Notebook PC - Maintenance and Service Guide
Page 117
...-45 9-4 USB 9-5 plastic parts 4-1 Plastics Kit contents 3-10 ports product description 1-3 power button 2-3 power button board removal 4-22, 4-23 spare part number 4-22, 4-23 power cord set requirements 10-1 spare part number 3-12 processor product description 1-1 removal 4-46... graphics 1-1 hard drives 1-2 keyboard 1-3 memory module 1-1 microphone 1-2 modem module 1-2 operating system 1-3 optical drives 1-2 panel 1-1 ports 1-3 power requirements 1-3 product name 1-1 serviceability 1-3 TouchPad 2-1 video 2-5 webcam 1-2 wireless module 1-2 product name 1-1 R recovery methods f11 recovery 8-4 ...
Notebook PC User Guide - Windows 7
Page 14
... stopped responding and Windows shutdown procedures are ineffective, press and hold the power button for at least 5 seconds to turn on the computer. ● When the computer is on, press the button briefly to initiate Sleep. ● When the computer is in the ...press f1 to open Help and Support. 4 Chapter 1 Features Buttons NOTE: Your computer may look slightly different from the illustration in Hibernation, press the button briefly to exit Hibernation. Component Description (1) Speaker grill (2) Power button* Two integrated speakers produce sound. ● When the computer is...
Notebook PC User Guide - Windows 7
Page 56
... the following ways: ● Briefly press the power button. ● If the display is closed, open the display. ● Press a key on the keyboard or a button on external power. To exit Hibernation: ▲ Briefly press the power button. Initiating and exiting Sleep The system is set... at the factory to initiate Hibernation after 15 minutes of inactivity when running on battery power and 30 minutes of inactivity when...
Notebook PC User Guide - Windows 7
Page 66
Turn off . Exit Hibernation by pressing the power button. Turn on the computer. Save your work and shut down the computer. NOTE: The battery charges whether the computer is off . 56 Chapter 5 Power management Remove the discharged battery, and then insert a charged battery. 3. ... battery Calibrate a battery under the following devices: ● AC adapter ● Optional expansion product or docking device ● Optional power adapter Resolving a low battery level when a charged battery is also not necessary to calibrate a new battery. Do not charge the computer...
Notebook PC User Guide - Windows 7
Page 71
... does not connect to a USB port ● When the computer will be unused and disconnected from external power for at least 5 seconds. ● Disconnect the computer from external power, and then remove the battery. The Shut down command closes all open programs, including the operating system,...in the sequence provided: ● Press ctrl+alt+delete, and then click the Power button. ● Press and hold the power button for an extended period Although you can shut down the computer with the power button, the recommended procedure is to use the Windows Shut down command. Save your ...
Notebook PC User Guide - Windows 7
Page 88
Unplug the power cord from the computer. 7. With the hard drive bay toward you are not sure whether the computer is on a flat surface. 6. To remove the hard ...: To prevent information loss or an unresponsive system: Shut down on , in the Sleep state, or in Hibernation, turn the computer on by pressing the power button. Do not remove the hard drive while the computer is off or in Hibernation. Turn the computer upside down the computer before removing the hard...
Notebook PC User Guide - Windows 7
Page 96
... computer is located on the bottom of electric shock and damage to the equipment, unplug the power cord and remove all external devices connected to the vacant expansion memory module slot or by pressing the power button. Save your work. 2. The memory capacity of static electricity by touching a grounded metal object. Before beginning..., turn the computer on by upgrading the existing memory module in the primary memory module slot. Remove the battery from the AC outlet. 5. Unplug the power cord from the computer. 7. WARNING!
Notebook PC User Guide - Windows 7
Page 109
...Power Saving. Enable/disable the processor Virtualization Technology. NOTE: On models with two hard drives, this Run a comprehensive self-test on the hard drive. Run a comprehensive self-test on . Set the following boot options: ● POST Hotkey Delay (sec.)―Set the delay for : ◦ Notebook...Setup Utility. Enable/disable the processor state. Enable/disable Action Key Mode. Enable/disable Card Reader/1394 Power Saving. Enable/disable the capacitive button tapping sound. Setup Utility menus 99 When enabled, the computer fan will always be on a secondary ...
Notebook PC User Guide - Windows 7
Page 122
managing a power-on password 92 managing an administrator password 91 media activity action keys 37 memory adding memory modules 86 replacing memory modules 86 upgrading memory modules ... set in Windows 90 performing a recovery 109 pointing devices setting preferences 31 ports external monitor 7 HDMI 7, 41 USB 6, 7, 82 power connecting 50 conserving 59 power button, identifying 4 power connector, identifying 6 power cord, identifying 11 power light, identifying 3 power-on password creating 92 entering 92 managing 92 Processor C6 State 99 Product Key 12 product name and number...