Drives - Windows Vista
Page 3
... or DVD ...7 Creating or "burning" a CD or DVD ...7 Removing an optical disc (CD or DVD 8 3 Improving hard drive performance Using Disk Defragmenter ...9 Using Disk Cleanup ...9 4 Replacing the hard drive 5 Troubleshooting The optical disc tray does not open for removal of a CD or DVD 13 The computer does not detect the... optical drive 14 A disc does not play ...15 A disc does not play automatically ...16 The process of burning a disc does not begin, or it stops before completion 16 A device driver must be reinstalled ...17 Obtaining the latest HP device drivers 17 Obtaining...
... or DVD ...7 Creating or "burning" a CD or DVD ...7 Removing an optical disc (CD or DVD 8 3 Improving hard drive performance Using Disk Defragmenter ...9 Using Disk Cleanup ...9 4 Replacing the hard drive 5 Troubleshooting The optical disc tray does not open for removal of a CD or DVD 13 The computer does not detect the... optical drive 14 A disc does not play ...15 A disc does not play automatically ...16 The process of burning a disc does not begin, or it stops before completion 16 A device driver must be reinstalled ...17 Obtaining the latest HP device drivers 17 Obtaining...
Drives - Windows Vista
Page 14
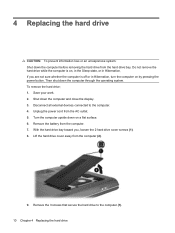
...from the computer. 7. Shut down the computer through the operating system. Do not remove the hard drive while the computer is off or in Hibernation. To remove the hard drive: 1. 4 Replacing the hard drive CAUTION: To prevent information loss or an unresponsive system: Shut down on by pressing the power ...button. With the hard drive bay toward you are not sure whether the computer is on,...
...from the computer. 7. Shut down the computer through the operating system. Do not remove the hard drive while the computer is off or in Hibernation. To remove the hard drive: 1. 4 Replacing the hard drive CAUTION: To prevent information loss or an unresponsive system: Shut down on by pressing the power ...button. With the hard drive bay toward you are not sure whether the computer is on,...
Drives - Windows Vista
Page 15
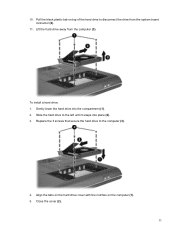
Gently lower the hard drive into place (2). 3. 10. Lift the hard drive away from the system board connector (2). 11. Close the cover (2). 11 Pull the black plastic tab on the computer (1). 5. Replace the 3 screws that secure the hard drive to disconnect the drive from the computer (3). To install a hard drive: 1. Slide the hard drive to the left until it snaps into the compartment (1). 2. Align the tabs on the hard drive cover with the notches on top of the hard drive to the computer (3). 4.
Gently lower the hard drive into place (2). 3. 10. Lift the hard drive away from the system board connector (2). 11. Close the cover (2). 11 Pull the black plastic tab on the computer (1). 5. Replace the 3 screws that secure the hard drive to disconnect the drive from the computer (3). To install a hard drive: 1. Slide the hard drive to the left until it snaps into the compartment (1). 2. Align the tabs on the hard drive cover with the notches on top of the hard drive to the computer (3). 4.

Drives - Windows Vista
Page 16
6. Tighten the 2 hard drive cover screws (3). 12 Chapter 4 Replacing the hard drive
6. Tighten the 2 hard drive cover screws (3). 12 Chapter 4 Replacing the hard drive
Drives - Windows Vista
Page 23
... 7 playing 5 removing 8 CD drive 3 CD, drive 2 copyright warning 6 D device drivers HP drivers 17 Windows drivers 18 Disk Cleanup software 9 Disk Defragmenter software 9 disk performance 9 drives caring for 1 hard 10, 11 optical 2 drives, optical drive 3 DVD burning 7, 16 changing region setting 6 copying 7 drive 2 playing 5 removing 8 DVD drive 3 H hard disk drive installing 11 removing 10 replacing 10 hard drive installing 11 removing 10 replacing 10 M maintenance Disk...
... 7 playing 5 removing 8 CD drive 3 CD, drive 2 copyright warning 6 D device drivers HP drivers 17 Windows drivers 18 Disk Cleanup software 9 Disk Defragmenter software 9 disk performance 9 drives caring for 1 hard 10, 11 optical 2 drives, optical drive 3 DVD burning 7, 16 changing region setting 6 copying 7 drive 2 playing 5 removing 8 DVD drive 3 H hard disk drive installing 11 removing 10 replacing 10 hard drive installing 11 removing 10 replacing 10 M maintenance Disk...
Notebook Tour - Windows Vista
Page 15
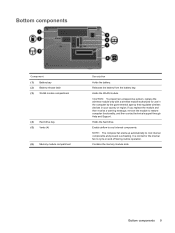
Releases the battery from the battery bay. If you replace the module and then receive a warning message, remove the module to cool internal components. Holds the hard drive. Enable airflow to restore computer functionality, and then contact technical support through...: To prevent an unresponsive system, replace the wireless module only with a wireless module authorized for the internal fan to cool internal components and prevent overheating. Bottom components Component (1) Battery bay (2) Battery release latch (3) WLAN module compartment (4) Hard drive bay (5) Vents (4) (6) Memory ...
Releases the battery from the battery bay. If you replace the module and then receive a warning message, remove the module to cool internal components. Holds the hard drive. Enable airflow to restore computer functionality, and then contact technical support through...: To prevent an unresponsive system, replace the wireless module only with a wireless module authorized for the internal fan to cool internal components and prevent overheating. Bottom components Component (1) Battery bay (2) Battery release latch (3) WLAN module compartment (4) Hard drive bay (5) Vents (4) (6) Memory ...


