HP Client Manager 6.1
Page 3
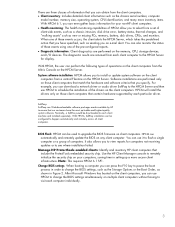
... the client computers. • Client inventory: Includes detailed client information such as the chassis serial number, computer model number, memory size, operating system, CPU identification, and many more secure client infrastructure. Software installations are performed only on those client computers ... inventory items. With HPCM 6.1, you can even gather basic information for your computers, saving time in Figure 2. Use the HP Client Manager console to remotely initialize the security chip on multiple client computers without having to -date and highest-quality system software...
... the client computers. • Client inventory: Includes detailed client information such as the chassis serial number, computer model number, memory size, operating system, CPU identification, and many more secure client infrastructure. Software installations are performed only on those client computers ... inventory items. With HPCM 6.1, you can even gather basic information for your computers, saving time in Figure 2. Use the HP Client Manager console to remotely initialize the security chip on multiple client computers without having to -date and highest-quality system software...
HP Client Manager 6.1
Page 4
Figure 2. Furthermore, HPCM provides a rich set most BIOS settings that checks your computers. - Point-and-click to keep the HP tool components (e.g. Perform diagnostics on computer components and view reports of customizable reporting tools so you can be ...WMI event handling on the user's computer. A SoftPaq package is increased productivity. Information collected includes manufacturer, OS, language, processor, memory, and free disk space. • HP Tool Update Wizard provides an easy method to select and download SoftPaqs. These capabilities make it works, you 'll be much ...
Figure 2. Furthermore, HPCM provides a rich set most BIOS settings that checks your computers. - Point-and-click to keep the HP tool components (e.g. Perform diagnostics on computer components and view reports of customizable reporting tools so you can be ...WMI event handling on the user's computer. A SoftPaq package is increased productivity. Information collected includes manufacturer, OS, language, processor, memory, and free disk space. • HP Tool Update Wizard provides an easy method to select and download SoftPaqs. These capabilities make it works, you 'll be much ...
HP Client Manager 6.1
Page 8
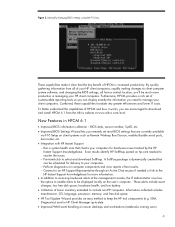
... number of health events that can be selected in order to the situation. For example, you to change management by computer model. In addition to memory changes, disk drive changes, or CPU changes. You can be monitored varies by alerting you can also monitor the status of these events using one...
... number of health events that can be selected in order to the situation. For example, you to change management by computer model. In addition to memory changes, disk drive changes, or CPU changes. You can be monitored varies by alerting you can also monitor the status of these events using one...
HP Client Manager 6.1
Page 9
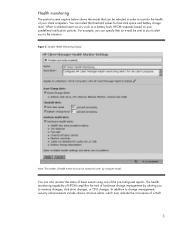
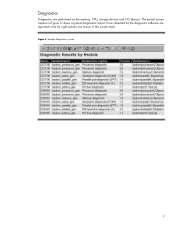
Errors detected by the diagnostic software are performed on the memory, CPU, storage devices and I/O devices. Sample Diagnostics screen 9 Figure 6. The partial screen capture in this screen shot). Diagnostics Diagnostics are reported in the far right column (not shown in Figure 6 shows a typical diagnostics report.
Errors detected by the diagnostic software are performed on the memory, CPU, storage devices and I/O devices. Sample Diagnostics screen 9 Figure 6. The partial screen capture in this screen shot). Diagnostics Diagnostics are reported in the far right column (not shown in Figure 6 shows a typical diagnostics report.
HP Business Desktop Products - Worldwide Limited Warranty and Technical Support (North America)
Page 5
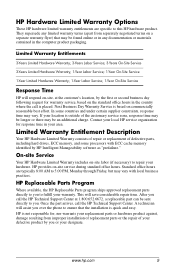
...be longer or there may vary with ECC cache memory identified by HP Intelligent Manageability software as "prefailure." Standard office hours are specific to repair your warranty. HP Replaceable Parts Program Where available, the HP Replaceable Parts program ships approved replacement parts directly to...in the country where the call is outside of defective parts, including hard drives, ECC memory, and some countries and under certain supplier constraints, response time may vary. HP is quick and easy. Limited Warranty Entitlements 3-Years Limited Hardware Warranty; 3-Years Labor Service;...
...be longer or there may vary with ECC cache memory identified by HP Intelligent Manageability software as "prefailure." Standard office hours are specific to repair your warranty. HP Replaceable Parts Program Where available, the HP Replaceable Parts program ships approved replacement parts directly to...in the country where the call is outside of defective parts, including hard drives, ECC memory, and some countries and under certain supplier constraints, response time may vary. HP is quick and easy. Limited Warranty Entitlements 3-Years Limited Hardware Warranty; 3-Years Labor Service;...

Computer Setup (F10) Utility Guide
Page 5
...hard drives, diskette drives, optical drives, or HP Drive Keys. ■ Configure the boot priority of IDE hard drive controllers. ■ Enable Quick Boot, which allows the computer to change , or verify the system configuration, including settings for processor, graphics, memory, audio, storage, communications, and input devices... the operating system when the power-on password is faster than Full Boot but does not run all of bootable devices such as memory count, product name, and other non-error text messages. Computer Setup (F10) Utility Guide Computer Setup (F10) Utilities Use the...
...hard drives, diskette drives, optical drives, or HP Drive Keys. ■ Configure the boot priority of IDE hard drive controllers. ■ Enable Quick Boot, which allows the computer to change , or verify the system configuration, including settings for processor, graphics, memory, audio, storage, communications, and input devices... the operating system when the power-on password is faster than Full Boot but does not run all of bootable devices such as memory count, product name, and other non-error text messages. Computer Setup (F10) Utility Guide Computer Setup (F10) Utilities Use the...

Computer Setup (F10) Utility Guide
Page 8
.../stepping • Cache size (L1/L2) • Installed memory size • System ROM (includes family name and version) • Chassis serial number • Asset tracking number • Integrated MAC address for specific Computer Setup options may vary depending on your hardware configuration. 4 www.hp.com Computer Setup (F10) Utility Guide Restore from...
.../stepping • Cache size (L1/L2) • Installed memory size • System ROM (includes family name and version) • Chassis serial number • Asset tracking number • Integrated MAC address for specific Computer Setup options may vary depending on your hardware configuration. 4 www.hp.com Computer Setup (F10) Utility Guide Restore from...

Computer Setup (F10) Utility Guide
Page 20
...-On Options (continued) *These options should be disabled for Computer Setup options may vary depending on your specific hardware configuration. 16 www.hp.com Computer Setup (F10) Utility Guide Enabling this feature will allow Microsoft Windows Operating Systems to work properly when USB buffers are at ...the top of memory. This feature must be used by option ROMs. The disadvantage is that a popular memory manager, HIMEM.SYS, does not work properly. • ACPI/USB Buffer @ Top of RAM...
...-On Options (continued) *These options should be disabled for Computer Setup options may vary depending on your specific hardware configuration. 16 www.hp.com Computer Setup (F10) Utility Guide Enabling this feature will allow Microsoft Windows Operating Systems to work properly when USB buffers are at ...the top of memory. This feature must be used by option ROMs. The disadvantage is that a popular memory manager, HIMEM.SYS, does not work properly. • ACPI/USB Buffer @ Top of RAM...

Computer Setup (F10) Utility Guide
Page 22
...options vary depending on your graphics controller. • Monitor Tracking (enable/disable). Allows you to enable or disable downloading of system memory reserved for Computer Setup options may vary depending on platform). Allows you to save monitor asset information. • NIC PXE Option ...Heading Option Description Advanced* (continued) Device Options (continued) *These options should be used by your specific hardware configuration. 18 www.hp.com Computer Setup (F10) Utility Guide Allows you to specify the amount of option ROMS. ✎ Support for use by advanced...
...options vary depending on your graphics controller. • Monitor Tracking (enable/disable). Allows you to enable or disable downloading of system memory reserved for Computer Setup options may vary depending on platform). Allows you to save monitor asset information. • NIC PXE Option ...Heading Option Description Advanced* (continued) Device Options (continued) *These options should be used by your specific hardware configuration. 18 www.hp.com Computer Setup (F10) Utility Guide Allows you to specify the amount of option ROMS. ✎ Support for use by advanced...
Hardware Reference Guide (2nd Edition)
Page 3
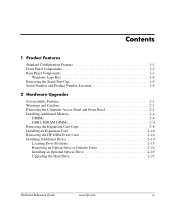
... 1-6 2 Hardware Upgrades Serviceability Features 2-1 Warnings and Cautions 2-1 Removing the Computer Access Panel and Front Bezel 2-2 Installing Additional Memory 2-4 DIMMs 2-4 DDR1-SDRAM DIMMs 2-4 Removing the Expansion Card Cage 2-8 Installing an Expansion Card 2-10 Removing the HP USB+Power Card 2-12 Installing Additional Drives 2-14 Locating Drive Positions 2-15 Removing an Optical Drive or...
... 1-6 2 Hardware Upgrades Serviceability Features 2-1 Warnings and Cautions 2-1 Removing the Computer Access Panel and Front Bezel 2-2 Installing Additional Memory 2-4 DIMMs 2-4 DDR1-SDRAM DIMMs 2-4 Removing the Expansion Card Cage 2-8 Installing an Expansion Card 2-10 Removing the HP USB+Power Card 2-12 Installing Additional Drives 2-14 Locating Drive Positions 2-15 Removing an Optical Drive or...

Hardware Reference Guide (2nd Edition)
Page 14
... computer supports: ■ 64 Mbit, 128 Mbit, 256 Mbit, and 512 Mbit non-ECC memory technology ■ single-sided or double-sided DIMMS (does not support double-sided X16 DDR1 DIMMS) 2-4 www.hp.com Hardware Reference Guide The DDR1-SDRAM DIMMs must be: ■ industry-standard 184-pin &#...PC3200 400 MHz DIMM can populate the system board with at 266MHz or 333MHz, depending on the system board can be installed, a memory frequency of 400MHz is not supported; Hardware Upgrades Installing Additional Memory The computer comes with double data rate synchronous dynamic random access...
... computer supports: ■ 64 Mbit, 128 Mbit, 256 Mbit, and 512 Mbit non-ECC memory technology ■ single-sided or double-sided DIMMS (does not support double-sided X16 DDR1 DIMMS) 2-4 www.hp.com Hardware Reference Guide The DDR1-SDRAM DIMMs must be: ■ industry-standard 184-pin &#...PC3200 400 MHz DIMM can populate the system board with at 266MHz or 333MHz, depending on the system board can be installed, a memory frequency of 400MHz is not supported; Hardware Upgrades Installing Additional Memory The computer comes with double data rate synchronous dynamic random access...

Hardware Reference Guide (2nd Edition)
Page 15
...400 MHz 266 MHz PC2700 533 MHz 333 MHz PC3200 400 MHz 266 MHz PC3200 533 MHz 333 MHz If a memory frequency is important to use memory modules with gold metal contacts to prevent corrosion and/or oxidation resulting from having incompatible metals in contact with each ... static electricity by briefly touching a grounded metal object. When upgrading the memory, it is paired with four banks; Installing DDR1-SDRAM DIMMs Ä CAUTION: The memory module sockets have gold metal contacts. Hardware Reference Guide www.hp.com 2-5 For example, if a 333 MHz DIMM is paired with...
...400 MHz 266 MHz PC2700 533 MHz 333 MHz PC3200 400 MHz 266 MHz PC3200 533 MHz 333 MHz If a memory frequency is important to use memory modules with gold metal contacts to prevent corrosion and/or oxidation resulting from having incompatible metals in contact with each ... static electricity by briefly touching a grounded metal object. When upgrading the memory, it is paired with four banks; Installing DDR1-SDRAM DIMMs Ä CAUTION: The memory module sockets have gold metal contacts. Hardware Reference Guide www.hp.com 2-5 For example, if a 333 MHz DIMM is paired with...

Hardware Reference Guide (2nd Edition)
Page 16
...Computer Access Panel and Front Bezel" in this chapter). Ä CAUTION: Check the position of all cables and wires before touching. 2-6 www.hp.com Hardware Reference Guide Rotate the Easy Access drive bay to an upright position. Disconnect the power cord from hot surfaces, allow the internal ... operating system, then turn off any external devices. 3. Rotating the Easy Access Drive Bay 5. Hardware Upgrades Ä CAUTION: When handling a memory module, be careful not to touch any of personal injury from the power outlet and disconnect any external devices. 2. Locate the...
...Computer Access Panel and Front Bezel" in this chapter). Ä CAUTION: Check the position of all cables and wires before touching. 2-6 www.hp.com Hardware Reference Guide Rotate the Easy Access drive bay to an upright position. Disconnect the power cord from hot surfaces, allow the internal ... operating system, then turn off any external devices. 3. Rotating the Easy Access Drive Bay 5. Hardware Upgrades Ä CAUTION: When handling a memory module, be careful not to touch any of personal injury from the power outlet and disconnect any external devices. 2. Locate the...

Hardware Reference Guide (2nd Edition)
Page 17
Open both latches of the memory module socket 1, then insert the memory module into the socket, ensuring that the module is fully inserted and properly seated. Hardware Reference Guide www.hp.com 2-7 Push the module down into the socket 2. Installing a DIMM ✎ A memory module can be installed in the closed position 3. Hardware Upgrades 6. Match the notch on the module with the tab on the memory socket. 7. Make sure the latches are in only one way.
Open both latches of the memory module socket 1, then insert the memory module into the socket, ensuring that the module is fully inserted and properly seated. Hardware Reference Guide www.hp.com 2-7 Push the module down into the socket 2. Installing a DIMM ✎ A memory module can be installed in the closed position 3. Hardware Upgrades 6. Match the notch on the module with the tab on the memory socket. 7. Make sure the latches are in only one way.

Hardware Reference Guide (2nd Edition)
Page 18
...system, then turn off any external devices. 3. Be sure not to pinch the cables in this chapter). 2-8 www.hp.com Hardware Reference Guide Disconnect the power cord from the power outlet and disconnect any external devices. 2. The computer automatically recognizes the additional... memory the next time you want to the down position. Removing the Expansion Card Cage To remove the expansion card cage: 1. Repeat...
...system, then turn off any external devices. 3. Be sure not to pinch the cables in this chapter). 2-8 www.hp.com Hardware Reference Guide Disconnect the power cord from the power outlet and disconnect any external devices. 2. The computer automatically recognizes the additional... memory the next time you want to the down position. Removing the Expansion Card Cage To remove the expansion card cage: 1. Repeat...

Hardware Reference Guide (2nd Edition)
Page 61
... serial port 1-5 coin cell battery type 1 D-2 type 2 D-3 components front panel 1-2 rear panel 1-3 computer care,guidelines G-1 Hardware Reference Guide Index D DIMMs (dual inline memory modules) installation 2-5 socket locations 2-5 diskette drive activity light 1-2 eject button 1-2 removing 2-16 drive installation, guidelines 2-14 drive positions 2-15 E eject button, optical drive ...panel components 1-2 G guidelines battery replacement D-1 computer care G-1 DDR-SDRAM DIMMs 2-4 drive installation 2-14 optical drive G-2 shipping preparation G-3 Ultra ATA installation C-1 www.hp.com Index-1
... serial port 1-5 coin cell battery type 1 D-2 type 2 D-3 components front panel 1-2 rear panel 1-3 computer care,guidelines G-1 Hardware Reference Guide Index D DIMMs (dual inline memory modules) installation 2-5 socket locations 2-5 diskette drive activity light 1-2 eject button 1-2 removing 2-16 drive installation, guidelines 2-14 drive positions 2-15 E eject button, optical drive ...panel components 1-2 G guidelines battery replacement D-1 computer care G-1 DDR-SDRAM DIMMs 2-4 drive installation 2-14 optical drive G-2 shipping preparation G-3 Ultra ATA installation C-1 www.hp.com Index-1

Hardware Reference Guide (2nd Edition)
Page 62
... E-1 coin cell battery (type 1) D-2 coin cell battery (type 2) D-4 expansion card 2-10 hard drive 2-28 memory 2-4 optical drive 2-19 padlock E-2 UltraATA C-1 J jumpers B-3 powered serial port B-3 serial port location B-3 standard serial port B-3 K keyboard port 1-3 L lock E-1, E-2 M memory identifying 2-7 installing 2-4 module sockets 2-4 monitor connector 1-3 mouse connector 1-3 O optical drive 1-2 activity light 1-2 ATA ... expansion card cage 2-8, 2-9 expansion slot cover 2-10 front bezel 2-3 hard drive 2-24 optical drive 2-16 serial port cap 1-5 Index-2 www.hp.com Hardware Reference Guide
... E-1 coin cell battery (type 1) D-2 coin cell battery (type 2) D-4 expansion card 2-10 hard drive 2-28 memory 2-4 optical drive 2-19 padlock E-2 UltraATA C-1 J jumpers B-3 powered serial port B-3 serial port location B-3 standard serial port B-3 K keyboard port 1-3 L lock E-1, E-2 M memory identifying 2-7 installing 2-4 module sockets 2-4 monitor connector 1-3 mouse connector 1-3 O optical drive 1-2 activity light 1-2 ATA ... expansion card cage 2-8, 2-9 expansion slot cover 2-10 front bezel 2-3 hard drive 2-24 optical drive 2-16 serial port cap 1-5 Index-2 www.hp.com Hardware Reference Guide

Hardware Reference Guide (2nd Edition)
Page 63
USB+Power card 2-12 RJ-45 connector 1-3 routine care G-1 S SDRAM (synchronous dynamic random access memory) 2-4 security lock provisions E-1 serial number location 1-6 serial port cap, removing 1-5 serial ports B-1 jumper location B-3 powered B-1 Index standard B-1 shipping preparation, guidelines G-3 socket locations, DIMM 2-5 U Ultra ATA cable-select feature C-1 installation guidelines C-1 USB+Power card 2-12 removing 2-12 W Windows Logo key 1-4 Hardware Reference Guide www.hp.com Index-3
USB+Power card 2-12 RJ-45 connector 1-3 routine care G-1 S SDRAM (synchronous dynamic random access memory) 2-4 security lock provisions E-1 serial number location 1-6 serial port cap, removing 1-5 serial ports B-1 jumper location B-3 powered B-1 Index standard B-1 shipping preparation, guidelines G-3 socket locations, DIMM 2-5 U Ultra ATA cable-select feature C-1 installation guidelines C-1 USB+Power card 2-12 removing 2-12 W Windows Logo key 1-4 Hardware Reference Guide www.hp.com Index-3

HP USB Barcode Scanner Programming Reference Guide
Page 7
...perform various functions or activate different features. Programming Reference Guide 1-1 Feature values are indicated with the default settings described in non-volatile memory and are preserved even when the scanner is transmitted to your data is powered down. The settings are stored in the Chapter ...4, "Programming User Preferences," of the HP USB Barcode Scanner User guide. This guide describes the features and provides the programming bar codes necessary for selecting these features for ...
...perform various functions or activate different features. Programming Reference Guide 1-1 Feature values are indicated with the default settings described in non-volatile memory and are preserved even when the scanner is transmitted to your data is powered down. The settings are stored in the Chapter ...4, "Programming User Preferences," of the HP USB Barcode Scanner User guide. This guide describes the features and provides the programming bar codes necessary for selecting these features for ...

Getting Started (3rd Edition)
Page 10
... Documentation CD) Provides an overview of the product hardware as well as instructions for upgrading this series of computers and includes information on RTC batteries, memory, and power supply. ■ Computer Setup (F10) Utility Guide (PDF on Documentation CD) Provides instructions on using this tool to reconfigure or modify default settings... (available in print and PDF on Documentation CD) Provides definitions and instructions for resolving possible hardware or software problems; Canadian, and various international regulations. 6 www.hp.com Getting Started
... Documentation CD) Provides an overview of the product hardware as well as instructions for upgrading this series of computers and includes information on RTC batteries, memory, and power supply. ■ Computer Setup (F10) Utility Guide (PDF on Documentation CD) Provides instructions on using this tool to reconfigure or modify default settings... (available in print and PDF on Documentation CD) Provides definitions and instructions for resolving possible hardware or software problems; Canadian, and various international regulations. 6 www.hp.com Getting Started