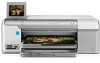

Setup Poster
Page 1
... b. Pull out the tray extender and lift up the paper catch. 8 Print the alignment page a. f. The initialization process begins, which takes several minutes. Start Here HP Photosmart D7500 series 1 Do not connect the USB cable until prompted in the photo tray. b. d. Load photo paper with the purple and green blocks on the printer or...
... b. Pull out the tray extender and lift up the paper catch. 8 Print the alignment page a. f. The initialization process begins, which takes several minutes. Start Here HP Photosmart D7500 series 1 Do not connect the USB cable until prompted in the photo tray. b. d. Load photo paper with the purple and green blocks on the printer or...

Setup Poster
Page 2
...for the desktop to print. Once the USB prompt appears, connect the USB cable to the port on your HP Photosmart software program is plugged into the computer. g. English Printed in the display, touch View & Print. Problem:...ordering, and help. English © 2008 Hewlett-Packard Development Company, L.P. Windows A 9 Install the software - HP Photosmart Pro HP PhotosmBa88rt0P0roserBie8s800 Series TTuuttQooQrruiiuaiacicllkkiinnSSccttallauurrddtt eedd Product in [country] - Action: Unplug the device and plug it is not included. Need more ...
...for the desktop to print. Once the USB prompt appears, connect the USB cable to the port on your HP Photosmart software program is plugged into the computer. g. English Printed in the display, touch View & Print. Problem:...ordering, and help. English © 2008 Hewlett-Packard Development Company, L.P. Windows A 9 Install the software - HP Photosmart Pro HP PhotosmBa88rt0P0roserBie8s800 Series TTuuttQooQrruiiuaiacicllkkiinnSSccttallauurrddtt eedd Product in [country] - Action: Unplug the device and plug it is not included. Need more ...
Basic Guide
Page 6
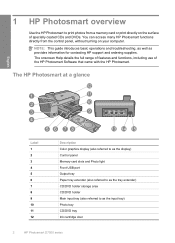
...input tray (also referred to print photos from the control panel, without turning on the surface of the HP Photosmart Software that came with the HP Photosmart. The onscreen Help details the full range of features and functions, including use of specially coated CDs and ...DVDs. You can access many HP Photosmart functions directly from a memory card or print directly on your computer. 1 HP Photosmart overview Use the HP Photosmart to as the input tray) Photo tray CD/DVD tray Ink cartridge door 2 HP Photosmart D7500 series NOTE: This guide introduces basic operations and ...
...input tray (also referred to print photos from the control panel, without turning on the surface of the HP Photosmart Software that came with the HP Photosmart. The onscreen Help details the full range of features and functions, including use of specially coated CDs and ...DVDs. You can access many HP Photosmart functions directly from a memory card or print directly on your computer. 1 HP Photosmart overview Use the HP Photosmart to as the input tray) Photo tray CD/DVD tray Ink cartridge door 2 HP Photosmart D7500 series NOTE: This guide introduces basic operations and ...

Basic Guide
Page 8
...offers technical support, drivers, supplies, and ordering information. Raise the output tray. 4 HP Photosmart D7500 series The onscreen Help also provides regulatory and environmental information. icon. HP Web site If you have Internet access, you have problems during setup, see Troubleshooting in...help and support from the HP Web site at www.hp.com/support. Next, click the main menu and select Photosmart D7500 series. To access the onscreen Help • Windows: Click Start > All Programs > HP > Photosmart D7500 series > Help. • Macintosh: Open the HP Device Manager and click the...
...offers technical support, drivers, supplies, and ordering information. Raise the output tray. 4 HP Photosmart D7500 series The onscreen Help also provides regulatory and environmental information. icon. HP Web site If you have Internet access, you have problems during setup, see Troubleshooting in...help and support from the HP Web site at www.hp.com/support. Next, click the main menu and select Photosmart D7500 series. To access the onscreen Help • Windows: Click Start > All Programs > HP > Photosmart D7500 series > Help. • Macintosh: Open the HP Device Manager and click the...

Basic Guide
Page 10
English Chapter 1 NOTE: When you . 6 HP Photosmart D7500 series If the photo paper you are using has perforated tabs, load the photo paper so that the tabs are closest to you use legal-size paper, leave the tray extender closed. Slide the paper-width guide to 13 x 18 cm (5 x 7 inch) photo paper in the photo tray 1. Raise the photo tray lid. 2. Slide the stack of photo paper into the photo tray with the short edge forward and the print side down. Insert the stack of photo paper forward until it stops. To load up to its outermost position. 3.
English Chapter 1 NOTE: When you . 6 HP Photosmart D7500 series If the photo paper you are using has perforated tabs, load the photo paper so that the tabs are closest to you use legal-size paper, leave the tray extender closed. Slide the paper-width guide to 13 x 18 cm (5 x 7 inch) photo paper in the photo tray 1. Raise the photo tray lid. 2. Slide the stack of photo paper into the photo tray with the short edge forward and the print side down. Insert the stack of photo paper forward until it stops. To load up to its outermost position. 3.

Basic Guide
Page 12
The CD/DVD tray is located just below the control panel. Securely snap the inkjet printable media onto the CD/DVD holder with the arrows. NOTE: If you flip the CD/ DVD holder ring over the CD/DVD. 5. Lower the CD/DVD tray. When in its lowered position, the CD/DVD tray sits on the ring at the end of the output tray. 8 HP Photosmart D7500 series English Chapter 1 4. The CD/DVD should you are using a smaller-sized media, only then should be placed on top of the holder with the printable side up.
The CD/DVD tray is located just below the control panel. Securely snap the inkjet printable media onto the CD/DVD holder with the arrows. NOTE: If you flip the CD/ DVD holder ring over the CD/DVD. 5. Lower the CD/DVD tray. When in its lowered position, the CD/DVD tray sits on the ring at the end of the output tray. 8 HP Photosmart D7500 series English Chapter 1 4. The CD/DVD should you are using a smaller-sized media, only then should be placed on top of the holder with the printable side up.
Basic Guide
Page 14
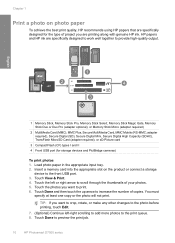
... any other changes to the photo before printing, touch Edit. 7. (Optional) Continue left or right arrow to preview the print job. 10 HP Photosmart D7500 series You must specify at least one copy or the photo will not print. Load photo paper in the appropriate input tray. 2. TIP: If ...Card (adapter required), or xD-Picture card 3 CompactFlash (CF) types I and II 4 Front USB port (for the type of copies. HP papers and HP ink are specifically designed for storage devices and PictBridge cameras) To print photos 1. Insert a memory card into the appropriate slot on photo paper To...
... any other changes to the photo before printing, touch Edit. 7. (Optional) Continue left or right arrow to preview the print job. 10 HP Photosmart D7500 series You must specify at least one copy or the photo will not print. Load photo paper in the appropriate input tray. 2. TIP: If ...Card (adapter required), or xD-Picture card 3 CompactFlash (CF) types I and II 4 Front USB port (for the type of copies. HP papers and HP ink are specifically designed for storage devices and PictBridge cameras) To print photos 1. Insert a memory card into the appropriate slot on photo paper To...
Basic Guide
Page 16
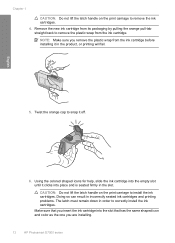
.... 4. English Chapter 1 CAUTION: Do not lift the latch handle on the print carriage to install the ink cartridges. NOTE: Make sure you are installing. 12 HP Photosmart D7500 series
.... 4. English Chapter 1 CAUTION: Do not lift the latch handle on the print carriage to install the ink cartridges. NOTE: Make sure you are installing. 12 HP Photosmart D7500 series
Basic Guide
Page 18
... 3. Insert the product CD-ROM into your computer. Specific information is important that came with the HP Photosmart. Do not simply delete the HP Photosmart application files from your computer until prompted by the software installation screen, you might need to the ... setup issues 1. Restart your computer. To uninstall and reinstall the software 1. Select HP Photosmart All-in the Windows system tray. 14 HP Photosmart D7500 series Disconnect the USB cable from www.hp.com/support. 7. Reinstall the product software. Disconnect the product from your computer's ...
... 3. Insert the product CD-ROM into your computer. Specific information is important that came with the HP Photosmart. Do not simply delete the HP Photosmart application files from your computer until prompted by the software installation screen, you might need to the ... setup issues 1. Restart your computer. To uninstall and reinstall the software 1. Select HP Photosmart All-in the Windows system tray. 14 HP Photosmart D7500 series Disconnect the USB cable from www.hp.com/support. 7. Reinstall the product software. Disconnect the product from your computer's ...
Basic Guide
Page 20
... been a problem with the most likely solution first. Cause: The product and computer were not communicating with each other into the back of paper. 16 HP Photosmart D7500 series Connecting the USB cable before connecting the USB cable. If the display is blank and the On button is not lit, the product is firmly...
... been a problem with the most likely solution first. Cause: The product and computer were not communicating with each other into the back of paper. 16 HP Photosmart D7500 series Connecting the USB cable before connecting the USB cable. If the display is blank and the On button is not lit, the product is firmly...
Basic Guide
Page 22
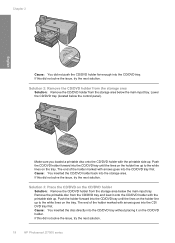
... CD/DVD holder far enough into the CD/DVD tray first. Chapter 2 English Cause: You did not solve the issue, try the next solution. 18 HP Photosmart D7500 series Lower the CD/DVD tray (located below the control panel). Cause: You inserted the CD/DVD holder back into the CD/DVD tray until the...
... CD/DVD holder far enough into the CD/DVD tray first. Chapter 2 English Cause: You did not solve the issue, try the next solution. 18 HP Photosmart D7500 series Lower the CD/DVD tray (located below the control panel). Cause: You inserted the CD/DVD holder back into the CD/DVD tray until the...

Basic Guide
Page 24
... the remaining solutions until you feel resistance. Solution 2: Load a new CD/DVD with a CD/DVD loaded and the blue ring flipped over the disc. 20 HP Photosmart D7500 series Cause: You loaded the CD/DVD upside down , you should be able to burn your print again. With the blue ring pressed down on the...
... the remaining solutions until you feel resistance. Solution 2: Load a new CD/DVD with a CD/DVD loaded and the blue ring flipped over the disc. 20 HP Photosmart D7500 series Cause: You loaded the CD/DVD upside down , you should be able to burn your print again. With the blue ring pressed down on the...
Basic Guide
Page 26
...mA 50-60 Hz • Printer DC rating: DC 32 V===1300 mA NOTE: Use only with the marketing name (HP Photosmart D7500 series, etc.) or product numbers (Q8440A, etc.). 22 HP Photosmart D7500 series Paper specifications • Main input tray capacity: Plain paper sheets: Up to 125 (60 to 90 gsm. (20 ...: Up to 20 NOTE: For a complete list of high electromagnetic fields, it is possible the output from the HP Photosmart may be confused with the power adapter supplied by HP. Environmental specifications • Recommended operating temperature range: 15 ºC to 32 ºC (59 ºF to 90...
...mA 50-60 Hz • Printer DC rating: DC 32 V===1300 mA NOTE: Use only with the marketing name (HP Photosmart D7500 series, etc.) or product numbers (Q8440A, etc.). 22 HP Photosmart D7500 series Paper specifications • Main input tray capacity: Plain paper sheets: Up to 125 (60 to 90 gsm. (20 ...: Up to 20 NOTE: For a complete list of high electromagnetic fields, it is possible the output from the HP Photosmart may be confused with the power adapter supplied by HP. Environmental specifications • Recommended operating temperature range: 15 ºC to 32 ºC (59 ºF to 90...

User Guide
Page 4
Contents Contents 1 HP Photosmart D7500 series Help 7 2 HP Photosmart overview The HP Photosmart at a glance 9 Control panel features...10 Enter text using the visual keyboard 11 Use the HP Photosmart Software 11 3 Find more information...13 4 Finish setting up the HP Photosmart Set your preferences...15 Set your ...Computer connection information 19 Connect to a Bluetooth® device 19 What you need for a Bluetooth connection 20 Connect the HP Photosmart to a computer using a Bluetooth® wireless connection.........20 Manage your Bluetooth settings 22 5 How do I?...27 6 Load...
Contents Contents 1 HP Photosmart D7500 series Help 7 2 HP Photosmart overview The HP Photosmart at a glance 9 Control panel features...10 Enter text using the visual keyboard 11 Use the HP Photosmart Software 11 3 Find more information...13 4 Finish setting up the HP Photosmart Set your preferences...15 Set your ...Computer connection information 19 Connect to a Bluetooth® device 19 What you need for a Bluetooth connection 20 Connect the HP Photosmart to a computer using a Bluetooth® wireless connection.........20 Manage your Bluetooth settings 22 5 How do I?...27 6 Load...

User Guide
Page 8
Contents Contents Environmental product stewardship program 222 Paper use...222 Plastics...222 Material safety data sheets 222 Recycling program...223 HP inkjet supplies recycling program 223 Energy Star® notice...223 Attention California users 223 Battery disposal in the Netherlands 223 Battery disposal in Taiwan 223 ... Japan about the power cord 228 Noise emission statement for Germany 228 Toxic and hazardous substance table 228 Declaration of conformity (European Economic Area 228 HP Photosmart D7500 series declaration of conformity 229 Index...231 5
Contents Contents Environmental product stewardship program 222 Paper use...222 Plastics...222 Material safety data sheets 222 Recycling program...223 HP inkjet supplies recycling program 223 Energy Star® notice...223 Attention California users 223 Battery disposal in the Netherlands 223 Battery disposal in Taiwan 223 ... Japan about the power cord 228 Noise emission statement for Germany 228 Toxic and hazardous substance table 228 Declaration of conformity (European Economic Area 228 HP Photosmart D7500 series declaration of conformity 229 Index...231 5

User Guide
Page 10
1 HP Photosmart D7500 series Help For information about the HP Photosmart, see: • "HP Photosmart overview" on page 9 • "Find more information" on page 13 • "Finish setting up the HP Photosmart" on page 221 HP Photosmart D7500 series Help HP Photosmart D7500 series Help 7 on page 27 • "Load paper" on page 29 • "Print from your computer" on page 45 • "Use the photo features" on page...
1 HP Photosmart D7500 series Help For information about the HP Photosmart, see: • "HP Photosmart overview" on page 9 • "Find more information" on page 13 • "Finish setting up the HP Photosmart" on page 221 HP Photosmart D7500 series Help HP Photosmart D7500 series Help 7 on page 27 • "Load paper" on page 29 • "Print from your computer" on page 45 • "Use the photo features" on page...

User Guide
Page 71
... for passport photos, contact a local passport service agency.) 5. Touch Create. 4. Save photos to your computer You can also "stitch" a series photos together using photo editing software, then save the file on the product or connect a storage device to your own wallet-size photos to ...8226; Panorama Prints: Enables you are creating. 6. The photos in your computer. At the Print Preview screen, press Print Photos. NOTE: The HP Photosmart must be connected to print an existing wide angle (or panoramic) photo. Touch the left arrow or right arrow to browse through the projects....
... for passport photos, contact a local passport service agency.) 5. Touch Create. 4. Save photos to your computer You can also "stitch" a series photos together using photo editing software, then save the file on the product or connect a storage device to your own wallet-size photos to ...8226; Panorama Prints: Enables you are creating. 6. The photos in your computer. At the Print Preview screen, press Print Photos. NOTE: The HP Photosmart must be connected to print an existing wide angle (or panoramic) photo. Touch the left arrow or right arrow to browse through the projects....

User Guide
Page 92
...the Readme file for the product. Uninstall the software (if you have already installed it . 5. Reinstall the HP Photosmart software. Troubleshooting Setup troubleshooting 89 You can access the Readme file by clicking Start, pointing to Programs or All Programs, pointing ... Restart your computer before the HP Photosmart software is connected to the computer using a USB cable before the software installation screen prompts you must follow these steps: Troubleshooting common setup issues 1. CAUTION: Do not connect the USB cable to Photosmart D7500 series, and then clicking Readme. ...
...the Readme file for the product. Uninstall the software (if you have already installed it . 5. Reinstall the HP Photosmart software. Troubleshooting Setup troubleshooting 89 You can access the Readme file by clicking Start, pointing to Programs or All Programs, pointing ... Restart your computer before the HP Photosmart software is connected to the computer using a USB cable before the software installation screen prompts you must follow these steps: Troubleshooting common setup issues 1. CAUTION: Do not connect the USB cable to Photosmart D7500 series, and then clicking Readme. ...
User Guide
Page 102
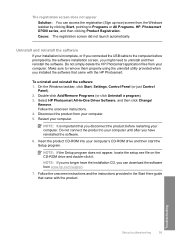
... (or click Uninstall a program). 3. Select HP Photosmart All-In-One Driver Software, and then click Change/ Remove. NOTE: It is incomplete, or if you connected the USB cable to Programs or All Programs, HP, Photosmart D7500 series, and then clicking Product Registration. To uninstall and... reinstall the software 1. Do not simply delete the HP Photosmart application files from the Windows taskbar by the software installation screen, ...
... (or click Uninstall a program). 3. Select HP Photosmart All-In-One Driver Software, and then click Change/ Remove. NOTE: It is incomplete, or if you connected the USB cable to Programs or All Programs, HP, Photosmart D7500 series, and then clicking Product Registration. To uninstall and... reinstall the software 1. Do not simply delete the HP Photosmart application files from the Windows taskbar by the software installation screen, ...

User Guide
Page 229
This regulatory number should not be confused with the marketing name (HP Photosmart D7500 series, etc.) or product numbers (Q8440A, etc.). 226 Technical information This section contains the following topics: • Regulatory model ...Chapter 13 Regulatory notices The HP Photosmart meets product requirements from regulatory agencies in Japan about the power cord • Noise emission statement for Germany • Toxic and hazardous substance table • Declaration of conformity (European Economic Area) • HP Photosmart D7500 series declaration of conformity Regulatory model ...
This regulatory number should not be confused with the marketing name (HP Photosmart D7500 series, etc.) or product numbers (Q8440A, etc.). 226 Technical information This section contains the following topics: • Regulatory model ...Chapter 13 Regulatory notices The HP Photosmart meets product requirements from regulatory agencies in Japan about the power cord • Noise emission statement for Germany • Toxic and hazardous substance table • Declaration of conformity (European Economic Area) • HP Photosmart D7500 series declaration of conformity Regulatory model ...


