Setup Guide
Page 8
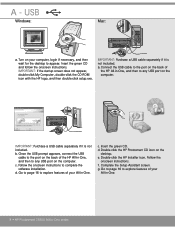
... the back of your All-in -One, and then to any USB port on your computer, login if necessary, and then wait for the desktop to complete the software installation. e. Complete the Setup Assistant screen. g. c. Double-click the HP Photosmart CD icon on the computer. Go ...to page 16 to explore features of the HP All-in -One series IMPORTANT: Purchase a USB cable separately if it is...
... the back of your All-in -One, and then to any USB port on your computer, login if necessary, and then wait for the desktop to complete the software installation. e. Complete the Setup Assistant screen. g. c. Double-click the HP Photosmart CD icon on the computer. Go ...to page 16 to explore features of the HP All-in -One series IMPORTANT: Purchase a USB cable separately if it is...
Setup Guide
Page 10
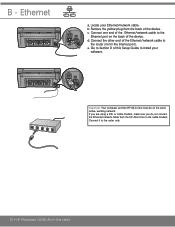
d. B - Connect the other end of this Setup Guide to install your Ethernet/network cable. Important: Your computer and the HP All-in -One to the Ethernet port on the same active, working network. If you are using a DSL or cable modem, make sure you do not ... from the HP All-in -One must be on the back of the device. c. e. Connect it to the router (not in -One series Connect one end of the device. Go to Section D of the Ethernet/network cable to the router only. 10 • HP Photosmart C6300 All-in the Internet port). Ethernet a. Locate your software. b.
d. B - Connect the other end of this Setup Guide to install your Ethernet/network cable. Important: Your computer and the HP All-in -One to the Ethernet port on the same active, working network. If you are using a DSL or cable modem, make sure you do not ... from the HP All-in -One must be on the back of the device. c. e. Connect it to the router (not in -One series Connect one end of the device. Go to Section D of the Ethernet/network cable to the router only. 10 • HP Photosmart C6300 All-in the Internet port). Ethernet a. Locate your software. b.
Setup Guide
Page 12
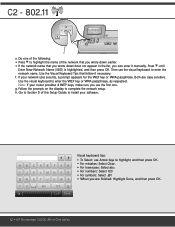
... on the display to enter the WEP key or WPA passphrase, as requested. If your software. Go to enter the network name. Note: If your router provides 4 WEP keys, make sure you are case sensitive. g. Do one . h. A BCDE FGH I J K LMNOP QRS TUVWX YZ abc 123 .@! Press ...until Enter New Network Name (SSID) is highlighted, and then press OK. Both are finished: Highlight Done, and then press OK. 12 • HP Photosmart C6300 All-in the list, you ...
... on the display to enter the WEP key or WPA passphrase, as requested. If your software. Go to enter the network name. Note: If your router provides 4 WEP keys, make sure you are case sensitive. g. Do one . h. A BCDE FGH I J K LMNOP QRS TUVWX YZ abc 123 .@! Press ...until Enter New Network Name (SSID) is highlighted, and then press OK. Both are finished: Highlight Done, and then press OK. 12 • HP Photosmart C6300 All-in the list, you ...
Setup Guide
Page 13
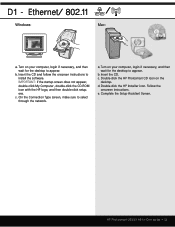
...through the network. b. On the Connection Type screen, make sure to install the software. Turn on your computer, login if necessary, and then wait for the desktop to appear. Insert the CD. d. HP Photosmart C6300 All-in-One series • 13 Ethernet/ 802.11 / Windows: Mac: a. c. exe .... Double-click the HP Photosmart CD icon on your computer, login if necessary, and then wait for the desktop to ...
...through the network. b. On the Connection Type screen, make sure to install the software. Turn on your computer, login if necessary, and then wait for the desktop to appear. Insert the CD. d. HP Photosmart C6300 All-in-One series • 13 Ethernet/ 802.11 / Windows: Mac: a. c. exe .... Double-click the HP Photosmart CD icon on your computer, login if necessary, and then wait for the desktop to ...

Setup Guide
Page 14
... and the network). 14 • HP Photosmart C6300 All-in-One series Your firewall software may need to be disabled. Follow the onscreen instructions. You should respond so that you have additional computers on your network, install the HP All-in -One (not between your network. Then continue with the HP software installation. Make sure that access...
... and the network). 14 • HP Photosmart C6300 All-in-One series Your firewall software may need to be disabled. Follow the onscreen instructions. You should respond so that you have additional computers on your network, install the HP All-in -One (not between your network. Then continue with the HP software installation. Make sure that access...
Setup Guide
Page 15
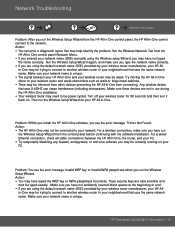
...by your wireless router manufacturer, your HP All- in-One may be trying to connect to another wireless router in -One may not be typed exactly. Action: • The HP All-in your neighborhood that may help identify the problem. HP Photosmart C6300 All-in -One and your wireless router and avoid ...see the error message Printer Not Found. Try moving the HP All-in-One closer to your wireless router may be inference from other devices preventing the HP All-in-One from the HP All-in-One control panel, the HP All-in -One software, you see the error message Invalid WEP key or ...
...by your wireless router manufacturer, your HP All- in-One may be trying to connect to another wireless router in -One may not be typed exactly. Action: • The HP All-in your neighborhood that may help identify the problem. HP Photosmart C6300 All-in -One and your wireless router and avoid ...see the error message Printer Not Found. Try moving the HP All-in-One closer to your wireless router may be inference from other devices preventing the HP All-in-One from the HP All-in-One control panel, the HP All-in -One software, you see the error message Invalid WEP key or ...
Setup Guide
Page 16
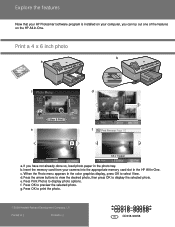
... from your computer, you have not already done so, load photo paper in the photo tray. b. Explore the features Now that your HP Photosmart software program is installed on the HP All-in-One. f. Press OK to preview the selected photo. Print a 4 x 6 inch photo b a c Photo Menu d Create View & Print...color graphics display, press OK to select View. g. e. d. If you can try out one of the features on your camera into the appropriate memory card slot in the HP All-in-One. When the Photo menu appears in () **CCDD001188--9900005588** EN CD018-90058 Press the arrow...
... from your computer, you have not already done so, load photo paper in the photo tray. b. Explore the features Now that your HP Photosmart software program is installed on the HP All-in-One. f. Press OK to preview the selected photo. Print a 4 x 6 inch photo b a c Photo Menu d Create View & Print...color graphics display, press OK to select View. g. e. d. If you can try out one of the features on your camera into the appropriate memory card slot in the HP All-in-One. When the Photo menu appears in () **CCDD001188--9900005588** EN CD018-90058 Press the arrow...

