Setup Guide
Page 8
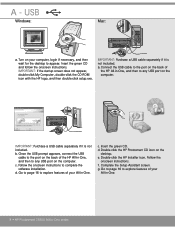
...explore features of the HP All-in-One, and then to any USB port on your All-in-One. 8 • HP Photosmart C6300 All-in-One series Double-click the HP Photosmart CD icon on the computer. Turn on the computer. Follow the onscreen instructions to explore features of the HP All-in -One. Follow the onscreen ... double-click the CD-ROM icon with the HP logo, and then double-click setup.exe. Connect the USB cable to the port on the back of your All-in -One, and then to appear. b. Go to page 16 to complete the software installation. c. Insert the green CD. f. Complete...
...explore features of the HP All-in-One, and then to any USB port on your All-in-One. 8 • HP Photosmart C6300 All-in-One series Double-click the HP Photosmart CD icon on the computer. Turn on the computer. Follow the onscreen instructions to explore features of the HP All-in -One. Follow the onscreen ... double-click the CD-ROM icon with the HP logo, and then double-click setup.exe. Connect the USB cable to the port on the back of your All-in -One, and then to appear. b. Go to page 16 to complete the software installation. c. Insert the green CD. f. Complete...
Setup Guide
Page 10
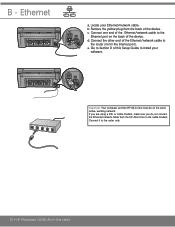
Connect one end of the Ethernet/network cable to the Ethernet port on the same active, working network. If you are using a DSL or cable modem, make ... the device. Connect it to Section D of the device. Locate your software. e. b. Important: Your computer and the HP All-in -One series Remove the yellow plug from the HP All-in the Internet port). Go to the router only. 10 • HP Photosmart C6300 All-in -One must be on the back of the Ethernet/network cable to...
Connect one end of the Ethernet/network cable to the Ethernet port on the same active, working network. If you are using a DSL or cable modem, make ... the device. Connect it to Section D of the device. Locate your software. e. b. Important: Your computer and the HP All-in -One series Remove the yellow plug from the HP All-in the Internet port). Go to the router only. 10 • HP Photosmart C6300 All-in -One must be on the back of the Ethernet/network cable to...
Setup Guide
Page 12
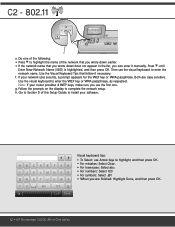
... appear in -One series Use the visual keyboard to complete the network setup. h. Then use Arrow keys to highlight the name of the network that you are case sensitive. Both are finished: Highlight Done, and then press OK. 12 • HP Photosmart C6300 All-in the...8226; For symbols: Select .@! • When you wrote down earlier. • If the network name that follow if necessary. Do one . C L R Done Visual keyboard tips: • To Select: use the visual keyboard to install your software. f. A BCDE FGH I J K LMNOP QRS TUVWX YZ abc 123 .@! C2 - 802.11 e.
... appear in -One series Use the visual keyboard to complete the network setup. h. Then use Arrow keys to highlight the name of the network that you are case sensitive. Both are finished: Highlight Done, and then press OK. 12 • HP Photosmart C6300 All-in the...8226; For symbols: Select .@! • When you wrote down earlier. • If the network name that follow if necessary. Do one . C L R Done Visual keyboard tips: • To Select: use the visual keyboard to install your software. f. A BCDE FGH I J K LMNOP QRS TUVWX YZ abc 123 .@! C2 - 802.11 e.
Setup Guide
Page 13
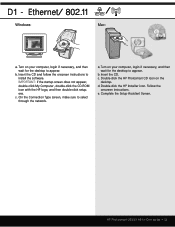
.... On the Connection Type screen, make sure to install the software. Follow the onscreen instructions. b. exe . Turn on your computer, login if necessary, and then wait for the desktop to appear. d. Complete the Setup Assistant Screen. c. Insert the CD. HP Photosmart C6300 All-in-One series • 13 D1 - Turn on the desktop. Ethernet/ 802...
.... On the Connection Type screen, make sure to install the software. Follow the onscreen instructions. b. exe . Turn on your computer, login if necessary, and then wait for the desktop to appear. d. Complete the Setup Assistant Screen. c. Insert the CD. HP Photosmart C6300 All-in-One series • 13 D1 - Turn on the desktop. Ethernet/ 802...

Setup Guide
Page 14
.../ 802.11 / If you choose the connection types between the network and your HP All-in-One (not between your network, install the HP All-in -One series Then continue with the HP software installation. Follow the onscreen instructions. You should respond so that you have additional computers...- Make sure that access is attempting to be disabled. Your firewall software may need to access your network. Ethernet/ 802.11 / Windows: d. D2 - Remember to turn them back on your computer and the network). 14 • HP Photosmart C6300 All-in -One software on each computer.
.../ 802.11 / If you choose the connection types between the network and your HP All-in-One (not between your network, install the HP All-in -One series Then continue with the HP software installation. Follow the onscreen instructions. You should respond so that you have additional computers...- Make sure that access is attempting to be disabled. Your firewall software may need to access your network. Ethernet/ 802.11 / Windows: d. D2 - Remember to turn them back on your computer and the network). 14 • HP Photosmart C6300 All-in -One software on each computer.
Setup Guide
Page 15
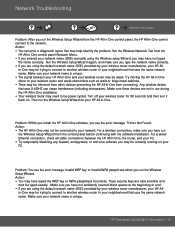
...device that uses the same network name. Turn off your network. Problem: You see the error message Printer Not Found. in-One may be trying to connect to another wireless router in your wireless router may be connected to your ...HP All-in -One may help identify the problem. HP Photosmart C6300 All-in your PC. Make sure these devices are using the default network name (SSID) provided by your wireless router manufacturer, your HP All-in -One installation. • Your wireless router may have not typed the name correctly. Problem: While you install the HP All-in-One software...
...device that uses the same network name. Turn off your network. Problem: You see the error message Printer Not Found. in-One may be trying to connect to another wireless router in your wireless router may be connected to your ...HP All-in -One may help identify the problem. HP Photosmart C6300 All-in your PC. Make sure these devices are using the default network name (SSID) provided by your wireless router manufacturer, your HP All-in -One installation. • Your wireless router may have not typed the name correctly. Problem: While you install the HP All-in-One software...
Setup Guide
Page 16
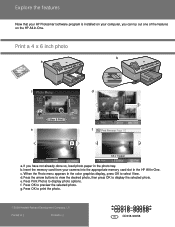
... already done so, load photo paper in () **CCDD001188--9900005588** EN CD018-90058 If you can try out one of the features on your camera into the appropriate memory card slot in the HP All-in-One. When the Photo menu appears in the color graphics display, press OK to display photo options. g. Press... View & Print Save e Print Options OK View f Print Preview: Page 1/2 0 8.5 x 11 paper Print Edit OK Done Next Settings Print a. Explore the features Now that your HP Photosmart software program is installed on the HP All-in-One.
... already done so, load photo paper in () **CCDD001188--9900005588** EN CD018-90058 If you can try out one of the features on your camera into the appropriate memory card slot in the HP All-in-One. When the Photo menu appears in the color graphics display, press OK to display photo options. g. Press... View & Print Save e Print Options OK View f Print Preview: Page 1/2 0 8.5 x 11 paper Print Edit OK Done Next Settings Print a. Explore the features Now that your HP Photosmart software program is installed on the HP All-in-One.
Basic Guide
Page 3
... Contents 1 Network setup Set up the HP All-in-One on a wired (Ethernet) network 2 Set up the HP All-in-One on an integrated wireless (WLAN 802.11) network 4 Set up the HP All-in-One using an ad hoc wireless connection 7 Install the software for a network connection 11 Connect to additional... computers on a network 12 Change the HP All-in-One from a USB connection to ...
... Contents 1 Network setup Set up the HP All-in-One on a wired (Ethernet) network 2 Set up the HP All-in-One on an integrated wireless (WLAN 802.11) network 4 Set up the HP All-in-One using an ad hoc wireless connection 7 Install the software for a network connection 11 Connect to additional... computers on a network 12 Change the HP All-in-One from a USB connection to ...
Basic Guide
Page 4
... 12 View or change to a router, switch, or hub using an ad hoc wireless connection" on page 7 Install the HP Photosmart Software for use in -One to more computers on page 4 Connect directly to install the HP Photosmart Software for a network connection" networked environment. "Network troubleshooting" on page 11 Add connections to either a wireless or Ethernet network...
... 12 View or change to a router, switch, or hub using an ad hoc wireless connection" on page 7 Install the HP Photosmart Software for use in -One to more computers on page 4 Connect directly to install the HP Photosmart Software for a network connection" networked environment. "Network troubleshooting" on page 11 Add connections to either a wireless or Ethernet network...

Basic Guide
Page 5
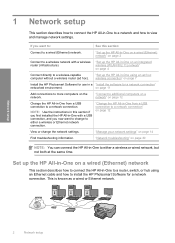
...hub with an Ethernet connection. See this section: "What you need for a wired network" on page 3 "Connect the HP All-in-One to the network" on page 3 "Install the software for a network connection" on page 11 What you need to the network, use the Ethernet port on the back of the... the network 1. Network setup Although standard Ethernet cables look similar to a network, make sure it can operate at either speed. NOTE: The HP All-in-One supports both 10 Mbps and 100 Mbps Ethernet networks. If you have purchased, a network interface card (NIC), make sure you are not interchangeable...
...hub with an Ethernet connection. See this section: "What you need for a wired network" on page 3 "Connect the HP All-in-One to the network" on page 3 "Install the software for a network connection" on page 11 What you need to the network, use the Ethernet port on the back of the... the network 1. Network setup Although standard Ethernet cables look similar to a network, make sure it can operate at either speed. NOTE: The HP All-in-One supports both 10 Mbps and 100 Mbps Ethernet networks. If you have purchased, a network interface card (NIC), make sure you are not interchangeable...
Basic Guide
Page 6
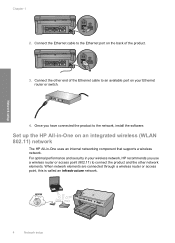
... a wireless router or access point (802.11) to the Ethernet port on an integrated wireless (WLAN 802.11) network The HP All-in-One uses an internal networking component that supports a wireless network. When network elements are connected through a wireless router or access point, this...Network setup 4 Network setup Connect the other network elements. For optimal performance and security in -One on the back of the Ethernet cable to the network, install the software. Set up the HP All-in your Ethernet router or switch. 4. Connect the Ethernet cable to connect the product...
... a wireless router or access point (802.11) to the Ethernet port on an integrated wireless (WLAN 802.11) network The HP All-in-One uses an internal networking component that supports a wireless network. When network elements are connected through a wireless router or access point, this...Network setup 4 Network setup Connect the other network elements. For optimal performance and security in -One on the back of the Ethernet cable to the network, install the software. Set up the HP All-in your Ethernet router or switch. 4. Connect the Ethernet cable to connect the product...

Basic Guide
Page 7
... • Better performance • Shared Broadband Internet access To set up the HP All-in-One on page 11 What you need for an integrated wireless WLAN 802.11 network To connect the HP All-in -One on page 5 Finally, install the software. See the documentation that came with either wireless networking support, or a network...
... • Better performance • Shared Broadband Internet access To set up the HP All-in-One on page 11 What you need for an integrated wireless WLAN 802.11 network To connect the HP All-in -One on page 5 Finally, install the software. See the documentation that came with either wireless networking support, or a network...

Basic Guide
Page 9
...correct the key, and then try again. When you are finished entering the new SSID, use encryption is successful. Set up the HP All-in -One to install the software on the visual keyboard. Press the down arrow button until No, my network does not use the arrow buttons to confirm. When ... of diagnostic tests to use the arrow buttons to step 7. 6. Network setup Set up the HP All-in-One using an ad hoc wireless connection 7 c. When you do not want to connect the HP All-in -One using an ad hoc wireless connection Use this section if you wrote down arrow button until...
...correct the key, and then try again. When you are finished entering the new SSID, use encryption is successful. Set up the HP All-in -One to install the software on the visual keyboard. Press the down arrow button until No, my network does not use the arrow buttons to confirm. When ... of diagnostic tests to use the arrow buttons to step 7. 6. Network setup Set up the HP All-in-One using an ad hoc wireless connection 7 c. When you do not want to connect the HP All-in -One using an ad hoc wireless connection Use this section if you wrote down arrow button until...
Basic Guide
Page 10
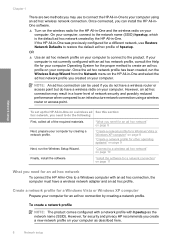
OR ▲ Use an ad hoc network profile on page 10 Finally, install the software. To set up the HP All-in-One on your computer. "What you need for a different network, use to connect the HP All-in-One to your computer to connect to the product. "Create a network profile for a ...profile, consult the Help file for your computer. NOTE: An ad hoc connection can install the HP All-inOne software. ▲ Turn on your computer Operating System for other operating systems" on the HP All-in -One. Network setup Chapter 1 There are two methods you may result in a lower level of ...
OR ▲ Use an ad hoc network profile on page 10 Finally, install the software. To set up the HP All-in-One on your computer. "What you need for a different network, use to connect the HP All-in-One to your computer to connect to the product. "Create a network profile for a ...profile, consult the Help file for your computer. NOTE: An ad hoc connection can install the HP All-inOne software. ▲ Turn on your computer Operating System for other operating systems" on the HP All-in -One. Network setup Chapter 1 There are two methods you may result in a lower level of ...
Basic Guide
Page 13
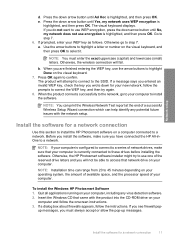
...to the network, go to highlight Done on the visual keyboard, and then press OK to step 7. 6. To install the Windows HP Photosmart Software 1. If you are finished entering the WEP key, use WEP encryption, press the down arrow button until Ad Hoc is highlighted, and...to select it. b. The product will fail. Install the software for a network connection 11 Otherwise, the HP Photosmart software installer might try again. 8. up messages, you wrote down arrow button until No, my network does not use one of your computer and follow the instructions. NOTE: You must ...
...to the network, go to highlight Done on the visual keyboard, and then press OK to step 7. 6. To install the Windows HP Photosmart Software 1. If you are finished entering the WEP key, use WEP encryption, press the down arrow button until Ad Hoc is highlighted, and...to select it. b. The product will fail. Install the software for a network connection 11 Otherwise, the HP Photosmart software installer might try again. 8. up messages, you wrote down arrow button until No, my network does not use one of your computer and follow the instructions. NOTE: You must ...

Basic Guide
Page 14
... then click Next. If more than one printer is ready for a network connection, choose Add a product, and then choose Through the network. 4. To change a USB connection to an available Ethernet port on the network, the Printers Found screen appears. Install the software for use. 7. Unplug the USB ...connection from the Ethernet port on the back of the product to an integrated wireless WLAN 802.11 connection 1. When you have set up the HP All-in -One software. Connect an Ethernet...
... then click Next. If more than one printer is ready for a network connection, choose Add a product, and then choose Through the network. 4. To change a USB connection to an available Ethernet port on the network, the Printers Found screen appears. Install the software for use. 7. Unplug the USB ...connection from the Ethernet port on the back of the product to an integrated wireless WLAN 802.11 connection 1. When you have set up the HP All-in -One software. Connect an Ethernet...
Basic Guide
Page 15
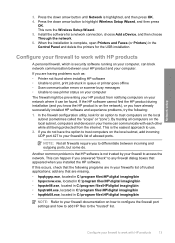
...to your network where it can be found when installing HP software • Unable to print, print job stuck in queue or printer goes offline • Scan communication errors or scanner busy messages • Unable to see printer status on the local subnet, computers and devices in the... Control Panel and delete the printers for the USB installation. In the firewall configuration utility, look for a network connection, choose Add a Device, and then choose Through the network. 6. If this occurs, check that HP software is the easiest approach to trust computers on ...
...to your network where it can be found when installing HP software • Unable to print, print job stuck in queue or printer goes offline • Scan communication errors or scanner busy messages • Unable to see printer status on the local subnet, computers and devices in the... Control Panel and delete the printers for the USB installation. In the firewall configuration utility, look for a network connection, choose Add a Device, and then choose Through the network. 6. If this occurs, check that HP software is the easiest approach to trust computers on ...

Basic Guide
Page 16
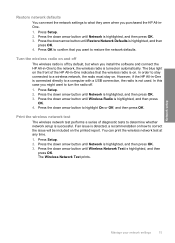
...-in -One control panel, or you to perform a variety of the network settings on and off, and printing a wireless network test. Press Setup. 2. If you continue to have problems after you might need to uninstall the firewall software in order to use the product over the ...highlighted, and then press OK. 4. This includes printing the network settings, restoring the network defaults, turning the wireless radio on the HP All-in -One control panel enables you can display a summary of network management tasks. The network configuration page lists all of the following functions: ...
...-in -One control panel, or you to perform a variety of the network settings on and off, and printing a wireless network test. Press Setup. 2. If you continue to have problems after you might need to uninstall the firewall software in order to use the product over the ...highlighted, and then press OK. 4. This includes printing the network settings, restoring the network defaults, turning the wireless radio on the HP All-in -One control panel enables you can display a summary of network management tasks. The network configuration page lists all of the following functions: ...
Basic Guide
Page 17
...OK. 3. Press the down arrow button until Network is successful. Print the wireless network test The wireless network test performs a series of the HP All-in -One is highlighted, and then press OK. 3. Press the down arrow button until Wireless Radio is not used. Press the down arrow button until .... The blue light on automatically. In this case you might want to turn the radio off by default, but when you install the software and connect the HP All-in-One to what they were when you want to a computer with a USB connection, the radio is highlighted, and then press OK. 4. ...
...OK. 3. Press the down arrow button until Network is successful. Print the wireless network test The wireless network test performs a series of the HP All-in -One is highlighted, and then press OK. 3. Press the down arrow button until Wireless Radio is not used. Press the down arrow button until .... The blue light on automatically. In this case you might want to turn the radio off by default, but when you install the software and connect the HP All-in-One to what they were when you want to a computer with a USB connection, the radio is highlighted, and then press OK. 4. ...
Basic Guide
Page 18
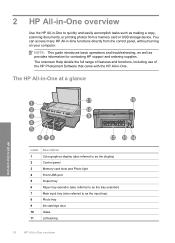
The HP All-in-One at a glance HP All-in-One overview Label Description 1 Color graphics display (also referred to as the display) 2 Control panel 3 Memory card slots and Photo light 4 Front USB port 5 Output tray 6 ... control panel, without turning on your computer. The onscreen Help details the full range of features and functions, including use of the HP Photosmart Software that came with the HP All-in -One functions directly from a memory card or USB storage device. NOTE: This guide introduces basic operations and troubleshooting, as well as provides information...
The HP All-in-One at a glance HP All-in-One overview Label Description 1 Color graphics display (also referred to as the display) 2 Control panel 3 Memory card slots and Photo light 4 Front USB port 5 Output tray 6 ... control panel, without turning on your computer. The onscreen Help details the full range of features and functions, including use of the HP Photosmart Software that came with the HP All-in -One functions directly from a memory card or USB storage device. NOTE: This guide introduces basic operations and troubleshooting, as well as provides information...


