

Setup Guide
Page 6
... o prompt USB for exibido, conecte o cabo USB à porta na parte posterior do software. b. Turn on the computer. Follow the onscreen instructions to complete the software installation. Allumez l'ordinateur, connectez-vous si nécessaire et attendez que le bureau s'af&#...icône du CD-ROM comportant le logo HP et double-cliquez sur setup.exe. AR USB My Computer HP .setup.exe AR USB USB a HP All-in-One USB b 6 • HP Photosmart C4600 All-in-One series / HP Photosmart C4600 All-in -One e a qualquer porta USB no ícone...
... o prompt USB for exibido, conecte o cabo USB à porta na parte posterior do software. b. Turn on the computer. Follow the onscreen instructions to complete the software installation. Allumez l'ordinateur, connectez-vous si nécessaire et attendez que le bureau s'af&#...icône du CD-ROM comportant le logo HP et double-cliquez sur setup.exe. AR USB My Computer HP .setup.exe AR USB USB a HP All-in-One USB b 6 • HP Photosmart C4600 All-in-One series / HP Photosmart C4600 All-in -One e a qualquer porta USB no ícone...
Basics Guide
Page 3
... paper...4 Avoid paper jams...7 Print 10 x 15 cm (4 x 6 inch) photos 7 Scan an image...8 Make a copy...9 Replace the print cartridges...9 Clean the HP Photosmart...12 2 Troubleshooting and support Uninstall and reinstall the software 14 Hardware setup troubleshooting 15 Clear paper jams...17 Print cartridge troubleshooting 18 Support process...18 3 Technical information System requirements...19...
... paper...4 Avoid paper jams...7 Print 10 x 15 cm (4 x 6 inch) photos 7 Scan an image...8 Make a copy...9 Replace the print cartridges...9 Clean the HP Photosmart...12 2 Troubleshooting and support Uninstall and reinstall the software 14 Hardware setup troubleshooting 15 Clear paper jams...17 Print cartridge troubleshooting 18 Support process...18 3 Technical information System requirements...19...
Basics Guide
Page 4
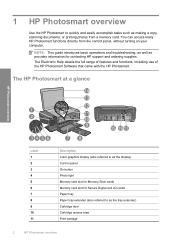
... (also referred to as the tray extender) Cartridge door Cartridge access area Print carriage 2 HP Photosmart overview The Electronic Help details the full range of features and functions, including use of the HP Photosmart Software that came with the HP Photosmart. 1 HP Photosmart overview Use the HP Photosmart to quickly and easily accomplish tasks such as making a copy, scanning documents, or...
... (also referred to as the tray extender) Cartridge door Cartridge access area Print carriage 2 HP Photosmart overview The Electronic Help details the full range of features and functions, including use of the HP Photosmart Software that came with the HP Photosmart. 1 HP Photosmart overview Use the HP Photosmart to quickly and easily accomplish tasks such as making a copy, scanning documents, or...
Basics Guide
Page 6
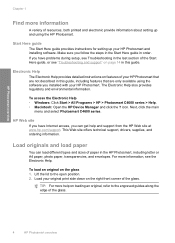
... setting up your HP Photosmart and installing software. TIP: For more information, see "Troubleshooting and support" on page 14 in order. To access the Electronic Help • Windows: Click Start > All Programs > HP > Photosmart C4600 series > Help. • Macintosh: Open the HP Device Manager and ...click the ? Start Here guide The Start Here guide provides instructions for setting up and using the software you have Internet access, you follow the ...
... setting up your HP Photosmart and installing software. TIP: For more information, see "Troubleshooting and support" on page 14 in order. To access the Electronic Help • Windows: Click Start > All Programs > HP > Photosmart C4600 series > Help. • Macintosh: Open the HP Device Manager and ...click the ? Start Here guide The Start Here guide provides instructions for setting up and using the software you have Internet access, you follow the ...
Basics Guide
Page 10
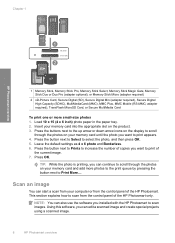
... one or more photos to the print queue by pressing the button next to scan from the control panel of copies you installed with the HP Photosmart to print appears. 4. Press the button next to Prints to increase the number of the HP Photosmart. Using this software, you can also use the software... from the control panel of the current image. 7. NOTE: You can edit a scanned image and create special projects using a scanned image. 8 HP Photosmart overview Press the buttons next to the up arrow or down arrow icons on the display to scroll through the photos on the product. 3. Press...
... one or more photos to the print queue by pressing the button next to scan from the control panel of copies you installed with the HP Photosmart to print appears. 4. Press the button next to Prints to increase the number of the HP Photosmart. Using this software, you can also use the software... from the control panel of the current image. 7. NOTE: You can edit a scanned image and create special projects using a scanned image. 8 HP Photosmart overview Press the buttons next to the up arrow or down arrow icons on the display to scroll through the photos on the product. 3. Press...

Basics Guide
Page 11
... such as books, you make quality copies from the control panel 1. Load paper in the memory card slots on the page. The HP Photosmart Software has many tools that you can edit it. Press the button next to Copies to the preview image, and then click Accept when ... shopping links on the product. 2. Following these instructions to edit your product, and then click one of the glass. 3. You can improve the overall image quality by using the software installed with the HP Photosmart. Any edits that you experience print quality issues related to a computer 1. TIP: To make ...
... such as books, you make quality copies from the control panel 1. Load paper in the memory card slots on the page. The HP Photosmart Software has many tools that you can edit it. Press the button next to Copies to the preview image, and then click Accept when ... shopping links on the product. 2. Following these instructions to edit your product, and then click one of the glass. 3. You can improve the overall image quality by using the software installed with the HP Photosmart. Any edits that you experience print quality issues related to a computer 1. TIP: To make ...
Basics Guide
Page 16
... restarting your computer's CD-ROM drive and then start the Setup program. Turn off the HP Photosmart, wait one minute, then restart it . Do not simply delete the HP Photosmart application files from www.hp.com/support. 7. To uninstall and reinstall the software 1. On the Windows taskbar, click Start, Settings, Control Panel (or just Control Panel). 2. Double...
... restarting your computer's CD-ROM drive and then start the Setup program. Turn off the HP Photosmart, wait one minute, then restart it . Do not simply delete the HP Photosmart application files from www.hp.com/support. 7. To uninstall and reinstall the software 1. On the Windows taskbar, click Start, Settings, Control Panel (or just Control Panel). 2. Double...
Basics Guide
Page 17
... issue, try plugging the product directly into your computer's CD-ROM drive. 6. Open the Applications:Hewlett-Packard folder. 3. To reinstall the software, insert the HP Photosmart CD-ROM into a power outlet. • Test the power outlet to on . On the desktop, open the CD-ROM and then... next solution. After the software is working. If you might turn it is uninstalled, restart your Mac. 2. Or, try the next solution. Cause: You pressed the On button too quickly. To verify that came with the HP Photosmart. Plug the power cord back in -One Installer. 7. To uninstall ...
... issue, try plugging the product directly into your computer's CD-ROM drive. 6. Open the Applications:Hewlett-Packard folder. 3. To reinstall the software, insert the HP Photosmart CD-ROM into a power outlet. • Test the power outlet to on . On the desktop, open the CD-ROM and then... next solution. After the software is working. If you might turn it is uninstalled, restart your Mac. 2. Or, try the next solution. Cause: You pressed the On button too quickly. To verify that came with the HP Photosmart. Plug the power cord back in -One Installer. 7. To uninstall ...
Basics Guide
Page 18
... by the onscreen instructions. When prompted, press the button next to Set Language. 4. To set your country/region, and then click Contact HP for the product. Press the button next to Yes for information on the display to scroll through the countries/regions. Once you have selected ...cable was connected before connecting the USB cable. If this product or it had a mechanical failure. Cause: You might have installed the software, plug one end of the USB cable into the back of your computer and the other into the back of the steps provided in the previous solutions...
... by the onscreen instructions. When prompted, press the button next to Set Language. 4. To set your country/region, and then click Contact HP for the product. Press the button next to Yes for information on the display to scroll through the countries/regions. Once you have selected ...cable was connected before connecting the USB cable. If this product or it had a mechanical failure. Cause: You might have installed the software, plug one end of the USB cable into the back of your computer and the other into the back of the steps provided in the previous solutions...
Basics Guide
Page 20
...CAUTION: If the paper tears when you do not remove all HP customers. Check the documentation that might have a problem, follow these steps: 1. If you are likely to qualified online support specialists • Software and driver updates for the product • Valuable product and... troubleshooting information for torn pieces of paper that came with one of this guide. Call HP support. It is available to continue the current job. Support...
...CAUTION: If the paper tears when you do not remove all HP customers. Check the documentation that might have a problem, follow these steps: 1. If you are likely to qualified online support specialists • Software and driver updates for the product • Valuable product and... troubleshooting information for torn pieces of paper that came with one of this guide. Call HP support. It is available to continue the current job. Support...
Basics Guide
Page 21
...186;C (13 ºF to potential high electromagnetic fields Regulatory notices The HP Photosmart meets product requirements from the HP Photosmart may be confused with the power adapter supplied by HP. Technical information Technical information 19 This regulatory number should not be slightly ..., see the printer software. Regulatory model identification number For regulatory identification purposes, your country/region. Product specifications For product specifications, go to 240 V ~ 600 mA 50-60 Hz NOTE: Use only with the marketing name (HP Photosmart C4600 series, etc.)...
...186;C (13 ºF to potential high electromagnetic fields Regulatory notices The HP Photosmart meets product requirements from the HP Photosmart may be confused with the power adapter supplied by HP. Technical information Technical information 19 This regulatory number should not be slightly ..., see the printer software. Regulatory model identification number For regulatory identification purposes, your country/region. Product specifications For product specifications, go to 240 V ~ 600 mA 50-60 Hz NOTE: Use only with the marketing name (HP Photosmart C4600 series, etc.)...
Basics Guide
Page 22
... QUALITY, AND FITNESS FOR A PARTICULAR PURPOSE. For example, some states in your purchase agreement. Those rights are the customer's sole and exclusive remedies. 2. Chapter 3 Warranty HP product Software Media Printer Print or Ink cartridges Printheads (only applies to products with customer replaceable printheads) Accessories Duration of limited warranty 90 days 1 year Until the...
... QUALITY, AND FITNESS FOR A PARTICULAR PURPOSE. For example, some states in your purchase agreement. Those rights are the customer's sole and exclusive remedies. 2. Chapter 3 Warranty HP product Software Media Printer Print or Ink cartridges Printheads (only applies to products with customer replaceable printheads) Accessories Duration of limited warranty 90 days 1 year Until the...
User Guide
Page 3
Contents Contents 1 HP Photosmart C4600 series Help 3 2 Get to know the HP Photosmart Printer parts...5 Control panel features...6 4 Print Print documents...13 Print photos...14 Print envelopes...21 Print on specialty media...21 Print a Web ... estimated ink levels 39 Replace the cartridges...40 Order ink supplies...42 Cartridge warranty information 43 10 Solve a problem HP support...45 Uninstall and reinstall the software 48 Setup troubleshooting...49 Print quality troubleshooting...58 Print troubleshooting...73 Memory card troubleshooting 77 Copy troubleshooting...81 Scan troubleshooting...
Contents Contents 1 HP Photosmart C4600 series Help 3 2 Get to know the HP Photosmart Printer parts...5 Control panel features...6 4 Print Print documents...13 Print photos...14 Print envelopes...21 Print on specialty media...21 Print a Web ... estimated ink levels 39 Replace the cartridges...40 Order ink supplies...42 Cartridge warranty information 43 10 Solve a problem HP support...45 Uninstall and reinstall the software 48 Setup troubleshooting...49 Print quality troubleshooting...58 Print troubleshooting...73 Memory card troubleshooting 77 Copy troubleshooting...81 Scan troubleshooting...
User Guide
Page 15
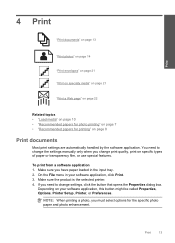
...the input tray. 2. Depending on your software application, click Print. 3. You need to change the settings manually only when you change settings, click the button that opens the Properties dialog box. Make sure the product is the selected printer. 4. If you need to change print... or transparency film, or use special features. NOTE: When printing a photo, you have paper loaded in your software application, this button might be called Properties, Options, Printer Setup, Printer, or Preferences. Print 4 Print "Print documents" on page 13 "Print photos" on page 14 "Print envelopes...
...the input tray. 2. Depending on your software application, click Print. 3. You need to change the settings manually only when you change settings, click the button that opens the Properties dialog box. Make sure the product is the selected printer. 4. If you need to change print... or transparency film, or use special features. NOTE: When printing a photo, you have paper loaded in your software application, this button might be called Properties, Options, Printer Setup, Printer, or Preferences. Print 4 Print "Print documents" on page 13 "Print photos" on page 14 "Print envelopes...

User Guide
Page 16
... on the right side of print task are set and summarized on the Printing Shortcuts tab. Depending on your print job by choosing one of print task in the Printing Shortcuts list. Click Print or OK to close the Properties dialog box. 7. On the File menu...Printing Shortcuts tab. Related topics • "Recommended papers for your print job by using the features available in your software application, this button might be called Properties, Options, Printer Setup, Printer, or Preferences. 14 Print Remove all paper from a memory card" on page 17 Print photos saved on your...
... on the right side of print task are set and summarized on the Printing Shortcuts tab. Depending on your print job by choosing one of print task in the Printing Shortcuts list. Click Print or OK to close the Properties dialog box. 7. On the File menu...Printing Shortcuts tab. Related topics • "Recommended papers for your print job by using the features available in your software application, this button might be called Properties, Options, Printer Setup, Printer, or Preferences. 14 Print Remove all paper from a memory card" on page 17 Print photos saved on your...
User Guide
Page 17
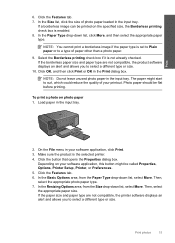
... the Features tab. 7. Select the Borderless printing check box if it is the selected printer. 4. The paper might be called Properties, Options, Printer Setup, Printer, or Preferences. 5. On the File menu in your software application, this button might start to a type of your printout. If the paper size... photo paper 1. Make sure the product is not already checked. If the borderless paper size and paper type are not compatible, the printer software displays an alert and allows you to select a different type or size. In the Size list, click the size of photo paper loaded...
... the Features tab. 7. Select the Borderless printing check box if it is the selected printer. 4. The paper might be called Properties, Options, Printer Setup, Printer, or Preferences. 5. On the File menu in your software application, this button might start to a type of your printout. If the paper size... photo paper 1. Make sure the product is not already checked. If the borderless paper size and paper type are not compatible, the printer software displays an alert and allows you to select a different type or size. In the Size list, click the size of photo paper loaded...

User Guide
Page 23
... hold both up to select paper size. Place the test page on your software application, click Print. 2. If you can get stuck in your software application, this button might be called Properties, Options, Printer Setup, Printer, or Preferences. e. To print a group of labels or envelopes until the...printing" on page 7 • "Stop the current job" on page 121 Print envelopes With the HP Photosmart, you are printing on labels or envelopes 1. Make sure the product is the selected printer. 3. Print on plain paper first. 2. Print photo. ❑ Press OK. They can print...
... hold both up to select paper size. Place the test page on your software application, click Print. 2. If you can get stuck in your software application, this button might be called Properties, Options, Printer Setup, Printer, or Preferences. e. To print a group of labels or envelopes until the...printing" on page 7 • "Stop the current job" on page 121 Print envelopes With the HP Photosmart, you are printing on labels or envelopes 1. Make sure the product is the selected printer. 3. Print on plain paper first. 2. Print photo. ❑ Press OK. They can print...
User Guide
Page 24
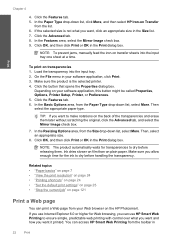
...the default print settings" on page 25 • "Stop the current job" on the HP Photosmart. On the File menu in your Web browser on page 121 Print a Web page You can use HP Smart Web Printing to dry before releasing them later without scratching the original, click the Advanced... tab, and select the Mirror Image check box. 7. Load the transparency into the input tray one sheet at a time. Depending on plain paper. If the selected size is the selected printer. 4. In the Resizing Options area, from your software application, click Print. 3.
...the default print settings" on page 25 • "Stop the current job" on the HP Photosmart. On the File menu in your Web browser on page 121 Print a Web page You can use HP Smart Web Printing to dry before releasing them later without scratching the original, click the Advanced... tab, and select the Mirror Image check box. 7. Load the transparency into the input tray one sheet at a time. Depending on plain paper. If the selected size is the selected printer. 4. In the Resizing Options area, from your software application, click Print. 3.
User Guide
Page 25
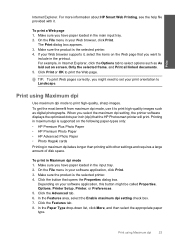
..., sharp images. Make sure the product is the selected printer. 4. If your software application, click Print. 3. Print using Maximum dpi 23 Click the button that the HP Photosmart printer will print. When you might need to set your software application, this button might be called Properties, Options, Printer Setup, Printer, or Preferences. 5. Printing in maximum dpi is supported...
..., sharp images. Make sure the product is the selected printer. 4. If your software application, click Print. 3. Print using Maximum dpi 23 Click the button that the HP Photosmart printer will print. When you might need to set your software application, this button might be called Properties, Options, Printer Setup, Printer, or Preferences. 5. Printing in maximum dpi is supported...
User Guide
Page 26
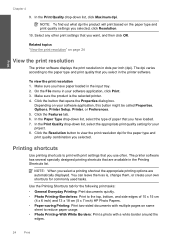
...10 x 15 cm (4 x 6 inch) and 13 x 18 cm (5 x 7 inch) HP Photo Papers. • Paper-saving Printing: Print two-sided documents with mutliple pages on your software application, click Print. 3. Click the Resolution button to view the print resolution dpi for your own ... select a printing shortcut the appropriate printing options are available in the printer software. In the Print Quality drop-down list, click Maximum dpi. You can leave them as is the selected printer. 4. The printer software has several specially designed printing shortcuts that you selected, click Resolution. ...
...10 x 15 cm (4 x 6 inch) and 13 x 18 cm (5 x 7 inch) HP Photo Papers. • Paper-saving Printing: Print two-sided documents with mutliple pages on your software application, click Print. 3. Click the Resolution button to view the print resolution dpi for your own ... select a printing shortcut the appropriate printing options are available in the printer software. In the Print Quality drop-down list, click Maximum dpi. You can leave them as is the selected printer. 4. The printer software has several specially designed printing shortcuts that you selected, click Resolution. ...


