
HP Photosmart 715 Digital Camera - User Guide
Page 4
ii HP photosmart 715 user guide No part of this document may be regulated because of this document is a U.S. Materials disposal This HP product contains the following materials that are included with the furnishing, performance, or use of environmental considerations. The information contained... require special handling at end-of-life: Mercury in the fluorescent lamp in the liquid crystal display Lead in connection with the camera Disposal of this material can be photocopied, reproduced, or translated to change without the prior written consent of Hewlett-Packard Company. ...
ii HP photosmart 715 user guide No part of this document may be regulated because of this document is a U.S. Materials disposal This HP product contains the following materials that are included with the furnishing, performance, or use of environmental considerations. The information contained... require special handling at end-of-life: Mercury in the fluorescent lamp in the liquid crystal display Lead in connection with the camera Disposal of this material can be photocopied, reproduced, or translated to change without the prior written consent of Hewlett-Packard Company. ...
HP Photosmart 715 Digital Camera - User Guide
Page 5
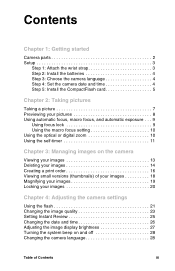
...9 Using the macro focus setting 10 Using the optical or digital zoom 10 Using the self-timer 11 Chapter 3: Managing images on the camera Viewing your images 13 Deleting your images 14 Creating a print order 16 Viewing small versions (thumbnails) of your images 18 Magnifying your images... 19 Locking your images 20 Chapter 4: Adjusting the camera settings Using the flash 21 Changing the image quality 23 Setting Instant Review 25 Changing the date and time 26 Adjusting the image display ...
...9 Using the macro focus setting 10 Using the optical or digital zoom 10 Using the self-timer 11 Chapter 3: Managing images on the camera Viewing your images 13 Deleting your images 14 Creating a print order 16 Viewing small versions (thumbnails) of your images 18 Magnifying your images... 19 Locking your images 20 Chapter 4: Adjusting the camera settings Using the flash 21 Changing the image quality 23 Setting Instant Review 25 Changing the date and time 26 Adjusting the image display ...
HP Photosmart 715 Digital Camera - User Guide
Page 6
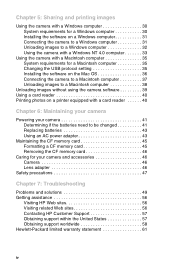
...camera to a Windows computer 31 Unloading images to a Windows computer 32 Using the camera with a Windows NT 4.0 computer 33 Using the camera... with a Macintosh computer 35 System requirements for a Macintosh computer 35 Changing the USB protocol setting 35 Installing the software on the Mac OS 36 Connecting the camera... to a Macintosh computer 37 Unloading images to a Macintosh computer 38 Unloading images without using the camera...camera Powering your camera...camera and accessories 46 Camera 46 Lens adapter 46 Safety...
...camera to a Windows computer 31 Unloading images to a Windows computer 32 Using the camera with a Windows NT 4.0 computer 33 Using the camera... with a Macintosh computer 35 System requirements for a Macintosh computer 35 Changing the USB protocol setting 35 Installing the software on the Mac OS 36 Connecting the camera... to a Macintosh computer 37 Unloading images to a Macintosh computer 38 Unloading images without using the camera...camera Powering your camera...camera and accessories 46 Camera 46 Lens adapter 46 Safety...

HP Photosmart 715 Digital Camera - User Guide
Page 7
Appendix A: Reference Symbols on the status LCD 63 Camera indicator lights (LEDs 64 Camera menus 65 Camera specifications 66 Index 69 Table of Contents v
Appendix A: Reference Symbols on the status LCD 63 Camera indicator lights (LEDs 64 Camera menus 65 Camera specifications 66 Index 69 Table of Contents v

HP Photosmart 715 Digital Camera - User Guide
Page 9
Your camera includes the following features: 3.3 megapixel (MP) resolution 3x optical zoom or 2x digital zoom point-and-shoot simplicity automatic exposure automatic focus automatic flash with ... 1 It comes with software for previewing and reviewing pictures economical "digital film" (reusable CompactFlash [CF] memory card) self-timer macro mode Getting started Your HP photosmart 715 digital camera takes high-quality pictures you can share with red-eye reduction universal serial bus (USB) computer connection color image display for manipulating, storing, and printing...
Your camera includes the following features: 3.3 megapixel (MP) resolution 3x optical zoom or 2x digital zoom point-and-shoot simplicity automatic exposure automatic focus automatic flash with ... 1 It comes with software for previewing and reviewing pictures economical "digital film" (reusable CompactFlash [CF] memory card) self-timer macro mode Getting started Your HP photosmart 715 digital camera takes high-quality pictures you can share with red-eye reduction universal serial bus (USB) computer connection color image display for manipulating, storing, and printing...

HP Photosmart 715 Digital Camera - User Guide
Page 10
self-timer LED lens flash sensor flash AC power adapter connection USB computer connection ON/OFF POWER PREVIEW button switch diopter control ZOOM button CF card access LED CF memory card door viewfinder viewfinder LED PLAY/MENU button 5-WAY controller image display battery compartment door 2 HP photosmart 715 user guide Camera parts The following illustrations show the parts of the camera.
self-timer LED lens flash sensor flash AC power adapter connection USB computer connection ON/OFF POWER PREVIEW button switch diopter control ZOOM button CF card access LED CF memory card door viewfinder viewfinder LED PLAY/MENU button 5-WAY controller image display battery compartment door 2 HP photosmart 715 user guide Camera parts The following illustrations show the parts of the camera.

HP Photosmart 715 Digital Camera - User Guide
Page 11
... flash symbols status LCD SHUTTER button macro symbol self-timer symbol IMAGE QUALITY button FLASH button SELF-TIMER/MACRO button Setup Setting up the digital camera is located under the CF memory card compartment door. Getting started 3 You might need to use a pointed object, such as a paper clip, to pull the...
... flash symbols status LCD SHUTTER button macro symbol self-timer symbol IMAGE QUALITY button FLASH button SELF-TIMER/MACRO button Setup Setting up the digital camera is located under the CF memory card compartment door. Getting started 3 You might need to use a pointed object, such as a paper clip, to pull the...
HP Photosmart 715 Digital Camera - User Guide
Page 12
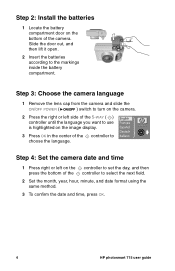
...the next field. 2 Set the month, year, hour, minute, and date format using the same method. 3 To confirm the date and time, press OK. 4 HP photosmart 715 user guide OK 3 Press OK in the center of the 5-WAY ( ) controller until the language you want to choose the language. Step 2: Install the batteries... the bottom of the controller to the markings inside the battery compartment. Step 3: Choose the camera language 1 Remove the lens cap from the camera and slide the ON/OFF POWER ( ) switch to turn on the camera. 2 Press the right or left on the controller to set the day, and then press...
...the next field. 2 Set the month, year, hour, minute, and date format using the same method. 3 To confirm the date and time, press OK. 4 HP photosmart 715 user guide OK 3 Press OK in the center of the 5-WAY ( ) controller until the language you want to choose the language. Step 2: Install the batteries... the bottom of the controller to the markings inside the battery compartment. Step 3: Choose the camera language 1 Remove the lens cap from the camera and slide the ON/OFF POWER ( ) switch to turn on the camera. 2 Press the right or left on the controller to set the day, and then press...
HP Photosmart 715 Digital Camera - User Guide
Page 13
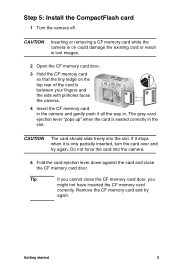
... stops when it all the way in. Remove the CF memory card and try again. Getting started 5 CAUTION The card should slide freely into the camera. 5 Fold the card ejection lever down against the card and close the CF memory card door, you cannot close the CF memory card door. Tip... If you might not have inserted the CF memory card correctly. CAUTION Inserting or removing a CF memory card while the camera is on could damage the existing card or result in lost images. 2 Open the CF memory card door. 3 Hold the CF memory card so that...
... stops when it all the way in. Remove the CF memory card and try again. Getting started 5 CAUTION The card should slide freely into the camera. 5 Fold the card ejection lever down against the card and close the CF memory card door, you cannot close the CF memory card door. Tip... If you might not have inserted the CF memory card correctly. CAUTION Inserting or removing a CF memory card while the camera is on could damage the existing card or result in lost images. 2 Open the CF memory card door. 3 Hold the CF memory card so that...
HP Photosmart 715 Digital Camera - User Guide
Page 15
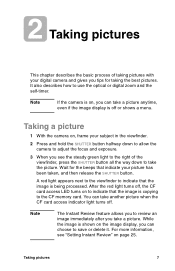
...memory card. It also describes how to use the optical or digital zoom and the self-timer. Note If the camera is on, you can take another picture when the CF card access indicator light turns off , the CF card ...to review an image immediately after you see "Setting Instant Review" on , frame your digital camera and gives you tips for the beeps that the image is off or shows a menu. Taking a picture 1 With the... camera on page 25. Wait for taking the best pictures. You can choose to save or delete it. ...
...memory card. It also describes how to use the optical or digital zoom and the self-timer. Note If the camera is on, you can take another picture when the CF card access indicator light turns off , the CF card ...to review an image immediately after you see "Setting Instant Review" on , frame your digital camera and gives you tips for the beeps that the image is off or shows a menu. Taking a picture 1 With the... camera on page 25. Wait for taking the best pictures. You can choose to save or delete it. ...

HP Photosmart 715 Digital Camera - User Guide
Page 16
... captures. Note Using the image display consumes a lot of battery power. To conserve battery power, the camera automatically turns off the image display, press the button. 8 HP photosmart 715 user guide To preview a picture 1 Press the PREVIEW ( ) button to turn off the image display after 60 seconds if you do not ... picture on the image display. 2 Frame your picture in the image display by pointing the camera lens at your subject. 3 Press and hold the SHUTTER button halfway down to allow the camera to adjust the focus and exposure. 4 When you see the steady green light to the right...
... captures. Note Using the image display consumes a lot of battery power. To conserve battery power, the camera automatically turns off the image display, press the button. 8 HP photosmart 715 user guide To preview a picture 1 Press the PREVIEW ( ) button to turn off the image display after 60 seconds if you do not ... picture on the image display. 2 Frame your picture in the image display by pointing the camera lens at your subject. 3 Press and hold the SHUTTER button halfway down to allow the camera to adjust the focus and exposure. 4 When you see the steady green light to the right...
HP Photosmart 715 Digital Camera - User Guide
Page 17
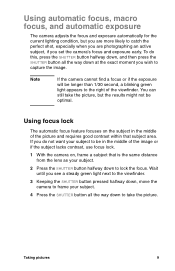
..., and then press the SHUTTER button all the way down to capture the image. Using automatic focus, macro focus, and automatic exposure The camera adjusts the focus and exposure automatically for the current lighting condition, but the results might not be optimal. Using focus lock The automatic focus.... Taking pictures 9 Wait until you see a steady green light next to the viewfinder. 3 Keeping the SHUTTER button pressed halfway down, move the camera to frame your subject. 2 Press the SHUTTER button halfway down to take the picture, but you are more likely to catch the perfect shot, ...
..., and then press the SHUTTER button all the way down to capture the image. Using automatic focus, macro focus, and automatic exposure The camera adjusts the focus and exposure automatically for the current lighting condition, but the results might not be optimal. Using focus lock The automatic focus.... Taking pictures 9 Wait until you see a steady green light next to the viewfinder. 3 Keeping the SHUTTER button pressed halfway down, move the camera to frame your subject. 2 Press the SHUTTER button halfway down to take the picture, but you are more likely to catch the perfect shot, ...

HP Photosmart 715 Digital Camera - User Guide
Page 18
... on , frame your subject in the viewfinder. 2 Press the right side of the button. 4 Take your picture. To use the digital zoom 1 With the camera on, press the button to take the picture. To return to normal view, press the left side of the button to three times the normal... the image display. 2 Frame your picture in up to zoom in the image display by pointing the camera lens at your subject. 3 Press the right side of the button. 3 Take your picture. 10 HP photosmart 715 user guide To return to normal view, press the left side of the ZOOM ( ) button to two ...
... on , frame your subject in the viewfinder. 2 Press the right side of the button. 4 Take your picture. To use the digital zoom 1 With the camera on, press the button to take the picture. To return to normal view, press the left side of the button to three times the normal... the image display. 2 Frame your picture in up to zoom in the image display by pointing the camera lens at your subject. 3 Press the right side of the button. 3 Take your picture. 10 HP photosmart 715 user guide To return to normal view, press the left side of the ZOOM ( ) button to two ...
HP Photosmart 715 Digital Camera - User Guide
Page 19
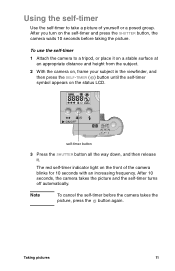
Taking pictures 11 The red self-timer indicator light on the self-timer and press the SHUTTER button, the camera waits 10 seconds before the camera takes the picture, press the button again. Note To cancel the self-timer before taking the picture. self-timer button 3 Press the SHUTTER button ...all the way down, and then release it on a stable surface at an appropriate distance and height from the subject. 2 With the camera on, frame your subject in the viewfinder, and then press the SELF-TIMER ( ) button until the self-timer symbol appears on the status LCD. ...
Taking pictures 11 The red self-timer indicator light on the self-timer and press the SHUTTER button, the camera waits 10 seconds before the camera takes the picture, press the button again. Note To cancel the self-timer before taking the picture. self-timer button 3 Press the SHUTTER button ...all the way down, and then release it on a stable surface at an appropriate distance and height from the subject. 2 With the camera on, frame your subject in the viewfinder, and then press the SELF-TIMER ( ) button until the self-timer symbol appears on the status LCD. ...

HP Photosmart 715 Digital Camera - User Guide
Page 21
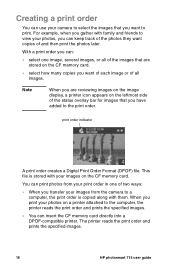
You can also delete images, lock them with the camera's image display. Each time a new image appears on the display, a status overlay bar also appears for ...(the Printer symbol appears only if an image is locked) File name information from the CF memory card Managing images on the camera After you have taken some pictures, you can view a single image, portions of an image (using the magnify feature), or... setting used to print a set of images (using the image display. 3 Managing images on the camera 13 The status overlay bar gives you took or viewed appears on the image display.
You can also delete images, lock them with the camera's image display. Each time a new image appears on the display, a status overlay bar also appears for ...(the Printer symbol appears only if an image is locked) File name information from the CF memory card Managing images on the camera After you have taken some pictures, you can view a single image, portions of an image (using the magnify feature), or... setting used to print a set of images (using the image display. 3 Managing images on the camera 13 The status overlay bar gives you took or viewed appears on the image display.

HP Photosmart 715 Digital Camera - User Guide
Page 23
... on the image display to select Yes, and then press OK. To delete all images by using the Delete menu, it is recommended that the camera is being formatted. To avoid damaging the card, do not open the main menu, use the up or down side of the controller to scroll... formatting the CF memory card. Note Although you can delete all images by formatting the CF memory card 1 Press the button to turn on the camera 15
... on the image display to select Yes, and then press OK. To delete all images by using the Delete menu, it is recommended that the camera is being formatted. To avoid damaging the card, do not open the main menu, use the up or down side of the controller to scroll... formatting the CF memory card. Note Although you can delete all images by formatting the CF memory card 1 Press the button to turn on the camera 15
HP Photosmart 715 Digital Camera - User Guide
Page 24
... order creates a Digital Print Order Format (DPOF) file. This file is copied along with family and friends to view your camera to select the images that you want to a computer, the print order is stored with your photos on the CF memory ...gather with them. With a print order you can: select one of two ways: When you transfer your images from the camera to print. You can print photos from your print order in one image, several images, or all of the images ... a DPOF-compatible printer. The printer reads the print order and prints the specified images. 16 HP photosmart 715 user guide
... order creates a Digital Print Order Format (DPOF) file. This file is copied along with family and friends to view your camera to select the images that you want to a computer, the print order is stored with your photos on the CF memory ...gather with them. With a print order you can: select one of two ways: When you transfer your images from the camera to print. You can print photos from your print order in one image, several images, or all of the images ... a DPOF-compatible printer. The printer reads the print order and prints the specified images. 16 HP photosmart 715 user guide
HP Photosmart 715 Digital Camera - User Guide
Page 25
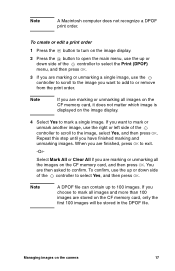
... the CF memory card, it does not matter which image is displayed on the image display. 4 Select Yes to mark all the images on the camera 17 To confirm, use the up or down side of the controller to or remove from the print order. Select Mark All or Clear All...
... the CF memory card, it does not matter which image is displayed on the image display. 4 Select Yes to mark all the images on the camera 17 To confirm, use the up or down side of the controller to or remove from the print order. Select Mark All or Clear All...
HP Photosmart 715 Digital Camera - User Guide
Page 27
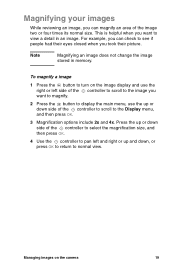
To magnify a image 1 Press the button to turn on the camera 19 Note Magnifying an image does not change the image stored in an image. Press the up or down side of the image two or ...
To magnify a image 1 Press the button to turn on the camera 19 Note Magnifying an image does not change the image stored in an image. Press the up or down side of the image two or ...
HP Photosmart 715 Digital Camera - User Guide
Page 29
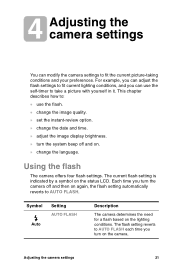
... chapter describes how to: use the self-timer to AUTO FLASH. set the instant-review option. change the image quality. Using the flash The camera offers four flash settings. The current flash setting is indicated by a symbol on again, the flash setting automatically reverts to take a picture with yourself... in it. Each time you turn the camera off and on the lighting conditions. change the date and time. adjust the image display brightness. change the language. Adjusting the...
... chapter describes how to: use the self-timer to AUTO FLASH. set the instant-review option. change the image quality. Using the flash The camera offers four flash settings. The current flash setting is indicated by a symbol on again, the flash setting automatically reverts to take a picture with yourself... in it. Each time you turn the camera off and on the lighting conditions. change the date and time. adjust the image display brightness. change the language. Adjusting the...


