
Using LightScribe (Select Models Only)
Page 2
© Copyright 2005 Hewlett-Packard Development Company, L.P. HP shall not be construed as constituting an additional warranty. Nothing herein should be liable for HP products and services are set forth in the express warranty statements accompanying such products and services. Creating Disc Labels on Your Notebook Using LightScribe First Edition February 2005 Document Part Number: 383416-001 The only warranties for technical or editorial errors or omissions contained herein. The information contained herein is subject to change without notice.
© Copyright 2005 Hewlett-Packard Development Company, L.P. HP shall not be construed as constituting an additional warranty. Nothing herein should be liable for HP products and services are set forth in the express warranty statements accompanying such products and services. Creating Disc Labels on Your Notebook Using LightScribe First Edition February 2005 Document Part Number: 383416-001 The only warranties for technical or editorial errors or omissions contained herein. The information contained herein is subject to change without notice.
Using LightScribe (Select Models Only)
Page 3
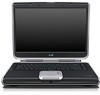
... create precise silk-screen-quality labels for discs. Creating a label uses the LightScribe-enabled optical drive of the disc itself. 1 Creating Disc Labels on Your Notebook Using LightScribe LightScribe is burn, flip the disc, and then burn again.
... create precise silk-screen-quality labels for discs. Creating a label uses the LightScribe-enabled optical drive of the disc itself. 1 Creating Disc Labels on Your Notebook Using LightScribe LightScribe is burn, flip the disc, and then burn again.
Using LightScribe (Select Models Only)
Page 4
... the burning of the label, the LightScribe software provides the estimated amount of time it take to complete the label. Creating Disc Labels on Your Notebook Using LightScribe Frequently asked questions ■ How do I need to a black-and-white photograph. 2
... the burning of the label, the LightScribe software provides the estimated amount of time it take to complete the label. Creating Disc Labels on Your Notebook Using LightScribe Frequently asked questions ■ How do I need to a black-and-white photograph. 2
Using LightScribe (Select Models Only)
Page 5
... for other tasks while the label is not recognized and prompts you that the label surface lasts. Creating Disc Labels on Your Notebook Using LightScribe ■ Can I use my PC for both the label and data, keep optical discs out of direct light. ■ Is the LightScribe surface/coating safe to handle...
... for other tasks while the label is not recognized and prompts you that the label surface lasts. Creating Disc Labels on Your Notebook Using LightScribe ■ Can I use my PC for both the label and data, keep optical discs out of direct light. ■ Is the LightScribe surface/coating safe to handle...
Using LightScribe (Select Models Only)
Page 6
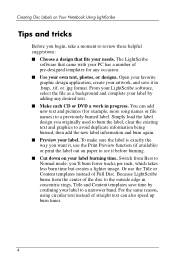
...Because LightScribe burns from Best to Normal mode: you begin, take a moment to review these helpful suggestions: ■ Choose a design that came with your PC has a number of straight text can add new text and pictures (for any desired text. ■ Make each CD or DVD a work in progress. ...the existing text and graphics to see it in concentric rings, Title and Content templates save it before burning. ■ Cut down on Your Notebook Using LightScribe Tips and tricks Before you 'll burn fewer tracks per inch, which takes less burn time but creates a lighter image.
...Because LightScribe burns from Best to Normal mode: you begin, take a moment to review these helpful suggestions: ■ Choose a design that came with your PC has a number of straight text can add new text and pictures (for any desired text. ■ Make each CD or DVD a work in progress. ...the existing text and graphics to see it in concentric rings, Title and Content templates save it before burning. ■ Cut down on Your Notebook Using LightScribe Tips and tricks Before you 'll burn fewer tracks per inch, which takes less burn time but creates a lighter image.
Using LightScribe (Select Models Only)
Page 7
... the disc is labeling, avoid any sudden shock or vibration to see how the graphics you use your PC for other activities. If you are using a notebook, avoid sudden loss of power. A high-contrast photo or graphic stands out better than a picture in the "Required for contrast. Insert... the disc and follow the on the HP DVD Writer disc in mostly soft middle tones. While the label is included with your notebook AC adapter and power cord plugged into a working electrical outlet. The LightScribe software indicates the time...
... the disc is labeling, avoid any sudden shock or vibration to see how the graphics you use your PC for other activities. If you are using a notebook, avoid sudden loss of power. A high-contrast photo or graphic stands out better than a picture in the "Required for contrast. Insert... the disc and follow the on the HP DVD Writer disc in mostly soft middle tones. While the label is included with your notebook AC adapter and power cord plugged into a working electrical outlet. The LightScribe software indicates the time...
Using LightScribe (Select Models Only)
Page 8
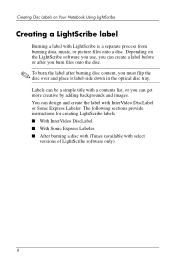
... label with a contents list, or you must flip the disc over and place it label-side down in the optical disc tray. Depending on Your Notebook Using LightScribe Creating a LightScribe label Burning a label with select versions of LightScribe software only). 6 You can get more creative by adding backgrounds and images...
... label with a contents list, or you must flip the disc over and place it label-side down in the optical disc tray. Depending on Your Notebook Using LightScribe Creating a LightScribe label Burning a label with select versions of LightScribe software only). 6 You can get more creative by adding backgrounds and images...
Using LightScribe (Select Models Only)
Page 9
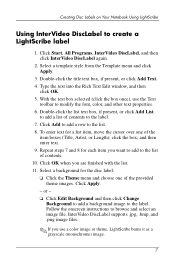
.... 9. Double-click the title text box, if present, or click Add Text. 4. Follow the onscreen instructions to create a LightScribe label 1. Creating Disc Labels on Your Notebook Using LightScribe Using InterVideo DiscLabel to browse and select an image file. Click Start, All Programs, InterVideo DiscLabel, and then click InterVideo DiscLabel again. 2. Double...
.... 9. Double-click the title text box, if present, or click Add Text. 4. Follow the onscreen instructions to create a LightScribe label 1. Creating Disc Labels on Your Notebook Using LightScribe Using InterVideo DiscLabel to browse and select an image file. Click Start, All Programs, InterVideo DiscLabel, and then click InterVideo DiscLabel again. 2. Double...
Using LightScribe (Select Models Only)
Page 10
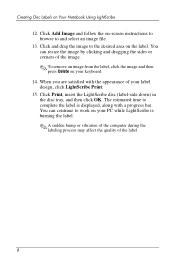
...press Delete on your keyboard. 14. Click and drag the image to and select an image file. 13. The estimated time to work on your PC while LightScribe is displayed, along with the appearance of the label. 8 When you are satisfied with a progress bar. Click Add Image and follow the... on-screen instructions to browse to the desired area on Your Notebook Using LightScribe 12. Click Print, insert the LightScribe disc (label-side down) in the disc tray, and then click OK. Creating Disc Labels on ...
...press Delete on your keyboard. 14. Click and drag the image to and select an image file. 13. The estimated time to work on your PC while LightScribe is displayed, along with the appearance of the label. 8 When you are satisfied with a progress bar. Click Add Image and follow the... on-screen instructions to browse to the desired area on Your Notebook Using LightScribe 12. Click Print, insert the LightScribe disc (label-side down) in the disc tray, and then click OK. Creating Disc Labels on ...
Using LightScribe (Select Models Only)
Page 11
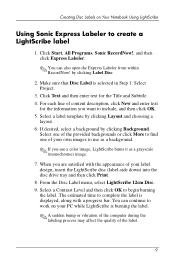
... for the information you want to include, and then click OK. 5. Select one of the provided backgrounds or click More to find one of your PC while LightScribe is burning the label. ✎ A sudden bump or vibration of the computer during the labeling process may affect the quality of the label... drive tray and then click Print. 8. Click Start, All Programs, Sonic RecordNow!, and then click Express Labeler. ✎ You can continue to work on Your Notebook Using LightScribe Using Sonic Express Labeler to begin burning the label. by clicking Label Disc. 2.
... for the information you want to include, and then click OK. 5. Select one of the provided backgrounds or click More to find one of your PC while LightScribe is burning the label. ✎ A sudden bump or vibration of the computer during the labeling process may affect the quality of the label... drive tray and then click Print. 8. Click Start, All Programs, Sonic RecordNow!, and then click Express Labeler. ✎ You can continue to work on Your Notebook Using LightScribe Using Sonic Express Labeler to begin burning the label. by clicking Label Disc. 2.
Using LightScribe (Select Models Only)
Page 12
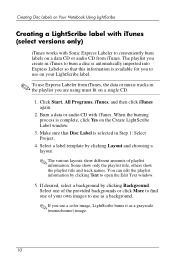
... a background. ✎ If you are using must fit on a single CD. 1. You can edit the playlist information by clicking Background. Creating Disc Labels on Your Notebook Using LightScribe Creating a LightScribe label with iTunes (select versions only) iTunes works with iTunes. Click Start, All Programs, iTunes, and then click iTunes again. 2. Select...
... a background. ✎ If you are using must fit on a single CD. 1. You can edit the playlist information by clicking Background. Creating Disc Labels on Your Notebook Using LightScribe Creating a LightScribe label with iTunes (select versions only) iTunes works with iTunes. Click Start, All Programs, iTunes, and then click iTunes again. 2. Select...
Using LightScribe (Select Models Only)
Page 13
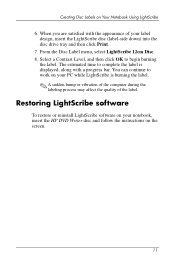
You can continue to work on Your Notebook Using LightScribe 6. The estimated time to begin burning the label. Creating Disc Labels on your PC while LightScribe is displayed, along with the appearance of the label. When you are satisfied with a progress bar. From the Disc Label menu, select LightScribe ... LightScribe disc (label-side down) into the disc drive tray and then click Print. 7. Restoring LightScribe software To restore or reinstall LightScribe software on your notebook, insert the HP DVD Writer disc and follow the instructions on the screen. 11
You can continue to work on Your Notebook Using LightScribe 6. The estimated time to begin burning the label. Creating Disc Labels on your PC while LightScribe is displayed, along with the appearance of the label. When you are satisfied with a progress bar. From the Disc Label menu, select LightScribe ... LightScribe disc (label-side down) into the disc drive tray and then click Print. 7. Restoring LightScribe software To restore or reinstall LightScribe software on your notebook, insert the HP DVD Writer disc and follow the instructions on the screen. 11
Hardware and Software Guide
Page 1
If your notebook. Additional 802.11 information is provided in a printed Go Wireless booklet. Hardware and Software Guide HP Notebook Series Document Part Number: 375382-001 March 2005 This guide explains how to the Help and Support Center at Start > Help and Support. For additional notebook information, including troubleshooting information, refer to identify and use most of the hardware and software features, including optional wireless features, available on your model includes a wireless device, wireless setup information is included within 802.11 software.
If your notebook. Additional 802.11 information is provided in a printed Go Wireless booklet. Hardware and Software Guide HP Notebook Series Document Part Number: 375382-001 March 2005 This guide explains how to the Help and Support Center at Start > Help and Support. For additional notebook information, including troubleshooting information, refer to identify and use most of the hardware and software features, including optional wireless features, available on your model includes a wireless device, wireless setup information is included within 802.11 software.
Hardware and Software Guide
Page 2
..., L.P. Bluetooth is subject to change without notice. The information contained herein is a trademark owned by its proprietor. Hardware and Software Guide HP Notebook Series First Edition March 2005 Reference Number: zv6000 Document Part Number: 375382-001 Microsoft and Windows are set forth in the express warranty statements accompanying such products and services. The...
..., L.P. Bluetooth is subject to change without notice. The information contained herein is a trademark owned by its proprietor. Hardware and Software Guide HP Notebook Series First Edition March 2005 Reference Number: zv6000 Document Part Number: 375382-001 Microsoft and Windows are set forth in the express warranty statements accompanying such products and services. The...
Hardware and Software Guide
Page 4
... 2-1 Power Sources 2-3 Selecting a Power Source 2-3 Using External or Battery Power 2-4 Standby and Hibernation 2-5 Standby 2-5 Hibernation 2-6 Initiating Standby, Hibernation or Shutdown 2-8 Default Power Settings 2-9 Turning the Notebook or Display On or Off 2-10 Initiating or Restoring from Hibernation 2-11 Initiating or Resuming from Standby 2-12 Using Emergency Shutdown Procedures 2-13 Power Options...
... 2-1 Power Sources 2-3 Selecting a Power Source 2-3 Using External or Battery Power 2-4 Standby and Hibernation 2-5 Standby 2-5 Hibernation 2-6 Initiating Standby, Hibernation or Shutdown 2-8 Default Power Settings 2-9 Turning the Notebook or Display On or Off 2-10 Initiating or Restoring from Hibernation 2-11 Initiating or Resuming from Standby 2-12 Using Emergency Shutdown Procedures 2-13 Power Options...

Hardware and Software Guide
Page 9
... 13-5 Advanced Features 13-6 Close the Setup Utility 13-7 14 Software Updates and Recovery Software Updates 14-1 Accessing Notebook Product Information 14-2 Accessing Notebook ROM Information 14-2 Internet Software 14-4 Downloading System ROM 14-4 Downloading Software 14-7 System Recovery 14-8 Before You... Repairing or Reinstalling Applications 14-12 Repairing the Operating System 14-14 Reinstalling the Operating System 14-15 15 Notebook Care Temperature 15-1 Notebook 15-1 Keyboard 15-3 Display 15-4 TouchPad 15-4 External Mouse 15-4 16 Travel and Shipping Travel 16-1 Shipping...
... 13-5 Advanced Features 13-6 Close the Setup Utility 13-7 14 Software Updates and Recovery Software Updates 14-1 Accessing Notebook Product Information 14-2 Accessing Notebook ROM Information 14-2 Internet Software 14-4 Downloading System ROM 14-4 Downloading Software 14-7 System Recovery 14-8 Before You... Repairing or Reinstalling Applications 14-12 Repairing the Operating System 14-14 Reinstalling the Operating System 14-15 15 Notebook Care Temperature 15-1 Notebook 15-1 Keyboard 15-3 Display 15-4 TouchPad 15-4 External Mouse 15-4 16 Travel and Shipping Travel 16-1 Shipping...

Hardware and Software Guide
Page 11
Hardware and Software Guide 1-1 1 Component ID Top Components Keyboard and Digital Media Slot Lights Component 1 Caps lock light 2 Digital Media Slot light (select models only) 3 Num lock light Description On: Caps lock is enabled. On: A digital memory card is being accessed. (This light is also visible from the left side of the notebook.) On: Num lock is on or the embedded numeric keypad is on.
Hardware and Software Guide 1-1 1 Component ID Top Components Keyboard and Digital Media Slot Lights Component 1 Caps lock light 2 Digital Media Slot light (select models only) 3 Num lock light Description On: Caps lock is enabled. On: A digital memory card is being accessed. (This light is also visible from the left side of the notebook.) On: Num lock is on or the embedded numeric keypad is on.

Hardware and Software Guide
Page 12
... ID Power/Standby, Drive and Battery Lights Component Description 1 Power/standby lights (2)* On: Notebook is open; Blinking: The notebook is unable to start the notebook. 1-2 Hardware and Software Guide Off: Notebook is off. 2 IDE (Integrated Drive On or blinking: The primary hard drive or an... The battery pack is fully charged or not inserted. *The notebook has 2 power/standby lights. the power/standby light on the front of the notebook is visible only when the notebook is turned on. Blinking: Notebook is disconnected from external power and contains a battery pack that...
... ID Power/Standby, Drive and Battery Lights Component Description 1 Power/standby lights (2)* On: Notebook is open; Blinking: The notebook is unable to start the notebook. 1-2 Hardware and Software Guide Off: Notebook is off. 2 IDE (Integrated Drive On or blinking: The primary hard drive or an... The battery pack is fully charged or not inserted. *The notebook has 2 power/standby lights. the power/standby light on the front of the notebook is visible only when the notebook is turned on. Blinking: Notebook is disconnected from external power and contains a battery pack that...

Hardware and Software Guide
Page 14
For information about changing the function of the display switch or power button, refer to turn off the notebook. 2 Display switch* Initiates standby if the notebook is ■ Off, press to turn on the notebook. ■ On, briefly press to initiate hibernation. ■ In standby, briefly press to resume from standby. ■ In ... 4 seconds to "Accessing the Power Options Window" in Chapter 2, "Power." 1-4 Hardware and Software Guide Component ID Power Controls Component Description 1 Power button* When the notebook is closed while on. *This table describes default settings.
For information about changing the function of the display switch or power button, refer to turn off the notebook. 2 Display switch* Initiates standby if the notebook is ■ Off, press to turn on the notebook. ■ On, briefly press to initiate hibernation. ■ In standby, briefly press to resume from standby. ■ In ... 4 seconds to "Accessing the Power Options Window" in Chapter 2, "Power." 1-4 Hardware and Software Guide Component ID Power Controls Component Description 1 Power button* When the notebook is closed while on. *This table describes default settings.

Hardware and Software Guide
Page 16
For information about establishing a wireless connection, refer to the printed Go Wireless brochure included with your notebook and to Chapter 11, "Wireless (Select Models Only)." 1-6 Hardware and Software Guide Component ID Wireless Button and Light Component Description 1 Wireless button (select models only) ...
For information about establishing a wireless connection, refer to the printed Go Wireless brochure included with your notebook and to Chapter 11, "Wireless (Select Models Only)." 1-6 Hardware and Software Guide Component ID Wireless Button and Light Component Description 1 Wireless button (select models only) ...


