
Expansion Base - Maintenance and Service Guide
Page 4
...5 Removal and Replacement Procedures 5.1 Serial Number 5-2 5.2 Disassembly Sequence Chart 5-3 5.3 Preparing the HP Notebook Expansion Base for Disassembly 5-4 5.4 Base Plate 5-5 5.5 Upper Chassis 5-6 5.6 Power Supply 5-10 5.7 System Board 5-12 5.8 Front Tray Cover 5-14 5.9 Back Panel 5-16 5.10 Expansion Cable 5-17 5.11 Speaker Assembly 5-18 5.12 Front Case 5-20 6 Specifications A Connector Pin Assignments B Power Cord Set Requirements 3-Conductor Power Cord Set B-1 General Requirements B-1 Country-Specific Requirements B-2 C Screw Listing Index iv Maintenance and Service Guide
...5 Removal and Replacement Procedures 5.1 Serial Number 5-2 5.2 Disassembly Sequence Chart 5-3 5.3 Preparing the HP Notebook Expansion Base for Disassembly 5-4 5.4 Base Plate 5-5 5.5 Upper Chassis 5-6 5.6 Power Supply 5-10 5.7 System Board 5-12 5.8 Front Tray Cover 5-14 5.9 Back Panel 5-16 5.10 Expansion Cable 5-17 5.11 Speaker Assembly 5-18 5.12 Front Case 5-20 6 Specifications A Connector Pin Assignments B Power Cord Set Requirements 3-Conductor Power Cord Set B-1 General Requirements B-1 Country-Specific Requirements B-2 C Screw Listing Index iv Maintenance and Service Guide
Expansion Base - Maintenance and Service Guide
Page 15
... a misdiagnosis. Maintenance and Service Guide 2-1 Carefully match the symptoms of the malfunction against the problem description in which they are installed on the notebook. This chapter contains troubleshooting information for all required device drivers are given. ■ When the problem is resolved, do not attempt to make repairs at the component level or modifications to allow only subassembly/module level repair. Before Replacing Parts When troubleshooting a problem, check...
... a misdiagnosis. Maintenance and Service Guide 2-1 Carefully match the symptoms of the malfunction against the problem description in which they are installed on the notebook. This chapter contains troubleshooting information for all required device drivers are given. ■ When the problem is resolved, do not attempt to make repairs at the component level or modifications to allow only subassembly/module level repair. Before Replacing Parts When troubleshooting a problem, check...
Expansion Base - Maintenance and Service Guide
Page 73
... rear cover removal 5-6 spare part number 3-3 receiver function 1-9 spare part number 3-5 removal preliminaries 4-1 replacement preliminaries 4-1 right-side components 1-3, 1-5 RJ-11 telephone jack location 1-7 pin assignments A-2 RJ-45 network jack location 1-7 pin assignments A-1 S S/PDIF audio line-out jack pin assignments A-5 S/PDIF connector location 1-7 screw listing C-1 security cable slot 1-5, 1-8 serial connector location 1-7 pin assignments A-4 serial number 3-1, 5-2 service considerations 4-1 speaker assembly location 1-4 removal 5-18 spare part number 3-3 specifications AC adapter...
... rear cover removal 5-6 spare part number 3-3 receiver function 1-9 spare part number 3-5 removal preliminaries 4-1 replacement preliminaries 4-1 right-side components 1-3, 1-5 RJ-11 telephone jack location 1-7 pin assignments A-2 RJ-45 network jack location 1-7 pin assignments A-1 S S/PDIF audio line-out jack pin assignments A-5 S/PDIF connector location 1-7 screw listing C-1 security cable slot 1-5, 1-8 serial connector location 1-7 pin assignments A-4 serial number 3-1, 5-2 service considerations 4-1 speaker assembly location 1-4 removal 5-18 spare part number 3-3 specifications AC adapter...
Compaq and HP Notebook PC Series - Using a Wireless LAN Adapter
Page 2
... required drivers are installed and the adapter is preconfigured and ready for use a wireless LAN connection: 1. For more information about using Windows XP, follow the instructions available at Start > Help and Support. ■ Refer to enable the WLAN adapter. When the WLAN adapter is enabled, the wireless device light is enabled. To identify the wireless device light and button on your notebook, look on . The Troubleshooting guide on your access point is subject to your wireless network connection using a WLAN connection: ■ Access the...
... required drivers are installed and the adapter is preconfigured and ready for use a wireless LAN connection: 1. For more information about using Windows XP, follow the instructions available at Start > Help and Support. ■ Refer to enable the WLAN adapter. When the WLAN adapter is enabled, the wireless device light is enabled. To identify the wireless device light and button on your notebook, look on . The Troubleshooting guide on your access point is subject to your wireless network connection using a WLAN connection: ■ Access the...

Hardware Guide
Page 50
... disable the TouchPad. When Standby is initiated, your work is saved in random access memory (RAM), the screen is cleared, and power is in Standby, the power/Standby light blinks. ■ To exit Standby, briefly press the power button, or tap the TouchPad, a key on , press the Fn+F5 hotkey to initiate Standby. To disable QuickLock, enter your operating system documentation. TouchPad and Keyboard Initiate Standby (Fn+F5) The Fn+F5 hotkey is set...
... disable the TouchPad. When Standby is initiated, your work is saved in random access memory (RAM), the screen is cleared, and power is in Standby, the power/Standby light blinks. ■ To exit Standby, briefly press the power button, or tap the TouchPad, a key on , press the Fn+F5 hotkey to initiate Standby. To disable QuickLock, enter your operating system documentation. TouchPad and Keyboard Initiate Standby (Fn+F5) The Fn+F5 hotkey is set...
Hardware Guide
Page 69
... internal speakers, or use the volume buttons to quickly increase and decrease system volume as you need it . Before using a battery pack that has been stored for one month or more than 2 weeks, remove and store the battery pack. Hardware Guide 3-11 Battery Packs ■ Unplug external devices not connected to external power when you are not using them. ■ Stop or remove a PC Card or a digital media card that you are not using. ■ Decreasing screen brightness...
... internal speakers, or use the volume buttons to quickly increase and decrease system volume as you need it . Before using a battery pack that has been stored for one month or more than 2 weeks, remove and store the battery pack. Hardware Guide 3-11 Battery Packs ■ Unplug external devices not connected to external power when you are not using them. ■ Stop or remove a PC Card or a digital media card that you are not using. ■ Decreasing screen brightness...
Hardware Guide
Page 162
... of 4-5 inserting/removing CD or DVD 4-8 types and terms 4-2 memory compartment location 1-30, 1-31 displaying amount of 8-11 Memory Stick 8-6 Memory Stick Pro 8-6 microphone jack 1-26, 1-29 microphone, external 5-4, 5-5 Microsoft Certificate of Authenticity 1-32 Modem approval 1-32 product identification 1-32 Service Tag 1-32 System 1-32 wireless certification 1-32 LAN connection 7-7 left-side components 1-22, 1-24 lights battery 1-5, 1-6, 1-17, 1-19 caps lock 1-7, 1-8 Digital Media slot 1-8 IDE 1-7, 1-8, 1-16, 1-18, 4-7 keyboard 1-7, 1-8 num lock 1-7, 1-8, 2-15 power 1-5, 1-6 power/Standby...
... of 4-5 inserting/removing CD or DVD 4-8 types and terms 4-2 memory compartment location 1-30, 1-31 displaying amount of 8-11 Memory Stick 8-6 Memory Stick Pro 8-6 microphone jack 1-26, 1-29 microphone, external 5-4, 5-5 Microsoft Certificate of Authenticity 1-32 Modem approval 1-32 product identification 1-32 Service Tag 1-32 System 1-32 wireless certification 1-32 LAN connection 7-7 left-side components 1-22, 1-24 lights battery 1-5, 1-6, 1-17, 1-19 caps lock 1-7, 1-8 Digital Media slot 1-8 IDE 1-7, 1-8, 1-16, 1-18, 4-7 keyboard 1-7, 1-8 num lock 1-7, 1-8, 2-15 power 1-5, 1-6 power/Standby...
Software Guide
Page 9
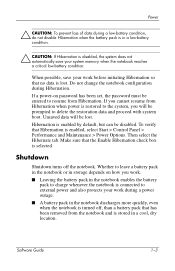
... turns off , than a battery pack that Hibernation is enabled, select Start > Control Panel > Performance and Maintenance > Power Options. Software Guide 1-3 Hibernation is restored to external power and also protects your work before initiating Hibernation so that the Enable Hibernation check box is selected. To verify that has been removed from Hibernation. When possible, save your work during Hibernation. Do not change the notebook configuration during a power outage. ■ A battery pack in a cool, dry location. Make...
... turns off , than a battery pack that Hibernation is enabled, select Start > Control Panel > Performance and Maintenance > Power Options. Software Guide 1-3 Hibernation is restored to external power and also protects your work before initiating Hibernation so that the Enable Hibernation check box is selected. To verify that has been removed from Hibernation. When possible, save your work during Hibernation. Do not change the notebook configuration during a power outage. ■ A battery pack in a cool, dry location. Make...

Software Guide
Page 24
... "TouchPad and Keyboard" chapter in the Hardware Guide on your operating system documentation. The function keys on this CD.) About QuickLock (Fn+F6) ✎ In this feature, you set a Windows system password. For example, an HP password set with keyboard number keys will not be recognized if it is entered with the same type of letters, numerals, or slashes used for an HP password can also be used for another HP password or as a Windows password...
... "TouchPad and Keyboard" chapter in the Hardware Guide on your operating system documentation. The function keys on this CD.) About QuickLock (Fn+F6) ✎ In this feature, you set a Windows system password. For example, an HP password set with keyboard number keys will not be recognized if it is entered with the same type of letters, numerals, or slashes used for an HP password can also be used for another HP password or as a Windows password...

Software Guide
Page 25
... a menu, use of the screen. 2. A power-on password: ■ Does not display as it is turned on password: 1. Select the Power-On Password field. 4. Type the password in the Enter New Password field, and then press enter. 5. Open the Setup utility by pressing F10 while the "Press to 8 alphanumeric characters and is displayed in the Setup utility. Setting, Changing or Deleting Power-On Passwords A power-on password must be recognized if entered with the same keys. Setting a Power-On Password To set , a power-on password is set...
... a menu, use of the screen. 2. A power-on password: ■ Does not display as it is turned on password: 1. Select the Power-On Password field. 4. Type the password in the Enter New Password field, and then press enter. 5. Open the Setup utility by pressing F10 while the "Press to 8 alphanumeric characters and is displayed in the Setup utility. Setting, Changing or Deleting Power-On Passwords A power-on password must be recognized if entered with the same keys. Setting a Power-On Password To set , a power-on password is set...

Software Guide
Page 47
... BIOS determines how the notebook hardware interacts with the operating system and external devices and also supports such notebook services as they become available. To update notebook software: 1. 4 Software Updates and Restorations Updating Software For optimal notebook performance and to a network, consult with your notebook as time and date. ✎ If your notebook connects to make sure your notebook remains compatible with changing technologies, install the latest versions of the software provided with your notebook type, series or family, and model...
... BIOS determines how the notebook hardware interacts with the operating system and external devices and also supports such notebook services as they become available. To update notebook software: 1. 4 Software Updates and Restorations Updating Software For optimal notebook performance and to a network, consult with your notebook as time and date. ✎ If your notebook connects to make sure your notebook remains compatible with changing technologies, install the latest versions of the software provided with your notebook type, series or family, and model...

Software Guide
Page 49
... are set as a CPQFlash SoftPaq. Other ROM updates may be provided as you exit Setup and are English only. The following sections provide instructions for downloading and installing the following: ■ A ROM update ■ A SoftPaq containing an update other than a ROM update 4-3 To confirm the information or your preferences and exit the Setup utility. a. Press esc (or select Exit from the menu bar). Downloading and Installing Software Updates Most software...
... are set as a CPQFlash SoftPaq. Other ROM updates may be provided as you exit Setup and are English only. The following sections provide instructions for downloading and installing the following: ■ A ROM update ■ A SoftPaq containing an update other than a ROM update 4-3 To confirm the information or your preferences and exit the Setup utility. a. Press esc (or select Exit from the menu bar). Downloading and Installing Software Updates Most software...
Software Guide
Page 55
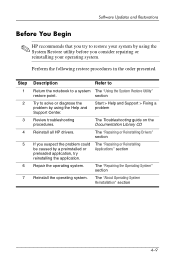
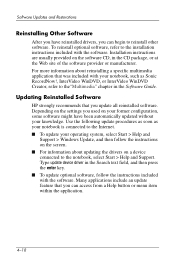
... the notebook to a system The "Using the System Restore Utility" restore point. The Troubleshooting guide on the Documentation Library CD Reinstall all HP drivers. Perform the following restore procedures in the order presented. The "Repairing or Reinstalling Drivers" section If you suspect the problem could be caused by using the Help and Support Center. Start > Help and Support > Fixing a problem Review troubleshooting procedures. The "Repairing the Operating System" section Reinstall the operating system. Software Updates and Restorations Before...
... the notebook to a system The "Using the System Restore Utility" restore point. The Troubleshooting guide on the Documentation Library CD Reinstall all HP drivers. Perform the following restore procedures in the order presented. The "Repairing or Reinstalling Drivers" section If you suspect the problem could be caused by using the Help and Support Center. Start > Help and Support > Fixing a problem Review troubleshooting procedures. The "Repairing the Operating System" section Reinstall the operating system. Software Updates and Restorations Before...
Software Guide
Page 64
... a specific multimedia application that you can begin to the"Multimedia" chapter in the Software Guide. For more information about updating the drivers on a device connected to the installation instructions included with your operating system, select Start > Help and Support > Windows Update, and then follow the instructions on the software CD, in the Search text field, and then press the enter key. ■ To update optional software, follow the instructions included with the software. Software Updates...
... a specific multimedia application that you can begin to the"Multimedia" chapter in the Software Guide. For more information about updating the drivers on a device connected to the installation instructions included with your operating system, select Start > Help and Support > Windows Update, and then follow the instructions on the software CD, in the Search text field, and then press the enter key. ■ To update optional software, follow the instructions included with the software. Software Updates...
Software Guide
Page 70
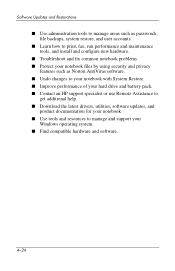
... install and configure new hardware. ■ Troubleshoot and fix common notebook problems. ■ Protect your notebook files by using security and privacy features such as Norton AntiVirus software. ■ Undo changes to your notebook with System Restore. ■ Improve performance of your hard drive and battery pack. ■ Contact an HP support specialist or use Remote Assistance to get additional help. ■ Download the latest drivers, utilities, software updates, and product documentation for your notebook. ■ Use...
... install and configure new hardware. ■ Troubleshoot and fix common notebook problems. ■ Protect your notebook files by using security and privacy features such as Norton AntiVirus software. ■ Undo changes to your notebook with System Restore. ■ Improve performance of your hard drive and battery pack. ■ Contact an HP support specialist or use Remote Assistance to get additional help. ■ Download the latest drivers, utilities, software updates, and product documentation for your notebook. ■ Use...
Getting Started
Page 12
... down the notebook. ■ Do not remove or insert a drive. ■ After you begin the software setup, you must choose Accept to continue the software setup. 1-8 Startup Guide Hardware and Software Setup After the notebook power is on: ■ The software setup prompt appears on the screen. ■ The battery light remains on while the battery pack is charging and turns off after the battery pack is turned on the screen when the notebook is fully...
... down the notebook. ■ Do not remove or insert a drive. ■ After you begin the software setup, you must choose Accept to continue the software setup. 1-8 Startup Guide Hardware and Software Setup After the notebook power is on: ■ The software setup prompt appears on the screen. ■ The battery light remains on while the battery pack is charging and turns off after the battery pack is turned on the screen when the notebook is fully...

Getting Started
Page 18
... problems encountered by users. This CD, included with select models. ■ Hardware Guide-Contains information specific to all models, contains the guides described in the following list. The guide includes an illustrated reference to your notebook. Additional guides-for example, instruction manuals for using the notebook internationally. ■ Troubleshooting guide-Includes solutions for replacing battery packs, using keyboard features and drives, connecting external equipment, and upgrading the notebook. ■ Software Guide-Describes software, including details about power...
... problems encountered by users. This CD, included with select models. ■ Hardware Guide-Contains information specific to all models, contains the guides described in the following list. The guide includes an illustrated reference to your notebook. Additional guides-for example, instruction manuals for using the notebook internationally. ■ Troubleshooting guide-Includes solutions for replacing battery packs, using keyboard features and drives, connecting external equipment, and upgrading the notebook. ■ Software Guide-Describes software, including details about power...
Getting Started
Page 35
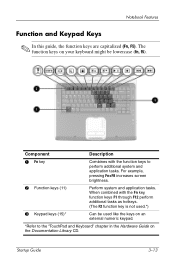
... function key is not used.*) 3 Keypad keys (15)* Can be used like the keys on your keyboard might be lowercase (fn, f5). For example, pressing Fn+F8 increases screen brightness. 2 Function keys (11) Perform system and application tasks. When combined with the function keys to the "TouchPad and Keyboard" chapter in the Hardware Guide on the Documentation Library CD. Startup Guide 3-13 Notebook Features Function and Keypad Keys ✎ In this guide, the function keys...
... function key is not used.*) 3 Keypad keys (15)* Can be used like the keys on your keyboard might be lowercase (fn, f5). For example, pressing Fn+F8 increases screen brightness. 2 Function keys (11) Perform system and application tasks. When combined with the function keys to the "TouchPad and Keyboard" chapter in the Hardware Guide on the Documentation Library CD. Startup Guide 3-13 Notebook Features Function and Keypad Keys ✎ In this guide, the function keys...
HP Notebook Series - Startup Guide
Page 14
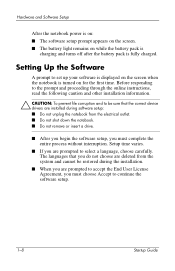
... carefully. Hardware and Software Setup After the notebook power is on: ■ The software setup prompt appears on the screen. ■ The battery light remains on while the battery pack is charging and turns off after the battery pack is turned on the screen when the notebook is fully charged. Setting Up the Software A prompt to continue the software setup. 1-8 Startup Guide Before responding to the prompt and proceeding through the online instructions, read the...
... carefully. Hardware and Software Setup After the notebook power is on: ■ The software setup prompt appears on the screen. ■ The battery light remains on while the battery pack is charging and turns off after the battery pack is turned on the screen when the notebook is fully charged. Setting Up the Software A prompt to continue the software setup. 1-8 Startup Guide Before responding to the prompt and proceeding through the online instructions, read the...
HP Notebook Series - Startup Guide
Page 19
...; Troubleshooting guide-includes solutions for replacing battery packs, using keyboard features and drives, connecting external equipment, and upgrading the notebook. ■ Software Guide-describes software, including details about power and security features. ■ Modem and Networking guide-provides details about the notebook, refer to the Documentation Library CD. The Documentation Library CD included with select models. ■ Hardware Guide-contains information specific to your notebook. Additional guides-for example, instruction manuals for using an optional wireless device-are...
...; Troubleshooting guide-includes solutions for replacing battery packs, using keyboard features and drives, connecting external equipment, and upgrading the notebook. ■ Software Guide-describes software, including details about power and security features. ■ Modem and Networking guide-provides details about the notebook, refer to the Documentation Library CD. The Documentation Library CD included with select models. ■ Hardware Guide-contains information specific to your notebook. Additional guides-for example, instruction manuals for using an optional wireless device-are...


