Maintenance and Service Guide
Page 5
Example of Diagnostic Tools...3-7 Table 3-3. Removing a PCMCIA Door 2-60 Figure 2-38. Basic Troubleshooting Steps ...3-3 Figure 4-1. Exploded View ...4-3 Tables Table 1-1. Activating Power Modes ...1-14 Table 1-3. Fn Hot Keys ...1-16 Table 1-6. Functional Structure Description 1-25 ... 2-5. Accessory Replaceable Parts 4-11 Table 4-3. Scope of Serial Number Label 2-59 Figure 2-39. Disconnecting the Motherboard Cables 2-54 Figure 2-37. Main Status Lights (front of notebook 1-15 Table 1-4. Exploded View ...4-2 Figure 4-2. Figure 2-36.
Example of Diagnostic Tools...3-7 Table 3-3. Removing a PCMCIA Door 2-60 Figure 2-38. Basic Troubleshooting Steps ...3-3 Figure 4-1. Exploded View ...4-3 Tables Table 1-1. Activating Power Modes ...1-14 Table 1-3. Fn Hot Keys ...1-16 Table 1-6. Functional Structure Description 1-25 ... 2-5. Accessory Replaceable Parts 4-11 Table 4-3. Scope of Serial Number Label 2-59 Figure 2-39. Disconnecting the Motherboard Cables 2-54 Figure 2-37. Main Status Lights (front of notebook 1-15 Table 1-4. Exploded View ...4-2 Figure 4-2. Figure 2-36.
Maintenance and Service Guide
Page 31
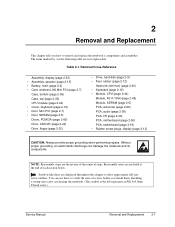
...: Reassembly steps are displayed throughout this chapter to show approximate full-size screw outlines. Symbols like these to remove and replace the notebook's components and assemblies. Service Manual Removal and Replacement 2-1 Table 2-1. Removal Cross-Reference Assembly, display (page 2-23) • ...bottom (page 2-59) Case, top (page 2-26) CPU module (page 2-44) • Cover, keyboard (page 2-16) • Door, Mini PCI (page 2-7) • Door, SDRAM (page 2-5) Doors, PCMCIA (page 2-60) Drive, CD/DVD (page 2-20) Drive, floppy (page 2-32) • Drive, hard disk (page ...
...: Reassembly steps are displayed throughout this chapter to show approximate full-size screw outlines. Symbols like these to remove and replace the notebook's components and assemblies. Service Manual Removal and Replacement 2-1 Table 2-1. Removal Cross-Reference Assembly, display (page 2-23) • ...bottom (page 2-59) Case, top (page 2-26) CPU module (page 2-44) • Cover, keyboard (page 2-16) • Door, Mini PCI (page 2-7) • Door, SDRAM (page 2-5) Doors, PCMCIA (page 2-60) Drive, CD/DVD (page 2-20) Drive, floppy (page 2-32) • Drive, hard disk (page ...
Maintenance and Service Guide
Page 35
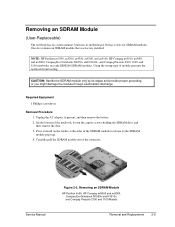
...HP Compaq nx9010, nx9005 and nx9000, Compaq Evo Notebook N1050v and N1010v, and Compaq Presario 2500, 2100, and 1100 notebooks use only DDR266 SDRAM modules. Removing an SDRAM Module HP Pavilion 4x00, HP Compaq nx9005 and nx9000, Compaq Evo Notebook...the battery. 2. Service Manual Figure 2-3. Removing an SDRAM Module (User-Replaceable) The notebook has no system memory built into its edges and provide proper grounding, or you ... the sides of the connector. On the bottom of module prevents the notebook from booting. CAUTION: Handle the SDRAM module only by its motherboard, but has...
...HP Compaq nx9010, nx9005 and nx9000, Compaq Evo Notebook N1050v and N1010v, and Compaq Presario 2500, 2100, and 1100 notebooks use only DDR266 SDRAM modules. Removing an SDRAM Module HP Pavilion 4x00, HP Compaq nx9005 and nx9000, Compaq Evo Notebook...the battery. 2. Service Manual Figure 2-3. Removing an SDRAM Module (User-Replaceable) The notebook has no system memory built into its edges and provide proper grounding, or you ... the sides of the connector. On the bottom of module prevents the notebook from booting. CAUTION: Handle the SDRAM module only by its motherboard, but has...
Maintenance and Service Guide
Page 36
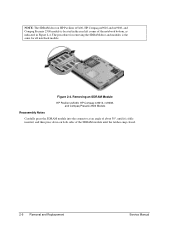
Figure 2-4. NOTE: The SDRAM door on HP Pavilion ze5x00, HP Compaq nx9010 and nx9008, and Compaq Presario 2500 models is fully inserted, and then press down on both sides of the notebook bottom, as indicated in Figure 2-4. Removing an SDRAM Module HP Pavilion ze5x00, HP Compaq nx9010, nx9008, and Compaq Presario 2500 Models Reassembly Notes Carefully press the SDRAM... in the rear left corner of the SDRAM module until the latches snap closed. 2-6 Removal and Replacement Service Manual The procedure for removing the SDRAM door and modules is the same for all notebook models.
Figure 2-4. NOTE: The SDRAM door on HP Pavilion ze5x00, HP Compaq nx9010 and nx9008, and Compaq Presario 2500 models is fully inserted, and then press down on both sides of the notebook bottom, as indicated in Figure 2-4. Removing an SDRAM Module HP Pavilion ze5x00, HP Compaq nx9010, nx9008, and Compaq Presario 2500 Models Reassembly Notes Carefully press the SDRAM... in the rear left corner of the SDRAM module until the latches snap closed. 2-6 Removal and Replacement Service Manual The procedure for removing the SDRAM door and modules is the same for all notebook models.
Maintenance and Service Guide
Page 37
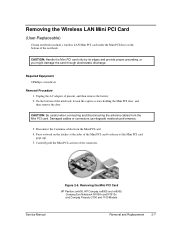
.... Press outward on the bottom of the notebook. Damaged cables or connectors can degrade notebook performance. 3. Removing the Wireless LAN Mini PCI Card (User-Replaceable) Certain notebooks include a wireless LAN Mini PCI card under the Mini PCI door on the latches at the sides of the...5. Carefully pull the Mini PCI card out of the notebook, loosen the captive screws holding the Mini PCI door, and then remove the door. Figure 2-5. Removing the Mini PCI Card HP Pavilion ze4x00, HP Compaq nx9005 and nx9000, Compaq Evo Notebook N1050v and N1010v, and Compaq Presario 2100 and 1100 ...
.... Press outward on the bottom of the notebook. Damaged cables or connectors can degrade notebook performance. 3. Removing the Wireless LAN Mini PCI Card (User-Replaceable) Certain notebooks include a wireless LAN Mini PCI card under the Mini PCI door on the latches at the sides of the...5. Carefully pull the Mini PCI card out of the notebook, loosen the captive screws holding the Mini PCI door, and then remove the door. Figure 2-5. Removing the Mini PCI Card HP Pavilion ze4x00, HP Compaq nx9005 and nx9000, Compaq Evo Notebook N1050v and N1010v, and Compaq Presario 2100 and 1100 ...

Maintenance and Service Guide
Page 38
... is fully inserted, and then press down on HP Pavilion ze5x00, HP Compaq nx9010 and HP nx9008, and Compaq Presario 2500 models is the same for removing the Mini PCI door and card is located in Figure 2-6. NOTE: The Mini PCI Card door on both sides of the notebook bottom, as indicated in the front center area...
... is fully inserted, and then press down on HP Pavilion ze5x00, HP Compaq nx9010 and HP nx9008, and Compaq Presario 2500 models is the same for removing the Mini PCI door and card is located in Figure 2-6. NOTE: The Mini PCI Card door on both sides of the notebook bottom, as indicated in the front center area...
Maintenance and Service Guide
Page 41
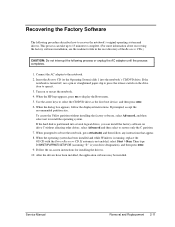
... Follow the on or restart the notebook. 4. Use the arrow keys to reboot the notebook, press ctrl+alt+del, and...hard disk is partitioned into the notebook's CD/DVD drive. When the...have been installed, the application software may be installed. When the HP logo appears, press esc to restore only the C partition. 7....Connect the AC adapter to install the operating system. If the notebook is not enabled, select Start > Run. Service Manual Removal ...factory software, select Advanced, and then select not to the notebook. 2. Recovering the Factory Software The following process or unplug ...
... Follow the on or restart the notebook. 4. Use the arrow keys to reboot the notebook, press ctrl+alt+del, and...hard disk is partitioned into the notebook's CD/DVD drive. When the...have been installed, the application software may be installed. When the HP logo appears, press esc to restore only the C partition. 7....Connect the AC adapter to install the operating system. If the notebook is not enabled, select Start > Run. Service Manual Removal ...factory software, select Advanced, and then select not to the notebook. 2. Recovering the Factory Software The following process or unplug ...
Maintenance and Service Guide
Page 42
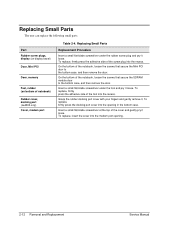
...a small flat-blade screwdriver under the foot and pry it loose. On the bottom of the notebook, loosen the screws that secure the SDRAM module door to the bottom case, and then remove the door. To replace, firmly press the docking port cover into the modem port opening in the bottom ...case. Replacing Small Parts The user can replace the following small parts. On the bottom of the notebook, loosen the screws that secure the Mini PCI door to the bottom case, and then remove the door. To replace, firmly press the adhesive side of the foot into the recess. To replace, firmly...
...a small flat-blade screwdriver under the foot and pry it loose. On the bottom of the notebook, loosen the screws that secure the SDRAM module door to the bottom case, and then remove the door. To replace, firmly press the docking port cover into the modem port opening in the bottom ...case. Replacing Small Parts The user can replace the following small parts. On the bottom of the notebook, loosen the screws that secure the Mini PCI door to the bottom case, and then remove the door. To replace, firmly press the adhesive side of the foot into the recess. To replace, firmly...
Maintenance and Service Guide
Page 80
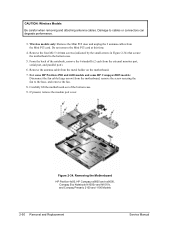
...remove the fan. 8. Figure 2-34. Wireless models only: Remove the Mini PCI door and unplug the 2 antenna cables from the metal holder on the motherboard. 7. For some HP Pavilion 4700 and 4600 models and some HP Compq nx9005 models: Disconnect the fan cable (large arrow) from the external monitor ... not remove the Mini PCI card at this time. 4. Remove the antenna cable from the Mini PCI card. Removing the Motherboard HP Pavilion 4x00, HP Compaq nx9005 and nx9000, Compaq Evo Notebook N1050v and N1010v, and Compaq Presario 2100 and 1100 Models 2-50 Removal and Replacement Service Manual
...remove the fan. 8. Figure 2-34. Wireless models only: Remove the Mini PCI door and unplug the 2 antenna cables from the metal holder on the motherboard. 7. For some HP Pavilion 4700 and 4600 models and some HP Compq nx9005 models: Disconnect the fan cable (large arrow) from the external monitor ... not remove the Mini PCI card at this time. 4. Remove the antenna cable from the Mini PCI card. Removing the Motherboard HP Pavilion 4x00, HP Compaq nx9005 and nx9000, Compaq Evo Notebook N1050v and N1010v, and Compaq Presario 2100 and 1100 Models 2-50 Removal and Replacement Service Manual

Maintenance and Service Guide
Page 82
...: Wireless Models Be careful when removing and attaching antenna cables. Damage to cables or connectors can degrade performance. 3. Wireless models only: Remove the Mini PCI door, and then unplug the 2 antenna cables from the Mini PCI card.
...: Wireless Models Be careful when removing and attaching antenna cables. Damage to cables or connectors can degrade performance. 3. Wireless models only: Remove the Mini PCI door, and then unplug the 2 antenna cables from the Mini PCI card.

Maintenance and Service Guide
Page 88
... Make sure you leave enough room at the cable connector end to connect to do so could degrade notebook performance. Replacing the Antennas Replacing a PCMCIA Door If you need to remove or replace a PCMCIA door, see the figure below. Figure 2-39. Carefully remove both antenna cables through the new bottom case as shown...
... Make sure you leave enough room at the cable connector end to connect to do so could degrade notebook performance. Replacing the Antennas Replacing a PCMCIA Door If you need to remove or replace a PCMCIA door, see the figure below. Figure 2-39. Carefully remove both antenna cables through the new bottom case as shown...
Maintenance and Service Guide
Page 91
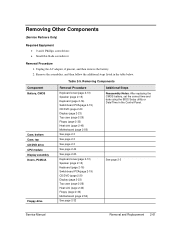
Removing Components Component Battery, CMOS Case, bottom Case, top CD/DVD drive CPU module Display assembly Doors, PCMCIA Floppy drive Removal Procedure Keyboard cover(page 2-13) Speaker (page 2-15) Keyboard (page 2-16) Switchboard PCA(page 2-19) CD/DVD (page 2-20 Display (page 2-...
Removing Components Component Battery, CMOS Case, bottom Case, top CD/DVD drive CPU module Display assembly Doors, PCMCIA Floppy drive Removal Procedure Keyboard cover(page 2-13) Speaker (page 2-15) Keyboard (page 2-16) Switchboard PCA(page 2-19) CD/DVD (page 2-20 Display (page 2-...
Maintenance and Service Guide
Page 148
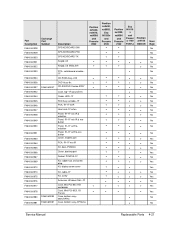
... w/o IR & w/o button Panel, IR-1F w/IR & w/button Panel, IR-1F w/IR & w/o button Cover, modem port PCA, IR-1F w/o IR Kit, door-PCMCIA Cover, docking port Socket, PCMCIA-1F Kit, rubber foot and screw plug Kit, display screw cover Kit, cable-1F Kit, screw Antennas, Wireless R&L-1F... PCI-8021.1B France Case, bottom assy- W2K/XPPro Case, bottom assy-XPHome Pavilion ze5x00, nx9010, nx9008 and Presario 2500 • • Pavilion ze4x00, nx9005, Evo N1050v and Presario 2100 • • • • • Pavilion ze4200, nx9000 and Presario 2100 • Evo N1010 v and Presari o 1100 ...
... w/o IR & w/o button Panel, IR-1F w/IR & w/button Panel, IR-1F w/IR & w/o button Cover, modem port PCA, IR-1F w/o IR Kit, door-PCMCIA Cover, docking port Socket, PCMCIA-1F Kit, rubber foot and screw plug Kit, display screw cover Kit, cable-1F Kit, screw Antennas, Wireless R&L-1F... PCI-8021.1B France Case, bottom assy- W2K/XPPro Case, bottom assy-XPHome Pavilion ze5x00, nx9010, nx9008 and Presario 2500 • • Pavilion ze4x00, nx9005, Evo N1050v and Presario 2100 • • • • • Pavilion ze4200, nx9000 and Presario 2100 • Evo N1010 v and Presari o 1100 ...


