Reference Guide
Page 1
It also provides information on modem commands, safety, and regulatory information. The last chapter provides additional reference material on battery pack and power management, external device connections, and modem and network connections. Reference Guide HP Notebook Series Document Part Number: 370697-002 April 2005 This guide explains how to set up, operate, maintain, and troubleshoot your notebook.
It also provides information on modem commands, safety, and regulatory information. The last chapter provides additional reference material on battery pack and power management, external device connections, and modem and network connections. Reference Guide HP Notebook Series Document Part Number: 370697-002 April 2005 This guide explains how to set up, operate, maintain, and troubleshoot your notebook.
Reference Guide
Page 2
... not be construed as constituting an additional warranty. Reference Guide HP Notebook Series Second Edition April 2005 First Edition June 2004 Document Part Number: 370697-002 The only warranties for technical or editorial errors or omissions contained ...
... not be construed as constituting an additional warranty. Reference Guide HP Notebook Series Second Edition April 2005 First Edition June 2004 Document Part Number: 370697-002 The only warranties for technical or editorial errors or omissions contained ...
Reference Guide
Page 3
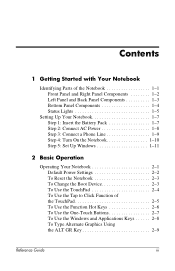
... 1: Insert the Battery Pack 1-7 Step 2: Connect AC Power 1-8 Step 3: Connect a Phone Line 1-9 Step 4: Turn On the Notebook 1-10 Step 5: Set Up Windows 1-11 2 Basic Operation Operating Your Notebook 2-1 Default Power Settings 2-2 To Reset the Notebook 2-3 To Change the Boot Device 2-3 To Use the TouchPad 2-4 To Use the Tap to Click Function of the...
... 1: Insert the Battery Pack 1-7 Step 2: Connect AC Power 1-8 Step 3: Connect a Phone Line 1-9 Step 4: Turn On the Notebook 1-10 Step 5: Set Up Windows 1-11 2 Basic Operation Operating Your Notebook 2-1 Default Power Settings 2-2 To Reset the Notebook 2-3 To Change the Boot Device 2-3 To Use the TouchPad 2-4 To Use the Tap to Click Function of the...
Reference Guide
Page 4
... to DVD Media (Select Models Only) . . . 2-12 To Create or Copy CDs 2-12 Securing Your Notebook 2-13 To Set Up Password Protection 2-13 To Lock Your Notebook 2-13 To Attach an Optional Security Cable 2-14 To Protect Against Viruses 2-14 To Lock the Hard Drive 2-15... To Safeguard Your Data 2-16 To Extend the Life of the Display 2-17 To Clean Your Notebook 2-17 3 Battery Packs and Power Management Managing Power Consumption 3-1 How the Notebook Manages Power Automatically 3-2 To Change Timeout Settings and Create Power Schemes 3-3 Using Battery Power 3-3 To Check Battery Status ...
... to DVD Media (Select Models Only) . . . 2-12 To Create or Copy CDs 2-12 Securing Your Notebook 2-13 To Set Up Password Protection 2-13 To Lock Your Notebook 2-13 To Attach an Optional Security Cable 2-14 To Protect Against Viruses 2-14 To Lock the Hard Drive 2-15... To Safeguard Your Data 2-16 To Extend the Life of the Display 2-17 To Clean Your Notebook 2-17 3 Battery Packs and Power Management Managing Power Consumption 3-1 How the Notebook Manages Power Automatically 3-2 To Change Timeout Settings and Create Power Schemes 3-3 Using Battery Power 3-3 To Check Battery Status ...
Reference Guide
Page 5
... Only 4-6 To Turn Wireless Communication On and Off . . . . . 4-7 5 Add-On Devices Connecting External Devices 5-1 To Insert or Remove a PC Card 5-1 To Connect an Audio Device 5-3 To Connect a TV to Your Notebook (Select Models Only 5-4 Switching the Display to the External Monitor (Select Models Only 5-5 To Connect a 1394 Device (Select Models Only... Drive 5-12 To Replace the Hard Drive 5-12 To Replace the Hard Drive Holder 5-13 To Prepare a New Hard Drive 5-14 6 Troubleshooting Troubleshooting Your Notebook 6-1 Audio Problems 6-2 CD-ROM and DVD Problems 6-3 Reference Guide v
... Only 4-6 To Turn Wireless Communication On and Off . . . . . 4-7 5 Add-On Devices Connecting External Devices 5-1 To Insert or Remove a PC Card 5-1 To Connect an Audio Device 5-3 To Connect a TV to Your Notebook (Select Models Only 5-4 Switching the Display to the External Monitor (Select Models Only 5-5 To Connect a 1394 Device (Select Models Only... Drive 5-12 To Replace the Hard Drive 5-12 To Replace the Hard Drive Holder 5-13 To Prepare a New Hard Drive 5-14 6 Troubleshooting Troubleshooting Your Notebook 6-1 Audio Problems 6-2 CD-ROM and DVD Problems 6-3 Reference Guide v
Reference Guide
Page 6
...Heat Problems 6-6 Infrared Problems 6-7 Keyboard and Pointing Device Problems 6-7 Local Area Network (LAN) Problems 6-8 Memory Problems 6-9 Modem Problems 6-10 PC Card (PCMCIA) Problems 6-13 Performance Problems 6-14 Power and Battery Pack Problems 6-15 Printing Problems 6-18 Serial, Parallel and USB Problems 6-...19 Startup Problems 6-20 Wireless Problems 6-22 Configuring Your Notebook 6-24 To Run the BIOS Setup Utility 6-24 Updating Software and Drivers from the Web 6-29 Using System Recovery Features ...
...Heat Problems 6-6 Infrared Problems 6-7 Keyboard and Pointing Device Problems 6-7 Local Area Network (LAN) Problems 6-8 Memory Problems 6-9 Modem Problems 6-10 PC Card (PCMCIA) Problems 6-13 Performance Problems 6-14 Power and Battery Pack Problems 6-15 Printing Problems 6-18 Serial, Parallel and USB Problems 6-...19 Startup Problems 6-20 Wireless Problems 6-22 Configuring Your Notebook 6-24 To Run the BIOS Setup Utility 6-24 Updating Software and Drivers from the Web 6-29 Using System Recovery Features ...
Reference Guide
Page 7
1 Getting Started with Your Notebook Identifying Parts of the Notebook Components included with most notebook models. The following tables identify the standard external components included with the notebook may vary by geographical region and the features you selected. Find the illustrations that closely match your notebook to identify your components. Reference Guide 1-1
1 Getting Started with Your Notebook Identifying Parts of the Notebook Components included with most notebook models. The following tables identify the standard external components included with the notebook may vary by geographical region and the features you selected. Find the illustrations that closely match your notebook to identify your components. Reference Guide 1-1
Reference Guide
Page 8
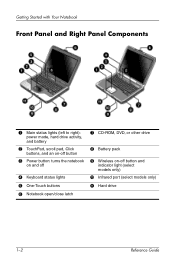
Getting Started with Your Notebook Front Panel and Right Panel Components 1 Main status lights (left to right): power mode, hard drive activity, and battery 2 TouchPad, scroll pad, Click buttons, and an on-off button 3 Power button: turns the notebook on and off 4 Keyboard status lights 5 One-Touch buttons 6 Notebook open/close latch 7 CD-ROM, DVD, or other drive 8 Battery pack 9 Wireless on-off button and indicator light (select models only) - Infrared port (select models only) q Hard drive 1-2 Reference Guide
Getting Started with Your Notebook Front Panel and Right Panel Components 1 Main status lights (left to right): power mode, hard drive activity, and battery 2 TouchPad, scroll pad, Click buttons, and an on-off button 3 Power button: turns the notebook on and off 4 Keyboard status lights 5 One-Touch buttons 6 Notebook open/close latch 7 CD-ROM, DVD, or other drive 8 Battery pack 9 Wireless on-off button and indicator light (select models only) - Infrared port (select models only) q Hard drive 1-2 Reference Guide
Reference Guide
Page 9
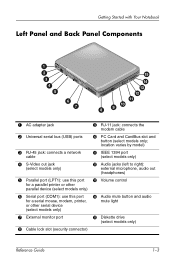
Getting Started with Your Notebook Left Panel and Back Panel Components 1 AC adapter jack 2 Universal serial bus (USB) ports 3 RJ-45 jack: connects a network cable 4 S-Video out jack (select models ... jacks (left to right): external microphone, audio out (headphones) e Volume control r Audio mute button and audio mute light t Diskette drive (select models only) Reference Guide 1-3 PC Card and CardBus slot and button (select models only;
Getting Started with Your Notebook Left Panel and Back Panel Components 1 AC adapter jack 2 Universal serial bus (USB) ports 3 RJ-45 jack: connects a network cable 4 S-Video out jack (select models ... jacks (left to right): external microphone, audio out (headphones) e Volume control r Audio mute button and audio mute light t Diskette drive (select models only) Reference Guide 1-3 PC Card and CardBus slot and button (select models only;
Reference Guide
Page 10
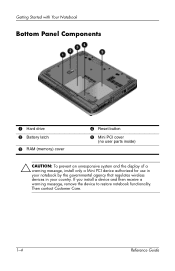
Then contact Customer Care. 1-4 Reference Guide If you install a device and then receive a warning message, remove the device to restore notebook functionality. Getting Started with Your Notebook Bottom Panel Components 1 Hard drive 2 Battery latch 3 RAM (memory) cover 4 Reset button 5 Mini PCI cover (no user parts inside) Ä CAUTION: To prevent an unresponsive system and the display of a warning message, install only a Mini PCI device authorized for use in your notebook by the governmental agency that regulates wireless devices in your country.
Then contact Customer Care. 1-4 Reference Guide If you install a device and then receive a warning message, remove the device to restore notebook functionality. Getting Started with Your Notebook Bottom Panel Components 1 Hard drive 2 Battery latch 3 RAM (memory) cover 4 Reset button 5 Mini PCI cover (no user parts inside) Ä CAUTION: To prevent an unresponsive system and the display of a warning message, install only a Mini PCI device authorized for use in your notebook by the governmental agency that regulates wireless devices in your country.
Reference Guide
Page 11
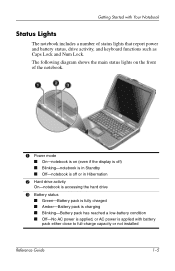
...shows the main status lights on the front of the notebook. 1 Power mode ■ On-notebook is on (even if the display is off) ■ Blinking-notebook is in Standby ■ Off-notebook is off or in Hibernation 2 Hard drive activity On-notebook is accessing the hard drive 3 Battery status ■...Blinking-Battery pack has reached a low-battery condition ■ Off-No AC power is applied, or AC power is applied with Your Notebook Status Lights The notebook includes a number of status lights that report power and battery status, drive activity, and keyboard functions such as Caps Lock and Num...
...shows the main status lights on the front of the notebook. 1 Power mode ■ On-notebook is on (even if the display is off) ■ Blinking-notebook is in Standby ■ Off-notebook is off or in Hibernation 2 Hard drive activity On-notebook is accessing the hard drive 3 Battery status ■...Blinking-Battery pack has reached a low-battery condition ■ Off-No AC power is applied, or AC power is applied with Your Notebook Status Lights The notebook includes a number of status lights that report power and battery status, drive activity, and keyboard functions such as Caps Lock and Num...
Reference Guide
Page 12
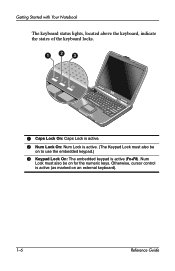
Num Lock must also be on an external keyboard). 1-6 Reference Guide Getting Started with Your Notebook The keyboard status lights, located above the keyboard, indicate the states of the keyboard locks. 1 Caps Lock On: Caps Lock is active. 2 Num Lock On: Num Lock is active. (The Keypad Lock must also be on to use the embedded keypad.) 3 Keypad Lock On: The embedded keypad is active (as marked on for the numeric keys. Otherwise, cursor control is active (Fn+F8).
Num Lock must also be on an external keyboard). 1-6 Reference Guide Getting Started with Your Notebook The keyboard status lights, located above the keyboard, indicate the states of the keyboard locks. 1 Caps Lock On: Caps Lock is active. 2 Num Lock On: Num Lock is active. (The Keypad Lock must also be on to use the embedded keypad.) 3 Keypad Lock On: The embedded keypad is active (as marked on for the numeric keys. Otherwise, cursor control is active (Fn+F8).
Reference Guide
Page 13
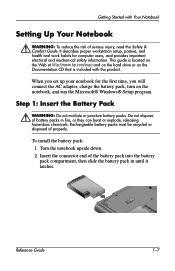
... the first time, you will connect the AC adapter, charge the battery pack, turn on the Documentation CD that is included with Your Notebook Setting Up Your Notebook Å WARNING: To reduce the risk of the battery pack into the battery pack compartment, then slide the battery pack in fire,... Comfort Guide. Reference Guide 1-7 Do not dispose of properly. This guide is located on the Web at http://www.hp.com/ergo and on the hard drive or on the notebook, and run the Microsoft® Windows® Setup program. Rechargeable battery packs must be recycled or disposed of battery packs...
... the first time, you will connect the AC adapter, charge the battery pack, turn on the Documentation CD that is included with Your Notebook Setting Up Your Notebook Å WARNING: To reduce the risk of the battery pack into the battery pack compartment, then slide the battery pack in fire,... Comfort Guide. Reference Guide 1-7 Do not dispose of properly. This guide is located on the Web at http://www.hp.com/ergo and on the hard drive or on the notebook, and run the Microsoft® Windows® Setup program. Rechargeable battery packs must be recycled or disposed of battery packs...
Reference Guide
Page 14
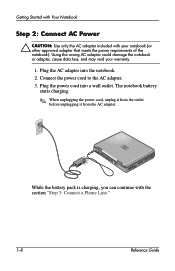
... the power cord to the AC adapter. 3. While the battery pack is charging, you can continue with your warranty. 1. Getting Started with Your Notebook Step 2: Connect AC Power Ä CAUTION: Use only the AC adapter included with the section "Step 3: Connect a Phone Line." 1-8 Reference ...Guide Plug the power cord into the notebook. 2. Using the wrong AC adapter could damage the notebook or adapter, cause data loss, and may void your notebook (or other approved adapter that meets the power requirements of the...
... the power cord to the AC adapter. 3. While the battery pack is charging, you can continue with your warranty. 1. Getting Started with Your Notebook Step 2: Connect AC Power Ä CAUTION: Use only the AC adapter included with the section "Step 3: Connect a Phone Line." 1-8 Reference ...Guide Plug the power cord into the notebook. 2. Using the wrong AC adapter could damage the notebook or adapter, cause data loss, and may void your notebook (or other approved adapter that meets the power requirements of the...
Reference Guide
Page 15
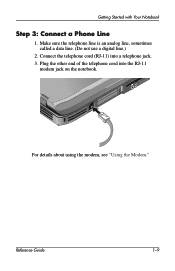
For details about using the modem, see "Using the Modem." Plug the other end of the telephone cord into a telephone jack. 3. Reference Guide 1-9 Make sure the telephone line is an analog line, sometimes called a data line. (Do not use a digital line.) 2. Connect the telephone cord (RJ-11) into the RJ-11 modem jack on the notebook. Getting Started with Your Notebook Step 3: Connect a Phone Line 1.
For details about using the modem, see "Using the Modem." Plug the other end of the telephone cord into a telephone jack. 3. Reference Guide 1-9 Make sure the telephone line is an analog line, sometimes called a data line. (Do not use a digital line.) 2. Connect the telephone cord (RJ-11) into the RJ-11 modem jack on the notebook. Getting Started with Your Notebook Step 3: Connect a Phone Line 1.
Reference Guide
Page 16
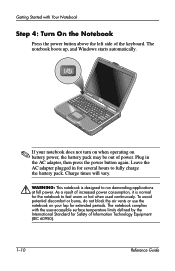
... the power button above the left side of the keyboard. Charge times will vary. Å WARNING: This notebook is normal for several hours to fully charge the battery pack. As a result of increased power consumption, it is designed to feel warm or hot ... avoid potential discomfort or burns, do not block the air vents or use the notebook on battery power, the battery pack may be out of power. The notebook boots up, and Windows starts automatically. ✎ If your notebook does not turn on when operating on your lap for extended periods. Plug in for...
... the power button above the left side of the keyboard. Charge times will vary. Å WARNING: This notebook is normal for several hours to fully charge the battery pack. As a result of increased power consumption, it is designed to feel warm or hot ... avoid potential discomfort or burns, do not block the air vents or use the notebook on battery power, the battery pack may be out of power. The notebook boots up, and Windows starts automatically. ✎ If your notebook does not turn on when operating on your lap for extended periods. Plug in for...
Reference Guide
Page 17
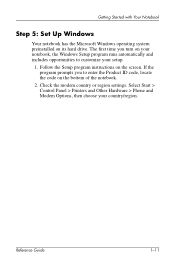
Reference Guide 1-11 Getting Started with Your Notebook Step 5: Set Up Windows Your notebook has the Microsoft Windows operating system preinstalled on the screen. If the program prompts you turn on your notebook, the Windows Setup program runs automatically and includes opportunities to enter the Product ID... code, locate the code on the bottom of the notebook. 2. The first time you to customize your country/region. Check the modem country or region settings. Select Start > Control Panel...
Reference Guide 1-11 Getting Started with Your Notebook Step 5: Set Up Windows Your notebook has the Microsoft Windows operating system preinstalled on the screen. If the program prompts you turn on your notebook, the Windows Setup program runs automatically and includes opportunities to enter the Product ID... code, locate the code on the bottom of the notebook. 2. The first time you to customize your country/region. Check the modem country or region settings. Select Start > Control Panel...
Reference Guide
Page 18
HP Manual Title 2-1 This chapter describes several methods. At other times, power considerations, types of active connections, and startup time may cause you to use alternative methods to start and stop your notebook by using the power button. 2 Basic Operation Operating Your Notebook You can start or stop your notebook.
HP Manual Title 2-1 This chapter describes several methods. At other times, power considerations, types of active connections, and startup time may cause you to use alternative methods to start and stop your notebook by using the power button. 2 Basic Operation Operating Your Notebook You can start or stop your notebook.
Reference Guide
Page 19
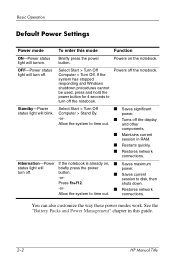
... already on the notebook. Select Start > Turn Off Computer > Turn Off. You can also customize the way these power modes work. Basic Operation Default Power Settings Power mode To enter this guide. 2-2 HP Manual Title Powers on , ■ Saves maximum status light will turnon. See the "Battery Packs and Power Management" chapter...
... already on the notebook. Select Start > Turn Off Computer > Turn Off. You can also customize the way these power modes work. Basic Operation Default Power Settings Power mode To enter this guide. 2-2 HP Manual Title Powers on , ■ Saves maximum status light will turnon. See the "Battery Packs and Power Management" chapter...
Reference Guide
Page 20
... its internal hard drive. Use the arrow keys to display the Boot menu. 3. HP Manual Title 2-3 Basic Operation To Reset the Notebook Occasionally, you may find that Windows or the notebook has stopped responding and will be lost. Select Start > Turn Off Computer > Restart. 2. Press the power button again to ... -or- ■ Insert the tip of a paper clip into the reset button on the bottom of the notebook, then press the power button to restart. If you turn off the notebook. If this happens, try the following procedures in this order: ■ If possible, shut down . Press ctrl...
... its internal hard drive. Use the arrow keys to display the Boot menu. 3. HP Manual Title 2-3 Basic Operation To Reset the Notebook Occasionally, you may find that Windows or the notebook has stopped responding and will be lost. Select Start > Turn Off Computer > Restart. 2. Press the power button again to ... -or- ■ Insert the tip of a paper clip into the reset button on the bottom of the notebook, then press the power button to restart. If you turn off the notebook. If this happens, try the following procedures in this order: ■ If possible, shut down . Press ctrl...


