

Maintenance and Service Guide
Page 3
... Operation...1-14 Specifications ...1-18 Internal Design...1-24 Removal and Replacement 2-1 Disassembly Flowchart ...2-3 Removing the Battery ...2-4 Removing an SDRAM Module...2-5 Removing the Wireless LAN Mini PCI Card 2-7 Removing the Hard Disk Drive...2-9 Recovering the Factory Software...2-11 Replacing Small Parts ...2-12 Removing the Keyboard Cover...2-13 Removing the Speaker Assembly ...2-15 Removing the Keyboard ...2-16 Removing the Switchboard PCA ...2-19 Removing the CD/DVD Drive...2-20 Removing the Display Assembly...2-23 Removing the Top Case ...2-26 Removing the Floppy Drive...
... Operation...1-14 Specifications ...1-18 Internal Design...1-24 Removal and Replacement 2-1 Disassembly Flowchart ...2-3 Removing the Battery ...2-4 Removing an SDRAM Module...2-5 Removing the Wireless LAN Mini PCI Card 2-7 Removing the Hard Disk Drive...2-9 Recovering the Factory Software...2-11 Replacing Small Parts ...2-12 Removing the Keyboard Cover...2-13 Removing the Speaker Assembly ...2-15 Removing the Keyboard ...2-16 Removing the Switchboard PCA ...2-19 Removing the CD/DVD Drive...2-20 Removing the Display Assembly...2-23 Removing the Top Case ...2-26 Removing the Floppy Drive...
Maintenance and Service Guide
Page 103
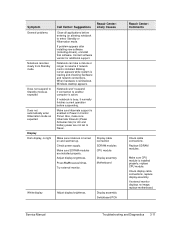
... is active. Notebook won't suspend if connection to another computer is loading and checking hardware and network connections. Make sure SDRAM modules are not set to Never. Adjust display brightness. Try external monitor. Replace SDRAM modules. Make sure CPU module is enabled in Power in Control Panel. If external monitor displays no light Call Center: Suggestions Close all applications before suspending. Make sure hibernate support is installed properly, replace CPU module. If notebook is turned on and warmed up. Service Manual Troubleshooting and Diagnostics...
... is active. Notebook won't suspend if connection to another computer is loading and checking hardware and network connections. Make sure SDRAM modules are not set to Never. Adjust display brightness. Try external monitor. Replace SDRAM modules. Make sure CPU module is enabled in Power in Control Panel. If external monitor displays no light Call Center: Suggestions Close all applications before suspending. Make sure hibernate support is installed properly, replace CPU module. If notebook is turned on and warmed up. Service Manual Troubleshooting and Diagnostics...
Maintenance and Service Guide
Page 107
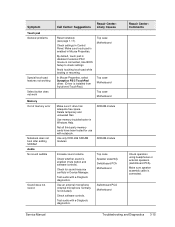
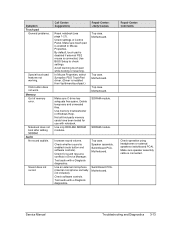
... driver. (Driver is enabled (mute button and software controls). Check for use with notebook. Check software controls. Delete temporary and unneeded files. Use memory troubleshooter in Control Panel. Test audio with e-Diagtools diagnostics. Check whether sound is installed from \hp\drivers\TouchPad.) Top case Motherboard Top case Motherboard Top case Motherboard Make sure C drive has adequate free space. SDRAM module SDRAM module Increase sound volume. Make sure speaker assembly cable is connected, Use BIOS Setup to check settings. Avoid touching touch pad while booting...
... driver. (Driver is enabled (mute button and software controls). Check for use with notebook. Check software controls. Delete temporary and unneeded files. Use memory troubleshooter in Control Panel. Test audio with e-Diagtools diagnostics. Check whether sound is installed from \hp\drivers\TouchPad.) Top case Motherboard Top case Motherboard Top case Motherboard Make sure C drive has adequate free space. SDRAM module SDRAM module Increase sound volume. Make sure speaker assembly cable is connected, Use BIOS Setup to check settings. Avoid touching touch pad while booting...
Maintenance and Service Guide
Page 115
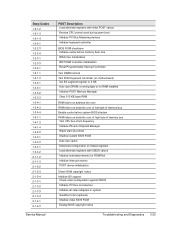
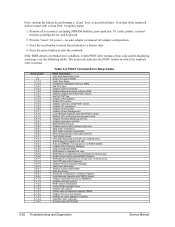
...23 Beep Codes 1-2-1-2 1-2-1-3 1-2-1-4 1-2-2-1 1-2-2-3 1-2-2-4 1-2-3-1 1-2-3-3 1-2-4-1 1-3-1-1 1-3-1-3 1-3-2-1 1-3-3-1 1-3-3-2 1-3-3-3 1-3-4-1 1-3-4-3 1-3-4-4 1-4-1-1 1-4-1-3 1-4-1-4 1-4-2-3 1-4-3-1 1-4-3-3 1-4-4-1 1-4-4-2 2-1-1-2 2-1-1-3 2-1-2-2 2-1-2-3 2-1-2-4 2-1-3-1 2-1-3-2 2-1-3-3 2-1-3-4 2-1-4-1 2-1-4-3 Service Manual POST Description Load alternate registers with initial POST values Restore CPU control word during warm boot Initialize PCI Bus Mastering devices Initialize keyboard controller BIOS ROM checksum Initialize cache before system BIOS shadow RAM failure on motherboard) Set ES...
...23 Beep Codes 1-2-1-2 1-2-1-3 1-2-1-4 1-2-2-1 1-2-2-3 1-2-2-4 1-2-3-1 1-2-3-3 1-2-4-1 1-3-1-1 1-3-1-3 1-3-2-1 1-3-3-1 1-3-3-2 1-3-3-3 1-3-4-1 1-3-4-3 1-3-4-4 1-4-1-1 1-4-1-3 1-4-1-4 1-4-2-3 1-4-3-1 1-4-3-3 1-4-4-1 1-4-4-2 2-1-1-2 2-1-1-3 2-1-2-2 2-1-2-3 2-1-2-4 2-1-3-1 2-1-3-2 2-1-3-3 2-1-3-4 2-1-4-1 2-1-4-3 Service Manual POST Description Load alternate registers with initial POST values Restore CPU control word during warm boot Initialize PCI Bus Mastering devices Initialize keyboard controller BIOS ROM checksum Initialize cache before system BIOS shadow RAM failure on motherboard) Set ES...
Maintenance and Service Guide
Page 122
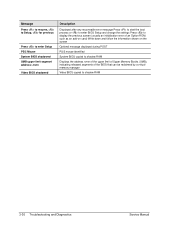
... to start the boot process or to enter BIOS Setup and change the settings Press to display the previous screen (usually an initialization error of an Option ROM, such as an add-on card) Write down and follow the information shown on the screen Optional message displayed during POST PS/2 mouse identified System BIOS copied to shadow RAM Displays the address nnnn of the upper limit of Upper Memory Blocks (UMB), indicating...
... to start the boot process or to enter BIOS Setup and change the settings Press to display the previous screen (usually an initialization error of an Option ROM, such as an add-on card) Write down and follow the information shown on the screen Optional message displayed during POST PS/2 mouse identified System BIOS copied to shadow RAM Displays the address nnnn of the upper limit of Upper Memory Blocks (UMB), indicating...
Service Manual
Page 141
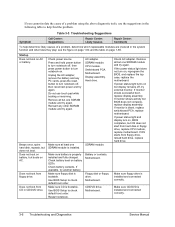
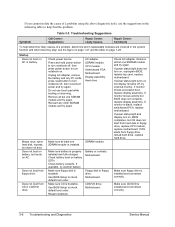
... battery contacts. If available, try again. Use BIOS Setup to check default boot order. Make sure CD is blank, replace switchboard PCA, replace motherboard. SDRAM module. Motherboard. Motherboard. Motherboard. Remove all but OS does not start from floppy drive, reload hard drive, replace hard drive. If the power status light does not turn on . If power status light turns on but display remains off , then press power button to turn notebook on , BIOS completes, but one SDRAM module is installed and connected correctly. If monitor shows activity but does not boot...
... battery contacts. If available, try again. Use BIOS Setup to check default boot order. Make sure CD is blank, replace switchboard PCA, replace motherboard. SDRAM module. Motherboard. Motherboard. Motherboard. Remove all but OS does not start from floppy drive, reload hard drive, replace hard drive. If the power status light does not turn on . If power status light turns on but display remains off , then press power button to turn notebook on , BIOS completes, but one SDRAM module is installed and connected correctly. If monitor shows activity but does not boot...
Service Manual
Page 145
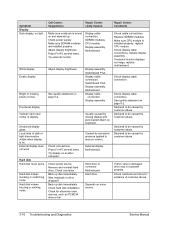
... Troubleshooting and Diagnostics Service Manual Check connector. Check for evidence of dark or light discoloration visible when display is turned on keyboard. Repair Center: Comments Check cable connections. Make sure CPU module is damaged, drive may not operate properly. Declared to be caused by customer abuse. Check notebook and drive for alternate noise sources, such as PCMCIA drive or fan. SDRAM modules. Motherboard. Bright or missing pixels or lines. Motherboard. Hard disk Hard disk never spins. External display. Motherboard. See...
... Troubleshooting and Diagnostics Service Manual Check connector. Check for evidence of dark or light discoloration visible when display is turned on keyboard. Repair Center: Comments Check cable connections. Make sure CPU module is damaged, drive may not operate properly. Declared to be caused by customer abuse. Check notebook and drive for alternate noise sources, such as PCMCIA drive or fan. SDRAM modules. Motherboard. Bright or missing pixels or lines. Motherboard. Hard disk Hard disk never spins. External display. Motherboard. See...
Service Manual
Page 148
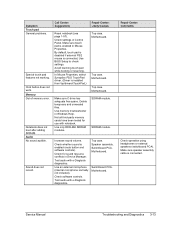
... files. Check whether sound is connected, Use BIOS Setup to check settings. Check software controls. Switchboard PCA. Use memory troubleshooter in Mouse Properties. Not all third-party memory cards have been tested for sound resource conflicts in Control Panel. Increase sound volume. Switchboard PCA. Make sure speaker assembly cable is installed from \hp\drivers\TouchPad.) Top case. Symptom Touch pad General problems. Special touch pad features not working. Check for use with notebook. Use an external microphone (internal microphone normally not included). Speaker...
... files. Check whether sound is connected, Use BIOS Setup to check settings. Check software controls. Switchboard PCA. Use memory troubleshooter in Mouse Properties. Not all third-party memory cards have been tested for sound resource conflicts in Control Panel. Increase sound volume. Switchboard PCA. Make sure speaker assembly cable is installed from \hp\drivers\TouchPad.) Top case. Symptom Touch pad General problems. Special touch pad features not working. Check for use with notebook. Use an external microphone (internal microphone normally not included). Speaker...
Service Manual
Page 154
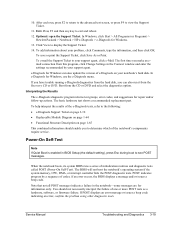
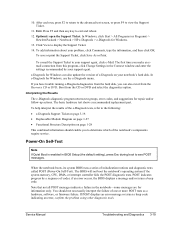
... a recommended replacement part. Service Manual Troubleshooting and Diagnostics 3-19 Press F3 and then any key to see POST messages. In Windows, click Start > All Programs (or Programs) > Hewlett-Packard > Notebook > HP e-Diagtools > e-Diagtools for Windows, use the e-Diagtools menu. You should enable you to view the Support Ticket. 11. To save or print the Support Ticket, click Save As or Print. Boot from the Recovery CD or DVD. Power-On...
... a recommended replacement part. Service Manual Troubleshooting and Diagnostics 3-19 Press F3 and then any key to see POST messages. In Windows, click Start > All Programs (or Programs) > Hewlett-Packard > Notebook > HP e-Diagtools > e-Diagtools for Windows, use the e-Diagtools menu. You should enable you to view the Support Ticket. 11. To save or print the Support Ticket, click Save As or Print. Boot from the Recovery CD or DVD. Power-On...
Service Manual
Page 155
.... Disable shadow and execute code from ROM. Test 8742 Keyboard Controller (on address line xxxx. Initialize POST Memory Manager. Initialize extended memory for option ROMs. Verify Real Mode. POST device initialization. Initialize I/O component. Check video configuration against CMOS. Auto size DRAM; Initialize PCI bus and devices. Initialize all accessories, including SDRAM modules, port replicator, PC cards, printer, external monitor, pointing device, and keyboard. 2. Provide "clean" AC power-no RAM installed. Clear 512 kB base RAM...
.... Disable shadow and execute code from ROM. Test 8742 Keyboard Controller (on address line xxxx. Initialize POST Memory Manager. Initialize extended memory for option ROMs. Verify Real Mode. POST device initialization. Initialize I/O component. Check video configuration against CMOS. Auto size DRAM; Initialize PCI bus and devices. Initialize all accessories, including SDRAM modules, port replicator, PC cards, printer, external monitor, pointing device, and keyboard. 2. Provide "clean" AC power-no RAM installed. Clear 512 kB base RAM...
Service Manual
Page 159
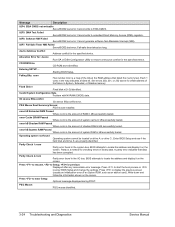
.... Fixed Disk n Fixed disk n (0-3) identified. I/O device IRQ conflict I /O bus. nnnn Cache SRAM Passed Where nnnn is a method for checking errors in System, Extended, or Shadow memory. Press to start the boot process or to shadow RAM. System BIOS shadowed System BIOS copied to enter BIOS Setup and change the settings. Operating system not found in kB successfully tested. Each 1 (one) in kB successfully tested. PS/2 Mouse Boot Summary Screen: PS/2 mouse installed. Parity...
.... Fixed Disk n Fixed disk n (0-3) identified. I/O device IRQ conflict I /O bus. nnnn Cache SRAM Passed Where nnnn is a method for checking errors in System, Extended, or Shadow memory. Press to start the boot process or to shadow RAM. System BIOS shadowed System BIOS copied to enter BIOS Setup and change the settings. Operating system not found in kB successfully tested. Each 1 (one) in kB successfully tested. PS/2 Mouse Boot Summary Screen: PS/2 mouse installed. Parity...
HP Pavilion ze4x00, ze5x00 and specific xt notebook series - Startup Guide
Page 41
..., 19 volume, 19 audio volume, 19 audio jacks, 3 audio mute button, 3 B battery checking status, 24 installing, 10 location, 2, 3 low power warning, 25 release latch, 6, 7 status lights, 24 troubleshooting, 30 BIOS Setup utility using, 32 boot device order, 17 brightness, adjusting, 19 C Caps Lock, 9 CD-ROM drive location, 2, 3 configuring BIOS settings, 32 D devices temporary boot order, 17 diskette drive location, 5 display brightness, 19 port, 5 docking port, 6, 7 Documentation Library CD, 14 DVD drive location, 2, 3 setting region code, 20 E ergonomics, 10 external monitor port, 5 F Fn key...
..., 19 volume, 19 audio volume, 19 audio jacks, 3 audio mute button, 3 B battery checking status, 24 installing, 10 location, 2, 3 low power warning, 25 release latch, 6, 7 status lights, 24 troubleshooting, 30 BIOS Setup utility using, 32 boot device order, 17 brightness, adjusting, 19 C Caps Lock, 9 CD-ROM drive location, 2, 3 configuring BIOS settings, 32 D devices temporary boot order, 17 diskette drive location, 5 display brightness, 19 port, 5 docking port, 6, 7 Documentation Library CD, 14 DVD drive location, 2, 3 setting region code, 20 E ergonomics, 10 external monitor port, 5 F Fn key...
HP Pavilion & Compaq Presario Notebook PC - Service Manual
Page 3
...Features ...1-15 Operation ...1-18 Turning the Notebook On and Off 1-18 Checking the Status of the Notebook 1-19 Using Fn Hot Keys ...1-20 Resetting the Notebook ...1-21 Specifications ...1-22 Internal Design ...1-27 Removal and Replacement 2-1 Disassembly Flowchart ...2-3 Removing the Battery (User-Replaceable 2-4 Removing a SDRAM Module (User-Replaceable 2-5 Removing the Wireless LAN Mini-PCI Card (User-Replaceable 2-6 Removing the Hard Disk Drive (User-Replaceable 2-7 Replacing Small Parts (User-Replaceable 2-9 Removing the Keyboard Cover (User-Replaceable 2-10 Removing the Speaker...
...Features ...1-15 Operation ...1-18 Turning the Notebook On and Off 1-18 Checking the Status of the Notebook 1-19 Using Fn Hot Keys ...1-20 Resetting the Notebook ...1-21 Specifications ...1-22 Internal Design ...1-27 Removal and Replacement 2-1 Disassembly Flowchart ...2-3 Removing the Battery (User-Replaceable 2-4 Removing a SDRAM Module (User-Replaceable 2-5 Removing the Wireless LAN Mini-PCI Card (User-Replaceable 2-6 Removing the Hard Disk Drive (User-Replaceable 2-7 Replacing Small Parts (User-Replaceable 2-9 Removing the Keyboard Cover (User-Replaceable 2-10 Removing the Speaker...

HP Pavilion & Compaq Presario Notebook PC - Service Manual
Page 29
...) active-matrix (TFT) LCD display. Headphone-out and microphone-in speakers. 3D-enhanced audio. Battery life: up to 1 GB (1024 MB) SDRAM using 256 MB modules. to 1.3-V core low-power processor with 400-MHz processor system bus. HP Pavilion ze5200, ze4200, ze4100, Compaq Evo N1050v, Compaq Presario 2500, and Compaq Presario 2100 Two slots for PC2100 DDR-266 SDRAM modules. Volume and mute buttons (certain models). Ethernet...
...) active-matrix (TFT) LCD display. Headphone-out and microphone-in speakers. 3D-enhanced audio. Battery life: up to 1 GB (1024 MB) SDRAM using 256 MB modules. to 1.3-V core low-power processor with 400-MHz processor system bus. HP Pavilion ze5200, ze4200, ze4100, Compaq Evo N1050v, Compaq Presario 2500, and Compaq Presario 2100 Two slots for PC2100 DDR-266 SDRAM modules. Volume and mute buttons (certain models). Ethernet...
HP Pavilion & Compaq Presario Notebook PC - Service Manual
Page 79
... default boot order. Restart notebook. Motherboard. If OS starts from floppy drive. Reinsert any PC cards, press reset button to help determine likely causes of a problem using the above diagnostic tools, use touch pad while booting or resuming. Motherboard. Hard drive. If available, try again. If monitor shows activity but does not boot. Unplug AC adapter, remove the battery and any other SDRAM module and try another battery. Display assembly. Does not boot from floppy drive, reload hard drive, replace hard drive. If power status light does not turn...
... default boot order. Restart notebook. Motherboard. If OS starts from floppy drive. Reinsert any PC cards, press reset button to help determine likely causes of a problem using the above diagnostic tools, use touch pad while booting or resuming. Motherboard. Hard drive. If available, try again. If monitor shows activity but does not boot. Unplug AC adapter, remove the battery and any other SDRAM module and try another battery. Display assembly. Does not boot from floppy drive, reload hard drive, replace hard drive. If power status light does not turn...

HP Pavilion & Compaq Presario Notebook PC - Service Manual
Page 83
... abuse. 3-10 Troubleshooting and Diagnostics Service Manual Scratched display glass. Check connections. Caused by excessive pressure applied to be caused by customer abuse. Motherboard. Repair Center: Comments Check cable connections. Make sure CPU module is turned on screen. Check power supply. Adjust display brightness. Try external monitor. SDRAM modules. White display. Display assembly. Switchboard PCA. Display assembly. Local area of dark or light discoloration visible when display is damaged, drive may not operate properly. Hard disk makes clunking or...
... abuse. 3-10 Troubleshooting and Diagnostics Service Manual Scratched display glass. Check connections. Caused by excessive pressure applied to be caused by customer abuse. Motherboard. Repair Center: Comments Check cable connections. Make sure CPU module is turned on screen. Check power supply. Adjust display brightness. Try external monitor. SDRAM modules. White display. Display assembly. Switchboard PCA. Display assembly. Local area of dark or light discoloration visible when display is damaged, drive may not operate properly. Hard disk makes clunking or...
HP Pavilion & Compaq Presario Notebook PC - Service Manual
Page 86
... Reset notebook (see page 1-21). Check software controls. Make sure speaker assembly cable is connected, Use BIOS Setup to check settings. In Mouse Properties, select Synaptics PS/2 TouchPad driver. (Driver is enabled (mute button and software controls). Use an external microphone (internal microphone normally not included). Increase sound volume. Top case. Motherboard. Click button does not work. Test audio with e-Diagtools diagnostics. Sound does not record. Make sure touch pad is enabled in Windows Help. Motherboard. SDRAM module. Check whether sound is installed...
... Reset notebook (see page 1-21). Check software controls. Make sure speaker assembly cable is connected, Use BIOS Setup to check settings. In Mouse Properties, select Synaptics PS/2 TouchPad driver. (Driver is enabled (mute button and software controls). Use an external microphone (internal microphone normally not included). Increase sound volume. Top case. Motherboard. Click button does not work. Test audio with e-Diagtools diagnostics. Sound does not record. Make sure touch pad is enabled in Windows Help. Motherboard. SDRAM module. Check whether sound is installed...
HP Pavilion & Compaq Presario Notebook PC - Service Manual
Page 92
... e-Diagtools menu. The basic hardware test shows a recommended replacement part. If POST displays an error message or issues a beep code indicating an error, confirm the problem using other diagnostic tools. Service Manual Troubleshooting and Diagnostics 3-19 Optional: open the Support Ticket. The first time you to display the Support Ticket. 14. To help interpret the results of the notebook's components require service. Power-On Self-Test Note If Quiet Boot is enabled in BIOS Setup (the default setting...
... e-Diagtools menu. The basic hardware test shows a recommended replacement part. If POST displays an error message or issues a beep code indicating an error, confirm the problem using other diagnostic tools. Service Manual Troubleshooting and Diagnostics 3-19 Optional: open the Support Ticket. The first time you to display the Support Ticket. 14. To help interpret the results of the notebook's components require service. Power-On Self-Test Note If Quiet Boot is enabled in BIOS Setup (the default setting...

HP Pavilion & Compaq Presario Notebook PC - Service Manual
Page 93
.... Enable CPU cache. Initialize Power Management. Initialize PCI Bus Mastering devices. Reset Programmable Interrupt Controller. Auto size cache. Check video configuration against CMOS. Initialize all accessories, including SDRAM modules, port replicator, PC cards, printer, external monitor, pointing device, and keyboard. 2. Note that if the notebook fails to restart with initial POST values. Press the power button to initial POST values. Search for RomPilot. Set IN POST flag. Initialize I/O component. Shadow system BIOS ROM. Initialize...
.... Enable CPU cache. Initialize Power Management. Initialize PCI Bus Mastering devices. Reset Programmable Interrupt Controller. Auto size cache. Check video configuration against CMOS. Initialize all accessories, including SDRAM modules, port replicator, PC cards, printer, external monitor, pointing device, and keyboard. 2. Note that if the notebook fails to restart with initial POST values. Press the power button to initial POST values. Search for RomPilot. Set IN POST flag. Initialize I/O component. Shadow system BIOS ROM. Initialize...
HP Pavilion & Compaq Presario Notebook PC - Service Manual
Page 97
... 2 nnnn Parity error found in the map indicates a failed bit. BIOS attempts to locate the address and display it on drive A: or drive C:. BIOS attempts to locate the address and display it on the screen. Press to start the boot process or to enter Setup Optional message displayed during POST. Press to enter BIOS Setup and change the settings. Each 1 (one) in the system bus. Invalid System Configuration Data Problem with NVRAM (CMOS) data. nnnn...
... 2 nnnn Parity error found in the map indicates a failed bit. BIOS attempts to locate the address and display it on drive A: or drive C:. BIOS attempts to locate the address and display it on the screen. Press to start the boot process or to enter Setup Optional message displayed during POST. Press to enter BIOS Setup and change the settings. Each 1 (one) in the system bus. Invalid System Configuration Data Problem with NVRAM (CMOS) data. nnnn...


