Using LightScribe (Select Models Only)
Page 7
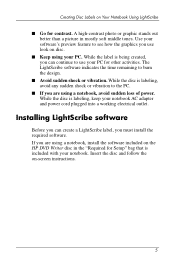
...keep your PC. Creating Disc Labels on -screen instructions. 5 Use your software's preview feature to use look on the HP DVD Writer disc in mostly soft middle tones. While the disc is being created, you can create a LightScribe label, you use your notebook. Installing ...software. If you are using a notebook, avoid sudden loss of power. The LightScribe software indicates the time remaining to the PC. ■ If you are using a notebook, install the software included on disc. ■ Keep using your notebook AC adapter and power cord plugged into a working electrical...
...keep your PC. Creating Disc Labels on -screen instructions. 5 Use your software's preview feature to use look on the HP DVD Writer disc in mostly soft middle tones. While the disc is being created, you can create a LightScribe label, you use your notebook. Installing ...software. If you are using a notebook, avoid sudden loss of power. The LightScribe software indicates the time remaining to the PC. ■ If you are using a notebook, install the software included on disc. ■ Keep using your notebook AC adapter and power cord plugged into a working electrical...

Hardware-Software Guide
Page 3
Contents 1 Hardware Top Components 1-1 Keys 1-1 TouchPad 1-3 Power Controls 1-4 Lights 1-5 Wireless (Select Models Only) and Volume Buttons 1-7 Antennae (Select Models Only 1-8 Front Components 1-9 Lights 1-9 Speakers, Jacks and Display Release Button. . . . . . 1-10 Rear Components 1-11 Left-Side Components 1-12 Ports and Jacks 1-12 PC Card Slot and Button 1-13 Right-Side Components 1-14 Bottom Components...
Contents 1 Hardware Top Components 1-1 Keys 1-1 TouchPad 1-3 Power Controls 1-4 Lights 1-5 Wireless (Select Models Only) and Volume Buttons 1-7 Antennae (Select Models Only 1-8 Front Components 1-9 Lights 1-9 Speakers, Jacks and Display Release Button. . . . . . 1-10 Rear Components 1-11 Left-Side Components 1-12 Ports and Jacks 1-12 PC Card Slot and Button 1-13 Right-Side Components 1-14 Bottom Components...

Hardware-Software Guide
Page 4
... Your Work 3-7 Interference with Drive Media 3-7 Standby, Hibernation and Shutdown Procedures 3-8 Turning the Notebook On or Off 3-8 Initiating or Resuming from Standby 3-9 Initiating or Restoring from Hibernation 3-10 Using Emergency Shutdown Procedures 3-11 Power Preferences 3-12 Using Power Schemes 3-12 Setting a Standby Password 3-12 Setting Other Power Preferences 3-13 iv Hardware and Software Guide
... Your Work 3-7 Interference with Drive Media 3-7 Standby, Hibernation and Shutdown Procedures 3-8 Turning the Notebook On or Off 3-8 Initiating or Resuming from Standby 3-9 Initiating or Restoring from Hibernation 3-10 Using Emergency Shutdown Procedures 3-11 Power Preferences 3-12 Using Power Schemes 3-12 Setting a Standby Password 3-12 Setting Other Power Preferences 3-13 iv Hardware and Software Guide
Hardware-Software Guide
Page 5
... Pack 3-14 Charging a Battery Pack 3-14 Monitoring the Charge in a Battery Pack 3-15 Managing Low-Battery Conditions 3-16 Calibrating a Battery Pack 3-18 Conserving Battery Pack Power 3-22 Replacing a Battery Pack 3-23 Storing a Battery Pack 3-26 Disposing of a Used Battery Pack 3-26 4 Multimedia Internal Speakers 4-1 Volume Controls 4-2 External Audio Devices 4-3 Using the...
... Pack 3-14 Charging a Battery Pack 3-14 Monitoring the Charge in a Battery Pack 3-15 Managing Low-Battery Conditions 3-16 Calibrating a Battery Pack 3-18 Conserving Battery Pack Power 3-22 Replacing a Battery Pack 3-23 Storing a Battery Pack 3-26 Disposing of a Used Battery Pack 3-26 4 Multimedia Internal Speakers 4-1 Volume Controls 4-2 External Audio Devices 4-3 Using the...

Hardware-Software Guide
Page 6
...an 802.11 Wireless Device 5-7 Troubleshooting Devices 5-7 Bluetooth Wireless Devices (Select Models Only) . . . . . 5-8 Wireless Device Power States 5-10 Turning On the Devices 5-12 Turning Off and Disabling the Devices 5-13 6 Security Security Features 6-1 QuickLock 6-3 Setup...Setup Utility Administrator Password 6-6 Setting an Administrator Password 6-7 Entering an Administrator Password 6-7 Setup Utility Power-On Password 6-8 Setting a Power-On Password 6-9 Entering a Power-On Password 6-9 Setup Utility Device Security 6-10 Antivirus Software 6-11 Critical Security Updates for ...
...an 802.11 Wireless Device 5-7 Troubleshooting Devices 5-7 Bluetooth Wireless Devices (Select Models Only) . . . . . 5-8 Wireless Device Power States 5-10 Turning On the Devices 5-12 Turning Off and Disabling the Devices 5-13 6 Security Security Features 6-1 QuickLock 6-3 Setup...Setup Utility Administrator Password 6-6 Setting an Administrator Password 6-7 Entering an Administrator Password 6-7 Setup Utility Power-On Password 6-8 Setting a Power-On Password 6-9 Entering a Power-On Password 6-9 Setup Utility Device Security 6-10 Antivirus Software 6-11 Critical Security Updates for ...
Hardware-Software Guide
Page 7
Contents 7 Hardware Upgrades and Replacements Device Connections 7-1 Connecting a Powered Device 7-1 Connecting a USB Device 7-2 Connecting a 1394 Device (Select Models Only 7-3 Connecting a Communication Device 7-4 Digital Memory Cards 7-4 Using the Digital Media Slot Light 7-5 Inserting a Digital Memory Card 7-6 Removing a Digital Memory Card 7-7 PC Cards 7-8 Inserting a PC Card 7-9 Stopping or Removing a PC Card 7-10 Drives 7-11 Adding a Drive to...
Contents 7 Hardware Upgrades and Replacements Device Connections 7-1 Connecting a Powered Device 7-1 Connecting a USB Device 7-2 Connecting a 1394 Device (Select Models Only 7-3 Connecting a Communication Device 7-4 Digital Memory Cards 7-4 Using the Digital Media Slot Light 7-5 Inserting a Digital Memory Card 7-6 Removing a Digital Memory Card 7-7 PC Cards 7-8 Inserting a PC Card 7-9 Stopping or Removing a PC Card 7-10 Drives 7-11 Adding a Drive to...

Hardware-Software Guide
Page 8
Contents Setup Utility 8-9 Opening the Setup Utility 8-9 Changing the Language of the Setup Utility 8-10 Navigating and Selecting in the Setup Utility . . . . . 8-10 Displaying System Information 8-11 Restoring Default Settings in the Setup Utility . . . . 8-12 Using Advanced Setup Utility Features 8-13 Closing the Setup Utility 8-14 A Specifications Operating Environment A-1 Rated Input Power A-2 Expansion Port Input/Output Signals A-3 Index viii Hardware and Software Guide
Contents Setup Utility 8-9 Opening the Setup Utility 8-9 Changing the Language of the Setup Utility 8-10 Navigating and Selecting in the Setup Utility . . . . . 8-10 Displaying System Information 8-11 Restoring Default Settings in the Setup Utility . . . . 8-12 Using Advanced Setup Utility Features 8-13 Closing the Setup Utility 8-14 A Specifications Operating Environment A-1 Rated Input Power A-2 Expansion Port Input/Output Signals A-3 Index viii Hardware and Software Guide

Hardware-Software Guide
Page 12
... table describes default settings. For information about changing the function of the display switch or power/standby button, refer to turn on the notebook. ■ On, briefly press to initiate hibernation. ■ In standby, briefly press to resume from standby. ■ In hibernation, briefly press to restore from hibernation. &#...
... table describes default settings. For information about changing the function of the display switch or power/standby button, refer to turn on the notebook. ■ On, briefly press to initiate hibernation. ■ In standby, briefly press to resume from standby. ■ In hibernation, briefly press to restore from hibernation. &#...

Hardware-Software Guide
Page 13
Lights Hardware Component 1 Caps lock light 2 Power/standby light* 3 Mute light Description On: Caps lock is turned on . On: Notebook is on . Off: Notebook is muted. (Continued) Hardware and Software Guide 1-5 On: Volume is off. Blinking: Notebook is in standby.
Lights Hardware Component 1 Caps lock light 2 Power/standby light* 3 Mute light Description On: Caps lock is turned on . On: Notebook is on . Off: Notebook is muted. (Continued) Hardware and Software Guide 1-5 On: Volume is off. Blinking: Notebook is in standby.

Hardware-Software Guide
Page 14
... light on . *The notebook has 2 power/standby lights. Hardware Component Description 4 Wireless light (select models only) On: One or more optional internal wireless devices, such as a WLAN and/or a Bluetooth® ... lock light On: Num lock or the embedded numeric keypad is on the front of the notebook is visible only when the notebook is open ; The power/standby light on the top of the notebook is visible whether the notebook is open or closed. †For information about establishing a wireless connection, refer to Chapter 5, "Wireless...
... light on . *The notebook has 2 power/standby lights. Hardware Component Description 4 Wireless light (select models only) On: One or more optional internal wireless devices, such as a WLAN and/or a Bluetooth® ... lock light On: Num lock or the embedded numeric keypad is on the front of the notebook is visible only when the notebook is open ; The power/standby light on the top of the notebook is visible whether the notebook is open or closed. †For information about establishing a wireless connection, refer to Chapter 5, "Wireless...
Hardware-Software Guide
Page 16
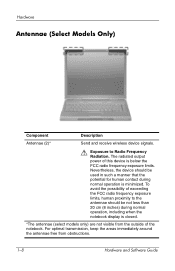
Nevertheless, the device should be used in such a manner that the potential for human contact during normal operation, including when the notebook display is closed. *The antennae (select models only) are not visible from obstructions. 1-8 Hardware and Software Guide Hardware Antennae (..., keep the areas immediately around the antennae free from the outside of the notebook. To avoid the possibility of this device is below the FCC radio frequency exposure limits. The radiated output power of exceeding the FCC radio frequency exposure limits, human proximity to Radio Frequency ...
Nevertheless, the device should be used in such a manner that the potential for human contact during normal operation, including when the notebook display is closed. *The antennae (select models only) are not visible from obstructions. 1-8 Hardware and Software Guide Hardware Antennae (..., keep the areas immediately around the antennae free from the outside of the notebook. To avoid the possibility of this device is below the FCC radio frequency exposure limits. The radiated output power of exceeding the FCC radio frequency exposure limits, human proximity to Radio Frequency ...

Hardware-Software Guide
Page 17
Blinking: The battery pack has reached a low-battery condition. The light on the power/standby button is visible when the notebook is open ; Off: Notebook is off. 2 IDE (Integrated Drive Electronics) drive light On or blinking: The internal hard drive or an optical drive... is turned on. the power/standby light on the front of the notebook display the same information. Front Components Lights Hardware Component Description 1 Power/standby light* On: Notebook is fully charged or not inserted. *The light on the power/standby button and the power/standby light on the front...
Blinking: The battery pack has reached a low-battery condition. The light on the power/standby button is visible when the notebook is open ; Off: Notebook is off. 2 IDE (Integrated Drive Electronics) drive light On or blinking: The internal hard drive or an optical drive... is turned on. the power/standby light on the front of the notebook display the same information. Front Components Lights Hardware Component Description 1 Power/standby light* On: Notebook is fully charged or not inserted. *The light on the power/standby button and the power/standby light on the front...

Hardware-Software Guide
Page 18
Hardware Speakers, Jacks and Display Release Button Component 1 Stereo speakers (2) 2 Display release button 3 Audio-in (microphone) jack 4 Audio-out (headphone) jack Description Produce stereo sound. Opens the notebook. Connects optional headphones or powered stereo speakers. Connects an optional monaural (single sound channel) microphone. Also connects the audio function of an audio/video device such as a television or VCR. 1-10 Hardware and Software Guide
Hardware Speakers, Jacks and Display Release Button Component 1 Stereo speakers (2) 2 Display release button 3 Audio-in (microphone) jack 4 Audio-out (headphone) jack Description Produce stereo sound. Opens the notebook. Connects optional headphones or powered stereo speakers. Connects an optional monaural (single sound channel) microphone. Also connects the audio function of an audio/video device such as a television or VCR. 1-10 Hardware and Software Guide

Hardware-Software Guide
Page 20
...-11 (modem) jack 6 USB port‡ Connects the modem cable. The other USB ports are on the model, the notebook has 2 or 3 USB ports. Hardware Left-Side Components Ports and Jacks Component 1 Power connector Description Connects the AC adapter cable. 2 Monitor port 3 Expansion Port 2 (select models only)*† 4 RJ-45 (network) jack...
...-11 (modem) jack 6 USB port‡ Connects the modem cable. The other USB ports are on the model, the notebook has 2 or 3 USB ports. Hardware Left-Side Components Ports and Jacks Component 1 Power connector Description Connects the AC adapter cable. 2 Monitor port 3 Expansion Port 2 (select models only)*† 4 RJ-45 (network) jack...

Hardware-Software Guide
Page 26
..., modem cables, and modem adapters vary in appearance by (modem) jack. Component Description 1 Battery pack* Powers the notebook when the notebook is not connected to external power. 2 AC adapter Converts AC power to DC power. 3 Power cord* Connects an AC adapter to an AC outlet. 4 Modem cable* Connects a modem to an RJ-11 telephone jack or to...
..., modem cables, and modem adapters vary in appearance by (modem) jack. Component Description 1 Battery pack* Powers the notebook when the notebook is not connected to external power. 2 AC adapter Converts AC power to DC power. 3 Power cord* Connects an AC adapter to an AC outlet. 4 Modem cable* Connects a modem to an RJ-11 telephone jack or to...

Hardware-Software Guide
Page 34
The function of the fn+f5 hotkey can be changed. For instructions, refer to the "Setting Other Power Preferences" section in Chapter 3, "Power." fn+f2 Opens default Internet browser. fn+f5 Initiates QuickLock. fn+f9 Stops an audio CD or DVD. fn+f1 Opens print options window. fn+...
The function of the fn+f5 hotkey can be changed. For instructions, refer to the "Setting Other Power Preferences" section in Chapter 3, "Power." fn+f2 Opens default Internet browser. fn+f5 Initiates QuickLock. fn+f9 Stops an audio CD or DVD. fn+f1 Opens print options window. fn+...
Hardware-Software Guide
Page 39
...using standby and hibernation, refer to the "Setting Other Power Preferences" section. Hardware and Software Guide 2-11 When standby is initiated, your work is saved in standby, the power/standby lights blink. ■ To initiate standby, the notebook must restore from hibernation before you can initiate standby. ...■ To resume from standby or restore from hibernation, briefly press the power/standby button. If the notebook is in random access memory (RAM), the screen clears, and power is set the fn+f5 hotkey to initiate hibernation instead of the fn+f5 hotkey, ...
...using standby and hibernation, refer to the "Setting Other Power Preferences" section. Hardware and Software Guide 2-11 When standby is initiated, your work is saved in standby, the power/standby lights blink. ■ To initiate standby, the notebook must restore from hibernation before you can initiate standby. ...■ To resume from standby or restore from hibernation, briefly press the power/standby button. If the notebook is in random access memory (RAM), the screen clears, and power is set the fn+f5 hotkey to initiate hibernation instead of the fn+f5 hotkey, ...

Hardware-Software Guide
Page 40
... entered. For information about combining Windows passwords with HP passwords, refert to Help and Support by displaying the operating system Log On window. Then follow the instructions on the screen to display the Log On window and lock the notebook. The longer you hold down the fn+f8 hotkey..., the more the screen dims. Decreasing screen brightness conserves power. » To increase screen brightness, press the fn+f8 hotkey. The longer you ...
... entered. For information about combining Windows passwords with HP passwords, refert to Help and Support by displaying the operating system Log On window. Then follow the instructions on the screen to display the Log On window and lock the notebook. The longer you hold down the fn+f8 hotkey..., the more the screen dims. Decreasing screen brightness conserves power. » To increase screen brightness, press the fn+f8 hotkey. The longer you ...

Hardware-Software Guide
Page 47
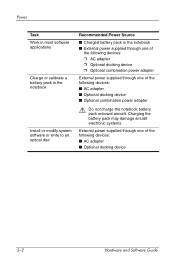
3 Power Power Sources Selecting a Power Source Use the following table to select a recommended power source for the way you plan to use the notebook. Hardware and Software Guide 3-1
3 Power Power Sources Selecting a Power Source Use the following table to select a recommended power source for the way you plan to use the notebook. Hardware and Software Guide 3-1
Hardware-Software Guide
Page 48
... software applications Charge or calibrate a battery pack in the notebook Install or modify system software or write to an optical disc Recommended Power Source ■ Charged battery pack in the notebook ■ External power supplied through one of the following devices: ❐ AC... adapter ❐ Optional docking device ❐ Optional combination power adapter External power supplied through one of the ...
... software applications Charge or calibrate a battery pack in the notebook Install or modify system software or write to an optical disc Recommended Power Source ■ Charged battery pack in the notebook ■ External power supplied through one of the following devices: ❐ AC... adapter ❐ Optional docking device ❐ Optional combination power adapter External power supplied through one of the ...


