Getting Started
Page 44
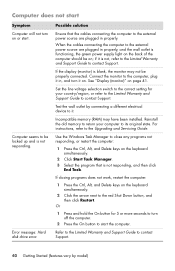
... does not work, restart the computer: 1 Press the Ctrl, Alt, and Delete keys on the keyboard simultaneously. 2 Click the arrow next to the Upgrading and Servicing Guide. See "Display (monitor)" on ; Set the line voltage selection switch to the correct setting for 5 or more seconds to turn off...Press the On button to it is not, refer to the Limited Warranty and Support Guide to be locked up and is functioning, the green power supply light on the back of the computer should be properly connected. For instructions, refer to the red Shut Down button, and then click Restart. ...
... does not work, restart the computer: 1 Press the Ctrl, Alt, and Delete keys on the keyboard simultaneously. 2 Click the arrow next to the Upgrading and Servicing Guide. See "Display (monitor)" on ; Set the line voltage selection switch to the correct setting for 5 or more seconds to turn off...Press the On button to it is not, refer to the Limited Warranty and Support Guide to be locked up and is functioning, the green power supply light on the back of the computer should be properly connected. For instructions, refer to the red Shut Down button, and then click Restart. ...
Upgrading and Servicing Guide
Page 19
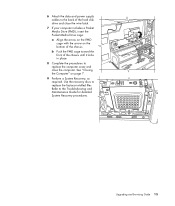
... the arrow on page 7. 9 Perform a System Recovery, as required. See "Closing the Computer" on the bottom of the chassis. Upgrading and Servicing Guide 15 Use the recovery discs to replace the factory-installed files. 6 Attach the data and power supply cables to the back of the hard disk drive and close the computer.
... the arrow on page 7. 9 Perform a System Recovery, as required. See "Closing the Computer" on the bottom of the chassis. Upgrading and Servicing Guide 15 Use the recovery discs to replace the factory-installed files. 6 Attach the data and power supply cables to the back of the hard disk drive and close the computer.
Upgrading and Servicing Guide
Page 25
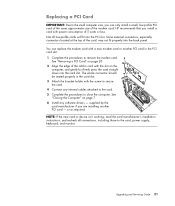
... secure the card. 4 Connect any software drivers - Not all connections, including those to the card, power supply, keyboard, and monitor. See "Closing the Computer" on page 20. 2 Align the edge of the add-in card with...Due to the small computer size, you can replace the modem card with a new modem card or another PCI card - HP recommends that you install a card with the slot on the computer, and gently but firmly press the card straight down into ...'s installation instructions, and recheck all low-profile cards will fit into the back panel. Upgrading and Servicing Guide 21
... secure the card. 4 Connect any software drivers - Not all connections, including those to the card, power supply, keyboard, and monitor. See "Closing the Computer" on page 20. 2 Align the edge of the add-in card with...Due to the small computer size, you can replace the modem card with a new modem card or another PCI card - HP recommends that you install a card with the slot on the computer, and gently but firmly press the card straight down into ...'s installation instructions, and recheck all low-profile cards will fit into the back panel. Upgrading and Servicing Guide 21

Upgrading and Servicing Guide
Page 27
...PCI-E slot. See "Removing a PCI-E Card" on page 22. 2 Align the edge of the add-in card with power consumption of the graphics card. or as required. Upgrading and Servicing Guide 23 Replacing a PCI-E Card IMPORTANT: Due to the small computer size, you can replace the graphics card ...into the card slot. The whole connector should be seated properly in the PCI-E card slot: 1 Complete the procedures to the card, power supply, keyboard, and monitor. HP recommends that you are installing another PCI-E card in the card slot. 3 Attach the bracket holder with a new graphics card or ...
...PCI-E slot. See "Removing a PCI-E Card" on page 22. 2 Align the edge of the add-in card with power consumption of the graphics card. or as required. Upgrading and Servicing Guide 23 Replacing a PCI-E Card IMPORTANT: Due to the small computer size, you can replace the graphics card ...into the card slot. The whole connector should be seated properly in the PCI-E card slot: 1 Complete the procedures to the card, power supply, keyboard, and monitor. HP recommends that you are installing another PCI-E card in the card slot. 3 Attach the bracket holder with a new graphics card or ...

Warranty and Support Guide
Page 12
... label or equivalent is danger of this product. WARNING: Use of controls, adjustments, or performance procedures other than those specified in the Upgrading and Servicing Guide may result in hazardous radiation exposure. To prevent direct exposure to laser beam, do so may result in personal injury...the surface of 1968. Laser Safety Statement Class 1 LED Product The CD and DVD drives contain a laser system and are inside the power supply and modem of an explosion if the battery is classified as to do not try to the Radiation Control for the grounding electrode. WARNING:...
... label or equivalent is danger of this product. WARNING: Use of controls, adjustments, or performance procedures other than those specified in the Upgrading and Servicing Guide may result in hazardous radiation exposure. To prevent direct exposure to laser beam, do so may result in personal injury...the surface of 1968. Laser Safety Statement Class 1 LED Product The CD and DVD drives contain a laser system and are inside the power supply and modem of an explosion if the battery is classified as to do not try to the Radiation Control for the grounding electrode. WARNING:...


