HP Notebook Reference Guide - Windows 7
Page 8
... only 49 Locating the fingerprint reader 49 8 Maintenance ...50 Cleaning your computer ...50 Cleaning the display ...50 Cleaning the sides and cover 50 Cleaning the TouchPad and keyboard 50 Updating programs and drivers ...50 Using SoftPaq Download Manager ...51 9 Setup Utility (BIOS) and System Diagnostics 52 Using Setup Utility (BIOS) ...52...
... only 49 Locating the fingerprint reader 49 8 Maintenance ...50 Cleaning your computer ...50 Cleaning the display ...50 Cleaning the sides and cover 50 Cleaning the TouchPad and keyboard 50 Updating programs and drivers ...50 Using SoftPaq Download Manager ...51 9 Setup Utility (BIOS) and System Diagnostics 52 Using Setup Utility (BIOS) ...52...
HP Notebook Reference Guide - Windows 7
Page 29
..., loss of audio or video playback functionality, or loss of inactivity when running on battery power or on the keyboard. ● Tap or swipe the TouchPad. To exit Sleep: ● Briefly press the power button. ● If the display is set a password to memory, letting you exit Sleep faster than exiting...
..., loss of audio or video playback functionality, or loss of inactivity when running on battery power or on the keyboard. ● Tap or swipe the TouchPad. To exit Sleep: ● Briefly press the power button. ● If the display is set a password to memory, letting you exit Sleep faster than exiting...
HP Notebook Reference Guide - Windows 7
Page 59
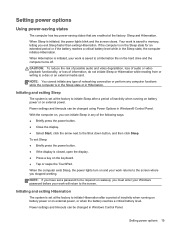
... The fingerprint reader is a small metallic sensor that is located in one of the following areas of your computer: ● Near the bottom of the TouchPad ● On the right side of the keyboard ● On the upper-right side of the display ● On the left side of a designated finger...
... The fingerprint reader is a small metallic sensor that is located in one of the following areas of your computer: ● Near the bottom of the TouchPad ● On the right side of the keyboard ● On the upper-right side of the display ● On the left side of a designated finger...

HP Notebook Reference Guide - Windows 7
Page 60
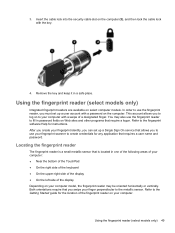
...and under the keys to aid in removing dirt and debris. Cleaning the TouchPad and keyboard Dirt and grease on the TouchPad can be used to blow air around on the screen. Updating programs and drivers HP recommends that can deposit household debris on a regular basis with a damp ...cloth, and wash your programs and drivers on the keyboard surface. To avoid this, clean the TouchPad with the latest versions. WARNING! A can of compressed air...
...and under the keys to aid in removing dirt and debris. Cleaning the TouchPad and keyboard Dirt and grease on the TouchPad can be used to blow air around on the screen. Updating programs and drivers HP recommends that can deposit household debris on a regular basis with a damp ...cloth, and wash your programs and drivers on the keyboard surface. To avoid this, clean the TouchPad with the latest versions. WARNING! A can of compressed air...

Getting Started Compaq Notebook - Windows 7
Page 5
Table of contents 1 Welcome ...1 Finding information ...2 2 Getting to know your computer ...4 Top ...4 TouchPad ...4 Lights ...5 Buttons ...6 Keys ...7 Right side ...8 Left side ...9 Display ...10 Bottom ...11 3 HP QuickWeb (select models only) ...12 Starting HP QuickWeb ...13 4 Networking ...14 Using an Internet service provider (ISP 15 Connecting to a wireless network ...15 Connecting to an existing WLAN ...5 Keyboard and pointing devices ...18 Using the keyboard ...18 Using the action keys ...18 Using pointing devices ...20 Setting pointing device preferences 20 Using the TouchPad ...20 v
Table of contents 1 Welcome ...1 Finding information ...2 2 Getting to know your computer ...4 Top ...4 TouchPad ...4 Lights ...5 Buttons ...6 Keys ...7 Right side ...8 Left side ...9 Display ...10 Bottom ...11 3 HP QuickWeb (select models only) ...12 Starting HP QuickWeb ...13 4 Networking ...14 Using an Internet service provider (ISP 15 Connecting to a wireless network ...15 Connecting to an existing WLAN ...5 Keyboard and pointing devices ...18 Using the keyboard ...18 Using the action keys ...18 Using pointing devices ...20 Setting pointing device preferences 20 Using the TouchPad ...20 v

Getting Started Compaq Notebook - Windows 7
Page 6
... and on 21 Navigating ...21 Selecting ...22 Using TouchPad gestures 22 Scrolling 23 Pinching/Zooming 23 Rotating (select models only 24 Flicking (select models only 24 6 Maintenance ...25 Inserting or removing the battery ...25 ... Restore to a previous date and time 41 8 Customer support ...42 Contacting customer support ...42 Labels ...43 9 Specifications ...44 Input power ...44 DC plug of external HP power supply 44 Operating environment ...45 Index ...46 vi
... and on 21 Navigating ...21 Selecting ...22 Using TouchPad gestures 22 Scrolling 23 Pinching/Zooming 23 Rotating (select models only 24 Flicking (select models only 24 6 Maintenance ...25 Inserting or removing the battery ...25 ... Restore to a previous date and time 41 8 Customer support ...42 Contacting customer support ...42 Labels ...43 9 Specifications ...44 Input power ...44 DC plug of external HP power supply 44 Operating environment ...45 Index ...46 vi

Getting Started Compaq Notebook - Windows 7
Page 10
Quickly double-tap the TouchPad on/off button to know your computer ● Top ● Right side ● Left side ● Display ● Bottom Top TouchPad Component (1) TouchPad light (2) TouchPad on/off button (3) TouchPad zone 4 Chapter 2 Getting to turn the TouchPad on and off . ● Off: The TouchPad is off . Moves the pointer and selects or activates items on and off. 2 Getting to know your computer Description ● Amber: The TouchPad is on. Turns the TouchPad on the screen.
Quickly double-tap the TouchPad on/off button to know your computer ● Top ● Right side ● Left side ● Display ● Bottom Top TouchPad Component (1) TouchPad light (2) TouchPad on/off button (3) TouchPad zone 4 Chapter 2 Getting to turn the TouchPad on and off . ● Off: The TouchPad is off . Moves the pointer and selects or activates items on and off. 2 Getting to know your computer Description ● Amber: The TouchPad is on. Turns the TouchPad on the screen.

Getting Started Compaq Notebook - Windows 7
Page 11
... the left button on an external mouse. Component (4) (5) Left TouchPad button Right TouchPad button Lights Description Functions like the right button on an external mouse. Component (1) TouchPad light (2) Caps lock light (3) Power light (4) Wireless light Description ● Amber: The TouchPad is off. ● Off: The TouchPad is on. ● White: Caps lock is on. ●...
... the left button on an external mouse. Component (4) (5) Left TouchPad button Right TouchPad button Lights Description Functions like the right button on an external mouse. Component (1) TouchPad light (2) Caps lock light (3) Power light (4) Wireless light Description ● Amber: The TouchPad is off. ● Off: The TouchPad is on. ● White: Caps lock is on. ●...
Getting Started Compaq Notebook - Windows 7
Page 26
... to one of the USB ports on an external mouse. 20 Chapter 5 Keyboard and pointing devices Using the TouchPad To move the pointer, slide one finger across the TouchPad in Windows® to customize settings for pointing devices, such as button configuration, click speed, and pointer options...Using pointing devices NOTE: In addition to the pointing devices included with your computer, and select Mouse settings. Use the left and right TouchPad buttons like the buttons on the computer. Setting pointing device preferences Use Mouse Properties in the direction you can use an external USB ...
... to one of the USB ports on an external mouse. 20 Chapter 5 Keyboard and pointing devices Using the TouchPad To move the pointer, slide one finger across the TouchPad in Windows® to customize settings for pointing devices, such as button configuration, click speed, and pointer options...Using pointing devices NOTE: In addition to the pointing devices included with your computer, and select Mouse settings. Use the left and right TouchPad buttons like the buttons on the computer. Setting pointing device preferences Use Mouse Properties in the direction you can use an external USB ...

Getting Started Compaq Notebook - Windows 7
Page 27
NOTE: The TouchPad light is off when the TouchPad is on /off and on, quickly double-tap the TouchPad on . Turning the TouchPad off and on To turn the TouchPad off button. Using pointing devices 21 Navigating To move the pointer, slide one finger across the TouchPad in the direction you want the pointer to go.
NOTE: The TouchPad light is off when the TouchPad is on /off and on, quickly double-tap the TouchPad on . Turning the TouchPad off and on To turn the TouchPad off button. Using pointing devices 21 Navigating To move the pointer, slide one finger across the TouchPad in the direction you want the pointer to go.

Getting Started Compaq Notebook - Windows 7
Page 28
To turn on and off . 3. Selecting Use the left and right TouchPad buttons like the corresponding buttons on the TouchPad at the same time. NOTE: TouchPad gestures are not supported in all programs. To view the demonstration of gestures. Select Start > Control Panel > Hardware...Synaptics > Settings. 2. Select the check box next to the gesture that you want to activate the demonstration. Using TouchPad gestures The TouchPad supports a variety of a gesture: 1. To use TouchPad gestures, place two fingers on an external mouse. Click a gesture to turn the gestures on or off : ...
To turn on and off . 3. Selecting Use the left and right TouchPad buttons like the corresponding buttons on the TouchPad at the same time. NOTE: TouchPad gestures are not supported in all programs. To view the demonstration of gestures. Select Start > Control Panel > Hardware...Synaptics > Settings. 2. Select the check box next to the gesture that you want to activate the demonstration. Using TouchPad gestures The TouchPad supports a variety of a gesture: 1. To use TouchPad gestures, place two fingers on an external mouse. Click a gesture to turn the gestures on or off : ...

Getting Started Compaq Notebook - Windows 7
Page 29
... motion. NOTE: Two-finger scrolling is enabled at the factory. NOTE: Pinching/zooming is controlled by placing two fingers apart on the TouchPad, and then moving them apart. ● Zoom out by finger speed. Using pointing devices 23 To scroll, place two fingers slightly apart on ...the TouchPad, and then drag them across the TouchPad in by placing two fingers together on the TouchPad, and then moving them together. NOTE: Scrolling speed is enabled at the factory.
... motion. NOTE: Two-finger scrolling is enabled at the factory. NOTE: Pinching/zooming is controlled by placing two fingers apart on the TouchPad, and then moving them apart. ● Zoom out by finger speed. Using pointing devices 23 To scroll, place two fingers slightly apart on ...the TouchPad, and then drag them across the TouchPad in by placing two fingers together on the TouchPad, and then moving them together. NOTE: Scrolling speed is enabled at the factory.

Getting Started Compaq Notebook - Windows 7
Page 30
...items such as photos. Move the right forefinger around the anchored finger in a light, quick flicking motion up, down, left forefinger in the TouchPad zone. To flick, use three fingers to 3 o'clock. Rotating (select models only) Rotating allows you to 12 o'clock. NOTE: Three-finger... flicking must be done within the TouchPad zone. To rotate, anchor your right forefinger from 12 o'clock to touch the TouchPad zone in a sweeping motion, moving from 3 o'clock to navigate through screens or quickly scroll through ...
...items such as photos. Move the right forefinger around the anchored finger in a light, quick flicking motion up, down, left forefinger in the TouchPad zone. To flick, use three fingers to 3 o'clock. Rotating (select models only) Rotating allows you to 12 o'clock. NOTE: Three-finger... flicking must be done within the TouchPad zone. To rotate, anchor your right forefinger from 12 o'clock to touch the TouchPad zone in a sweeping motion, moving from 3 o'clock to navigate through screens or quickly scroll through ...
Getting Started Compaq Notebook - Windows 7
Page 52
..., 43 battery release latch 11 battery, replacing 25 Bluetooth label 43 buttons left TouchPad 5 power 6 right TouchPad 5 display 10 left side 9 right side 8 top 4 connector, power 8 D DC plug of external HP power supply 44 Digital Media Slot, identifying 9 display image, switching 19 display ...switch, internal 10 drive light 9 E esc key, identifying 7 external monitor port 9 F f11 37 flicking TouchPad gesture 24 fn key, identifying 7 H hard drive installing 28...
..., 43 battery release latch 11 battery, replacing 25 Bluetooth label 43 buttons left TouchPad 5 power 6 right TouchPad 5 display 10 left side 9 right side 8 top 4 connector, power 8 D DC plug of external HP power supply 44 Digital Media Slot, identifying 9 display image, switching 19 display ...switch, internal 10 drive light 9 E esc key, identifying 7 external monitor port 9 F f11 37 flicking TouchPad gesture 24 fn key, identifying 7 H hard drive installing 28...

Getting Started Compaq Notebook - Windows 7
Page 53
... identifying 9 O operating environment 45 operating system Microsoft Certificate of Authenticity label 43 Product Key 43 optical drive, identifying 8 P pinching TouchPad gesture 23 pointing devices, setting preferences 20 ports external monitor 9 HDMI 9 USB 8, 9 power button, identifying 6 power connector, ... cable 8 supported discs 36 system recovery 37 system restore points 41 T TouchPad buttons 5 using 20 TouchPad gestures flicking 24 pinching 23 rotating 24 scrolling 23 zooming 23 TouchPad light 4 TouchPad zone, identifying 4 traveling with the computer 43 U USB ports, identifying ...
... identifying 9 O operating environment 45 operating system Microsoft Certificate of Authenticity label 43 Product Key 43 optical drive, identifying 8 P pinching TouchPad gesture 23 pointing devices, setting preferences 20 ports external monitor 9 HDMI 9 USB 8, 9 power button, identifying 6 power connector, ... cable 8 supported discs 36 system recovery 37 system restore points 41 T TouchPad buttons 5 using 20 TouchPad gestures flicking 24 pinching 23 rotating 24 scrolling 23 zooming 23 TouchPad light 4 TouchPad zone, identifying 4 traveling with the computer 43 U USB ports, identifying ...
User Guide - Windows 7
Page 5
Table of contents 1 Starting right ...1 Best practices ...1 Fun things to do ...2 More HP resources ...3 2 Getting to know your computer ...4 Finding your hardware and software information 4 Right side ...4 Left side ...6 Display ...8 Top ...9 TouchPad ...9 Lights ...10 Buttons and speakers ...11 Keys ...12 Bottom ...13 Labels ...14 3 Connecting to a network ...15 Connecting to a wireless network ...16...
Table of contents 1 Starting right ...1 Best practices ...1 Fun things to do ...2 More HP resources ...3 2 Getting to know your computer ...4 Finding your hardware and software information 4 Right side ...4 Left side ...6 Display ...8 Top ...9 TouchPad ...9 Lights ...10 Buttons and speakers ...11 Keys ...12 Bottom ...13 Labels ...14 3 Connecting to a network ...15 Connecting to a wireless network ...16...

User Guide - Windows 7
Page 6
... keys ...28 Using the hot keys ...29 Using the keypad ...30 Using the integrated numeric keypad 30 Using the TouchPad ...31 Turning the TouchPad off or on 31 Navigating ...32 Selecting ...32 Using TouchPad gestures 33 Scrolling ...34 Pinching/Zooming 34 Rotating ...35 6 Managing power ...36 Using Sleep or Hibernation ...37 Initiating and...
... keys ...28 Using the hot keys ...29 Using the keypad ...30 Using the integrated numeric keypad 30 Using the TouchPad ...31 Turning the TouchPad off or on 31 Navigating ...32 Selecting ...32 Using TouchPad gestures 33 Scrolling ...34 Pinching/Zooming 34 Rotating ...35 6 Managing power ...36 Using Sleep or Hibernation ...37 Initiating and...

User Guide - Windows 7
Page 7
...42 Storing a user-replaceable battery 42 Disposing of a user-replaceable battery 43 Replacing a user-replaceable battery 43 Running on external power ...44 HP CoolSense ...45 Shutting down the computer ...45 7 Managing and sharing information ...46 Using a USB device ...46 Connecting a USB device 46 ...memory modules 56 Updating programs and drivers ...60 Cleaning your computer ...61 Cleaning the display, sides, and cover 61 Cleaning the TouchPad and keyboard 61 Traveling with or shipping your computer 62 9 Securing your computer and information 63 Locating your security software ...63 ...
...42 Storing a user-replaceable battery 42 Disposing of a user-replaceable battery 43 Replacing a user-replaceable battery 43 Running on external power ...44 HP CoolSense ...45 Shutting down the computer ...45 7 Managing and sharing information ...46 Using a USB device ...46 Connecting a USB device 46 ...memory modules 56 Updating programs and drivers ...60 Cleaning your computer ...61 Cleaning the display, sides, and cover 61 Cleaning the TouchPad and keyboard 61 Traveling with or shipping your computer 62 9 Securing your computer and information 63 Locating your security software ...63 ...

User Guide - Windows 7
Page 19
Functions like the left button on an external mouse. Top 9 Top TouchPad Component (1) (2) TouchPad on/off button TouchPad light (3) TouchPad zone (4) Left TouchPad button (5) Right TouchPad button Description Turns the TouchPad on or off. ● Amber: The TouchPad is off. ● Off: The TouchPad is on the screen. Functions like the right button on an external mouse. Moves the on-screen pointer and selects or activates items on .
Functions like the left button on an external mouse. Top 9 Top TouchPad Component (1) (2) TouchPad on/off button TouchPad light (3) TouchPad zone (4) Left TouchPad button (5) Right TouchPad button Description Turns the TouchPad on or off. ● Amber: The TouchPad is off. ● Off: The TouchPad is on the screen. Functions like the right button on an external mouse. Moves the on-screen pointer and selects or activates items on .

User Guide - Windows 7
Page 20
Hibernation is an energy-saving mode. Lights Component (1) Power light (2) Caps lock light (3) Mute light (4) Wireless light (5) TouchPad light Description ● White: The computer is on . 10 Chapter 2 Getting to know your computer The computer shuts off power to all capital ... (WLAN) device and/or a Bluetooth® device, is on. ● Amber: All wireless devices are off. ● Amber: The TouchPad is off. ● Off: The TouchPad is on . ● Blinking white: The computer is in the Sleep state, which switches the keys to the display and other unneeded components...
Hibernation is an energy-saving mode. Lights Component (1) Power light (2) Caps lock light (3) Mute light (4) Wireless light (5) TouchPad light Description ● White: The computer is on . 10 Chapter 2 Getting to know your computer The computer shuts off power to all capital ... (WLAN) device and/or a Bluetooth® device, is on. ● Amber: All wireless devices are off. ● Amber: The TouchPad is off. ● Off: The TouchPad is on . ● Blinking white: The computer is in the Sleep state, which switches the keys to the display and other unneeded components...


