
Safety and Regulatory Information Desktops, Thin Clients, and Personal Workstations
Page 16
... between 3 and 30 seconds of receipt of the personal information collected, the purpose for its collection, how it is disclosed to go on the equipment (PC) associated with this device for recording telephone conversations shall comply with New Zealand law. The equipment shall be set to ensure that it is to... one attempt and the beginning of the next attempt. Some parameters required for compliance with Telecom's Telepermit requirements are dependent on -hook for any single manual call initiation. d. Voice Support All persons using this device.
... between 3 and 30 seconds of receipt of the personal information collected, the purpose for its collection, how it is disclosed to go on the equipment (PC) associated with this device for recording telephone conversations shall comply with New Zealand law. The equipment shall be set to ensure that it is to... one attempt and the beginning of the next attempt. Some parameters required for compliance with Telecom's Telepermit requirements are dependent on -hook for any single manual call initiation. d. Voice Support All persons using this device.

Limited Warranty and Support Guide
Page 11
...; For automatically answered incoming calls: Incoming calls shall be easily accessible at all devices connected to a single line at any 30-minute period for a single manual call attempts to reduce the risk of an electric shock from any telecommunications systems (such as telephone lines), networks, or modems before opening the equipment...
...; For automatically answered incoming calls: Incoming calls shall be easily accessible at all devices connected to a single line at any 30-minute period for a single manual call attempts to reduce the risk of an electric shock from any telecommunications systems (such as telephone lines), networks, or modems before opening the equipment...

Getting Started Guide
Page 6
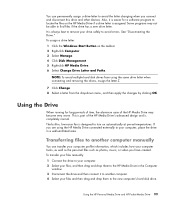
... the Drive 96 Inserting the Drive into an HP drive bay 96 Connecting the Drive to a Computer Without a Drive Bay 97 Locating the Drive and Assigning a Drive Letter 98 Using the Drive ...99 Transferring files to another computer manually 99 Disconnecting the Drive 100 Troubleshooting the HP Media Drive 101 vi Getting Started
... the Drive 96 Inserting the Drive into an HP drive bay 96 Connecting the Drive to a Computer Without a Drive Bay 97 Locating the Drive and Assigning a Drive Letter 98 Using the Drive ...99 Transferring files to another computer manually 99 Disconnecting the Drive 100 Troubleshooting the HP Media Drive 101 vi Getting Started
Getting Started Guide
Page 14
The network components may consist of the desktop, and then click Personalize. 2 Click the Display Settings. 3 If necessary, select the monitor, and then adjust the ...network (LAN) may include a hub or a switch, which device displays the computer desktop by pressing Alt+F5. A wired network uses Ethernet cables to all computer user manuals and warranty information in an easy-to connect the devices on the network. NOTE: ... and the router have an antenna and adapter that you press Alt+F5, the computer desktop appears on the network, included other devices among your documentation.
The network components may consist of the desktop, and then click Personalize. 2 Click the Display Settings. 3 If necessary, select the monitor, and then adjust the ...network (LAN) may include a hub or a switch, which device displays the computer desktop by pressing Alt+F5. A wired network uses Ethernet cables to all computer user manuals and warranty information in an easy-to connect the devices on the network. NOTE: ... and the router have an antenna and adapter that you press Alt+F5, the computer desktop appears on the network, included other devices among your documentation.

Getting Started Guide
Page 43
... Web You can find guides and information for your computer by using the Internet to access the Support Web site. 1 Go to http://www.hp.com/support in your Web browser. 2 Select your country/region and language. 3 Click Support and Drivers. 4 Click See support and troubleshooting information..., enter the model number of your computer, and then click Search . 5 Click Manuals. 6 Locate the manual you want, and then do one of the following: Click the title to display the file in the folder, your computer where you can...
... Web You can find guides and information for your computer by using the Internet to access the Support Web site. 1 Go to http://www.hp.com/support in your Web browser. 2 Select your country/region and language. 3 Click Support and Drivers. 4 Click See support and troubleshooting information..., enter the model number of your computer, and then click Search . 5 Click Manuals. 6 Locate the manual you want, and then do one of the following: Click the title to display the file in the folder, your computer where you can...
Getting Started Guide
Page 51
If you do so later by manually starting Easy Internet Services. See "Connecting to run Windows Vista Update monthly ... present. 4 Set up your computer by following the onscreen instructions. 6 Follow the onscreen instructions to register with HP or Compaq, sign up for updates, and get the latest updates for your computer. Turning On Your Computer for... the First Time After you are ready to finish, double-click the Easy Setup icon on the desktop to the Internet." 7 Norton Internet Security automatically opens. Turning On Your Computer for the First Time 43 Follow...
If you do so later by manually starting Easy Internet Services. See "Connecting to run Windows Vista Update monthly ... present. 4 Set up your computer by following the onscreen instructions. 6 Follow the onscreen instructions to register with HP or Compaq, sign up for updates, and get the latest updates for your computer. Turning On Your Computer for... the First Time After you are ready to finish, double-click the Easy Setup icon on the desktop to the Internet." 7 Norton Internet Security automatically opens. Turning On Your Computer for the First Time 43 Follow...

Getting Started Guide
Page 53
... is in sleep mode, it from sleep mode: Press the Sleep button on the keyboard, if it again. To put the computer into sleep mode manually: Press the Sleep button on the keyboard. To wake the computer from sleep mode, restart the computer. 1 Click the Windows Start Button on the front...
... is in sleep mode, it from sleep mode: Press the Sleep button on the keyboard, if it again. To put the computer into sleep mode manually: Press the Sleep button on the keyboard. To wake the computer from sleep mode, restart the computer. 1 Click the Windows Start Button on the front...

Getting Started Guide
Page 54
... the computer into sleep, hibernate, or away modes automatically when it is not present, you can set up your computer to go into hibernate mode manually: 1 Click the Windows Start Button on the taskbar. 2 Click the Arrow button next to Sleep. If the computer does not work properly when you turn...
... the computer into sleep, hibernate, or away modes automatically when it is not present, you can set up your computer to go into hibernate mode manually: 1 Click the Windows Start Button on the taskbar. 2 Click the Arrow button next to Sleep. If the computer does not work properly when you turn...

Getting Started Guide
Page 88
... the file. 5 Click Organize and Paste. When a file is deleted, it goes to the Recycle Bin and stays there until the Recycle Bin is emptied manually or it is to right-click the file and then click Delete. Or Right-click Windows Start Button on the taskbar, and then click Explore... to copy the item to retrieve the deleted file, see "Retrieving Files from the Recycle Bin. Copying Files 1 Click the Windows Start Button on your desktop. 2 Find the file you need to the new location. 80 Getting Started
... the file. 5 Click Organize and Paste. When a file is deleted, it goes to the Recycle Bin and stays there until the Recycle Bin is emptied manually or it is to right-click the file and then click Delete. Or Right-click Windows Start Button on the taskbar, and then click Explore... to copy the item to retrieve the deleted file, see "Retrieving Files from the Recycle Bin. Copying Files 1 Click the Windows Start Button on your desktop. 2 Find the file you need to the new location. 80 Getting Started
Getting Started Guide
Page 89
... finds the necessary printer driver for your particular printer to your computer. You can print text and graphics from your printer to the user manual that come with your printer. Managing Files 81 Using a Printer For instructions on the program menu bar, and click Print. 2 Select your... page range (for the printer. To print: 1 Click File on connecting and using the printer, refer to install the specific printer driver manually. Printers receive instructions from most software programs and Web sites if you have a printer connected to work with your computer, and if the ...
... finds the necessary printer driver for your particular printer to your computer. You can print text and graphics from your printer to the user manual that come with your printer. Managing Files 81 Using a Printer For instructions on the program menu bar, and click Print. 2 Select your... page range (for the printer. To print: 1 Click File on connecting and using the printer, refer to install the specific printer driver manually. Printers receive instructions from most software programs and Web sites if you have a printer connected to work with your computer, and if the ...
Getting Started Guide
Page 107
... connecting and removing the drives, assign the letter Z. 7 Click Change. 8 Select a letter from using the HP Media Drive connected externally to your computer, place the drive in a well-ventilated area. Also, it to another computer manually You can permanently assign a drive letter to avoid the letter changing when you connect and disconnect...
... connecting and removing the drives, assign the letter Z. 7 Click Change. 8 Select a letter from using the HP Media Drive connected externally to your computer, place the drive in a well-ventilated area. Also, it to another computer manually You can permanently assign a drive letter to avoid the letter changing when you connect and disconnect...
Getting Started Guide
Page 117
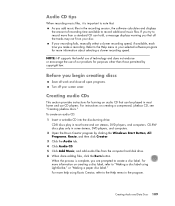
... and close all the tracks may not fit on your disc. For more information about selecting a slower recording speed. If your recording fails, manually select a slower recording speed, if available, each time you are prompted to create a disc label. Refer to the Help menu in most ... recording. To create an audio CD: 1 Insert a writable CD into the disc-burning drive. CD-R discs play only in the program. NOTE: HP supports the lawful use of technology and does not endorse or encourage the use of recording time available to record more information on creating a compressed...
... and close all the tracks may not fit on your disc. For more information about selecting a slower recording speed. If your recording fails, manually select a slower recording speed, if available, each time you are prompted to create a disc label. Refer to the Help menu in most ... recording. To create an audio CD: 1 Insert a writable CD into the disc-burning drive. CD-R discs play only in the program. NOTE: HP supports the lawful use of technology and does not endorse or encourage the use of recording time available to record more information on creating a compressed...
Getting Started Guide
Page 129
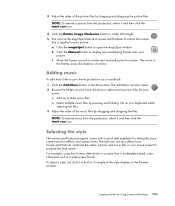
... and then click the trash can use also affects how muvee autoProducer combines the video, picture, and music files in the Music area. b Click the Manual button to rotate still images. 5 You can icon. Select multiple music files by Using muvee autoProducer 121 NOTE: To remove a picture from the production, select...
... and then click the trash can use also affects how muvee autoProducer combines the video, picture, and music files in the Music area. b Click the Manual button to rotate still images. 5 You can icon. Select multiple music files by Using muvee autoProducer 121 NOTE: To remove a picture from the production, select...
Getting Started Guide
Page 132
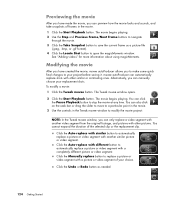
The Tweak muvee window opens. 2 Click the Start Playback button. Click the Manually replace button to replace a picture or video segment with other pictures. Click the Undo or Redo button as a picture file (.jpeg, .bmp, or .gif format). 4 ... video segment of your choice. Click the Auto-replace with similar button to modify the movie project: NOTE: In the Tweak muvee window, you can manually choose your project before saving it. Alternatively, you can only replace a video segment with another video segment from the original footage, and pictures with another...
The Tweak muvee window opens. 2 Click the Start Playback button. Click the Manually replace button to replace a picture or video segment with other pictures. Click the Undo or Redo button as a picture file (.jpeg, .bmp, or .gif format). 4 ... video segment of your choice. Click the Auto-replace with similar button to modify the movie project: NOTE: In the Tweak muvee window, you can manually choose your project before saving it. Alternatively, you can only replace a video segment with another video segment from the original footage, and pictures with another...
Getting Started Guide
Page 138
..., connecting a digital camera 4 H headphones using 31 Help and Support 36 home stereo system connecting to the PC 24 home videos 110, 118 HP Media Drive inserting a drive 96 HP Personal Media Drive 95 activity and power lights 96 automatic on and off feature 96 disconnecting the drive 100 location... Essential 74 HP Pocket Media Drive 95 HP Total Care Advisor 51 I Internet security 42, 71 K keyboard customizing buttons 59 shortcuts 59 types of buttons 53 using 53 L LAN 6 LAN antenna 9 local area network (LAN) 6 M magicSpot 121 manuals storing 6 memory card reader card types 89 in-use light 93...
..., connecting a digital camera 4 H headphones using 31 Help and Support 36 home stereo system connecting to the PC 24 home videos 110, 118 HP Media Drive inserting a drive 96 HP Personal Media Drive 95 activity and power lights 96 automatic on and off feature 96 disconnecting the drive 100 location... Essential 74 HP Pocket Media Drive 95 HP Total Care Advisor 51 I Internet security 42, 71 K keyboard customizing buttons 59 shortcuts 59 types of buttons 53 using 53 L LAN 6 LAN antenna 9 local area network (LAN) 6 M magicSpot 121 manuals storing 6 memory card reader card types 89 in-use light 93...
Troubleshooting and Maintenance Guide
Page 3
Table of Contents Maintenance 1 Creating Data Backup Discs 1 Creating System Recovery Discs 1 Removing Unused Programs 2 Running the Disk Cleanup Program 2 Running Disk Cleanup manually 2 Scheduling Disk Cleanup to run automatically 2 Running the Disk Defragmenter Program 3 Checking for Hard Disk Drive Errors 4 Understanding Hard Disk Drive Space 4 Recommended Maintenance Schedule 5 ...
Table of Contents Maintenance 1 Creating Data Backup Discs 1 Creating System Recovery Discs 1 Removing Unused Programs 2 Running the Disk Cleanup Program 2 Running Disk Cleanup manually 2 Scheduling Disk Cleanup to run automatically 2 Running the Disk Defragmenter Program 3 Checking for Hard Disk Drive Errors 4 Understanding Hard Disk Drive Space 4 Recommended Maintenance Schedule 5 ...

Troubleshooting and Maintenance Guide
Page 5
... your hard disk drive with your computer, you can restore it is an exact copy. Depending on your disc burning software, you may need to manually enable this feature (refer to its original factory settings using the Windows Explorer view to ensure it to the software documentation). If you create. TM...
... your hard disk drive with your computer, you can restore it is an exact copy. Depending on your disc burning software, you may need to manually enable this feature (refer to its original factory settings using the Windows Explorer view to ensure it to the software documentation). If you create. TM...
Troubleshooting and Maintenance Guide
Page 6
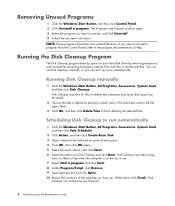
...have set . Running the Disk Cleanup Program The Disk Cleanup program frees up to finish deleting the selected files. You can run Disk Cleanup manually, or you can be saved. 2 Choose the files to run automatically. Disk Cleanup may take a long time, so select a time ...a program from the Control Panel, refer to remove, and click Uninstall. 4 Follow the onscreen instructions. When done, click Finish. Running Disk Cleanup manually 1 Click the Windows Start Button, All Programs, Accessories, System Tools, and then click Disk Cleanup. Scheduling Disk Cleanup to run automatically 1 Click the...
...have set . Running the Disk Cleanup Program The Disk Cleanup program frees up to finish deleting the selected files. You can run Disk Cleanup manually, or you can be saved. 2 Choose the files to run automatically. Disk Cleanup may take a long time, so select a time ...a program from the Control Panel, refer to remove, and click Uninstall. 4 Follow the onscreen instructions. When done, click Finish. Running Disk Cleanup manually 1 Click the Windows Start Button, All Programs, Accessories, System Tools, and then click Disk Cleanup. Scheduling Disk Cleanup to run automatically 1 Click the...
Troubleshooting and Maintenance Guide
Page 29
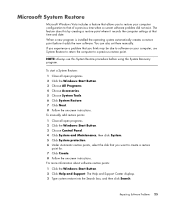
...Support. The Help and Support Center displays. 3 Type system restore into the Search box, and then click Search. Repairing Software Problems 25 To manually add restore points: 1 Close all open programs. 2 Click the Windows Start Button. 3 Choose Control Panel. 4 Click System and Maintenance, then... the disk that you to restore your computer, use this by creating a restore point where it adds the new software. You can also set them manually. To start a System Restore: 1 Close all open programs. 2 Click the Windows Start Button. 3 Choose All Programs. 4 Choose Accessories. 5 ...
...Support. The Help and Support Center displays. 3 Type system restore into the Search box, and then click Search. Repairing Software Problems 25 To manually add restore points: 1 Close all open programs. 2 Click the Windows Start Button. 3 Choose Control Panel. 4 Click System and Maintenance, then... the disk that you to restore your computer, use this by creating a restore point where it adds the new software. You can also set them manually. To start a System Restore: 1 Close all open programs. 2 Click the Windows Start Button. 3 Choose All Programs. 4 Choose Accessories. 5 ...


