Backup and Recovery - Windows Vista
Page 10
... pane, click System protection. 3. Click the System Protection tab. 4. Restore to a previous date and time To revert to create a restore point. 5. Click the System Restore button, and then click Next. Follow the on -screen instructions. In the left pane, click System protection. 3. Click the System Protection tab. 4. Create a system restore point...
... pane, click System protection. 3. Click the System Protection tab. 4. Restore to a previous date and time To revert to create a restore point. 5. Click the System Restore button, and then click Next. Follow the on -screen instructions. In the left pane, click System protection. 3. Click the System Protection tab. 4. Create a system restore point...
Backup and Recovery - Windows Vista
Page 11
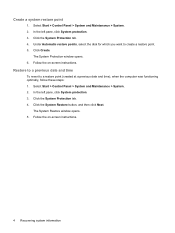
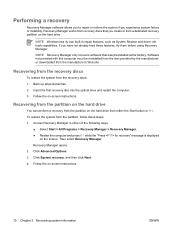
NOTE: Windows has its own built-in either the Start button or f11. NOTE: Recovery Manager recovers only software that was preinstalled at the factory. Follow the on the screen. Access Recovery Manager in repair features, ... Recovery Manager. Recovering from the partition on the hard drive You can only recover files that you experience system failure or instability. Click Advanced Options. 3. HP recommends that you use Recovery Manager to repair or restore the system if you have not already tried these steps: 1. Performing a recovery NOTE: You can...
NOTE: Windows has its own built-in either the Start button or f11. NOTE: Recovery Manager recovers only software that was preinstalled at the factory. Follow the on the screen. Access Recovery Manager in repair features, ... Recovery Manager. Recovering from the partition on the hard drive You can only recover files that you experience system failure or instability. Click Advanced Options. 3. HP recommends that you use Recovery Manager to repair or restore the system if you have not already tried these steps: 1. Performing a recovery NOTE: You can...

Drives - Windows Vista
Page 11
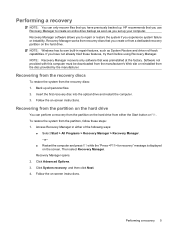
... normal. NOTE: After you have not selected a media player, an AutoPlay dialog box opens. Inserting an optical disc 1. Close the media tray. Press the release button (1) on the computer. 2. Pull out the tray (2). 4. Turn on the drive bezel to position it over the tray spindle. If you insert a disc, a short pause...
... normal. NOTE: After you have not selected a media player, an AutoPlay dialog box opens. Inserting an optical disc 1. Close the media tray. Press the release button (1) on the computer. 2. Pull out the tray (2). 4. Turn on the drive bezel to position it over the tray spindle. If you insert a disc, a short pause...
Drives - Windows Vista
Page 12
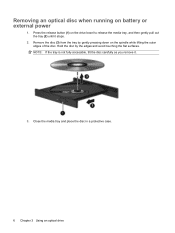
Removing an optical disc when running on the spindle while lifting the outer edges of the disc. Remove the disc (3) from the tray by the edges and avoid touching the flat surfaces. Hold the disc by gently pressing down on battery or external power 1. NOTE: If the tray is not fully accessible, tilt the disc carefully as you remove it stops. 2. Close the media tray and place the disc in a protective case. 6 Chapter 3 Using an optical drive Press the release button (1) on the drive bezel to release the media tray, and then gently pull out the tray (2) until it . 3.
Removing an optical disc when running on the spindle while lifting the outer edges of the disc. Remove the disc (3) from the tray by the edges and avoid touching the flat surfaces. Hold the disc by gently pressing down on battery or external power 1. NOTE: If the tray is not fully accessible, tilt the disc carefully as you remove it stops. 2. Close the media tray and place the disc in a protective case. 6 Chapter 3 Using an optical drive Press the release button (1) on the drive bezel to release the media tray, and then gently pull out the tray (2) until it . 3.
Drives - Windows Vista
Page 15
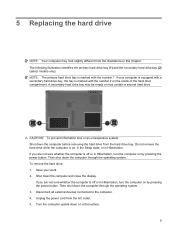
...bay (1) and the secondary hard drive bay (2) (select models only). Do not remove the hard drive while the computer is on by pressing the power button. Save your computer is equipped with a secondary hard drive bay, the bay is off or in Hibernation, turn the computer on , in the Sleep ...state, or in Hibernation. If you are not sure whether the computer is marked with the number 2 on by pressing the power button. CAUTION: To prevent information loss or an unresponsive system: Shut down the computer before removing the hard drive from the AC outlet. 5. NOTE: The ...
...bay (1) and the secondary hard drive bay (2) (select models only). Do not remove the hard drive while the computer is on by pressing the power button. Save your computer is equipped with a secondary hard drive bay, the bay is off or in Hibernation, turn the computer on , in the Sleep ...state, or in Hibernation. If you are not sure whether the computer is marked with the number 2 on by pressing the power button. CAUTION: To prevent information loss or an unresponsive system: Shut down the computer before removing the hard drive from the AC outlet. 5. NOTE: The ...

Memory Modules - Windows Vista
Page 7
...arrow next to the computer. 5. Disconnect all batteries before shutdown is off or in Hibernation, turn the computer on by pressing the power button. The memory capacity of the computer. If you are not sure whether the computer is possible. Turn the computer upside down the computer ... memory modules are discharged of electric shock and damage to the equipment, unplug the power cord and remove all external devices connected to the Lock button, and then click Shut Down. 3. Unplug the power cord from the computer. 8. To add or replace a memory module: 1. Remove the battery...
...arrow next to the computer. 5. Disconnect all batteries before shutdown is off or in Hibernation, turn the computer on by pressing the power button. The memory capacity of the computer. If you are not sure whether the computer is possible. Turn the computer upside down the computer ... memory modules are discharged of electric shock and damage to the equipment, unplug the power cord and remove all external devices connected to the Lock button, and then click Shut Down. 3. Unplug the power cord from the computer. 8. To add or replace a memory module: 1. Remove the battery...
Notebook Tour - Windows Vista
Page 5
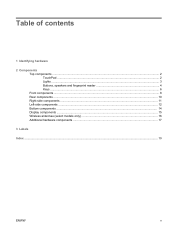
Table of contents 1 Identifying hardware 2 Components Top components ...2 TouchPad ...2 Lights ...3 Buttons, speakers and fingerprint reader 4 Keys ...6 Front components ...8 Rear components ...10 Right-side components ...11 Left-side components ...12 Bottom components ...14 Display components ...15 Wireless antennae (select models only 16 Additional hardware components ...17 3 Labels Index ...19 ENWW v
Table of contents 1 Identifying hardware 2 Components Top components ...2 TouchPad ...2 Lights ...3 Buttons, speakers and fingerprint reader 4 Keys ...6 Front components ...8 Rear components ...10 Right-side components ...11 Left-side components ...12 Bottom components ...14 Display components ...15 Wireless antennae (select models only 16 Additional hardware components ...17 3 Labels Index ...19 ENWW v
Notebook Tour - Windows Vista
Page 8
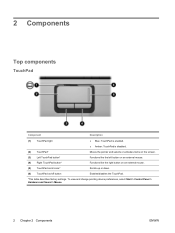
...: TouchPad is enabled. ● Amber: TouchPad is disabled. (2) TouchPad* Moves the pointer and selects or activates items on the screen. (3) Left TouchPad button* Functions like the left button on an external mouse. (4) Right TouchPad button* Functions like the right button on an external mouse. (5) TouchPad scroll zone* Scrolls up or down. (6) TouchPad on/off...
...: TouchPad is enabled. ● Amber: TouchPad is disabled. (2) TouchPad* Moves the pointer and selects or activates items on the screen. (3) Left TouchPad button* Functions like the left button on an external mouse. (4) Right TouchPad button* Functions like the right button on an external mouse. (5) TouchPad scroll zone* Scrolls up or down. (6) TouchPad on/off...
Notebook Tour - Windows Vista
Page 9
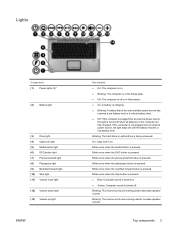
...is in the Sleep state. ● Off: The computer is off or in the computer are fully charged. Blinks once when the next/fast forward button is turned off when all batteries in Hibernation. ● On: A battery is charging. ● Blinking: A battery that is the only available ... Computer sound is turned on . On: Caps lock is pressed. Blinks once when the play/pause button is on . ● Amber: Computer sound is pressed. Blinks once when the previous/rewind button is being used to decrease speaker volume. Blinking: The volume scroll zone is being used to increase speaker...
...is in the Sleep state. ● Off: The computer is off or in the computer are fully charged. Blinks once when the next/fast forward button is turned off when all batteries in Hibernation. ● On: A battery is charging. ● Blinking: A battery that is the only available ... Computer sound is turned on . On: Caps lock is pressed. Blinks once when the play/pause button is on . ● Amber: Computer sound is pressed. Blinks once when the previous/rewind button is being used to decrease speaker volume. Blinking: The volume scroll zone is being used to increase speaker...
Notebook Tour - Windows Vista
Page 10
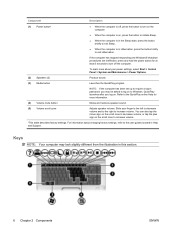
... the computer is off the computer. If the computer has stopped responding and Windows® shutdown procedures are ineffective, press and hold the power button for at least 5 seconds to exit Hibernation. ENWW To learn more about your computer. Launches the QuickPlay program. The light on or the ...embedded numeric keypad is in Hibernation, press the button briefly to turn off , press the button to turn on the computer. ● When the computer is on the front of the computer is visible whether the ...
... the computer is off the computer. If the computer has stopped responding and Windows® shutdown procedures are ineffective, press and hold the power button for at least 5 seconds to exit Hibernation. ENWW To learn more about your computer. Launches the QuickPlay program. The light on or the ...embedded numeric keypad is in Hibernation, press the button briefly to turn off , press the button to turn on the computer. ● When the computer is on the front of the computer is visible whether the ...
Notebook Tour - Windows Vista
Page 11
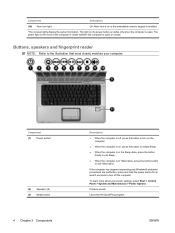
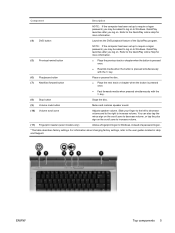
...Support. For information about changing factory settings, refer to increase volume. Refer to the QuickPlay online Help for more information. (4) DVD button Launches the DVD playback feature of a password logon. *This table describes factory settings. ENWW Top components 5 You can also tap the... volume. (11) Fingerprint reader (select models only) Allows a fingerprint logon to Windows, instead of the QuickPlay program. (5) Previous/rewind button NOTE: If the computer has been set up to require a logon password, you may be asked to log on to Windows. Component ...
...Support. For information about changing factory settings, refer to increase volume. Refer to the QuickPlay online Help for more information. (4) DVD button Launches the DVD playback feature of a password logon. *This table describes factory settings. ENWW Top components 5 You can also tap the... volume. (11) Fingerprint reader (select models only) Allows a fingerprint logon to Windows, instead of the QuickPlay program. (5) Previous/rewind button NOTE: If the computer has been set up to require a logon password, you may be asked to log on to Windows. Component ...
Notebook Tour - Windows Vista
Page 12
... volume and to the right to the user guides located in Help and Support. To learn more information. (4) Volume mute button Mutes and restores speaker sound. (5) Volume scroll zone Adjusts speaker volume. QuickPlay launches after you may look slightly different from the... illustration in Hibernation, press the button briefly to exit Hibernation. Refer to increase volume. *This table describes factory settings. Keys NOTE: Your computer may be asked to ...
... volume and to the right to the user guides located in Help and Support. To learn more information. (4) Volume mute button Mutes and restores speaker sound. (5) Volume scroll zone Adjusts speaker volume. QuickPlay launches after you may look slightly different from the... illustration in Hibernation, press the button briefly to exit Hibernation. Refer to increase volume. *This table describes factory settings. Keys NOTE: Your computer may be asked to ...
Notebook Tour - Windows Vista
Page 25
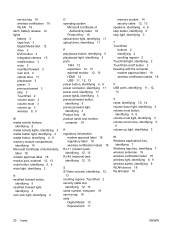
...bay, identifying 14 battery light, identifying 3 battery release latch, identifying 14 battery, identifying 17 bays battery 14, 18 hard drive 14 Bluetooth label 18 buttons DVD 5 media 4, 6 next/fast forward 5 play/pause 5 power 4, 6 previous/rewind 5 stop 5 TouchPad 2 TouchPad on/off 2 volume ...Digital Media Slot, identifying 12 display switch, identifying 15 drive light, identifying 3 drives hard drive 14 optical drive 11 DVD button light, identifying 3 DVD button, identifying 5 E esc key, identifying 7 expansion port, identifying 12, 13 ExpressCard slot, identifying 11 external monitor port, ...
...bay, identifying 14 battery light, identifying 3 battery release latch, identifying 14 battery, identifying 17 bays battery 14, 18 hard drive 14 Bluetooth label 18 buttons DVD 5 media 4, 6 next/fast forward 5 play/pause 5 power 4, 6 previous/rewind 5 stop 5 TouchPad 2 TouchPad on/off 2 volume ...Digital Media Slot, identifying 12 display switch, identifying 15 drive light, identifying 3 drives hard drive 14 optical drive 11 DVD button light, identifying 3 DVD button, identifying 5 E esc key, identifying 7 expansion port, identifying 12, 13 ExpressCard slot, identifying 11 external monitor port, ...
Notebook Tour - Windows Vista
Page 26
...stop 3 TouchPad 2 volume down 3 volume mute 3 volume up 3 wireless 8, 9 M media activity buttons, identifying 5 media activity lights, identifying 3 media button light, identifying 3 media button, identifying 4, 6 memory module compartment, identifying 14 Microsoft Certificate of Authenticity label 18 modem approval label 18... labels 18 U USB ports, identifying 11, 12, 13 V vents, identifying 10, 14 volume down light, identifying 3 volume mute button, identifying 5, 6 volume mute light, identifying 3 volume scroll zone, identifying 5, 6 volume up light, identifying 3 W Windows applications ...
...stop 3 TouchPad 2 volume down 3 volume mute 3 volume up 3 wireless 8, 9 M media activity buttons, identifying 5 media activity lights, identifying 3 media button light, identifying 3 media button, identifying 4, 6 memory module compartment, identifying 14 Microsoft Certificate of Authenticity label 18 modem approval label 18... labels 18 U USB ports, identifying 11, 12, 13 V vents, identifying 10, 14 volume down light, identifying 3 volume mute button, identifying 5, 6 volume mute light, identifying 3 volume scroll zone, identifying 5, 6 volume up light, identifying 3 W Windows applications ...
Setup Utility - Windows Vista
Page 10
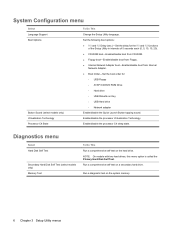
...) Memory Test To Do This Run a comprehensive self-test on the system memory. 6 Chapter 3 Setup Utility menus System Configuration menu Select Language Support Boot Options Button Sound (select models only) Virtualization Technology Processor C4 State To Do This Change the Setup Utility language. Enable/disable the processor Virtualization Technology. Run a diagnostic.... Enable/disable the processor C4 sleep state. Run a comprehensive self-test on Key ◦ USB Hard drive ◦ Network adapter Enable/disable the Quick Launch Button tapping sound.
...) Memory Test To Do This Run a comprehensive self-test on the system memory. 6 Chapter 3 Setup Utility menus System Configuration menu Select Language Support Boot Options Button Sound (select models only) Virtualization Technology Processor C4 State To Do This Change the Setup Utility language. Enable/disable the processor Virtualization Technology. Run a diagnostic.... Enable/disable the processor C4 sleep state. Run a comprehensive self-test on Key ◦ USB Hard drive ◦ Network adapter Enable/disable the Quick Launch Button tapping sound.

Setup Utility - Windows Vista
Page 11
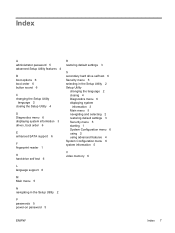
Index A administrator password 5 advanced Setup Utility features 4 B boot options 6 boot order 6 button sound 6 C changing the Setup Utility language 2 closing the Setup Utility 4 D Diagnostics menu 6 displaying system information 3 drives, boot order 6 F fingerprint reader 1 S secondary hard drive self test 6 ...
Index A administrator password 5 advanced Setup Utility features 4 B boot options 6 boot order 6 button sound 6 C changing the Setup Utility language 2 closing the Setup Utility 4 D Diagnostics menu 6 displaying system information 3 drives, boot order 6 F fingerprint reader 1 S secondary hard drive self test 6 ...

Setup Utility - Windows Vista and XP
Page 10
System Configuration menu Select Language Support Enhanced SATA support (select models only) Boot Options Button Sound (select models only) Video memory up to (select models only) To Do This Change the Setup Utility language. Set the following boot options: ● ...; ATAPI CD/DVD ROM Drive ● Hard drive ● USB Diskette on Key ● USB Hard drive ● Network adapter Enable/disable the Quick Launch Button tapping sound. Select the amount of 5 seconds each (0. 5, 10, 15, 20). ● CD-ROM boot―Enable/disable boot from CD-ROM. ● Floppy boot...
System Configuration menu Select Language Support Enhanced SATA support (select models only) Boot Options Button Sound (select models only) Video memory up to (select models only) To Do This Change the Setup Utility language. Set the following boot options: ● ...; ATAPI CD/DVD ROM Drive ● Hard drive ● USB Diskette on Key ● USB Hard drive ● Network adapter Enable/disable the Quick Launch Button tapping sound. Select the amount of 5 seconds each (0. 5, 10, 15, 20). ● CD-ROM boot―Enable/disable boot from CD-ROM. ● Floppy boot...
Setup Utility - Windows Vista and XP
Page 11
Index A administrator password 5 advanced Setup Utility features 4 B boot options 6 boot order 6 button sound 6 C changing the Setup Utility language 2 closing the Setup Utility 4 D Diagnostics menu 6 displaying system information 3 drives, boot order 6 E enhanced SATA support 6 F fingerprint reader 1 H hard drive ...
Index A administrator password 5 advanced Setup Utility features 4 B boot options 6 boot order 6 button sound 6 C changing the Setup Utility language 2 closing the Setup Utility 4 D Diagnostics menu 6 displaying system information 3 drives, boot order 6 E enhanced SATA support 6 F fingerprint reader 1 H hard drive ...

Software Update, Backup, and Recovery - Windows Vista
Page 11
... a restore point and then change your system, you are creating a system restore point. Select Start > Control Panel > System and Maintenance > System. 2. Click the System Restore button, and then click Next. You also can create additional restore points to provide increased protection for which you want to reverse subsequent changes made to...
... a restore point and then change your system, you are creating a system restore point. Select Start > Control Panel > System and Maintenance > System. 2. Click the System Restore button, and then click Next. You also can create additional restore points to provide increased protection for which you want to reverse subsequent changes made to...
Software Update, Backup, and Recovery - Windows Vista
Page 14
.... 4. Follow the on -screen instructions. 10 Chapter 2 Recovering system information ENWW Then select Recovery Manager. NOTE Windows has its own built-in either the Start button or f11. Insert the first recovery disc into the optical drive and restart the computer. 3. Click Advanced Options. 3. Software not provided with this computer must...
.... 4. Follow the on -screen instructions. 10 Chapter 2 Recovering system information ENWW Then select Recovery Manager. NOTE Windows has its own built-in either the Start button or f11. Insert the first recovery disc into the optical drive and restart the computer. 3. Click Advanced Options. 3. Software not provided with this computer must...


