User Guide
Page 8
... a battery ...70 Disposing of a used battery 71 Replacing the battery ...71 Shutting down the computer ...71 6 Drives ...73 Handling drives ...73 Using external drives ...74 Improving hard drive performance ...75 Using Disk Defragmenter 75 Using Disk Cleanup ...75 Replacing the hard drive ...76 7 External devices and external media cards 80 Using a USB device ...80 Connecting a USB device...
... a battery ...70 Disposing of a used battery 71 Replacing the battery ...71 Shutting down the computer ...71 6 Drives ...73 Handling drives ...73 Using external drives ...74 Improving hard drive performance ...75 Using Disk Defragmenter 75 Using Disk Cleanup ...75 Replacing the hard drive ...76 7 External devices and external media cards 80 Using a USB device ...80 Connecting a USB device...
User Guide
Page 18
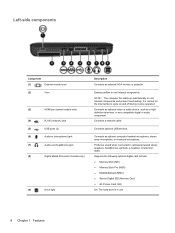
...is in (microphone) jack (7) Audio-out (headphone) jack (8) Digital Media Slot (select models only) (9) Drive light Description Connects an external VGA monitor or projector. Connects an optional computer headset microphone, stereo array microphone, ... Memory Stick Pro (MSP) ● MultiMediaCard (MMC) ● Secure Digital (SD) Memory Card ● xD-Picture Card (XD) On: The hard drive is normal for the internal fan to cool internal components and prevent overheating. Connects optional USB devices. Connects a network cable. Left-side components Component (1) External...
...is in (microphone) jack (7) Audio-out (headphone) jack (8) Digital Media Slot (select models only) (9) Drive light Description Connects an external VGA monitor or projector. Connects an optional computer headset microphone, stereo array microphone, ... Memory Stick Pro (MSP) ● MultiMediaCard (MMC) ● Secure Digital (SD) Memory Card ● xD-Picture Card (XD) On: The hard drive is normal for the internal fan to cool internal components and prevent overheating. Connects optional USB devices. Connects a network cable. Left-side components Component (1) External...

User Guide
Page 19
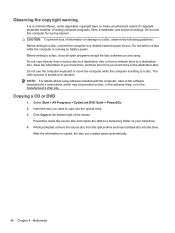
...computer fan starts up automatically to restore computer functionality, and then contact technical support through Help and Support. Holds the hard drive. Components 9 If you replace the module and then receive a warning message, remove the module to cool internal components...battery from the battery bay. Bottom components Component (1) (2) Battery bay Battery release latch (3) Vents (4) (4) Memory module compartment (5) Hard drive bay Description Holds the battery. CAUTION: To prevent an unresponsive system, replace the wireless module only with a wireless module authorized ...
...computer fan starts up automatically to restore computer functionality, and then contact technical support through Help and Support. Holds the hard drive. Components 9 If you replace the module and then receive a warning message, remove the module to cool internal components...battery from the battery bay. Bottom components Component (1) (2) Battery bay Battery release latch (3) Vents (4) (4) Memory module compartment (5) Hard drive bay Description Holds the battery. CAUTION: To prevent an unresponsive system, replace the wireless module only with a wireless module authorized ...

User Guide
Page 52
...the following : ● Distributing large presentations ● Sharing scanned and digital photos, video clips, and written data ● Making your hard drive to store large projects that cannot be erased or written over . DVD±RW discs Use DVD±RW discs if you want to ...Typical uses include the following : ● Developing and maintaining large documents and project files ● Transporting work files ● Making weekly backups of hard drive files ● Updating photos, video, audio, and data continuously DVD±R discs Use blank DVD±R discs to a CD or DVD that ...
...the following : ● Distributing large presentations ● Sharing scanned and digital photos, video clips, and written data ● Making your hard drive to store large projects that cannot be erased or written over . DVD±RW discs Use DVD±RW discs if you want to ...Typical uses include the following : ● Developing and maintaining large documents and project files ● Transporting work files ● Making weekly backups of hard drive files ● Updating photos, video, audio, and data continuously DVD±R discs Use blank DVD±R discs to a CD or DVD that ...
User Guide
Page 56
... with the computer, refer to a destination disc. Save the information to your hard drive, and then burn from your hard drive. 4. Copying a CD or DVD 1. When prompted, remove the source disc from a network drive to the software manufacturer's instructions, which may be provided on disc, in the.... Do not use this computer for such purposes. Power2Go reads the source disc and copies the data to a temporary folder on your hard drive to a disc, close all open programs except the disc software you created ejects automatically. 46 Chapter 4 Multimedia The write process is ...
... with the computer, refer to a destination disc. Save the information to your hard drive, and then burn from your hard drive. 4. Copying a CD or DVD 1. When prompted, remove the source disc from a network drive to the software manufacturer's instructions, which may be provided on disc, in the.... Do not use this computer for such purposes. Power2Go reads the source disc and copies the data to a temporary folder on your hard drive to a disc, close all open programs except the disc software you created ejects automatically. 46 Chapter 4 Multimedia The write process is ...

User Guide
Page 57
... files to a CD or DVD that contains the blank optical disc. 7. Do not use . Insert a blank CD or DVD into a folder on your hard drive. 2. To burn video files to a CD or DVD, use software such as Windows Media Player or CyberLink Power2Go to create-data, audio, or video. ... can be played only on MP3 players or on computers with MP3 software installed. Download or copy the source files into the optical drive. 3. Optical drive 47 Observe the copyright warning. NOTE: Some programs may be provided with your DVD player for a list of copyright-protected material, including computer...
... files to a CD or DVD that contains the blank optical disc. 7. Do not use . Insert a blank CD or DVD into a folder on your hard drive. 2. To burn video files to a CD or DVD, use software such as Windows Media Player or CyberLink Power2Go to create-data, audio, or video. ... can be played only on MP3 players or on computers with MP3 software installed. Download or copy the source files into the optical drive. 3. Optical drive 47 Observe the copyright warning. NOTE: Some programs may be provided with your DVD player for a list of copyright-protected material, including computer...
User Guide
Page 59
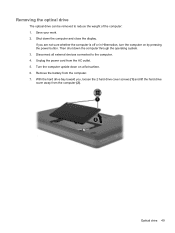
... computer. 7. Disconnect all external devices connected to reduce the weight of the computer: 1. Removing the optical drive The optical drive can be removed to the computer. 4. Shut down the computer through the operating system. 3. With the hard drive bay toward you are not sure whether the computer is off or in Hibernation, turn the...
... computer. 7. Disconnect all external devices connected to reduce the weight of the computer: 1. Removing the optical drive The optical drive can be removed to the computer. 4. Shut down the computer through the operating system. 3. With the hard drive bay toward you are not sure whether the computer is off or in Hibernation, turn the...

User Guide
Page 61
Replace the battery, turn the computer over, and turn on the computer, close the hard drive cover (2), and tighten the hard drive screws (3). 12. Replace the security screw. 11. Reconnect external power and external devices. 13. 10. Optical drive 51 Align the tabs (1) on the hard drive cover with the notches on the computer.
Replace the battery, turn the computer over, and turn on the computer, close the hard drive cover (2), and tighten the hard drive screws (3). 12. Replace the security screw. 11. Reconnect external power and external devices. 13. 10. Optical drive 51 Align the tabs (1) on the hard drive cover with the notches on the computer.
User Guide
Page 67
... external devices, such as the secondary display. b. A movie is not visible on the source disc to your hard drive. ● Reinstall the disc-burning device driver located in the DVD/CD-ROM drives category in this setting is inserted properly. ● Select a slower write speed and try again. ● If...● Turn off the Internet. ◦ Change the color properties of disc for more times to a new disc, and then burn from your hard drive before completion ● Be sure that all other programs are turned on a blank area of burning a disc does not begin, or it stops ...
... external devices, such as the secondary display. b. A movie is not visible on the source disc to your hard drive. ● Reinstall the disc-burning device driver located in the DVD/CD-ROM drives category in this setting is inserted properly. ● Select a slower write speed and try again. ● If...● Turn off the Internet. ◦ Change the color properties of disc for more times to a new disc, and then burn from your hard drive before completion ● Be sure that all other programs are turned on a blank area of burning a disc does not begin, or it stops ...
User Guide
Page 69
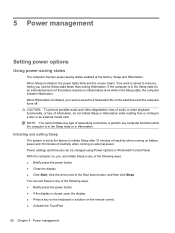
Follow the on your computer after the installation is displayed, click an updated driver to do so, restart your hard drive. Click your computer model number in the search box, and then press enter. 3. If prompted to open a window containing additional information. 6. or - ... products. Click Start > All Programs > Windows Update. Click Install now to install. 7. NOTE: If you have not previously set to http://www.hp.com/support, and select your computer. Click the option for updates. 2. When the list of drivers is complete, and then verify the operation of ...
Follow the on your computer after the installation is displayed, click an updated driver to do so, restart your hard drive. Click your computer model number in the search box, and then press enter. 3. If prompted to open a window containing additional information. 6. or - ... products. Click Start > All Programs > Windows Update. Click Install now to install. 7. NOTE: If you have not previously set to http://www.hp.com/support, and select your computer. Click the option for updates. 2. When the list of drivers is complete, and then verify the operation of ...
User Guide
Page 70
... following ways: ● Briefly press the power button. ● If the display is set at the factory: Sleep and Hibernation. With the computer on the hard drive and the computer turns off. Initiating and exiting Sleep The system is closed, open the display. ● Press a key on the keyboard or a button on...
... following ways: ● Briefly press the power button. ● If the display is set at the factory: Sleep and Hibernation. With the computer on the hard drive and the computer turns off. Initiating and exiting Sleep The system is closed, open the display. ● Press a key on the keyboard or a button on...

User Guide
Page 79
.... 6. Leave the computer plugged into the computer. 2. Insert the battery into external power until the battery is fully charged. Record the Turn off automatically. ◦ Hard drive speed will discharge faster while you plan to Never. 5.
.... 6. Leave the computer plugged into the computer. 2. Insert the battery into external power until the battery is fully charged. Record the Turn off automatically. ◦ Hard drive speed will discharge faster while you plan to Never. 5.

User Guide
Page 83
..., or in a bubble-pack mailer or other suitable protective packaging and label the package "FRAGILE." An external hard drive must be mailed, place the drive in Hibernation, turn the computer on an external device such as conveyor belts, use excessive force when inserting...Refer to the following cautions before writing to clear, or properly disconnect the external hard drive. Do not spray the drive with , shipping, or storing a drive. Remove media from a drive before removing the drive from the drive bay, or traveling with cleaning products. If you move the computer while the...
..., or in a bubble-pack mailer or other suitable protective packaging and label the package "FRAGILE." An external hard drive must be mailed, place the drive in Hibernation, turn the computer on an external device such as conveyor belts, use excessive force when inserting...Refer to the following cautions before writing to clear, or properly disconnect the external hard drive. Do not spray the drive with , shipping, or storing a drive. Remove media from a drive before removing the drive from the drive bay, or traveling with cleaning products. If you move the computer while the...
User Guide
Page 84
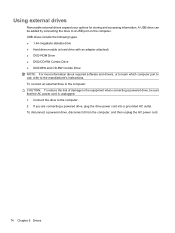
... be sure that the AC power cord is unplugged. 1. USB drives include the following types: ● 1.44-megabyte diskette drive ● Hard drive module (a hard drive with an adapter attached) ● DVD-ROM Drive ● DVD/CD-RW Combo Drive ● DVD±RW and CD-RW Combo Drive NOTE: For more information about required software and drivers, or...
... be sure that the AC power cord is unplugged. 1. USB drives include the following types: ● 1.44-megabyte diskette drive ● Hard drive module (a hard drive with an adapter attached) ● DVD-ROM Drive ● DVD/CD-RW Combo Drive ● DVD±RW and CD-RW Combo Drive NOTE: For more information about required software and drivers, or...
User Guide
Page 85
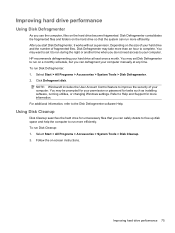
... without supervision. Click Defragment disk. To run Disk Defragmenter: 1. Using Disk Cleanup Disk Cleanup searches the hard drive for unnecessary files that the system can run more information. Improving hard drive performance 75 You may take more efficiently. HP recommends defragmenting your computer. For additional information, refer to run more than an hour to your...
... without supervision. Click Defragment disk. To run Disk Defragmenter: 1. Using Disk Cleanup Disk Cleanup searches the hard drive for unnecessary files that the system can run more information. Improving hard drive performance 75 You may take more efficiently. HP recommends defragmenting your computer. For additional information, refer to run more than an hour to your...
User Guide
Page 86
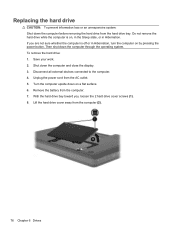
... from the computer (2). 76 Chapter 6 Drives Do not remove the hard drive while the computer is off or in Hibernation. To remove the hard drive: 1. Turn the computer upside down on by pressing the power button. With the hard drive bay toward you are not sure whether the... Save your work. 2. Disconnect all external devices connected to the computer. 4. Replacing the hard drive CAUTION: To prevent information loss or an unresponsive system: Shut down the computer before removing the hard drive from the computer. 7. Then shut down the computer and close the display. 3. Remove ...
... from the computer (2). 76 Chapter 6 Drives Do not remove the hard drive while the computer is off or in Hibernation. To remove the hard drive: 1. Turn the computer upside down on by pressing the power button. With the hard drive bay toward you are not sure whether the... Save your work. 2. Disconnect all external devices connected to the computer. 4. Replacing the hard drive CAUTION: To prevent information loss or an unresponsive system: Shut down the computer before removing the hard drive from the computer. 7. Then shut down the computer and close the display. 3. Remove ...
User Guide
Page 87
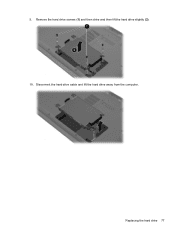
Replacing the hard drive 77 Remove the hard drive screws (1) and then drive and then lift the hard drive slightly (2). 10. Disconnect the hard drive cable and lift the hard drive away from the computer. 9.
Replacing the hard drive 77 Remove the hard drive screws (1) and then drive and then lift the hard drive slightly (2). 10. Disconnect the hard drive cable and lift the hard drive away from the computer. 9.
User Guide
Page 88
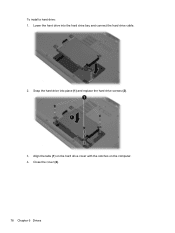
Lower the hard drive into place (1) and replace the hard drive screws (2). 3. Close the cover (2). 78 Chapter 6 Drives Align the tabs (1) on the hard drive cover with the notches on the computer. 4. Snap the hard drive into the hard drive bay and connect the hard drive cable. 2. To install a hard drive: 1.
Lower the hard drive into place (1) and replace the hard drive screws (2). 3. Close the cover (2). 78 Chapter 6 Drives Align the tabs (1) on the hard drive cover with the notches on the computer. 4. Snap the hard drive into the hard drive bay and connect the hard drive cable. 2. To install a hard drive: 1.

User Guide
Page 89
Turn on the computer. Replacing the hard drive 79 Replace the battery. 7. Tighten the hard drive cover screws (3). 6. Turn the computer right-side up, and then reconnect external power and external devices. 8. 5.
Turn on the computer. Replacing the hard drive 79 Replace the battery. 7. Tighten the hard drive cover screws (3). 6. Turn the computer right-side up, and then reconnect external power and external devices. 8. 5.
User Guide
Page 109
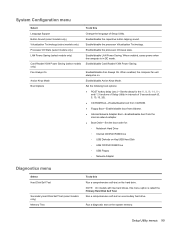
... the delay for : ◦ Notebook Hard Drive ◦ Internal CD/DVD ROM Drive ◦ USB Diskette on Key/USB Hard Disk ◦ USB CD/DVD ROM Drive ◦ USB Floppy ◦ Network Adapter Diagnostics menu Select Hard Disk Self Test Secondary Hard Disk Self Test (select models only) ... Always On. When enabled, the computer fan will always be on a secondary hard drive. Enable/disable Action Keys Mode. NOTE: On models with two hard drives, this Run a comprehensive self-test on the hard drive. Enable/disable LAN Power Saving. Enable/disable the capacitive button tapping sound. When...
... the delay for : ◦ Notebook Hard Drive ◦ Internal CD/DVD ROM Drive ◦ USB Diskette on Key/USB Hard Disk ◦ USB CD/DVD ROM Drive ◦ USB Floppy ◦ Network Adapter Diagnostics menu Select Hard Disk Self Test Secondary Hard Disk Self Test (select models only) ... Always On. When enabled, the computer fan will always be on a secondary hard drive. Enable/disable Action Keys Mode. NOTE: On models with two hard drives, this Run a comprehensive self-test on the hard drive. Enable/disable LAN Power Saving. Enable/disable the capacitive button tapping sound. When...


