User Guide
Page 8
... the computer cannot exit Hibernation 68 Calibrating a battery ...68 Step 1: Fully charge the battery 68 Step 2: Disable Hibernation and Sleep 69 Step 3: Discharge the battery 69 Step 4: Fully recharge the battery 70 Step 5: Reenable Hibernation and Sleep 70 Conserving battery power 70 Storing a battery ...70 Disposing of a used battery 71 Replacing the battery ...71 Shutting down the computer ...71...
... the computer cannot exit Hibernation 68 Calibrating a battery ...68 Step 1: Fully charge the battery 68 Step 2: Disable Hibernation and Sleep 69 Step 3: Discharge the battery 69 Step 4: Fully recharge the battery 70 Step 5: Reenable Hibernation and Sleep 70 Conserving battery power 70 Storing a battery ...70 Disposing of a used battery 71 Replacing the battery ...71 Shutting down the computer ...71...

User Guide
Page 19
... by the governmental agency that regulates wireless devices in your country or region. Holds the hard drive. If you replace the module and then receive a warning message, remove the module to cool internal components. Enable airflow to restore computer...Help and Support. CAUTION: To prevent an unresponsive system, replace the wireless module only with a wireless module authorized for the internal fan to cool internal components and prevent overheating. Bottom components Component (1) (2) Battery bay Battery release latch (3) Vents (4) (4) Memory module compartment (5) Hard...
... by the governmental agency that regulates wireless devices in your country or region. Holds the hard drive. If you replace the module and then receive a warning message, remove the module to cool internal components. Enable airflow to restore computer...Help and Support. CAUTION: To prevent an unresponsive system, replace the wireless module only with a wireless module authorized for the internal fan to cool internal components and prevent overheating. Bottom components Component (1) (2) Battery bay Battery release latch (3) Vents (4) (4) Memory module compartment (5) Hard...

User Guide
Page 61
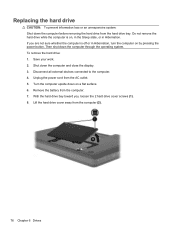
Optical drive 51 10. Replace the security screw. 11. Align the tabs (1) on the hard drive cover with the notches on the computer. Replace the battery, turn the computer over, and turn on the computer, close the hard drive cover (2), and tighten the hard drive screws (3). 12. Reconnect external power and external devices. 13.
Optical drive 51 10. Replace the security screw. 11. Align the tabs (1) on the hard drive cover with the notches on the computer. Replace the battery, turn the computer over, and turn on the computer, close the hard drive cover (2), and tighten the hard drive screws (3). 12. Reconnect external power and external devices. 13.
User Guide
Page 73
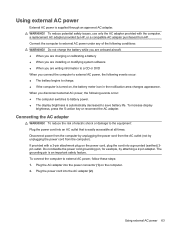
...The display brightness is automatically decreased to charge. ● If the computer is easily accessible at all times. If provided with the computer, a replacement AC adapter provided by attaching a 2-pin adapter. Plug the AC adapter into the AC adapter (2). The grounding pin is supplied through an approved AC... to save battery life. Disconnect power from the computer by unplugging the power cord from the AC outlet (not by unplugging the power cord from HP. Plug the power cord into the power connector (1) on the computer. 2. To increase display brightness, press the f3 action key or ...
...The display brightness is automatically decreased to charge. ● If the computer is easily accessible at all times. If provided with the computer, a replacement AC adapter provided by attaching a 2-pin adapter. Plug the AC adapter into the AC adapter (2). The grounding pin is supplied through an approved AC... to save battery life. Disconnect power from the computer by unplugging the power cord from the AC outlet (not by unplugging the power cord from HP. Plug the power cord into the power connector (1) on the computer. 2. To increase display brightness, press the f3 action key or ...
User Guide
Page 74
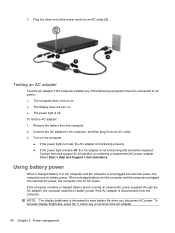
... the power lights turn on , the AC adapter is plugged into an AC outlet (3). When a charged battery is in the computer and the computer is not functioning and should be replaced. NOTE: The display brightness is decreased to AC power: ● The computer does not turn on. ...To increase display brightness, press the f3 action key or reconnect the AC adapter. 64 Chapter 5 Power management Remove the battery from the computer. Using battery power When a charged battery is in the computer and the computer is functioning properly. ● If the power light remains off . 3. To...
... the power lights turn on , the AC adapter is plugged into an AC outlet (3). When a charged battery is in the computer and the computer is not functioning and should be replaced. NOTE: The display brightness is decreased to AC power: ● The computer does not turn on. ...To increase display brightness, press the f3 action key or reconnect the AC adapter. 64 Chapter 5 Power management Remove the battery from the computer. Using battery power When a charged battery is in the computer and the computer is functioning properly. ● If the power light remains off . 3. To...
User Guide
Page 75
...: 1. Turn the computer upside down the computer through Windows before removing the battery. To reduce potential safety issues, use only the battery provided with the computer, a replacement battery provided by HP, or a compatible battery purchased from external power. Using Battery Check Help and Support provides information on the status of information. Connect the AC adapter to maximize...
...: 1. Turn the computer upside down the computer through Windows before removing the battery. To reduce potential safety issues, use only the battery provided with the computer, a replacement battery provided by HP, or a compatible battery purchased from external power. Using Battery Check Help and Support provides information on the status of information. Connect the AC adapter to maximize...
User Guide
Page 81
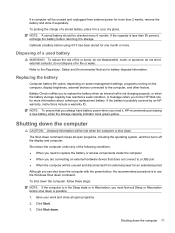
... Although you can shut down the computer with the power button, the recommended procedure is to replace the battery when an internal cell is not charging properly, or when the battery storage capacity has reached a weak condition. Shutting down . Disposing of the following conditions: &#... you need to replace the battery or access components inside the computer ● When you are connecting an external hardware device that you always have battery power when you to storage. Click Shut down the computer 71 If the battery is possibly covered by an HP warranty, instructions include...
... Although you can shut down the computer with the power button, the recommended procedure is to replace the battery when an internal cell is not charging properly, or when the battery storage capacity has reached a weak condition. Shutting down . Disposing of the following conditions: &#... you need to replace the battery or access components inside the computer ● When you are connecting an external hardware device that you always have battery power when you to storage. Click Shut down the computer 71 If the battery is possibly covered by an HP warranty, instructions include...
User Guide
Page 86
Save your work. 2. Turn the computer upside down the computer and close the display. 3. Replacing the hard drive CAUTION: To prevent information loss or an unresponsive system: Shut down the computer before removing the hard drive from the computer (2). 76 ... the power cord from the computer. 7. If you , loosen the 2 hard drive cover screws (1). 8. Then shut down the computer through the operating system. Remove the battery from the AC outlet. 5.
Save your work. 2. Turn the computer upside down the computer and close the display. 3. Replacing the hard drive CAUTION: To prevent information loss or an unresponsive system: Shut down the computer before removing the hard drive from the computer (2). 76 ... the power cord from the computer. 7. If you , loosen the 2 hard drive cover screws (1). 8. Then shut down the computer through the operating system. Remove the battery from the AC outlet. 5.

User Guide
Page 89
Tighten the hard drive cover screws (3). 6. Turn on the computer. Replacing the hard drive 79 Replace the battery. 7. 5. Turn the computer right-side up, and then reconnect external power and external devices. 8.
Tighten the hard drive cover screws (3). 6. Turn on the computer. Replacing the hard drive 79 Replace the battery. 7. 5. Turn the computer right-side up, and then reconnect external power and external devices. 8.
User Guide
Page 94
... AC outlet. 5. WARNING! Disconnect all external devices connected to the equipment, unplug the power cord and remove all batteries before installing a memory module. To reduce the risk of the computer. To add or replace a memory module: 1. Save your work. 2. 8 Memory modules The computer has one memory module compartment, which is off or...
... AC outlet. 5. WARNING! Disconnect all external devices connected to the equipment, unplug the power cord and remove all batteries before installing a memory module. To reduce the risk of the computer. To add or replace a memory module: 1. Save your work. 2. 8 Memory modules The computer has one memory module compartment, which is off or...

User Guide
Page 96
... module (2) into place. 10. Gently press the memory module (3) down, applying pressure to the memory module, hold the memory module by the edges only. Replace the battery. 86 Chapter 8 Memory modules Do not touch the components on the memory module compartment cover with the tab in the memory module slot. b. Close the...
... module (2) into place. 10. Gently press the memory module (3) down, applying pressure to the memory module, hold the memory module by the edges only. Replace the battery. 86 Chapter 8 Memory modules Do not touch the components on the memory module compartment cover with the tab in the memory module slot. b. Close the...
User Guide
Page 121
... 5 L labels Bluetooth 12 modem approval 12 service tag 12 wireless certification 12 WLAN 12 LAN Power Saving 99 language support 99 latch, battery release 9 light power 3 lights caps lock 3 Digital Media Slot 8 optical drive 7 webcam 6 wireless 3 local area network (LAN) cable required...password 91 managing an administrator password 90 media controls, hotkeys 34 memory module inserting 85 removing 85 memory module compartment cover removing 85 replacing 86 memory module compartment, identifying 9 memory test 99 microphone (internal), identifying 6, 32 minimizing interference 22 modem approval label 12 ...
... 5 L labels Bluetooth 12 modem approval 12 service tag 12 wireless certification 12 WLAN 12 LAN Power Saving 99 language support 99 latch, battery release 9 light power 3 lights caps lock 3 Digital Media Slot 8 optical drive 7 webcam 6 wireless 3 local area network (LAN) cable required...password 91 managing an administrator password 90 media controls, hotkeys 34 memory module inserting 85 removing 85 memory module compartment cover removing 85 replacing 86 memory module compartment, identifying 9 memory test 99 microphone (internal), identifying 6, 32 minimizing interference 22 modem approval label 12 ...


