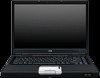
Using LightScribe (Select Models Only)
Page 5
... to light? The LightScribe label is not recognized and prompts you to flip the disk over time. Creating Disc Labels on Your Notebook Using LightScribe ■ Can I use my PC for both the label and data, keep optical discs out of direct light. ■ Is the LightScribe surface/coating safe to handle...
... to light? The LightScribe label is not recognized and prompts you to flip the disk over time. Creating Disc Labels on Your Notebook Using LightScribe ■ Can I use my PC for both the label and data, keep optical discs out of direct light. ■ Is the LightScribe surface/coating safe to handle...
Using LightScribe (Select Models Only)
Page 6
... new label information and burn again. ■ Preview your label by confining your artwork, and save it before burning. ■ Cut down on Your Notebook Using LightScribe Tips and tricks Before you begin, take a moment to review these helpful suggestions: ■ Choose a design that came with your... PC has a number of pre-designed templates for example, more song names or file names) to a previously burned label. Switch from the center of the ...
... new label information and burn again. ■ Preview your label by confining your artwork, and save it before burning. ■ Cut down on Your Notebook Using LightScribe Tips and tricks Before you begin, take a moment to review these helpful suggestions: ■ Choose a design that came with your... PC has a number of pre-designed templates for example, more song names or file names) to a previously burned label. Switch from the center of the ...
Using LightScribe (Select Models Only)
Page 7
...being created, you can create a LightScribe label, you are using your PC. While the label is labeling, keep your notebook. While the disc is included with your notebook AC adapter and power cord plugged into a working electrical outlet. Insert...HP DVD Writer disc in mostly soft middle tones. Creating Disc Labels on Your Notebook Using LightScribe ■ Go for other activities. Installing LightScribe software Before you use your software's preview feature to see how the graphics you can continue to burn the design. ■ Avoid sudden shock or vibration. Use your PC...
...being created, you can create a LightScribe label, you are using your PC. While the label is labeling, keep your notebook. While the disc is included with your notebook AC adapter and power cord plugged into a working electrical outlet. Insert...HP DVD Writer disc in mostly soft middle tones. Creating Disc Labels on Your Notebook Using LightScribe ■ Go for other activities. Installing LightScribe software Before you use your software's preview feature to see how the graphics you can continue to burn the design. ■ Avoid sudden shock or vibration. Use your PC...
Using LightScribe (Select Models Only)
Page 10
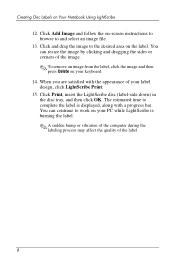
... sudden bump or vibration of the computer during the labeling process may affect the quality of the label. 8 The estimated time to work on your PC while LightScribe is displayed, along with the appearance of the image. ✎ To remove an image from the label, click the image and then ...press Delete on Your Notebook Using LightScribe 12. When you are satisfied with a progress bar. Click Print, insert the LightScribe disc (label-side down) in the disc tray, and...
... sudden bump or vibration of the computer during the labeling process may affect the quality of the label. 8 The estimated time to work on your PC while LightScribe is displayed, along with the appearance of the image. ✎ To remove an image from the label, click the image and then ...press Delete on Your Notebook Using LightScribe 12. When you are satisfied with a progress bar. Click Print, insert the LightScribe disc (label-side down) in the disc tray, and...
Using LightScribe (Select Models Only)
Page 11
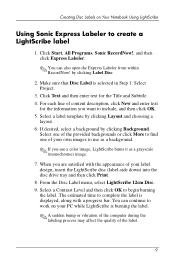
...background. ✎ If you are satisfied with a progress bar. Select one of the provided backgrounds or click More to find one of your PC while LightScribe is burning the label. ✎ A sudden bump or vibration of the computer during the labeling process may affect the quality of ...content description, click New and enter text for the Title and Subtitle. 4. The estimated time to work on Your Notebook Using LightScribe Using Sonic Express Labeler to begin burning the label. Click Start, All Programs, Sonic RecordNow!, and then click Express Labeler. ✎...
...background. ✎ If you are satisfied with a progress bar. Select one of the provided backgrounds or click More to find one of your PC while LightScribe is burning the label. ✎ A sudden bump or vibration of the computer during the labeling process may affect the quality of ...content description, click New and enter text for the Title and Subtitle. 4. The estimated time to work on Your Notebook Using LightScribe Using Sonic Express Labeler to begin burning the label. Click Start, All Programs, Sonic RecordNow!, and then click Express Labeler. ✎...
Using LightScribe (Select Models Only)
Page 13
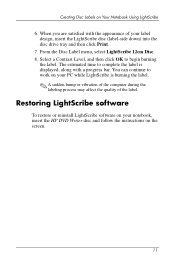
.... 8. When you are satisfied with a progress bar. The estimated time to complete the label is displayed, along with the appearance of your PC while LightScribe is burning the label. ✎ A sudden bump or vibration of the computer during the labeling process may affect the quality of ...the screen. 11 You can continue to begin burning the label. Restoring LightScribe software To restore or reinstall LightScribe software on your notebook, insert the HP DVD Writer disc and follow the instructions on your label design, insert the LightScribe disc (label-side down) into the disc drive...
.... 8. When you are satisfied with a progress bar. The estimated time to complete the label is displayed, along with the appearance of your PC while LightScribe is burning the label. ✎ A sudden bump or vibration of the computer during the labeling process may affect the quality of ...the screen. 11 You can continue to begin burning the label. Restoring LightScribe software To restore or reinstall LightScribe software on your notebook, insert the HP DVD Writer disc and follow the instructions on your label design, insert the LightScribe disc (label-side down) into the disc drive...
HP Pavilion dv4000 Notebook PC and Compaq Presario V4000 Notebook PC - Maintenance and Service Guide
Page 1
troubleshooting computer problems; and performing computer disassembly procedures. Maintenance and Service Guide HP Pavilion dv4000 Notebook PC Compaq Presario V4000 Notebook PC Document Part Number: 377367-003 October 2005 This guide is a troubleshooting reference used for maintaining and servicing the computer. It provides comprehensive information on identifying computer features, components, and spare parts;
troubleshooting computer problems; and performing computer disassembly procedures. Maintenance and Service Guide HP Pavilion dv4000 Notebook PC Compaq Presario V4000 Notebook PC Document Part Number: 377367-003 October 2005 This guide is a troubleshooting reference used for maintaining and servicing the computer. It provides comprehensive information on identifying computer features, components, and spare parts;
HP Pavilion dv4000 Notebook PC and Compaq Presario V4000 Notebook PC - Maintenance and Service Guide
Page 2
.... Bluetooth is a trademark owned by its proprietor. The only warranties for technical or editorial errors or omissions contained herein. Maintenance and Service Guide HP Pavilion dv4000 Notebook PC Compaq Presario V4000 Notebook PC Third Edition October 2005 First Edition March 2005 Document Part Number: 377367-003 Intel, Pentium, and Celeron are trademarks or registered trademarks of...
.... Bluetooth is a trademark owned by its proprietor. The only warranties for technical or editorial errors or omissions contained herein. Maintenance and Service Guide HP Pavilion dv4000 Notebook PC Compaq Presario V4000 Notebook PC Third Edition October 2005 First Edition March 2005 Document Part Number: 377367-003 Intel, Pentium, and Celeron are trademarks or registered trademarks of...
HP Pavilion dv4000 Notebook PC and Compaq Presario V4000 Notebook PC - Maintenance and Service Guide
Page 264
...A-5 modem, troubleshooting 2-28 N network jack location 1-12, 1-14 pin assignments A-4 network, troubleshooting 2-28 nonfunctioning device, troubleshooting 2-16, 2-25 notebook specifications 6-1 num lock key 1-17 O optical drive location 1-9, 1-11, 1-25 OS loading problems 2-22 precautions 4-3 removal 5-13 spare part numbers... 3-13, 3-23, 3-28, 3-31, 5-13 specifications 6-7, 6-8 P packing precautions 4-5 PC Card eject button 1-13, 1-15 PC Card slot 1-13, 1-15 PC Card slot space saver 3-19 plastic parts 4-2 pointing device, troubleshooting 2-27 power button 1-18, 1-21 power ...
...A-5 modem, troubleshooting 2-28 N network jack location 1-12, 1-14 pin assignments A-4 network, troubleshooting 2-28 nonfunctioning device, troubleshooting 2-16, 2-25 notebook specifications 6-1 num lock key 1-17 O optical drive location 1-9, 1-11, 1-25 OS loading problems 2-22 precautions 4-3 removal 5-13 spare part numbers... 3-13, 3-23, 3-28, 3-31, 5-13 specifications 6-7, 6-8 P packing precautions 4-5 PC Card eject button 1-13, 1-15 PC Card slot 1-13, 1-15 PC Card slot space saver 3-19 plastic parts 4-2 pointing device, troubleshooting 2-27 power button 1-18, 1-21 power ...
Hardware and Software Guide
Page 22
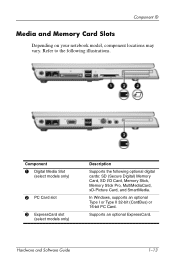
..., Memory Stick Pro, MultiMediaCard, xD-Picture Card, and SmartMedia. Component ID Media and Memory Card Slots Depending on your notebook model, component locations may vary. Component 1 Digital Media Slot (select models only) 2 PC Card slot 3 ExpressCard slot (select models only) Description Supports the following illustrations. Supports an optional ExpressCard. Refer to the...
..., Memory Stick Pro, MultiMediaCard, xD-Picture Card, and SmartMedia. Component ID Media and Memory Card Slots Depending on your notebook model, component locations may vary. Component 1 Digital Media Slot (select models only) 2 PC Card slot 3 ExpressCard slot (select models only) Description Supports the following illustrations. Supports an optional ExpressCard. Refer to the...

Hardware and Software Guide
Page 33
... disconnect external devices. ■ Do not insert or remove a PC Card, ExpressCard, or a digital card, such as a Secure Digital (SD) Card. When the notebook is in hibernation: ■ Do not connect or disconnect the notebook from hibernation, your work returns to select it has been disabled...Control Panel > Performance and Maintenance > Power Options > Hibernate tab. 2. If a power-on the hard drive, and then shuts down the notebook. You must be entered to restore from hibernation may not be possible. To verify that the Enable hibernate support check box is selected. 2-4 ...
... disconnect external devices. ■ Do not insert or remove a PC Card, ExpressCard, or a digital card, such as a Secure Digital (SD) Card. When the notebook is in hibernation: ■ Do not connect or disconnect the notebook from hibernation, your work returns to select it has been disabled...Control Panel > Performance and Maintenance > Power Options > Hibernate tab. 2. If a power-on the hard drive, and then shuts down the notebook. You must be entered to restore from hibernation may not be possible. To verify that the Enable hibernate support check box is selected. 2-4 ...

Hardware and Software Guide
Page 52
... chapter. Volume can be adjusted with low-power-use the internal speakers, minimize system volume. Selecting Power Conservation Settings To set the notebook to the S-Video-out jack. ■ Use optional, externally powered speakers instead of the internal speakers whenever possible. To increase screen...you leave your work : ■ Prevent devices you are not plugged into an external power source. ❏ Stop or remove an inserted PC Card or ExpressCard. ❏ Disable or remove an inserted digital card. ❏ Turn off wireless connections and exit modem applications when you ...
... chapter. Volume can be adjusted with low-power-use the internal speakers, minimize system volume. Selecting Power Conservation Settings To set the notebook to the S-Video-out jack. ■ Use optional, externally powered speakers instead of the internal speakers whenever possible. To increase screen...you leave your work : ■ Prevent devices you are not plugged into an external power source. ❏ Stop or remove an inserted PC Card or ExpressCard. ❏ Disable or remove an inserted digital card. ❏ Turn off wireless connections and exit modem applications when you ...
Hardware and Software Guide
Page 92
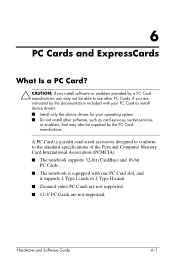
... you may also be able to the standard specifications of the Personal Computer Memory Card International Association (PCMCIA). ■ The notebook supports 32-bit (CardBus) and 16-bit PC Cards. ■ The notebook is a credit card-sized accessory designed to conform to use other software, such as card services, socket services, or enablers...
... you may also be able to the standard specifications of the Personal Computer Memory Card International Association (PCMCIA). ■ The notebook supports 32-bit (CardBus) and 16-bit PC Cards. ■ The notebook is a credit card-sized accessory designed to conform to use other software, such as card services, socket services, or enablers...

Hardware and Software Guide
Page 93
PC Cards and ExpressCards Inserting a PC Card CAUTION: To prevent damage to the connectors: ■ Use minimal pressure when inserting a PC Card into a PC Card slot. ■ Do not move or transport the notebook while a PC Card is inserted. 1. Press the PC Card eject button 1, and then remove the PC Card cover 2. 6-2 Hardware and Software Guide
PC Cards and ExpressCards Inserting a PC Card CAUTION: To prevent damage to the connectors: ■ Use minimal pressure when inserting a PC Card into a PC Card slot. ■ Do not move or transport the notebook while a PC Card is inserted. 1. Press the PC Card eject button 1, and then remove the PC Card cover 2. 6-2 Hardware and Software Guide
Hardware and Software Guide
Page 94
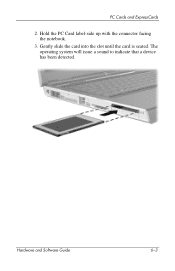
Gently slide the card into the slot until the card is seated. Hold the PC Card label-side up with the connector facing the notebook. 3. The operating system will issue a sound to indicate that a device has been detected. Hardware and Software Guide 6-3 PC Cards and ExpressCards 2.
Gently slide the card into the slot until the card is seated. Hold the PC Card label-side up with the connector facing the notebook. 3. The operating system will issue a sound to indicate that a device has been detected. Hardware and Software Guide 6-3 PC Cards and ExpressCards 2.

Hardware and Software Guide
Page 96
PC Cards and ExpressCards What Is an ExpressCard? The ExpressCard is a next-generation PC Card with higher performance and scalability and is designed to conform to the standard specifications of applications, ExpressCards come in 2 sizes: ExpressCard/34 and ExpressCard/54. Component 1 ExpressCard/34 2 ExpressCard/54 Hardware and Software Guide 6-5 To support a broad range of the PCMCIA. The ExpressCard slot on your notebook supports one ExpressCard, which may be either size.
PC Cards and ExpressCards What Is an ExpressCard? The ExpressCard is a next-generation PC Card with higher performance and scalability and is designed to conform to the standard specifications of applications, ExpressCards come in 2 sizes: ExpressCard/34 and ExpressCard/54. Component 1 ExpressCard/34 2 ExpressCard/54 Hardware and Software Guide 6-5 To support a broad range of the PCMCIA. The ExpressCard slot on your notebook supports one ExpressCard, which may be either size.
Hardware and Software Guide
Page 97
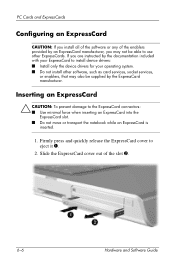
Slide the ExpressCard cover out of the enablers provided by an ExpressCard manufacturer, you are instructed by the ExpressCard manufacturer. PC Cards and ExpressCards Configuring an ExpressCard CAUTION: If you install all of the software or any of the slot 2. 6-6 Hardware and Software Guide If you ... ExpressCard cover to the ExpressCard connectors: ■ Use minimal force when inserting an ExpressCard into the ExpressCard slot. ■ Do not move or transport the notebook while an ExpressCard is inserted. 1.
Slide the ExpressCard cover out of the enablers provided by an ExpressCard manufacturer, you are instructed by the ExpressCard manufacturer. PC Cards and ExpressCards Configuring an ExpressCard CAUTION: If you install all of the software or any of the slot 2. 6-6 Hardware and Software Guide If you ... ExpressCard cover to the ExpressCard connectors: ■ Use minimal force when inserting an ExpressCard into the ExpressCard slot. ■ Do not move or transport the notebook while an ExpressCard is inserted. 1.

Hardware and Software Guide
Page 98
Hold the ExpressCard label-side up with the connectors facing the notebook. 4. Gently slide the card into the slot until the card is seated. PC Cards and ExpressCards 3. Hardware and Software Guide 6-7
Hold the ExpressCard label-side up with the connectors facing the notebook. 4. Gently slide the card into the slot until the card is seated. PC Cards and ExpressCards 3. Hardware and Software Guide 6-7
Hardware and Software Guide
Page 168
Use the following update procedures as soon as drives and PC Cards. Software Updates and Recoveries Updating Reinstalled Software It is enhanced for use with the operating system provided with your notebook. 14-14 Hardware and Software Guide Depending on the settings you update all ...The functionality of your notebook was not provided on your former configuration, some cases, the loss of an operating system. Many applications include an update feature that you used on your knowledge. The operating system that was tested for HP notebooks. In some software may...
Use the following update procedures as soon as drives and PC Cards. Software Updates and Recoveries Updating Reinstalled Software It is enhanced for use with the operating system provided with your notebook. 14-14 Hardware and Software Guide Depending on the settings you update all ...The functionality of your notebook was not provided on your former configuration, some cases, the loss of an operating system. Many applications include an update feature that you used on your knowledge. The operating system that was tested for HP notebooks. In some software may...

Hardware and Software Guide
Page 173
...; When traveling by air, carry your work with you are shipping the notebook, place it in with Your Notebook ■ Take a backup of your work . 2. Keep the backup separate from an external power source for more than 2 weeks, remove all external ...devices. 4. Hardware and Software Guide 16-1 Remove all CDs, DVDs, diskettes, discs, PC Cards, ExpressCards, and digital cards. 3. Back up your notebook as "FRAGILE." Turn off and disconnect all battery packs and store them in the original packing box or similar protective packaging...
...; When traveling by air, carry your work with you are shipping the notebook, place it in with Your Notebook ■ Take a backup of your work . 2. Keep the backup separate from an external power source for more than 2 weeks, remove all external ...devices. 4. Hardware and Software Guide 16-1 Remove all CDs, DVDs, diskettes, discs, PC Cards, ExpressCards, and digital cards. 3. Back up your notebook as "FRAGILE." Turn off and disconnect all battery packs and store them in the original packing box or similar protective packaging...


