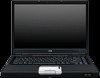
HP Pavilion dv4000 Notebook PC and Compaq Presario V4000 Notebook PC - Maintenance and Service Guide
Page 23
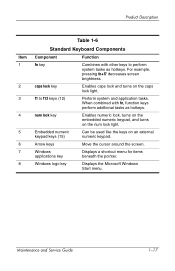
... tasks. Embedded numeric keypad keys (15) Can be used like the keys on the num lock light. Windows logo key Displays the Microsoft Windows Start menu. f1 to perform system tasks as hotkeys. Arrow keys Move the cursor around the screen. Product Description Item 1 2 3 4 5 6 7 8 Table 1-6 Standard Keyboard Components Component Function fn key Combines with fn, function keys perform additional tasks as hotkeys. caps lock key Enables caps lock and turns on the caps lock light. Maintenance and Service Guide 1-17
... tasks. Embedded numeric keypad keys (15) Can be used like the keys on the num lock light. Windows logo key Displays the Microsoft Windows Start menu. f1 to perform system tasks as hotkeys. Arrow keys Move the cursor around the screen. Product Description Item 1 2 3 4 5 6 7 8 Table 1-6 Standard Keyboard Components Component Function fn key Combines with fn, function keys perform additional tasks as hotkeys. caps lock key Enables caps lock and turns on the caps lock light. Maintenance and Service Guide 1-17

HP Pavilion dv4000 Notebook PC and Compaq Presario V4000 Notebook PC - Maintenance and Service Guide
Page 38
... in Battery Optimized mode.) 2-6 Maintenance and Service Guide When USB legacy support is enabled ❐ A USB keyboard, mouse, and hub work even when a Windows operating system is not loaded. ❐ The computer starts from the Advanced Menu Select Language (or press f2) Boot options Device options Table 2-4 Advanced Menu To Do This Change the Computer Setup language. ■ Enable/Disable MultiBoot, which sets a startup sequence that can include most bootable devices and media in the system. ■ Set the boot order. ■...
... in Battery Optimized mode.) 2-6 Maintenance and Service Guide When USB legacy support is enabled ❐ A USB keyboard, mouse, and hub work even when a Windows operating system is not loaded. ❐ The computer starts from the Advanced Menu Select Language (or press f2) Boot options Device options Table 2-4 Advanced Menu To Do This Change the Computer Setup language. ■ Enable/Disable MultiBoot, which sets a startup sequence that can include most bootable devices and media in the system. ■ Set the boot order. ■...
HP Pavilion dv4000 Notebook PC and Compaq Presario V4000 Notebook PC - Maintenance and Service Guide
Page 53
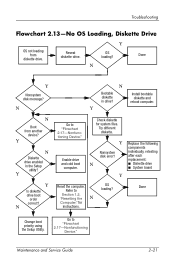
Install bootable diskette and reboot computer. Try different diskette. Done Section 1.2, "Resetting the N Computer," for system files. Change boot priority using the Setup Utility. Done N Y Nonsystem disk message? Y N Diskette drive enabled in drive? N N Bootable diskette in the Setup utility? Enable drive and cold boot computer. Y Replace the following components Nonsystem disk error? N N Boot from diskette drive. Y Go to OS loading? Check diskette for instructions. Maintenance and Service Guide 2-21 Refer to "Flowchart 2.17-Nonfunctioning Device."...
Install bootable diskette and reboot computer. Try different diskette. Done Section 1.2, "Resetting the N Computer," for system files. Change boot priority using the Setup Utility. Done N Y Nonsystem disk message? Y N Diskette drive enabled in drive? N N Bootable diskette in the Setup utility? Enable drive and cold boot computer. Y Replace the following components Nonsystem disk error? N N Boot from diskette drive. Y Go to OS loading? Check diskette for instructions. Maintenance and Service Guide 2-21 Refer to "Flowchart 2.17-Nonfunctioning Device."...
HP Pavilion dv4000 Notebook PC and Compaq Presario V4000 Notebook PC - Maintenance and Service Guide
Page 264
... A-4 network, troubleshooting 2-28 nonfunctioning device, troubleshooting 2-16, 2-25 notebook specifications 6-1 num lock key 1-17 O optical drive location 1-9, 1-11, 1-25 OS loading problems 2-22 precautions 4-3 removal 5-13 spare part numbers 3-13, 3-23, 3-28, 3-31, 5-13 specifications 6-7, 6-8 P packing precautions 4-5 PC Card eject button 1-13, 1-15 PC Card slot 1-13, 1-15 PC Card slot space saver 3-19 plastic parts 4-2 pointing device, troubleshooting 2-27 power button 1-18, 1-21 power connector 1-12, 1-14 power cord set requirements B-2 spare part numbers 3-24, 3-29, 3-30 power light...
... A-4 network, troubleshooting 2-28 nonfunctioning device, troubleshooting 2-16, 2-25 notebook specifications 6-1 num lock key 1-17 O optical drive location 1-9, 1-11, 1-25 OS loading problems 2-22 precautions 4-3 removal 5-13 spare part numbers 3-13, 3-23, 3-28, 3-31, 5-13 specifications 6-7, 6-8 P packing precautions 4-5 PC Card eject button 1-13, 1-15 PC Card slot 1-13, 1-15 PC Card slot space saver 3-19 plastic parts 4-2 pointing device, troubleshooting 2-27 power button 1-18, 1-21 power connector 1-12, 1-14 power cord set requirements B-2 spare part numbers 3-24, 3-29, 3-30 power light...
Hardware and Software Guide
Page 7
... Communication Software 10-7 Network Cable 10-7 11 Wireless (Select Models Only) Wireless Local Area Network (Select Models Only) . 11-3 Setting Up a WLAN in Your Home 11-5 Using a WLAN Connection 11-6 Using Wireless Security Features 11-7 Installing Wireless Software (Optional 11-7 Troubleshooting Devices 11-9 Bluetooth (Select Models Only 11-10 Device Power States 11-12 Turning On the Devices 11-14 Turning Off and Disabling the Devices 11-15 12 Security Security Features 12-1 Security Preferences in the Setup Utility 12...
... Communication Software 10-7 Network Cable 10-7 11 Wireless (Select Models Only) Wireless Local Area Network (Select Models Only) . 11-3 Setting Up a WLAN in Your Home 11-5 Using a WLAN Connection 11-6 Using Wireless Security Features 11-7 Installing Wireless Software (Optional 11-7 Troubleshooting Devices 11-9 Bluetooth (Select Models Only 11-10 Device Power States 11-12 Turning On the Devices 11-14 Turning Off and Disabling the Devices 11-15 12 Security Security Features 12-1 Security Preferences in the Setup Utility 12...
Hardware and Software Guide
Page 8
... the Setup Utility 13-4 Using Advanced Setup Utility Features 13-4 Closing the Setup Utility 13-5 14 Software Updates and Recoveries Software Updates 14-1 Preparing for a Software Update 14-2 Downloading and Installing an Update 14-4 System Restore Points 14-8 Setting a Restore Point 14-8 Restoring to a Restore Point 14-9 Repairing or Reinstalling Applications 14-9 Reinstalling Applications from Your Hard Drive 14-10 Reinstalling Applications from Discs 14-10 Repairing the Operating System 14-11 Reinstalling the Operating System 14-12 Reinstalling Device Drivers...
... the Setup Utility 13-4 Using Advanced Setup Utility Features 13-4 Closing the Setup Utility 13-5 14 Software Updates and Recoveries Software Updates 14-1 Preparing for a Software Update 14-2 Downloading and Installing an Update 14-4 System Restore Points 14-8 Setting a Restore Point 14-8 Restoring to a Restore Point 14-9 Repairing or Reinstalling Applications 14-9 Reinstalling Applications from Your Hard Drive 14-10 Reinstalling Applications from Discs 14-10 Repairing the Operating System 14-11 Reinstalling the Operating System 14-12 Reinstalling Device Drivers...
Hardware and Software Guide
Page 21
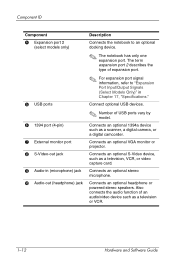
... microphone. The term expansion port 2 describes the type of USB ports vary by model. Connect optional USB devices. ✎ Number of expansion port. ✎ For expansion port signal information, refer to an optional docking device. ✎ The notebook has only one expansion port. Component ID Component 4 Expansion port 2 (select models only) 5 USB ports 6 1394 port (4-pin) 7 External monitor port 8 S-Video-out jack 9 Audio-in Chapter 17, "Specifications." Also connects the audio function of an audio/video device such as a television or VCR. 1-12 Hardware and Software Guide...
... microphone. The term expansion port 2 describes the type of USB ports vary by model. Connect optional USB devices. ✎ Number of expansion port. ✎ For expansion port signal information, refer to an optional docking device. ✎ The notebook has only one expansion port. Component ID Component 4 Expansion port 2 (select models only) 5 USB ports 6 1394 port (4-pin) 7 External monitor port 8 S-Video-out jack 9 Audio-in Chapter 17, "Specifications." Also connects the audio function of an audio/video device such as a television or VCR. 1-12 Hardware and Software Guide...

Hardware and Software Guide
Page 49
... the discharge process. Connect the notebook to external power until the battery pack is fully charged. (The notebook battery light is shut down. ■ The system will be lost when the battery pack is fully discharged and the notebook is turned off a connected optional monitor. 2-20 Hardware and Software Guide The battery pack can discharge whether or not you use . If you are using the notebook, but the battery pack will discharge faster...
... the discharge process. Connect the notebook to external power until the battery pack is fully charged. (The notebook battery light is shut down. ■ The system will be lost when the battery pack is fully discharged and the notebook is turned off a connected optional monitor. 2-20 Hardware and Software Guide The battery pack can discharge whether or not you use . If you are using the notebook, but the battery pack will discharge faster...

Hardware and Software Guide
Page 64
... Getting Started guide included with your notebook. ■ After you have set up your Internet or network services and your Web browser home page, you have set up your home page and the Internet. In Windows, you press the fn+f4 hotkey the image switches among display devices connected to quickly access your Internet or network services, the fn+f3 hotkey opens the Windows Internet Connection wizard. For example, if a monitor is connected to the notebook through the monitor port...
... Getting Started guide included with your notebook. ■ After you have set up your Internet or network services and your Web browser home page, you have set up your home page and the Internet. In Windows, you press the fn+f4 hotkey the image switches among display devices connected to quickly access your Internet or network services, the fn+f3 hotkey opens the Windows Internet Connection wizard. For example, if a monitor is connected to the notebook through the monitor port...
Hardware and Software Guide
Page 65
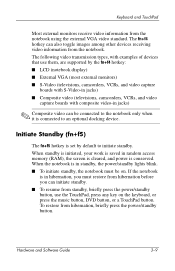
... hotkey is connected to initiate standby. Hardware and Software Guide 3-9 To restore from the notebook using the external VGA video standard. The following video transmission types, with examples of devices that use the TouchPad, press any key on . When the notebook is in jacks) ✎ Composite video can be on the keyboard, or press the music button, DVD button, or a TouchPad button. If the notebook is in random access memory (RAM), the screen is cleared, and power is conserved. Keyboard and TouchPad Most external monitors receive video...
... hotkey is connected to initiate standby. Hardware and Software Guide 3-9 To restore from the notebook using the external VGA video standard. The following video transmission types, with examples of devices that use the TouchPad, press any key on . When the notebook is in jacks) ✎ Composite video can be on the keyboard, or press the music button, DVD button, or a TouchPad button. If the notebook is in random access memory (RAM), the screen is cleared, and power is conserved. Keyboard and TouchPad Most external monitors receive video...

Hardware and Software Guide
Page 81
... is an option in Windows that turns the Autorun feature on a disc as soon as it is inserted into the optical drive. ❏ If Autorun is enabled an installation wizard is displayed. ❏ If Autorun is your operating system documentation or visit the Microsoft Web site at http://www.microsoft.com. 4-8 Hardware and Software Guide Enter x:\setup.exe where x is disabled, select Start > Run. To disable AutoPlay...
... is an option in Windows that turns the Autorun feature on a disc as soon as it is inserted into the optical drive. ❏ If Autorun is enabled an installation wizard is displayed. ❏ If Autorun is your operating system documentation or visit the Microsoft Web site at http://www.microsoft.com. 4-8 Hardware and Software Guide Enter x:\setup.exe where x is disabled, select Start > Run. To disable AutoPlay...
Hardware and Software Guide
Page 92
... your PC Card to use other software, such as card services, socket services, or enablers, that may not be supplied by the documentation included with one PC Card slot, and it supports 2 Type I cards or 2 Type II cards. ■ Zoomed video PC Cards are not supported. ■ 12-V PC Cards are instructed by the PC Card manufacturer. If you may also be able to install device drivers: ■ Install only the device drivers for your operating system. ■ Do not install other PC Cards. Hardware and Software Guide 6-1 6 PC Cards...
... your PC Card to use other software, such as card services, socket services, or enablers, that may not be supplied by the documentation included with one PC Card slot, and it supports 2 Type I cards or 2 Type II cards. ■ Zoomed video PC Cards are not supported. ■ 12-V PC Cards are instructed by the PC Card manufacturer. If you may also be able to install device drivers: ■ Install only the device drivers for your operating system. ■ Do not install other PC Cards. Hardware and Software Guide 6-1 6 PC Cards...
Hardware and Software Guide
Page 120
... shops, hotels, and universities. ■ A Bluetooth wireless notebook can connect to wireless networks in corporate offices, your notebook is equipped with an integrated wireless device such as 802.11 or Bluetooth wireless devices, you have a wireless notebook. ■ An 802.11 wireless notebook can connect to other Bluetooth wireless-enabled devices using a wireless personal area network (PAN). 11 Wireless (Select Models Only) If your home, and public places. Wireless networks include wireless local area networks (WLANs) or "hotspots." Hardware and Software Guide 11-1
... shops, hotels, and universities. ■ A Bluetooth wireless notebook can connect to wireless networks in corporate offices, your notebook is equipped with an integrated wireless device such as 802.11 or Bluetooth wireless devices, you have a wireless notebook. ■ An 802.11 wireless notebook can connect to other Bluetooth wireless-enabled devices using a wireless personal area network (PAN). 11 Wireless (Select Models Only) If your home, and public places. Wireless networks include wireless local area networks (WLANs) or "hotspots." Hardware and Software Guide 11-1
Hardware and Software Guide
Page 136
... Setup utility is started or restarted. For more information on the security cable slot, refer to the "Optional Security Cable" section in this chapter. *This security feature is configured in Setup utility. The procedures for using the Setup utility to set specific security preferences are set in the Setup utility. For information about displaying system information and using the Setup utility, you must use of the notebook ■ Quick Lock ■ Power-on password* Unauthorized access to the Setup HP administrator password* utility...
... Setup utility is started or restarted. For more information on the security cable slot, refer to the "Optional Security Cable" section in this chapter. *This security feature is configured in Setup utility. The procedures for using the Setup utility to set specific security preferences are set in the Setup utility. For information about displaying system information and using the Setup utility, you must use of the notebook ■ Quick Lock ■ Power-on password* Unauthorized access to the Setup HP administrator password* utility...

Hardware and Software Guide
Page 137
... you can use passwords. Passwords Most security features use the QuickLock feature, you set a Windows user password or Windows administrator password. QuickLock protects your notebook by selecting Start > Help and Support. ■ To initiate QuickLock, press fn+f6. ■ To exit QuickLock, enter your Windows user password or Windows administrator password. Hardware and Software Guide 12-3 For instructions, refer to access the Setup utility. While the log-on password and your power-on screen is displayed, the notebook cannot be able...
... you can use passwords. Passwords Most security features use the QuickLock feature, you set a Windows user password or Windows administrator password. QuickLock protects your notebook by selecting Start > Help and Support. ■ To initiate QuickLock, press fn+f6. ■ To exit QuickLock, enter your Windows user password or Windows administrator password. Hardware and Software Guide 12-3 For instructions, refer to access the Setup utility. While the log-on password and your power-on screen is displayed, the notebook cannot be able...
Hardware and Software Guide
Page 140
... Setup utility, and an HP administrator password cannot provide administrator-level access to use the same word or series of up to 8 letters and numbers and is not case sensitive. 12-6 Hardware and Software Guide HP Administrator Password The HP administrator password protects the configuration settings and system identification information in your notebook contents. You can use the same text for various passwords, HP passwords and Windows passwords function independently. After this password is set and entered with keyboard number keys...
... Setup utility, and an HP administrator password cannot provide administrator-level access to use the same word or series of up to 8 letters and numbers and is not case sensitive. 12-6 Hardware and Software Guide HP Administrator Password The HP administrator password protects the configuration settings and system identification information in your notebook contents. You can use the same text for various passwords, HP passwords and Windows passwords function independently. After this password is set and entered with keyboard number keys...

Hardware and Software Guide
Page 141
... the operating system. 2. To save your current password in the Enter Password field, press enter 3 times, and then press f10. 5. Open the Setup utility by pressing the power button, and then shut down the notebook. Use the arrow keys to select Security > Administrator Password, and then press enter. ❏ To set an HP administrator password, type your password in the Enter New Password and Confirm New Password fields, and then press enter. ❏ To change an HP administrator password, type...
... the operating system. 2. To save your current password in the Enter Password field, press enter 3 times, and then press f10. 5. Open the Setup utility by pressing the power button, and then shut down the notebook. Use the arrow keys to select Security > Administrator Password, and then press enter. ❏ To set an HP administrator password, type your password in the Enter New Password and Confirm New Password fields, and then press enter. ❏ To change an HP administrator password, type...
Hardware and Software Guide
Page 142
... type keys. Be sure that the hard drive is turned on by pressing the power button, and then shut down the notebook. For example, a power-on password set with keyboard number keys will not be recognized if you enter it is not case sensitive. A power-on password prevents unauthorized use of up to 8 letters and numbers and is set the password, and then press enter. Security Entering HP Administrator Passwords At the Enter SETUP Password prompt, type your HP administrator password...
... type keys. Be sure that the hard drive is turned on by pressing the power button, and then shut down the notebook. For example, a power-on password set with keyboard number keys will not be recognized if you enter it is not case sensitive. A power-on password prevents unauthorized use of up to 8 letters and numbers and is set the password, and then press enter. Security Entering HP Administrator Passwords At the Enter SETUP Password prompt, type your HP administrator password...
Hardware and Software Guide
Page 162
...software, driver, and operating system files. All System Restore procedures are restorable, benchmark "snapshots" of your software was functioning optimally. It is performing optimally. Manually setting additional restore points provides additional protection for your data files. Setting a Restore Point To set a system restore point manually: 1. Select Create a restore point, and then follow the instructions on the screen. 14-8 Hardware and Software Guide Restore points are reversible. Select Start > Help and Support > System Restore. 2. Software Updates and Recoveries...
...software, driver, and operating system files. All System Restore procedures are restorable, benchmark "snapshots" of your software was functioning optimally. It is performing optimally. Manually setting additional restore points provides additional protection for your data files. Setting a Restore Point To set a system restore point manually: 1. Select Create a restore point, and then follow the instructions on the screen. 14-8 Hardware and Software Guide Restore points are reversible. Select Start > Help and Support > System Restore. 2. Software Updates and Recoveries...

Hardware and Software Guide
Page 187
... password 2-11 serial number 1-19, 3-7, 14-2 series, notebook 14-2 Service Tag 1-19 Setup utility changing language 13-2 closing 13-5 default settings 13-4 navigating 13-3 opening 13-2 overview 13-1 restoring default settings 13-4 setting security preferences 12-2 shift key hibernation function 2-9 keypad function 3-16 shipping 16-1 shortcut menu 1-2 shutdown 2-5, 2-7, 2-10 signals supported 17-4 sleep button 2-11, 3-10 slots Digital Media 1-13 ExpressCard 1-13 memory module 8-1 PC Card 1-13 SD Card 7-1 security cable 1-15 SmartMedia (SM) card 7-1 socket services ExpressCard 6-6 PC Card...
... password 2-11 serial number 1-19, 3-7, 14-2 series, notebook 14-2 Service Tag 1-19 Setup utility changing language 13-2 closing 13-5 default settings 13-4 navigating 13-3 opening 13-2 overview 13-1 restoring default settings 13-4 setting security preferences 12-2 shift key hibernation function 2-9 keypad function 3-16 shipping 16-1 shortcut menu 1-2 shutdown 2-5, 2-7, 2-10 signals supported 17-4 sleep button 2-11, 3-10 slots Digital Media 1-13 ExpressCard 1-13 memory module 8-1 PC Card 1-13 SD Card 7-1 security cable 1-15 SmartMedia (SM) card 7-1 socket services ExpressCard 6-6 PC Card...


