
End User License Agreement
Page 2
...treaty provisions. The transfer may only be used for restoring the hard disk of the HP Product with /for in this EULA. 8. You may make a one-time transfer of a hard disk drive-based solution, an external media-based recovery solution (e.g. This EULA is expressly provided for... your upgrade eligibility. 3. This EULA will prevail. 4. CONSENT TO USE OF DATA. floppy disk, CD or DVD) or an equivalent solution delivered in any other ...
...treaty provisions. The transfer may only be used for restoring the hard disk of the HP Product with /for in this EULA. 8. You may make a one-time transfer of a hard disk drive-based solution, an external media-based recovery solution (e.g. This EULA is expressly provided for... your upgrade eligibility. 3. This EULA will prevail. 4. CONSENT TO USE OF DATA. floppy disk, CD or DVD) or an equivalent solution delivered in any other ...
Using LightScribe (Select Models Only)
Page 3
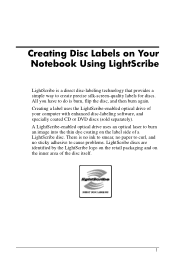
... the disc itself. 1 A LightScribe-enabled optical drive uses an optical laser to cause problems. LightScribe discs are identified by the LightScribe logo on the retail packaging and on the label side of a LightScribe disc. Creating Disc Labels on Your Notebook Using LightScribe LightScribe is a direct disc-labeling technology that provides a simple ...burn an image into the thin dye coating on the inner area of your computer with enhanced disc-labeling software, and specially coated CD or DVD discs (sold separately). All you have to create precise silk-screen-quality labels for discs.
... the disc itself. 1 A LightScribe-enabled optical drive uses an optical laser to cause problems. LightScribe discs are identified by the LightScribe logo on the retail packaging and on the label side of a LightScribe disc. Creating Disc Labels on Your Notebook Using LightScribe LightScribe is a direct disc-labeling technology that provides a simple ...burn an image into the thin dye coating on the inner area of your computer with enhanced disc-labeling software, and specially coated CD or DVD discs (sold separately). All you have to create precise silk-screen-quality labels for discs.
Using LightScribe (Select Models Only)
Page 4
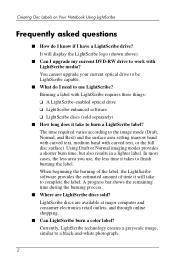
... Best) and the surface area setting (narrow band with curved text, medium band with LightScribe requires three things: ❏ A LightScribe-enabled optical drive ❏ LightScribe-enhanced software ❏ LightScribe discs (sold ? It will take to burn a LightScribe label? A progress bar shows the remaining time...amount of time it will display the LightScribe logo (shown above). ■ Can I upgrade my current DVD-RW drive to work with LightScribe media? Creating Disc Labels on Your Notebook Using LightScribe Frequently asked questions ■ How do I need to use , the less time it ...
... Best) and the surface area setting (narrow band with curved text, medium band with LightScribe requires three things: ❏ A LightScribe-enabled optical drive ❏ LightScribe-enhanced software ❏ LightScribe discs (sold ? It will take to burn a LightScribe label? A progress bar shows the remaining time...amount of time it will display the LightScribe logo (shown above). ■ Can I upgrade my current DVD-RW drive to work with LightScribe media? Creating Disc Labels on Your Notebook Using LightScribe Frequently asked questions ■ How do I need to use , the less time it ...
Using LightScribe (Select Models Only)
Page 13
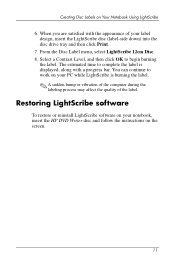
...is burning the label. ✎ A sudden bump or vibration of the computer during the labeling process may affect the quality of your notebook, insert the HP DVD Writer disc and follow the instructions on your label design, insert the LightScribe disc (label-side down) into the disc... drive tray and then click Print. 7. You can continue to work on Your Notebook Using LightScribe 6. Creating Disc Labels on your PC while LightScribe is displayed, along with ...
...is burning the label. ✎ A sudden bump or vibration of the computer during the labeling process may affect the quality of your notebook, insert the HP DVD Writer disc and follow the instructions on your label design, insert the LightScribe disc (label-side down) into the disc... drive tray and then click Print. 7. You can continue to work on Your Notebook Using LightScribe 6. Creating Disc Labels on your PC while LightScribe is displayed, along with ...
Hardware and Software Guide
Page 3
Contents 1 Component ID Top Components 1-2 Keys 1-2 TouchPad 1-3 Power Controls 1-4 DVD Button 1-5 Music Button 1-6 Media Controls-Media Activity Buttons 1-7 Media Controls-Volume, Back and OK Buttons 1-8 Lights 1-9 Wireless Lights and Button (Select Models Only 1-10 ... Components 1-12 Speakers, Jacks Display Release Button and Infrared Lens 1-12 Lights 1-13 Rear Components 1-14 Left-Side Components 1-15 Ports and Jacks 1-15 PC Card Slot and Button 1-16 Vent and Security Cable Slot 1-17 Right-Side Components 1-18 Ports and Jack 1-18 Digital Media Slot Components and Optical...
Contents 1 Component ID Top Components 1-2 Keys 1-2 TouchPad 1-3 Power Controls 1-4 DVD Button 1-5 Music Button 1-6 Media Controls-Media Activity Buttons 1-7 Media Controls-Volume, Back and OK Buttons 1-8 Lights 1-9 Wireless Lights and Button (Select Models Only 1-10 ... Components 1-12 Speakers, Jacks Display Release Button and Infrared Lens 1-12 Lights 1-13 Rear Components 1-14 Left-Side Components 1-15 Ports and Jacks 1-15 PC Card Slot and Button 1-16 Vent and Security Cable Slot 1-17 Right-Side Components 1-18 Ports and Jack 1-18 Digital Media Slot Components and Optical...
Hardware and Software Guide
Page 27
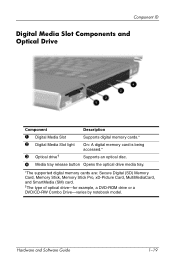
... memory cards.* 2 Digital Media Slot light On: A digital memory card is being accessed.* 3 Optical drive† Supports an optical disc. 4 Media tray release button Opens the optical drive media tray. *The supported digital memory cards are: Secure Digital (SD) Memory Card, Memory Stick, Memory... Stick Pro, xD-Picture Card, MultiMediaCard, and SmartMedia (SM) card. †The type of optical drive-for example, a DVD-ROM drive or a DVD/CD-RW Combo Drive-varies by notebook model...
... memory cards.* 2 Digital Media Slot light On: A digital memory card is being accessed.* 3 Optical drive† Supports an optical disc. 4 Media tray release button Opens the optical drive media tray. *The supported digital memory cards are: Secure Digital (SD) Memory Card, Memory Stick, Memory... Stick Pro, xD-Picture Card, MultiMediaCard, and SmartMedia (SM) card. †The type of optical drive-for example, a DVD-ROM drive or a DVD/CD-RW Combo Drive-varies by notebook model...

Hardware and Software Guide
Page 44
... is sometimes called the system ROM version number. For information about updating the system ROM, refer to the "CD and DVD Procedures" section in Chapter 8, "Software Updates and Recovery and System Software." For more information about system hardware components and software version numbers. Display...the system BIOS (basic input-output system) is playing before you can remove it from the optical drive. To clear the fn+esc display, press esc. 2-12 Hardware and Software Guide On some notebook models, the BIOS date is playing. The BIOS date is playing. Play Next Track or Chapter...
... is sometimes called the system ROM version number. For information about updating the system ROM, refer to the "CD and DVD Procedures" section in Chapter 8, "Software Updates and Recovery and System Software." For more information about system hardware components and software version numbers. Display...the system BIOS (basic input-output system) is playing before you can remove it from the optical drive. To clear the fn+esc display, press esc. 2-12 Hardware and Software Guide On some notebook models, the BIOS date is playing. The BIOS date is playing. Play Next Track or Chapter...
Hardware and Software Guide
Page 57
...select Start > Turn Off Computer. When the notebook is not displayed, press the down arrow, ...notebook in Windows. When hibernation is in Windows at default settings, hibernation can be possible to a hibernation file on the hard drive and then shuts down the notebook. Initiating Hibernation When the notebook...notebook system is changed during hibernation, it may not be initiated by the system. Initiating Hibernation Manually To initiate hibernation manually while the notebook... is in hibernation: ■ Do not add or remove a memory module. ■ Do not add or remove a hard drive...
...select Start > Turn Off Computer. When the notebook is not displayed, press the down arrow, ...notebook in Windows. When hibernation is in Windows at default settings, hibernation can be possible to a hibernation file on the hard drive and then shuts down the notebook. Initiating Hibernation When the notebook...notebook system is changed during hibernation, it may not be initiated by the system. Initiating Hibernation Manually To initiate hibernation manually while the notebook... is in hibernation: ■ Do not add or remove a memory module. ■ Do not add or remove a hard drive...
Hardware and Software Guide
Page 60
... may see the warning message "Putting the computer into hibernation or standby might stop and the screen may stop the playback. To resume your notebook, refer to the "Power Preferences" section later in this chapter. Standby, Hibernation and Shutdown Procedures This section explains the default standby, hibernation,... To prevent the loss of the power features on or off. If standby or hibernation is initiated while a drive medium such as a CD or DVD is displayed, select No. (Playback may need to continue?" The controls and lights discussed in this section are illustrated in in ...
... may see the warning message "Putting the computer into hibernation or standby might stop and the screen may stop the playback. To resume your notebook, refer to the "Power Preferences" section later in this chapter. Standby, Hibernation and Shutdown Procedures This section explains the default standby, hibernation,... To prevent the loss of the power features on or off. If standby or hibernation is initiated while a drive medium such as a CD or DVD is displayed, select No. (Playback may need to continue?" The controls and lights discussed in this section are illustrated in in ...
Hardware and Software Guide
Page 91
... sensitive to a destination disc. Do not write to a disc while the notebook is writing to a reliable external power source. Instead, copy from a source disc or network drive to your hard drive, and then copy from a network drive to vibration. Multimedia Protecting a CD or DVD Write Process Ä CAUTION: To prevent loss of the multimedia software...
... sensitive to a destination disc. Do not write to a disc while the notebook is writing to a reliable external power source. Instead, copy from a source disc or network drive to your hard drive, and then copy from a network drive to vibration. Multimedia Protecting a CD or DVD Write Process Ä CAUTION: To prevent loss of the multimedia software...

Hardware and Software Guide
Page 94
...soon the disc is inserted into the drive and the drive door is closed. To disable AutoPlay or to your DVD drive. Multimedia Enabling AutoPlay AutoPlay is displayed when you insert the DVD. Autorun starts a program or plays a title on the notebook. The number in Windows that contain ...copyrighted files also contain region codes. Most DVDs that turns the Autorun feature ...
...soon the disc is inserted into the drive and the drive door is closed. To disable AutoPlay or to your DVD drive. Multimedia Enabling AutoPlay AutoPlay is displayed when you insert the DVD. Autorun starts a program or plays a title on the notebook. The number in Windows that contain ...copyrighted files also contain region codes. Most DVDs that turns the Autorun feature ...
Hardware and Software Guide
Page 95
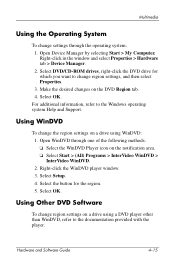
...> InterVideo WinDVD. 2. For additional information, refer to change the region settings on a drive using a DVD player other than WinDVD, refer to the documentation provided with the player. Using Other DVD Software To change settings through one of the following methods: ❏ Select the WinDVD Player...: 1. Select Setup. 4. Select OK. Hardware and Software Guide 4-15 Multimedia Using the Operating System To change region settings on a drive using WinDVD: 1. Using WinDVD To change region settings, and then select Properties. 3. Select the button for which you want to the...
...> InterVideo WinDVD. 2. For additional information, refer to change the region settings on a drive using a DVD player other than WinDVD, refer to the documentation provided with the player. Using Other DVD Software To change settings through one of the following methods: ❏ Select the WinDVD Player...: 1. Select Setup. 4. Select OK. Hardware and Software Guide 4-15 Multimedia Using the Operating System To change region settings on a drive using WinDVD: 1. Using WinDVD To change region settings, and then select Properties. 3. Select the button for which you want to the...

Hardware and Software Guide
Page 164
...PC Card category view, Windows 2-4 CDs audio, hotkeys 2-11 copying 4-11 creating 4-11 playing 4-10 writing to 4-11 Certificate of Authenticity label 1-23 classic view, Windows 2-4 combination power adapter 3-2 compartments memory 1-20, 1-24, 7-17 Mini PCI 1-20, 1-24 See also bays composite video 2-8 connectors drive..., displaying 6-2, 8-2 Bluetooth device 1-10, 1-14 Bluetooth label 1-24 buttons back 1-8 display release 1-12 DVD 1-5 music 1-6 mute 1-8, 4-2 next/fast forward 1-7, 4-9 ok 1-8 PC Card eject 7-10 play/pause 1-7, 4-9 power 1-4, 3-16 previous/rewind 1-7, 4-9 Quick Launch 8-8 stop ...
...PC Card category view, Windows 2-4 CDs audio, hotkeys 2-11 copying 4-11 creating 4-11 playing 4-10 writing to 4-11 Certificate of Authenticity label 1-23 classic view, Windows 2-4 combination power adapter 3-2 compartments memory 1-20, 1-24, 7-17 Mini PCI 1-20, 1-24 See also bays composite video 2-8 connectors drive..., displaying 6-2, 8-2 Bluetooth device 1-10, 1-14 Bluetooth label 1-24 buttons back 1-8 display release 1-12 DVD 1-5 music 1-6 mute 1-8, 4-2 next/fast forward 1-7, 4-9 ok 1-8 PC Card eject 7-10 play/pause 1-7, 4-9 power 1-4, 3-16 previous/rewind 1-7, 4-9 Quick Launch 8-8 stop ...
Hardware and Software Guide
Page 165
... 7-11 shipping 7-12 USB 7-2 See also CDs; See CDs; DVDs diskette affected by airport security 7-12 avoiding standby and hibernation while using disc, diskette 4-10 expansion port on notebook 1-15 monitor port 2-8 USB support 7-2 docking device as power source 3-2 drives adding to 4-11 E eject buttons, PC Card 7-10 electrostatic discharge (ESD) 7-12, 7-18 embedded...
... 7-11 shipping 7-12 USB 7-2 See also CDs; See CDs; DVDs diskette affected by airport security 7-12 avoiding standby and hibernation while using disc, diskette 4-10 expansion port on notebook 1-15 monitor port 2-8 USB support 7-2 docking device as power source 3-2 drives adding to 4-11 E eject buttons, PC Card 7-10 electrostatic discharge (ESD) 7-12, 7-18 embedded...
Hardware and Software Guide
Page 169
standby Hardware and Software Guide Index-7 DVDs optical drive identifying 1-19 See also CDs; jacks power conserving 3-7, 3-26 control and light locations 3-4 schemes 3-15 setting preferences 3-15 sources ... 6-6 power-on 6-4, 6-8 QuickLock 2-10 Setup utility 6-3 standby 3-16, 6-4 user 6-4 Windows 6-3 Windows administrator 2-10 Windows user 2-10 PC Card configuring 7-8 inserting, removing 7-9 stopping 7-10 types supported 7-8 PC Card eject button 1-16, 7-10 PC Card slot 1-16, 7-9 play/pause button 1-7, 4-9 pointing device 2-3 ports 1394 1-18, 7-3 Expansion Port 2 1-15 external monitor 1-15...
standby Hardware and Software Guide Index-7 DVDs optical drive identifying 1-19 See also CDs; jacks power conserving 3-7, 3-26 control and light locations 3-4 schemes 3-15 setting preferences 3-15 sources ... 6-6 power-on 6-4, 6-8 QuickLock 2-10 Setup utility 6-3 standby 3-16, 6-4 user 6-4 Windows 6-3 Windows administrator 2-10 Windows user 2-10 PC Card configuring 7-8 inserting, removing 7-9 stopping 7-10 types supported 7-8 PC Card eject button 1-16, 7-10 PC Card slot 1-16, 7-9 play/pause button 1-7, 4-9 pointing device 2-3 ports 1394 1-18, 7-3 Expansion Port 2 1-15 external monitor 1-15...

