Hardware and Software Guide
Page 8
... the System 7-11 Using the IDE Drive Light 7-11 Caring for Drives 7-12 Replacing the Internal Hard Drive 7-13 Memory 7-17 Increasing Memory 7-17 Removing or Inserting a Memory Module 7-18 8 Software Updates and Recovery and System Software Software Updates 8-1 Preparing for a Software Update 8-2 ...
... the System 7-11 Using the IDE Drive Light 7-11 Caring for Drives 7-12 Replacing the Internal Hard Drive 7-13 Memory 7-17 Increasing Memory 7-17 Removing or Inserting a Memory Module 7-18 8 Software Updates and Recovery and System Software Software Updates 8-1 Preparing for a Software Update 8-2 ...
Hardware and Software Guide
Page 21
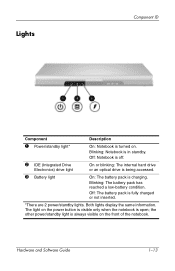
...is visible only when the notebook is always visible on . Hardware and Software Guide 1-13 Both lights display the same information. Off: Notebook is off. 2 IDE (Integrated Drive Electronics) drive light On or blinking: The internal hard drive or an optical drive is being accessed. 3 ...Battery light On: The battery pack is turned on the front of the notebook. Lights Component ID Component Description...
...is visible only when the notebook is always visible on . Hardware and Software Guide 1-13 Both lights display the same information. Off: Notebook is off. 2 IDE (Integrated Drive Electronics) drive light On or blinking: The internal hard drive or an optical drive is being accessed. 3 ...Battery light On: The battery pack is turned on the front of the notebook. Lights Component ID Component Description...
Hardware and Software Guide
Page 29
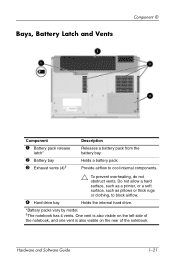
...1-21 Holds the internal hard drive. *Battery packs vary by model. †The notebook has 4 vents. One vent is also visible on the left side of the notebook, and one vent is also visible on the rear of the notebook. Provide airflow to block airflow. Do not allow a hard surface, such as a... printer, or a soft surface, such as pillows or thick rugs or clothing, to cool internal components. 4 Hard drive bay Ä To prevent overheating, do not obstruct vents. ...
...1-21 Holds the internal hard drive. *Battery packs vary by model. †The notebook has 4 vents. One vent is also visible on the left side of the notebook, and one vent is also visible on the rear of the notebook. Provide airflow to block airflow. Do not allow a hard surface, such as a... printer, or a soft surface, such as pillows or thick rugs or clothing, to cool internal components. 4 Hard drive bay Ä To prevent overheating, do not obstruct vents. ...
Hardware and Software Guide
Page 57
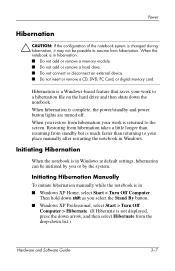
...■ Do not add or remove a memory module. ■ Do not add or remove a hard drive. ■ Do not connect or disconnect an external device. ■ Do not insert or remove a CD, DVD, PC Card, or digital memory card. Then hold down shift as you select the Stand By button. ... hibernation. When you or by the system. When hibernation is returned to a hibernation file on the hard drive and then shuts down list.) Hardware and Software Guide 3-7 Initiating Hibernation When the notebook is not displayed, press the down arrow, and then select Hibernate from standby but is much faster ...
...■ Do not add or remove a memory module. ■ Do not add or remove a hard drive. ■ Do not connect or disconnect an external device. ■ Do not insert or remove a CD, DVD, PC Card, or digital memory card. Then hold down shift as you select the Stand By button. ... hibernation. When you or by the system. When hibernation is returned to a hibernation file on the hard drive and then shuts down list.) Hardware and Software Guide 3-7 Initiating Hibernation When the notebook is not displayed, press the down arrow, and then select Hibernate from standby but is much faster ...
Hardware and Software Guide
Page 74
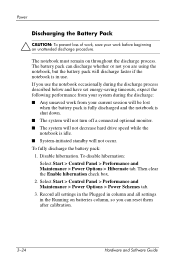
... an unattended discharge procedure. Disable hibernation. Record all settings in the Plugged in column and all settings in use the notebook occasionally during the discharge process described below and have set energy-saving timeouts, expect the following performance from your system during... tab. 3. Then clear the Enable hibernation check box. 2. If you are using the notebook, but the battery pack will discharge faster if the notebook is idle. ■ System-initiated standby will not decrease hard drive speed while the notebook is in the Running on throughout the discharge process.
... an unattended discharge procedure. Disable hibernation. Record all settings in the Plugged in column and all settings in use the notebook occasionally during the discharge process described below and have set energy-saving timeouts, expect the following performance from your system during... tab. 3. Then clear the Enable hibernation check box. 2. If you are using the notebook, but the battery pack will discharge faster if the notebook is idle. ■ System-initiated standby will not decrease hard drive speed while the notebook is in the Running on throughout the discharge process.
Hardware and Software Guide
Page 91
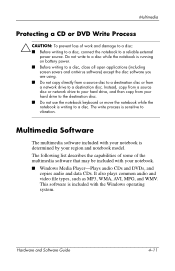
... or from your notebook is included with the Windows operating system. Multimedia Protecting a CD or DVD Write Process Ä CAUTION: To prevent loss of the multimedia software that may be included with your hard drive to the destination disc. ■ Do not use the notebook keyboard or move the notebook while the notebook is sensitive to...
... or from your notebook is included with the Windows operating system. Multimedia Protecting a CD or DVD Write Process Ä CAUTION: To prevent loss of the multimedia software that may be included with your hard drive to the destination disc. ■ Do not use the notebook keyboard or move the notebook while the notebook is sensitive to...
Hardware and Software Guide
Page 134
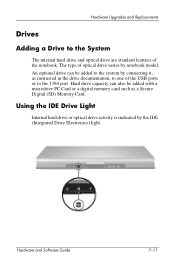
... a microdrive PC Card or a digital memory card such as instructed in the drive documentation, to one of the USB ports or to the System The internal hard drive and optical drive are standard features of optical drive varies by the IDE (Integrated Drive Electronics) light. The type of the notebook. Using the IDE Drive Light Internal hard drive or optical drive activity...
... a microdrive PC Card or a digital memory card such as instructed in the drive documentation, to one of the USB ports or to the System The internal hard drive and optical drive are standard features of optical drive varies by the IDE (Integrated Drive Electronics) light. The type of the notebook. Using the IDE Drive Light Internal hard drive or optical drive activity...
Hardware and Software Guide
Page 135
... x-rays instead of work: ■ Do not remove the internal hard drive except for Drives Ä CAUTION: To prevent damage to the notebook or a drive and loss of magnetism and will not damage a hard drive or a diskette. ■ Do not spray a drive with magnetic fields include airport walk-through devices and security wands. To prevent electrostatic damage to...
... x-rays instead of work: ■ Do not remove the internal hard drive except for Drives Ä CAUTION: To prevent damage to the notebook or a drive and loss of magnetism and will not damage a hard drive or a diskette. ■ Do not spray a drive with magnetic fields include airport walk-through devices and security wands. To prevent electrostatic damage to...
Hardware and Software Guide
Page 136
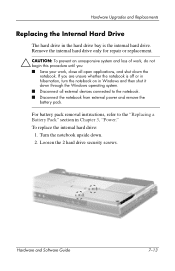
... down . 2. Hardware and Software Guide 7-13 If you ■ Save your work , do not begin this procedure until you are unsure whether the notebook is the internal hard drive. Hardware Upgrades and Replacements Replacing the Internal Hard Drive The hard drive in the hard drive bay is off or in hibernation, turn the notebook on in Chapter 3, "Power." Loosen the...
... down . 2. Hardware and Software Guide 7-13 If you ■ Save your work , do not begin this procedure until you are unsure whether the notebook is the internal hard drive. Hardware Upgrades and Replacements Replacing the Internal Hard Drive The hard drive in the hard drive bay is off or in hibernation, turn the notebook on in Chapter 3, "Power." Loosen the...
Hardware and Software Guide
Page 137
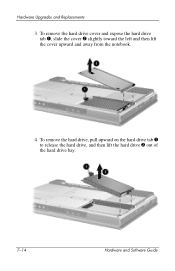
To remove the hard drive cover and expose the hard drive tab 1, slide the cover 2 slightly toward the left and then lift the cover upward and away from the notebook. 4. Hardware Upgrades and Replacements 3. To remove the hard drive, pull upward on the hard drive tab 1 to release the hard drive, and then lift the hard drive 2 out of the hard drive bay. 7-14 Hardware and Software Guide
To remove the hard drive cover and expose the hard drive tab 1, slide the cover 2 slightly toward the left and then lift the cover upward and away from the notebook. 4. Hardware Upgrades and Replacements 3. To remove the hard drive, pull upward on the hard drive tab 1 to release the hard drive, and then lift the hard drive 2 out of the hard drive bay. 7-14 Hardware and Software Guide
Hardware and Software Guide
Page 138
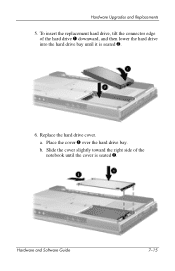
Hardware Upgrades and Replacements 5. Hardware and Software Guide 7-15 To insert the replacement hard drive, tilt the connector edge of the notebook until it is seated 2. a. Place the cover 1 over the hard drive bay. Replace the hard drive cover. b. Slide the cover slightly toward the right side of the hard drive 1 downward, and then lower the hard drive into the hard drive bay until the cover is seated 2. 6.
Hardware Upgrades and Replacements 5. Hardware and Software Guide 7-15 To insert the replacement hard drive, tilt the connector edge of the notebook until it is seated 2. a. Place the cover 1 over the hard drive bay. Replace the hard drive cover. b. Slide the cover slightly toward the right side of the hard drive 1 downward, and then lower the hard drive into the hard drive bay until the cover is seated 2. 6.
Hardware and Software Guide
Page 139
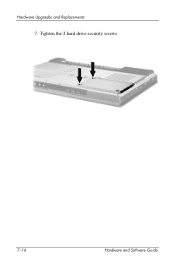
Tighten the 2 hard drive security screws. 7-16 Hardware and Software Guide Hardware Upgrades and Replacements 7.
Tighten the 2 hard drive security screws. 7-16 Hardware and Software Guide Hardware Upgrades and Replacements 7.

Hardware and Software Guide
Page 140
...your Windows software and data files. Depending on your hard drive is increased, the Windows operating system increases the hard drive space reserved for the larger hibernation file. ■ To display the amount of RAM in the notebook by adding memory modules to vacant memory slots or by... > Performance and Maintenance > Power Options icon > Hibernate tab. ✎ The amount of free space on your hard drive and the amount of free space on your notebook model, either one or both the amount of space required by replacing installed memory modules. Increasing Memory You can increase...
...your Windows software and data files. Depending on your hard drive is increased, the Windows operating system increases the hard drive space reserved for the larger hibernation file. ■ To display the amount of RAM in the notebook by adding memory modules to vacant memory slots or by... > Performance and Maintenance > Power Options icon > Hibernate tab. ✎ The amount of free space on your hard drive and the amount of free space on your notebook model, either one or both the amount of space required by replacing installed memory modules. Increasing Memory You can increase...
Hardware and Software Guide
Page 141
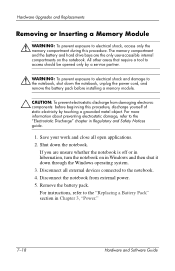
...Disconnect all open applications. 2. Shut down through the Windows operating system. 3. The memory compartment and the battery and hard drive bays are unsure whether the notebook is off or in Chapter 3, "Power." 7-18 Hardware and Software Guide Hardware Upgrades and Replacements Removing or Inserting ... yourself of static electricity by a service partner. Å WARNING: To prevent exposure to electrical shock and damage to the notebook, shut down the notebook, unplug the power cord, and remove the battery pack before installing a memory module. Ä CAUTION: To prevent electrostatic ...
...Disconnect all open applications. 2. Shut down through the Windows operating system. 3. The memory compartment and the battery and hard drive bays are unsure whether the notebook is off or in Chapter 3, "Power." 7-18 Hardware and Software Guide Hardware Upgrades and Replacements Removing or Inserting ... yourself of static electricity by a service partner. Å WARNING: To prevent exposure to electrical shock and damage to the notebook, shut down the notebook, unplug the power cord, and remove the battery pack before installing a memory module. Ä CAUTION: To prevent electrostatic ...
Hardware and Software Guide
Page 149
... it has been downloaded.) c. Downloading a ROM Update: 1. Follow the instructions on the screen to identify your notebook and access the ROM update you want to the hard drive. 8-4 Hardware and Software Guide Follow the online instructions to download your selection to download. 3. Software Updates and ... has been downloaded to the hard drive.) b. Record the date, name, or other identifier of any ROM update that provides software for your notebook: ❏ Select Start > Help and Support, and then select a software update link. - Access the page at the HP Web site that is docked ...
... it has been downloaded.) c. Downloading a ROM Update: 1. Follow the instructions on the screen to identify your notebook and access the ROM update you want to the hard drive. 8-4 Hardware and Software Guide Follow the online instructions to download your selection to download. 3. Software Updates and ... has been downloaded to the hard drive.) b. Record the date, name, or other identifier of any ROM update that provides software for your notebook: ❏ Select Start > Help and Support, and then select a software update link. - Access the page at the HP Web site that is docked ...
Hardware and Software Guide
Page 150
...exe extension-for your hard drive containing the update. 3. Access the page at the HP Web site that are displayed: 1. To complete the installation, follow the path you recorded earlier to the folder on the screen to download. Follow the instructions on your notebook, select Start > Help...Filename.exe. (The ROM update installation begins.) 4. In the left pane of the Windows Explorer window, select My Computer > your hard drive designation. (The hard drive designation is typically Local Disk C.) Then follow the instructions on the screen. ✎ After a message on the screen after the ...
...exe extension-for your hard drive containing the update. 3. Access the page at the HP Web site that are displayed: 1. To complete the installation, follow the path you recorded earlier to the folder on the screen to download. Follow the instructions on your notebook, select Start > Help...Filename.exe. (The ROM update installation begins.) 4. In the left pane of the Windows Explorer window, select My Computer > your hard drive designation. (The hard drive designation is typically Local Disk C.) Then follow the instructions on the screen. ✎ After a message on the screen after the ...
Hardware and Software Guide
Page 151
... typically Local Disk C) > SWSetup. If you have downloaded. 7. Select the file that includes an .exe extension-for most downloads from the HP Web site is the SWSetup folder. Software Updates and Recovery and System Software 3. The destination folder for example, Filename.exe. (The installation begins...'t see the download in the SWSetup folder, look in the My Documents folder. 6. Follow the online instructions to download the SoftPaq to the hard drive.) b. In the left pane of the SoftPaq you can delete the downloaded file from the Start button, select Start > All Programs > Accessories...
... typically Local Disk C) > SWSetup. If you have downloaded. 7. Select the file that includes an .exe extension-for most downloads from the HP Web site is the SWSetup folder. Software Updates and Recovery and System Software 3. The destination folder for example, Filename.exe. (The installation begins...'t see the download in the SWSetup folder, look in the My Documents folder. 6. Follow the online instructions to download the SoftPaq to the hard drive.) b. In the left pane of the SoftPaq you can delete the downloaded file from the Start button, select Start > All Programs > Accessories...
Hardware and Software Guide
Page 158
...from hibernation is in Windows or restored from hibernation is the prompt to the Help and Support Center, which is accessible only when the notebook is the prompt for advanced users only, refer to change the boot order. Hardware and Software Guide 8-13 For more information about ...in the lower-left corner of the screen each time the notebook is started or restarted in Windows. To access the Help and Support Center, select Start > Help and Support. The Setup utility features available for advanced users include a hard drive self-test, a Network Service Boot, and settings for all...
...from hibernation is in Windows or restored from hibernation is the prompt to the Help and Support Center, which is accessible only when the notebook is the prompt for advanced users only, refer to change the boot order. Hardware and Software Guide 8-13 For more information about ...in the lower-left corner of the screen each time the notebook is started or restarted in Windows. To access the Help and Support Center, select Start > Help and Support. The Setup utility features available for advanced users include a hard drive self-test, a Network Service Boot, and settings for all...
Hardware and Software Guide
Page 163
... inserting 3-29 low-battery conditions 3-21 monitoring charge 3-19 recycling 3-30 removing 3-28 storing 3-30 battery pack release latch 1-21, 3-28 bays battery 1-21, 1-23 hard drive 1-21 See also compartments Hardware and Software Guide Index-1 Index 1394 devices, connecting 7-3 1394 port, identifying 1-18 A AC adapter 1-22 AC power vs.
... inserting 3-29 low-battery conditions 3-21 monitoring charge 3-19 recycling 3-30 removing 3-28 storing 3-30 battery pack release latch 1-21, 3-28 bays battery 1-21, 1-23 hard drive 1-21 See also compartments Hardware and Software Guide Index-1 Index 1394 devices, connecting 7-3 1394 port, identifying 1-18 A AC adapter 1-22 AC power vs.
Hardware and Software Guide
Page 165
...powered 7-1 Digital Media Slot 1-19, 7-5 Digital Media Slot light 1-19, 7-5 digital memory cards inserting 7-6 removing 7-7 disc, optical. hard drive DVD button function summary 1-5 opening Windows DVD player application 4-16 DVDs hotkeys 2-11 playing 4-10 writing to system 7-11 affected by airport... switch docking device docking, undocking while using disc, diskette 4-10 expansion port on notebook 1-15 monitor port 2-8 USB support 7-2 docking device as power source 3-2 drives adding to 4-11 E eject buttons, PC Card 7-10 electrostatic discharge (ESD) 7-12, 7-18 embedded numeric keypad 2-15...
...powered 7-1 Digital Media Slot 1-19, 7-5 Digital Media Slot light 1-19, 7-5 digital memory cards inserting 7-6 removing 7-7 disc, optical. hard drive DVD button function summary 1-5 opening Windows DVD player application 4-16 DVDs hotkeys 2-11 playing 4-10 writing to system 7-11 affected by airport... switch docking device docking, undocking while using disc, diskette 4-10 expansion port on notebook 1-15 monitor port 2-8 USB support 7-2 docking device as power source 3-2 drives adding to 4-11 E eject buttons, PC Card 7-10 electrostatic discharge (ESD) 7-12, 7-18 embedded numeric keypad 2-15...


