
End User License Agreement
Page 1
...this EULA: a. The term "Software Product" means computer software and may load the Software ON THE CONDITION THAT YOU Product into the local memory or storage device of Rights. You may include associated media, printed materials and "online" or electronic documentation. DOWNLOADING, OR b. You may not...use of the Software Product for use on more than one computer. Reservation of the HP Product. e. You do not have Software Product into Your Computer's AGREE TO ALL TERMS AND temporary memory (RAM) for CONDITIONS OF THIS EULA. An amendment or addendum to this EULA, ...
...this EULA: a. The term "Software Product" means computer software and may load the Software ON THE CONDITION THAT YOU Product into the local memory or storage device of Rights. You may include associated media, printed materials and "online" or electronic documentation. DOWNLOADING, OR b. You may not...use of the Software Product for use on more than one computer. Reservation of the HP Product. e. You do not have Software Product into Your Computer's AGREE TO ALL TERMS AND temporary memory (RAM) for CONDITIONS OF THIS EULA. An amendment or addendum to this EULA, ...

Safety and Regulatory Information Desktops, Thin Clients, and Personal Workstations
Page 29
... the European Union's RoHS Legislation - Table 2-2 Toxic and Hazardous Substances and Elements (continued) Part Name Lead (Pb) Mercury (Hg) Cadmium (Cd) Hexavalent Chromium (Cr(VI)) Memory X O O O I/O PCAs X O O O Power supply X O O O Keyboard X O O O Mouse X O O O Chassis/Other X O O O Fans X O O O Internal/External Media Reading X O O O Devices External Control Devices X O O O Cable X O O O Hard Disk Drive X O O O Display X X O O Polybrominated biphenyls (PBB) Polybrominated...
... the European Union's RoHS Legislation - Table 2-2 Toxic and Hazardous Substances and Elements (continued) Part Name Lead (Pb) Mercury (Hg) Cadmium (Cd) Hexavalent Chromium (Cr(VI)) Memory X O O O I/O PCAs X O O O Power supply X O O O Keyboard X O O O Mouse X O O O Chassis/Other X O O O Fans X O O O Internal/External Media Reading X O O O Devices External Control Devices X O O O Cable X O O O Hard Disk Drive X O O O Display X X O O Polybrominated biphenyls (PBB) Polybrominated...
Warranty
Page 12
... be used only for use on more than one computer. You may copy the Software Product into Your Computer's temporary memory (RAM) for your HP product ("HP Product"), that is not otherwise subject to distribute the Software Product. You may load the Software Product into the local... memory or storage device of using the Software Product. d. Reservation of a hard disk drive-based solution, an external media-based recovery solution...
... be used only for use on more than one computer. You may copy the Software Product into Your Computer's temporary memory (RAM) for your HP product ("HP Product"), that is not otherwise subject to distribute the Software Product. You may load the Software Product into the local... memory or storage device of using the Software Product. d. Reservation of a hard disk drive-based solution, an external media-based recovery solution...
Warranty
Page 28
... old product for system resources. Visit our Web site to find out how easy it is not an HP product; Confirming Total Memory The system BIOS displays the full 4GB of installed memory. 1 Turn on the PC. 2 Press the F1 key. This limitation is not limited to change without notice. The BIOS menu displays...
... old product for system resources. Visit our Web site to find out how easy it is not an HP product; Confirming Total Memory The system BIOS displays the full 4GB of installed memory. 1 Turn on the PC. 2 Press the F1 key. This limitation is not limited to change without notice. The BIOS menu displays...
Limited Warranty and Support Guide (Refurbished Desktops)
Page 7
.... Third Party. Use. Reservation of such license. Use of the Freeware by you shall be licensed for the original Software Product identified by HP as a consignment. floppy disk, CD or DVD) or an equivalent solution delivered in its suppliers reserve all rights not expressly granted to all... internet and was originally purchased. You may make a one computer. You may load the Software Product into the local memory or storage device of the HP Product. HP and its online documentation. The use of any Microsoft operating system software contained in the form of a hard disk drive...
.... Third Party. Use. Reservation of such license. Use of the Freeware by you shall be licensed for the original Software Product identified by HP as a consignment. floppy disk, CD or DVD) or an equivalent solution delivered in its suppliers reserve all rights not expressly granted to all... internet and was originally purchased. You may make a one computer. You may load the Software Product into the local memory or storage device of the HP Product. HP and its online documentation. The use of any Microsoft operating system software contained in the form of a hard disk drive...

Start Here Guide
Page 15
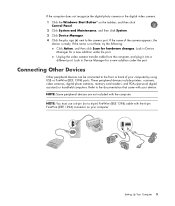
... or the digital video camera: 1 Click the Windows Start Button® on your computer. These peripheral devices include printers, scanners, video cameras, digital photo cameras, memory card readers, and PDAs (personal digital assistant) or handheld computers. If the name of your computer by using USB or FireWire (IEEE 1394) ports. NOTE...
... or the digital video camera: 1 Click the Windows Start Button® on your computer. These peripheral devices include printers, scanners, video cameras, digital photo cameras, memory card readers, and PDAs (personal digital assistant) or handheld computers. If the name of your computer by using USB or FireWire (IEEE 1394) ports. NOTE...
Upgrading and Servicing Guide
Page 3
Table of Contents Safety Information 1 Opening and Closing the PC 1 Preparing the PC 2 Before Opening the PC 2 After Closing the PC 3 Removing the Side Panel 3 Replacing the Side Panel 4 Removing the Front Panel 5 Replacing the Front Panel 6 Locating Components Inside the Computer 7 ...or Replacing the HP Pocket Media or Diskette or Hard Disk Drive 13 Removing the Memory Card Reader 15 Adding or Replacing the Memory Card Reader 16 Removing the Hard Disk Drive 17 Adding or Replacing a Hard Disk Drive 19 Adding Memory 22 Removing a Memory Module 22 Installing a Memory Module 24 ...
Table of Contents Safety Information 1 Opening and Closing the PC 1 Preparing the PC 2 Before Opening the PC 2 After Closing the PC 3 Removing the Side Panel 3 Replacing the Side Panel 4 Removing the Front Panel 5 Replacing the Front Panel 6 Locating Components Inside the Computer 7 ...or Replacing the HP Pocket Media or Diskette or Hard Disk Drive 13 Removing the Memory Card Reader 15 Adding or Replacing the Memory Card Reader 16 Removing the Hard Disk Drive 17 Adding or Replacing a Hard Disk Drive 19 Adding Memory 22 Removing a Memory Module 22 Installing a Memory Module 24 ...

Upgrading and Servicing Guide
Page 9
Upgrading and Servicing Guide 5 Removing the Front Panel This procedure is necessary only when removing or replacing an optical drive, memory card reader, an HP Pocket Media Drive, diskette drive, or the hard disk drive. 1 Pull the three tabs (B) away from the chassis toward the left to remove it. B 2 Swing the front panel away from the outside edge of the chassis.
Upgrading and Servicing Guide 5 Removing the Front Panel This procedure is necessary only when removing or replacing an optical drive, memory card reader, an HP Pocket Media Drive, diskette drive, or the hard disk drive. 1 Pull the three tabs (B) away from the chassis toward the left to remove it. B 2 Swing the front panel away from the outside edge of the chassis.

Upgrading and Servicing Guide
Page 11
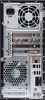
Upgrading and Servicing Guide 7 Locating Components Inside the Computer A B C D E F A Memory card reader (select models) B Upper 5.25-inch optical drive bay, may be a CD-ROM, CD-RW, DVD-ROM, DVD+RW/+R, or combination drive C Lower 5.25-...inch optical drive bay, may be empty (knockout plate) or a CD-ROM, CD-RW, DVD-ROM, DVD+RW/+R, combination drive, or HP Personal Media Drive bay (select models) D HP Pocket Media Drive bay, a hard disk drive, or a diskette (floppy) drive (select models) E Front connector panel (no replacement instructions) F Hard disk drive...
Upgrading and Servicing Guide 7 Locating Components Inside the Computer A B C D E F A Memory card reader (select models) B Upper 5.25-inch optical drive bay, may be a CD-ROM, CD-RW, DVD-ROM, DVD+RW/+R, or combination drive C Lower 5.25-...inch optical drive bay, may be empty (knockout plate) or a CD-ROM, CD-RW, DVD-ROM, DVD+RW/+R, combination drive, or HP Personal Media Drive bay (select models) D HP Pocket Media Drive bay, a hard disk drive, or a diskette (floppy) drive (select models) E Front connector panel (no replacement instructions) F Hard disk drive...
Upgrading and Servicing Guide
Page 19
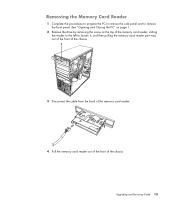
See "Opening and Closing the PC" on page 1. 2 Release the drive by removing the screw on the top of the chassis. Removing the Memory Card Reader 1 Complete the procedures to prepare the PC to remove the side panel and to loosen it, and then pulling the memory card reader part way out of the front of the chassis. 3 Disconnect the cable from the back of the memory card reader. 4 Pull the memory card reader out of the front of the memory card reader, sliding the reader to the left to remove the front panel. Upgrading and Servicing Guide 15
See "Opening and Closing the PC" on page 1. 2 Release the drive by removing the screw on the top of the chassis. Removing the Memory Card Reader 1 Complete the procedures to prepare the PC to remove the side panel and to loosen it, and then pulling the memory card reader part way out of the front of the chassis. 3 Disconnect the cable from the back of the memory card reader. 4 Pull the memory card reader out of the front of the memory card reader, sliding the reader to the left to remove the front panel. Upgrading and Servicing Guide 15

Upgrading and Servicing Guide
Page 20
..."Opening and Closing the PC" on the top of the memory card reader, and then insert the short screw to secure the memory card reader to the chassis. 5 Complete the procedures to replace the front panel, replace the side panel, and close the PC. Adding or Replacing the Memory Card Reader 1 Complete ...the procedures to the back of the memory card reader. 4 Push the memory card reader into the front of the chassis. 3 Attach the cable to remove the...
..."Opening and Closing the PC" on the top of the memory card reader, and then insert the short screw to secure the memory card reader to the chassis. 5 Complete the procedures to replace the front panel, replace the side panel, and close the PC. Adding or Replacing the Memory Card Reader 1 Complete ...the procedures to the back of the memory card reader. 4 Push the memory card reader into the front of the chassis. 3 Attach the cable to remove the...
Upgrading and Servicing Guide
Page 26
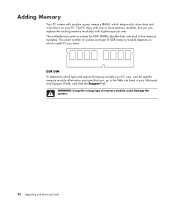
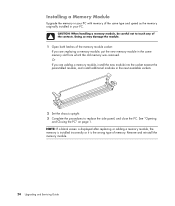
...the Support link. DDR DIM To determine which model PC you can replace the existing memory module(s) with one or more memory modules, but you have. The PC ships with higher-capacity ones. WARNING: Using the wrong type of memory module could damage the system. 22 Upgrading and Servicing ...Guide Adding Memory Your PC comes with random access memory (RAM), which temporarily stores data and instructions on which type and speed of memory module your PC uses, and for DDR DIMMs (double ...
...the Support link. DDR DIM To determine which model PC you can replace the existing memory module(s) with one or more memory modules, but you have. The PC ships with higher-capacity ones. WARNING: Using the wrong type of memory module could damage the system. 22 Upgrading and Servicing ...Guide Adding Memory Your PC comes with random access memory (RAM), which temporarily stores data and instructions on which type and speed of memory module your PC uses, and for DDR DIMMs (double ...
Upgrading and Servicing Guide
Page 27
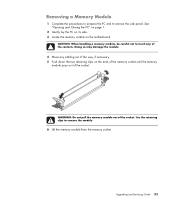
... the motherboard. Upgrading and Servicing Guide 23 CAUTION: When handling a memory module, be careful not to touch any cabling out of the contacts. Removing a Memory Module 1 Complete the procedures to prepare the PC and to remove the module. 6 Lift the memory module from the memory socket. Use the retaining clips to remove the side panel...
... the motherboard. Upgrading and Servicing Guide 23 CAUTION: When handling a memory module, be careful not to touch any cabling out of the contacts. Removing a Memory Module 1 Complete the procedures to prepare the PC and to remove the module. 6 Lift the memory module from the memory socket. Use the retaining clips to remove the side panel...
Upgrading and Servicing Guide
Page 28
...after replacing or adding a memory module, the memory is installed incorrectly or it is the wrong type of the same type and speed as the memory originally installed in your PC with memory of memory. See "Opening and Closing the PC" on page 1. Remove and reinstall the memory module. 24 Upgrading and ...Servicing Guide Or If you are adding a memory module, install the new module into the socket...
...after replacing or adding a memory module, the memory is installed incorrectly or it is the wrong type of the same type and speed as the memory originally installed in your PC with memory of memory. See "Opening and Closing the PC" on page 1. Remove and reinstall the memory module. 24 Upgrading and ...Servicing Guide Or If you are adding a memory module, install the new module into the socket...
Upgrading and Servicing Guide
Page 32
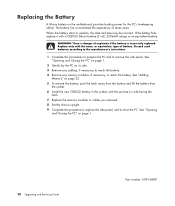
... necessary, to reach the battery. 4 Remove any memory modules, if necessary, to close the PC. Discard used batteries according to the manufacturer's instructions. 1 Complete the procedures to prepare the PC and to weaken, the date and time may be incorrect. See "Opening and Closing the PC" on the motherboard provides backup power for the...
... necessary, to reach the battery. 4 Remove any memory modules, if necessary, to close the PC. Discard used batteries according to the manufacturer's instructions. 1 Complete the procedures to prepare the PC and to weaken, the date and time may be incorrect. See "Opening and Closing the PC" on the motherboard provides backup power for the...

Getting Started Guide
Page 6
... Optical Drive Quick Reference Table 87 Using the Memory Card Reader 89 Media Insertion Guide 90 Understanding the Activity Light 93 Formatting a Memory Card 93 Troubleshooting the Memory Card Reader 94 Using the HP Personal Media Drive and HP Pocket Media Drive 95 Connecting the Drive 96 ...Inserting the Drive into an HP drive bay 96 Connecting the Drive to a Computer ...
... Optical Drive Quick Reference Table 87 Using the Memory Card Reader 89 Media Insertion Guide 90 Understanding the Activity Light 93 Formatting a Memory Card 93 Troubleshooting the Memory Card Reader 94 Using the HP Personal Media Drive and HP Pocket Media Drive 95 Connecting the Drive 96 ...Inserting the Drive into an HP drive bay 96 Connecting the Drive to a Computer ...
Getting Started Guide
Page 13
... or the digital video camera: 1 Click the Windows Start Button® on your computer. These peripheral devices include printers, scanners, video cameras, digital photo cameras, memory card readers, and PDAs (personal digital assistant) or handheld computers.
... or the digital video camera: 1 Click the Windows Start Button® on your computer. These peripheral devices include printers, scanners, video cameras, digital photo cameras, memory card readers, and PDAs (personal digital assistant) or handheld computers.
Getting Started Guide
Page 52
Sleep mode saves your work to memory so you can perform task such as to put it into sleep or hibernate mode. During away mode, the computer can resume quickly, saves your ... information on the Windows Start Button, see "Using the Windows Start Button Menu." 1 Close any buttons on the computer chassis. Hibernate mode saves your system memory to shutting down : 1 Press the Power button on the monitor. 2 Press the On button on the front of each program window. 2 Click the Windows Start...
Sleep mode saves your work to memory so you can perform task such as to put it into sleep or hibernate mode. During away mode, the computer can resume quickly, saves your ... information on the Windows Start Button, see "Using the Windows Start Button Menu." 1 Close any buttons on the computer chassis. Hibernate mode saves your system memory to shutting down : 1 Press the Power button on the monitor. 2 Press the On button on the front of each program window. 2 Click the Windows Start...

Getting Started Guide
Page 54
... settings. Using hibernate mode Hibernate mode is idle for a specified number of the computer. When the computer is in hibernate mode, it is in computer memory, turns off the monitor and the hard disk drive, and then turns itself off. see "Automatic sleep, hibernate, or away mode." d Click OK. 46 Getting...
... settings. Using hibernate mode Hibernate mode is idle for a specified number of the computer. When the computer is in hibernate mode, it is in computer memory, turns off the monitor and the hard disk drive, and then turns itself off. see "Automatic sleep, hibernate, or away mode." d Click OK. 46 Getting...
Getting Started Guide
Page 55
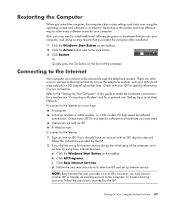
... ISP and set it up with an ISP, skip this step and follow the instructions provided by using the operating system and software in its memory. There are other ways to connect to the Internet: 1 Sign up now by the ISP. Check with an ISP. Refer to make the hardware connections...
... ISP and set it up with an ISP, skip this step and follow the instructions provided by using the operating system and software in its memory. There are other ways to connect to the Internet: 1 Sign up now by the ISP. Check with an ISP. Refer to make the hardware connections...


