Safety and Regulatory Information Desktops, Thin Clients, and Personal Workstations
Page 17
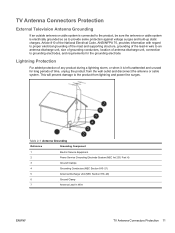
... lightning and power line surges. Article 810 of the National Electrical Code, ANSI/NFPA 70, provides information with regard to proper electrical grounding of the mast and supporting structure, grounding of the lead-in Wire ENWW TV Antenna Connectors Protection 11 TV Antenna Connectors Protection External Television Antenna Grounding If an outside antenna or cable system is connected to...
... lightning and power line surges. Article 810 of the National Electrical Code, ANSI/NFPA 70, provides information with regard to proper electrical grounding of the mast and supporting structure, grounding of the lead-in Wire ENWW TV Antenna Connectors Protection 11 TV Antenna Connectors Protection External Television Antenna Grounding If an outside antenna or cable system is connected to...
Upgrading and Servicing Guide
Page 5
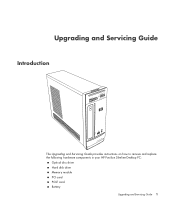
Upgrading and Servicing Guide Introduction The Upgrading and Servicing Guide provides instructions on how to remove and replace the following hardware components in your HP Pavilion Slimline Desktop PC: Optical disc drive Hard disk drive Memory module PCI card PCI-E card Battery Upgrading and Servicing Guide 1
Upgrading and Servicing Guide Introduction The Upgrading and Servicing Guide provides instructions on how to remove and replace the following hardware components in your HP Pavilion Slimline Desktop PC: Optical disc drive Hard disk drive Memory module PCI card PCI-E card Battery Upgrading and Servicing Guide 1
Upgrading and Servicing Guide
Page 25
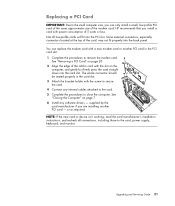
.... NOTE: If the new card or device isn't working, read the card manufacturer's installation instructions, and recheck all low-profile cards will fit into the PCI slot. Upgrading and Servicing Guide 21 See "Removing a PCI Card" on page 20. 2 Align the edge of the card, may not fit properly into the card slot. The whole connector should be seated properly in card with power consumption of the modem card. or as required. See...
.... NOTE: If the new card or device isn't working, read the card manufacturer's installation instructions, and recheck all low-profile cards will fit into the PCI slot. Upgrading and Servicing Guide 21 See "Removing a PCI Card" on page 20. 2 Align the edge of the card, may not fit properly into the card slot. The whole connector should be seated properly in card with power consumption of the modem card. or as required. See...
Advanced Setup Guide
Page 21
... have an integrated WLAN device, or the driver for wireless topics. Checking the wireless LAN device installation To set up a firewall. Your WLAN device should be listed here. NOTE: If no WLAN device is not properly installed. 4 Click the Windows Start Button on the taskbar. 5 Type Network and Sharing Center into the Start Search box, and then click Device Manager to open the Network and Sharing Center window. 6 Click Connect to open the Device Manager window. 3 Click Network adapters. For more of...
... have an integrated WLAN device, or the driver for wireless topics. Checking the wireless LAN device installation To set up a firewall. Your WLAN device should be listed here. NOTE: If no WLAN device is not properly installed. 4 Click the Windows Start Button on the taskbar. 5 Type Network and Sharing Center into the Start Search box, and then click Device Manager to open the Network and Sharing Center window. 6 Click Connect to open the Device Manager window. 3 Click Network adapters. For more of...
Limited Warranty and Support Guide
Page 14
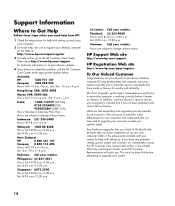
... the problem, call the HP Customer Care Center at the appropriate number below. Refer to the setup poster included with your system for help online, go through a comprehensive quality test to change without notice Indonesia: (21) 350-3408 Hours: M-F 8 a.m.-5 p.m. If you have any problems setting up your system and turning it on, immediately contact the HP Customer Care Center listed earlier in this a key...
... the problem, call the HP Customer Care Center at the appropriate number below. Refer to the setup poster included with your system for help online, go through a comprehensive quality test to change without notice Indonesia: (21) 350-3408 Hours: M-F 8 a.m.-5 p.m. If you have any problems setting up your system and turning it on, immediately contact the HP Customer Care Center listed earlier in this a key...

Getting Started
Page 25
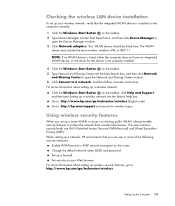
... Network adapters. Checking the wireless LAN device installation To set up a wireless network into the Search Help box. NOTE: If no WLAN device is installed on the computer correctly: 1 Click the Windows Start Button on the taskbar. 2 Type Device Manager into the Start Search box, and then click Device Manager to : http://www.hp.com/go/techcenter/wireless (English only). Setting Up the Computer 15 To connect the wireless LAN antenna: 1 Screw the wireless LAN antenna cable into the wireless LAN connector...
... Network adapters. Checking the wireless LAN device installation To set up a wireless network into the Search Help box. NOTE: If no WLAN device is installed on the computer correctly: 1 Click the Windows Start Button on the taskbar. 2 Type Device Manager into the Start Search box, and then click Device Manager to : http://www.hp.com/go/techcenter/wireless (English only). Setting Up the Computer 15 To connect the wireless LAN antenna: 1 Screw the wireless LAN antenna cable into the wireless LAN connector...
Getting Started
Page 58
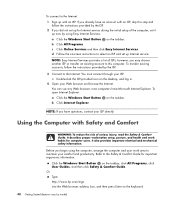
... the Internet. d Follow the onscreen instructions to the Internet. NOTE: Easy Internet Services provides a list of the computer, set up now by model) Double-click the ISP-provided icon on the keyboard. 48 Getting Started (features vary by using the computer, arrange the computer and your ISP. Using the Computer with an ISP. however, you begin using Easy Internet Services. To open Internet Explorer: a Click the Windows Start Button on...
... the Internet. d Follow the onscreen instructions to the Internet. NOTE: Easy Internet Services provides a list of the computer, set up now by model) Double-click the ISP-provided icon on the keyboard. 48 Getting Started (features vary by using the computer, arrange the computer and your ISP. Using the Computer with an ISP. however, you begin using Easy Internet Services. To open Internet Explorer: a Click the Windows Start Button on...

Getting Started
Page 63
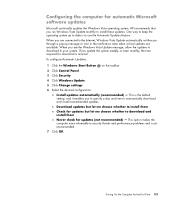
... Automatic Updates feature. To configure Automatic Updates: 1 Click the Windows Start Button on the taskbar. 2 Click Control Panel. 3 Click Security. 4 Click Windows Update. 5 Click Change settings. 6 Select the desired configuration: Install updates automatically (recommended) - This is to keep the operating system up message or icon in the notification area when critical updates are available. This option makes the computer more vulnerable to your system. HP recommends that you see the Windows Vista Update...
... Automatic Updates feature. To configure Automatic Updates: 1 Click the Windows Start Button on the taskbar. 2 Click Control Panel. 3 Click Security. 4 Click Windows Update. 5 Click Change settings. 6 Select the desired configuration: Install updates automatically (recommended) - This is to keep the operating system up message or icon in the notification area when critical updates are available. This option makes the computer more vulnerable to your system. HP recommends that you see the Windows Vista Update...

Getting Started
Page 95
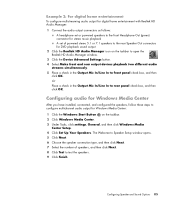
... installed, connected, and configured the speakers, follow these steps to rear panel check box, and then click OK. The Welcome to Speaker Setup window opens. 5 Click Next. 6 Choose the speaker connection type, and then click Next. 7 Select the number of powered stereo 5.1 or 7.1 speakers to the rear Speaker Out connectors for DVD playback sound output 2 Click the Realtek HD Audio Manager icon on the taskbar. 2 Click Windows Media Center. 3 Under Tasks, click settings, General, and then click Windows Media Center Setup...
... installed, connected, and configured the speakers, follow these steps to rear panel check box, and then click OK. The Welcome to Speaker Setup window opens. 5 Click Next. 6 Choose the speaker connection type, and then click Next. 7 Select the number of powered stereo 5.1 or 7.1 speakers to the rear Speaker Out connectors for DVD playback sound output 2 Click the Realtek HD Audio Manager icon on the taskbar. 2 Click Windows Media Center. 3 Under Tasks, click settings, General, and then click Windows Media Center Setup...

Getting Started
Page 219
... HP Pocket Media Drive 125 HP Total Care Advisor 41 I IBM Microdrive 122 Internet security 52, 100 K keyboard connector 4 customizing buttons 62 shortcuts 63 types of buttons 57 using 57 L LAN (local area network) 12 antenna 15 checking wireless LAN device 15 connecting Ethernet LAN 5 connecting wireless LAN device 14 setting up 13 using Local Area Network 12 LightScribe, creating a LightScribe disc label 175 local area network (LAN) 12 M magicSpot 198 manuals storing 10 memory card reader 179 card types 119 in-use light 123 troubleshooting 124 using 119 memory card...
... HP Pocket Media Drive 125 HP Total Care Advisor 41 I IBM Microdrive 122 Internet security 52, 100 K keyboard connector 4 customizing buttons 62 shortcuts 63 types of buttons 57 using 57 L LAN (local area network) 12 antenna 15 checking wireless LAN device 15 connecting Ethernet LAN 5 connecting wireless LAN device 14 setting up 13 using Local Area Network 12 LightScribe, creating a LightScribe disc label 175 local area network (LAN) 12 M magicSpot 198 manuals storing 10 memory card reader 179 card types 119 in-use light 123 troubleshooting 124 using 119 memory card...
Getting Started Guide
Page 25
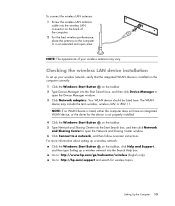
... the device is installed on the computer correctly: 1 Click the Windows Start Button on the taskbar, click Help and Support, and then type Setting up a wireless network: Click the Windows Start Button on the taskbar. 2 Type Device Manager into the Start Search box, and then click Network and Sharing Center to open the Device Manager window. 3 Click Network adapters. Setting Up the Computer 15 Your WLAN device should be listed here. Go to a network, and then follow onscreen instructions. NOTE...
... the device is installed on the computer correctly: 1 Click the Windows Start Button on the taskbar, click Help and Support, and then type Setting up a wireless network: Click the Windows Start Button on the taskbar. 2 Type Device Manager into the Start Search box, and then click Network and Sharing Center to open the Device Manager window. 3 Click Network adapters. Setting Up the Computer 15 Your WLAN device should be listed here. Go to a network, and then follow onscreen instructions. NOTE...
Getting Started Guide
Page 63
... keep the operating system up message or icon in the notification area when critical updates are available. If you to specify a day and time to install these updates. To configure Automatic Updates: 1 Click the Windows Start Button on the taskbar. 2 Click Control Panel. 3 Click Security. 4 Click Windows Update. 5 Click Change settings. 6 Select the desired configuration: Install updates automatically (recommended) - When you run Windows Vista Update monthly to automatically download and install recommended updates. This option makes the...
... keep the operating system up message or icon in the notification area when critical updates are available. If you to specify a day and time to install these updates. To configure Automatic Updates: 1 Click the Windows Start Button on the taskbar. 2 Click Control Panel. 3 Click Security. 4 Click Windows Update. 5 Click Change settings. 6 Select the desired configuration: Install updates automatically (recommended) - When you run Windows Vista Update monthly to automatically download and install recommended updates. This option makes the...
Getting Started Guide
Page 95
... rear panel check box, and then click OK. Configuring Speaker and Sound Options 85 Configuring audio for Windows Media Center: 1 Click the Windows Start Button on the taskbar to open the Realtek HD Audio Manager window. 3 Click the Device Advanced Settings button. 4 Select Make front and rear output devices playback two different audio streams simultaneously. 5 Place a check in the Output Mic In/Line In to test the speakers. 9 Click Finish. The Welcome to Speaker Setup window opens. 5 Click Next. 6 Choose the speaker connection type...
... rear panel check box, and then click OK. Configuring Speaker and Sound Options 85 Configuring audio for Windows Media Center: 1 Click the Windows Start Button on the taskbar to open the Realtek HD Audio Manager window. 3 Click the Device Advanced Settings button. 4 Select Make front and rear output devices playback two different audio streams simultaneously. 5 Place a check in the Output Mic In/Line In to test the speakers. 9 Click Finish. The Welcome to Speaker Setup window opens. 5 Click Next. 6 Choose the speaker connection type...

Getting Started Guide
Page 219
... HP Pocket Media Drive 125 HP Total Care Advisor 41 I IBM Microdrive 122 Internet security 52, 100 K keyboard connector 4 customizing buttons 62 shortcuts 63 types of buttons 57 using 57 L LAN (local area network) 12 antenna 15 checking wireless LAN device 15 connecting Ethernet LAN 5 connecting wireless LAN device 14 setting up 13 using Local Area Network 12 LightScribe, creating a LightScribe disc label 175 local area network (LAN) 12 M magicSpot 198 manuals storing 10 memory card reader 179 card types 119 in-use light 123 troubleshooting 124 using 119 memory card...
... HP Pocket Media Drive 125 HP Total Care Advisor 41 I IBM Microdrive 122 Internet security 52, 100 K keyboard connector 4 customizing buttons 62 shortcuts 63 types of buttons 57 using 57 L LAN (local area network) 12 antenna 15 checking wireless LAN device 15 connecting Ethernet LAN 5 connecting wireless LAN device 14 setting up 13 using Local Area Network 12 LightScribe, creating a LightScribe disc label 175 local area network (LAN) 12 M magicSpot 198 manuals storing 10 memory card reader 179 card types 119 in-use light 123 troubleshooting 124 using 119 memory card...
PC Troubleshooting
Page 3
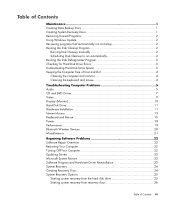
... Troubleshooting Computer Problems 5 Audio ...5 CD and DVD Drives 7 Video...9 Display (Monitor 10 Hard Disk Drive...11 Hardware Installation 11 Internet Access ...13 Keyboard and Mouse 15 Power ...18 Performance ...19 Bluetooth Wireless Devices 20 Miscellaneous ...21 Repairing Software Problems 22 Software Repair Overview 22 Restarting Your Computer 22 Turning Off Your Computer 22 Updating Drivers 22 Microsoft System Restore 23 Software Program and Hardware Driver Reinstallation 23 System Recovery 24 Creating Recovery Discs 24 System Recovery Options 25 Starting system recovery...
... Troubleshooting Computer Problems 5 Audio ...5 CD and DVD Drives 7 Video...9 Display (Monitor 10 Hard Disk Drive...11 Hardware Installation 11 Internet Access ...13 Keyboard and Mouse 15 Power ...18 Performance ...19 Bluetooth Wireless Devices 20 Miscellaneous ...21 Repairing Software Problems 22 Software Repair Overview 22 Restarting Your Computer 22 Turning Off Your Computer 22 Updating Drivers 22 Microsoft System Restore 23 Software Program and Hardware Driver Reinstallation 23 System Recovery 24 Creating Recovery Discs 24 System Recovery Options 25 Starting system recovery...
PC Troubleshooting
Page 6
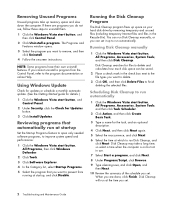
.... 3 Click Software Explorer. 4 In the Category list, select Startup Programs. 5 Select the program that automatically run at which to remove, and then click Uninstall. 4 Follow the onscreen instructions. NOTE: Some programs have their own uninstall features. Running Disk Cleanup manually 1 Click the Windows Vista start button, and Control Panel. 2 Under Security, click the Check for files to delete and calculates how much disk space can set it...
.... 3 Click Software Explorer. 4 In the Category list, select Startup Programs. 5 Select the program that automatically run at which to remove, and then click Uninstall. 4 Follow the onscreen instructions. NOTE: Some programs have their own uninstall features. Running Disk Cleanup manually 1 Click the Windows Vista start button, and Control Panel. 2 Under Security, click the Check for files to delete and calculates how much disk space can set it...
PC Troubleshooting
Page 9
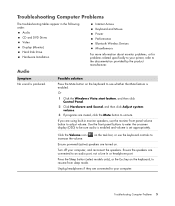
... DVD Drives Video Display (Monitor) Hard Disk Drive Hardware Installation Internet Access Keyboard and Mouse Power Performance Bluetooth Wireless Devices Miscellaneous For more information about monitor problems, or for problems related specifically to your computer, and reconnect the speakers. Press the Sleep button (select models only), or the Esc key on . Use the front panel buttons to enter the onscreen display (OSD) to be sure audio is enabled and volume is produced. Troubleshooting Computer Problems The troubleshooting tables appear in monitor speakers, use the keyboard controls...
... DVD Drives Video Display (Monitor) Hard Disk Drive Hardware Installation Internet Access Keyboard and Mouse Power Performance Bluetooth Wireless Devices Miscellaneous For more information about monitor problems, or for problems related specifically to your computer, and reconnect the speakers. Press the Sleep button (select models only), or the Esc key on . Use the front panel buttons to enter the onscreen display (OSD) to be sure audio is enabled and volume is produced. Troubleshooting Computer Problems The troubleshooting tables appear in monitor speakers, use the keyboard controls...
PC Troubleshooting
Page 15
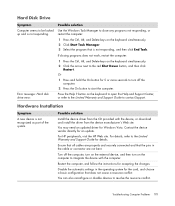
Error message: Hard disk drive error. Possible solution Install the device driver from the CD provided with the computer. For HP peripherals, visit the HP Web site. Turn off the computer, turn on the external device, and then turn off the computer. 2 Press the On button to start the computer. Disable the automatic settings in the cable or connector are not bent. Press the Help ? For details, refer to the Limited Warranty...
Error message: Hard disk drive error. Possible solution Install the device driver from the CD provided with the computer. For HP peripherals, visit the HP Web site. Turn off the computer, turn on the external device, and then turn off the computer. 2 Press the On button to start the computer. Disable the automatic settings in the cable or connector are not bent. Press the Help ? For details, refer to the Limited Warranty...
PC Troubleshooting
Page 17
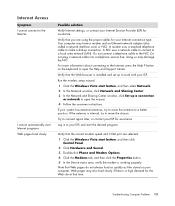
... service line; If the antenna is working properly. Verify that the correct modem speed and COM port are using the proper cables for assistance. A modem uses a standard telephone cable to open the wizard. 4 Follow the onscreen instructions. A NIC uses a network cable to connect to open the Help and Support Center. Run the wireless setup wizard: 1 Click the Windows Vista start button, and then select Network. 2 In the Network window, click Network and Sharing Center. 3 In the Network and Sharing Center window, click Set...
... service line; If the antenna is working properly. Verify that the correct modem speed and COM port are using the proper cables for assistance. A modem uses a standard telephone cable to open the wizard. 4 Follow the onscreen instructions. A NIC uses a network cable to connect to open the Help and Support Center. Run the wireless setup wizard: 1 Click the Windows Vista start button, and then select Network. 2 In the Network window, click Network and Sharing Center. 3 In the Network and Sharing Center window, click Set...
PC Troubleshooting
Page 31
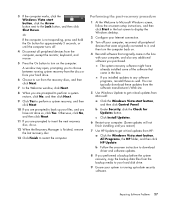
... recovery disc. 13 Click Finish to get critical updates from the backup media to your hard disk drive. 9 Ensure your hard drive. 6 Choose to run from the software manufacturer's Web site. 5 Use Windows Update to restart the computer. Repairing Software Problems 27 Performing the post-recovery procedure 1 At the Welcome to Microsoft Windows screen, follow the onscreen setup instructions, and then click Start in the last screen to display the Windows desktop. 2 Configure your Internet connection. 3 Turn off . 4 Disconnect all peripheral devices...
... recovery disc. 13 Click Finish to get critical updates from the backup media to your hard disk drive. 9 Ensure your hard drive. 6 Choose to run from the software manufacturer's Web site. 5 Use Windows Update to restart the computer. Repairing Software Problems 27 Performing the post-recovery procedure 1 At the Welcome to Microsoft Windows screen, follow the onscreen setup instructions, and then click Start in the last screen to display the Windows desktop. 2 Configure your Internet connection. 3 Turn off . 4 Disconnect all peripheral devices...


