
End User License Agreement
Page 1
... a. Use. You do not have Software Product into Your Computer's AGREE TO ALL TERMS AND temporary memory (RAM) for use on more than one computer. d. BY purposes of the HP Product. Notwithstanding the terms and conditions of this EULA, all rights not expressly granted to a separate ...: This End-User license Agreement ("EULA") is a legal agreement between you and HP or its suppliers. Other software may load the Software ON THE CONDITION THAT YOU Product into the local memory or storage device of using the Software INSTALLING, COPYING, Product. You may use ...
... a. Use. You do not have Software Product into Your Computer's AGREE TO ALL TERMS AND temporary memory (RAM) for use on more than one computer. d. BY purposes of the HP Product. Notwithstanding the terms and conditions of this EULA, all rights not expressly granted to a separate ...: This End-User license Agreement ("EULA") is a legal agreement between you and HP or its suppliers. Other software may load the Software ON THE CONDITION THAT YOU Product into the local memory or storage device of using the Software INSTALLING, COPYING, Product. You may use ...

Safety and Regulatory Information Desktops, Thin Clients, and Personal Workstations
Page 29
... in electrical and electronic equipment". Table 2-2 Toxic and Hazardous Substances and Elements (continued) Part Name Lead (Pb) Mercury (Hg) Cadmium (Cd) Hexavalent Chromium (Cr(VI)) Memory X O O O I/O PCAs X O O O Power supply X O O O Keyboard X O O O Mouse X O O O Chassis/Other X O O O Fans X O O O Internal/External Media Reading X O O O Devices External Control Devices X O O O Cable X O O O Hard Disk Drive X O O O Display X X O O Polybrominated biphenyls (PBB) Polybrominated...
... in electrical and electronic equipment". Table 2-2 Toxic and Hazardous Substances and Elements (continued) Part Name Lead (Pb) Mercury (Hg) Cadmium (Cd) Hexavalent Chromium (Cr(VI)) Memory X O O O I/O PCAs X O O O Power supply X O O O Keyboard X O O O Mouse X O O O Chassis/Other X O O O Fans X O O O Internal/External Media Reading X O O O Devices External Control Devices X O O O Cable X O O O Hard Disk Drive X O O O Display X X O O Polybrominated biphenyls (PBB) Polybrominated...
Upgrading and Servicing Guide
Page 3
... a Hard Disk Drive 12 Before You Begin 12 Removing a Hard Disk Drive 12 Replacing a Hard Disk Drive 14 Removing and Replacing Memory 16 Before You Begin 16 Removing a Memory Module 17 Replacing a Memory Module 18 Removing and Replacing a PCI Card 19 Before You Begin 20 Removing a PCI Card 20 Replacing a PCI Card 21...
... a Hard Disk Drive 12 Before You Begin 12 Removing a Hard Disk Drive 12 Replacing a Hard Disk Drive 14 Removing and Replacing Memory 16 Before You Begin 16 Removing a Memory Module 17 Replacing a Memory Module 18 Removing and Replacing a PCI Card 19 Before You Begin 20 Removing a PCI Card 20 Replacing a PCI Card 21...
Upgrading and Servicing Guide
Page 5
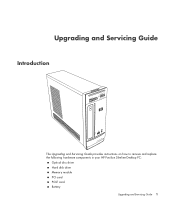
Upgrading and Servicing Guide Introduction The Upgrading and Servicing Guide provides instructions on how to remove and replace the following hardware components in your HP Pavilion Slimline Desktop PC: Optical disc drive Hard disk drive Memory module PCI card PCI-E card Battery Upgrading and Servicing Guide 1
Upgrading and Servicing Guide Introduction The Upgrading and Servicing Guide provides instructions on how to remove and replace the following hardware components in your HP Pavilion Slimline Desktop PC: Optical disc drive Hard disk drive Memory module PCI card PCI-E card Battery Upgrading and Servicing Guide 1
Upgrading and Servicing Guide
Page 7
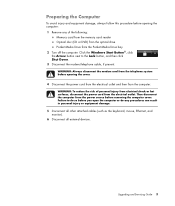
...: Always disconnect the modem cord from the Pocket Media Drive bay 2 Turn off the computer. WARNING: To reduce the risk of the following: Memory card from the memory card reader Optical disc (CD or DVD) from the optical drive Pocket Media Drive from the telephone system before removing the computer cover. Upgrading...
...: Always disconnect the modem cord from the Pocket Media Drive bay 2 Turn off the computer. WARNING: To reduce the risk of the following: Memory card from the memory card reader Optical disc (CD or DVD) from the optical drive Pocket Media Drive from the telephone system before removing the computer cover. Upgrading...
Upgrading and Servicing Guide
Page 9
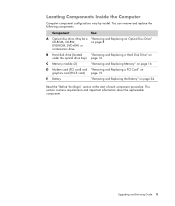
... and Replacing Memory" on page 8. Read the "Before You Begin" section at the start of each component procedure. May be a "Removing and Replacing an Optical Disc Drive" CD-...
... and Replacing Memory" on page 8. Read the "Before You Begin" section at the start of each component procedure. May be a "Removing and Replacing an Optical Disc Drive" CD-...

Upgrading and Servicing Guide
Page 20
... care. Touching the gold contacts may damage the module. Removing and Replacing Memory The motherboard contains one or two memory module sockets for specific memory module information and specifications: 1 Go to not touch any memory module contacts. Be careful to http://www.hp.com/support in your Web browser. 2 Select your country/region and language...
... care. Touching the gold contacts may damage the module. Removing and Replacing Memory The motherboard contains one or two memory module sockets for specific memory module information and specifications: 1 Go to not touch any memory module contacts. Be careful to http://www.hp.com/support in your Web browser. 2 Select your country/region and language...
Upgrading and Servicing Guide
Page 21
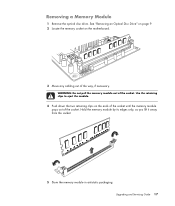
WARNING: Do not pull the memory module out of the way, if necessary. See "Removing an Optical Disc Drive" on page 9. 2 Locate the memory socket on the ends of the socket until the memory module pops out of the socket. Use the retaining clips to eject the module. 4 Push down the two retaining clips on the motherboard. 3 Move any cabling out of the socket. Upgrading and Servicing Guide 17 Removing a Memory Module 1 Remove the optical disc drive. Hold the memory module by its edges only, as you lift it away from the socket. 5 Store the memory module in antistatic packaging.
WARNING: Do not pull the memory module out of the way, if necessary. See "Removing an Optical Disc Drive" on page 9. 2 Locate the memory socket on the ends of the socket until the memory module pops out of the socket. Use the retaining clips to eject the module. 4 Push down the two retaining clips on the motherboard. 3 Move any cabling out of the socket. Upgrading and Servicing Guide 17 Removing a Memory Module 1 Remove the optical disc drive. Hold the memory module by its edges only, as you lift it away from the socket. 5 Store the memory module in antistatic packaging.
Upgrading and Servicing Guide
Page 22
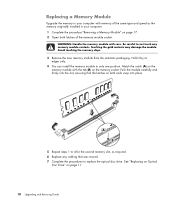
...firmly into place. Replacing a Memory Module Upgrade the memory in your computer with memory of the same type and speed as required. 6 Replace any memory module contacts. Match the notch (A) on the memory socket. A B 5 Repeat steps 1 to 4 for the second memory slot, as the memory originally installed in only one ...Be careful to replace the optical disc drive. Hold it by its edges only. 4 You can install the memory module in your computer. 1 Complete the procedure "Removing a Memory Module" on page 17. 2 Open both ends snap into the slot, ensuring that was moved. 7 Complete ...
...firmly into place. Replacing a Memory Module Upgrade the memory in your computer with memory of the same type and speed as required. 6 Replace any memory module contacts. Match the notch (A) on the memory socket. A B 5 Repeat steps 1 to 4 for the second memory slot, as the memory originally installed in only one ...Be careful to replace the optical disc drive. Hold it by its edges only. 4 You can install the memory module in your computer. 1 Complete the procedure "Removing a Memory Module" on page 17. 2 Open both ends snap into the slot, ensuring that was moved. 7 Complete ...
Limited Warranty and Support Guide
Page 6
... the following rights provided you comply with : • Generating or diagnosing user-generated programs or source codes. • Installing non-HP products. b. You may include associated media, printed materials and "online" or electronic documentation. Excludes system optimization, customization, and network ... computer software and may copy the Software Product into Your Computer's temporary memory (RAM) for purposes of the HP Product. Copying. You may load the Software Product into the local memory or storage device of using the Software Product. Software technical support does ...
... the following rights provided you comply with : • Generating or diagnosing user-generated programs or source codes. • Installing non-HP products. b. You may include associated media, printed materials and "online" or electronic documentation. Excludes system optimization, customization, and network ... computer software and may copy the Software Product into Your Computer's temporary memory (RAM) for purposes of the HP Product. Copying. You may load the Software Product into the local memory or storage device of using the Software Product. Software technical support does ...

Start Here Guide
Page 15
... the video camera transfer cable from the computer, and plug it into a different port. These peripheral devices include printers, scanners, video cameras, digital photo cameras, memory card readers, and PDAs (personal digital assistant) or handheld computers. Refer to the front or back of the camera appears, the device is not there...
... the video camera transfer cable from the computer, and plug it into a different port. These peripheral devices include printers, scanners, video cameras, digital photo cameras, memory card readers, and PDAs (personal digital assistant) or handheld computers. Refer to the front or back of the camera appears, the device is not there...
PC Troubleshooting
Page 5
... with the data copied to the disc to ensure it is an exact copy. To open Roxio project window (which reflects what will end up memory space and slow down the computer. to begin recording A progress screen opens. 7 Click Done to return to the Roxio project window. 8 Remove the disc from...
... with the data copied to the disc to ensure it is an exact copy. To open Roxio project window (which reflects what will end up memory space and slow down the computer. to begin recording A progress screen opens. 7 Click Done to return to the Roxio project window. 8 Remove the disc from...
PC Troubleshooting
Page 21
... Press the Num Lock key. Power Symptom Computer will not turn it . Connect the monitor to its original state. Reinstall the old memory to return your country/ region, or refer to the Limited Warranty and Support Guide to the Upgrading and Servicing Guide. key pad....and Servicing Guide. Test the wall outlet by connecting a different electrical device to the external power source are plugged in properly. Incompatible memory (RAM) may not be properly connected. Troubleshooting Computer Problems 17 Possible solution Ensure that cables connecting the computer to it on the ...
... Press the Num Lock key. Power Symptom Computer will not turn it . Connect the monitor to its original state. Reinstall the old memory to return your country/ region, or refer to the Limited Warranty and Support Guide to the Upgrading and Servicing Guide. key pad....and Servicing Guide. Test the wall outlet by connecting a different electrical device to the external power source are plugged in properly. Incompatible memory (RAM) may not be properly connected. Troubleshooting Computer Problems 17 Possible solution Ensure that cables connecting the computer to it on the ...
PC Troubleshooting
Page 25
... Close all other USB devices after the remote sensor appears in -use light is one of the supported types: CompactFlash (I, II, and Microdrive), Memory Stick, Memory Stick Pro, MultiMedia, Secure Digital, SmartMedia, or xD. Ensure the switch is fully inserted into the same USB port. 6 Disconnect all open ...Windows Start Button, click the Arrow button next to the card. Clean the contacts with a lint-free cloth and a small amount of the memory card. Inspect the ends of the USB cable on the remote sensor from the remote control (select models only). 1 Click the Windows Start ...
... Close all other USB devices after the remote sensor appears in -use light is one of the supported types: CompactFlash (I, II, and Microdrive), Memory Stick, Memory Stick Pro, MultiMedia, Secure Digital, SmartMedia, or xD. Ensure the switch is fully inserted into the same USB port. 6 Disconnect all open ...Windows Start Button, click the Arrow button next to the card. Clean the contacts with a lint-free cloth and a small amount of the memory card. Inspect the ends of the USB cable on the remote sensor from the remote control (select models only). 1 Click the Windows Start ...

PC Troubleshooting
Page 26
...for your computer by pressing the On button. Turning Off Your Computer When you restart, the computer reloads the operating system and software into its memory. If your problem: 1 Click the Windows Start Button, right-click Computer, and then click Properties. 2 Under Tasks, click Device Manager. ...available methods of fixing your computer to expand the type of device for which clears some problems that follow provide detailed instructions for example, HP DVD Writer 640b). 5 Click the Driver tab. 6 To update a driver, click Update Driver, and follow the onscreen instructions. 22...
...for your computer by pressing the On button. Turning Off Your Computer When you restart, the computer reloads the operating system and software into its memory. If your problem: 1 Click the Windows Start Button, right-click Computer, and then click Properties. 2 Under Tasks, click Device Manager. ...available methods of fixing your computer to expand the type of device for which clears some problems that follow provide detailed instructions for example, HP DVD Writer 640b). 5 Click the Driver tab. 6 To update a driver, click Update Driver, and follow the onscreen instructions. 22...

Getting Started Guide
Page 6
... Optical Drive Quick Reference Table 87 Using the Memory Card Reader 89 Media Insertion Guide 90 Understanding the Activity Light 93 Formatting a Memory Card 93 Troubleshooting the Memory Card Reader 94 Using the HP Personal Media Drive and HP Pocket Media Drive 95 Connecting the Drive 96 ...Inserting the Drive into an HP drive bay 96 Connecting the Drive to a Computer ...
... Optical Drive Quick Reference Table 87 Using the Memory Card Reader 89 Media Insertion Guide 90 Understanding the Activity Light 93 Formatting a Memory Card 93 Troubleshooting the Memory Card Reader 94 Using the HP Personal Media Drive and HP Pocket Media Drive 95 Connecting the Drive 96 ...Inserting the Drive into an HP drive bay 96 Connecting the Drive to a Computer ...
Getting Started Guide
Page 13
These peripheral devices include printers, scanners, video cameras, digital photo cameras, memory card readers, and PDAs (personal digital assistant) or handheld computers. Unplug the video camera transfer cable from the computer, and plug it into a different port. ...
These peripheral devices include printers, scanners, video cameras, digital photo cameras, memory card readers, and PDAs (personal digital assistant) or handheld computers. Unplug the video camera transfer cable from the computer, and plug it into a different port. ...
Getting Started Guide
Page 52
Sleep and hibernate are available. Sleep mode saves your work to memory so you can resume quickly, saves your work where you must turn off the power for safety reasons, such as recording a scheduled TV program or ... button next to the Lock button. 4 Click Shut Down. 5 Turn off the monitor. As an alternative to shutting down the computer, you or your system memory to a temporary file on the hard disk and then turns off the hardware. You can lock it or put the computer automatically into either sleep...
Sleep and hibernate are available. Sleep mode saves your work to memory so you can resume quickly, saves your work where you must turn off the power for safety reasons, such as recording a scheduled TV program or ... button next to the Lock button. 4 Click Shut Down. 5 Turn off the monitor. As an alternative to shutting down the computer, you or your system memory to a temporary file on the hard disk and then turns off the hardware. You can lock it or put the computer automatically into either sleep...

Getting Started Guide
Page 54
... in hibernate mode, it saves to the hard disk drive everything that is available as an advanced power setting. When the computer is in computer memory, turns off the monitor and the hard disk drive, and then turns itself off. Automatic sleep, hibernate, or away mode You can set your programs...
... in hibernate mode, it saves to the hard disk drive everything that is available as an advanced power setting. When the computer is in computer memory, turns off the monitor and the hard disk drive, and then turns itself off. Automatic sleep, hibernate, or away mode You can set your programs...
Getting Started Guide
Page 55
... did not set it up with an ISP, skip this step and follow the instructions provided by using the operating system and software in its memory. A Web browser. a Click the Windows Start Button on your computer. NOTE: Easy Internet Services provides a list of the computer. There are other ways to connect...
... did not set it up with an ISP, skip this step and follow the instructions provided by using the operating system and software in its memory. A Web browser. a Click the Windows Start Button on your computer. NOTE: Easy Internet Services provides a list of the computer. There are other ways to connect...


