Upgrading and Servicing Guide
Page 13
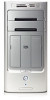
...a wide data cable. 3 Remove the four screws from the sides of the PC. Use a Phillips screwdriver. Or • Parallel ATA (Advanced Technology Attachment) drive that uses a narrow data cable. If your PC motherboard does not have the holes, you cannot add an additional hard disk drive. If...have an open Parallel ATA connector before attaching the drive to press the tip of the stud on the PC motherboard. Check the bottom of the PC case. If your PC for an open Parallel ATA connector, you may need a separate Parallel ATA connection cable (purchased separately). Use...
...a wide data cable. 3 Remove the four screws from the sides of the PC. Use a Phillips screwdriver. Or • Parallel ATA (Advanced Technology Attachment) drive that uses a narrow data cable. If your PC motherboard does not have the holes, you cannot add an additional hard disk drive. If...have an open Parallel ATA connector before attaching the drive to press the tip of the stud on the PC motherboard. Check the bottom of the PC case. If your PC for an open Parallel ATA connector, you may need a separate Parallel ATA connection cable (purchased separately). Use...
Upgrading and Servicing Guide
Page 15
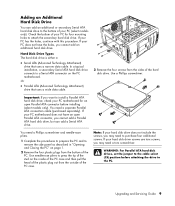
... to replace the side panel, and to the original Serial ATA drive that was installed in its side. 5 Locate the memory sockets on the PC motherboard. Upgrading and Servicing Guide 11 6 Attach the data cable connector end to touch any cabling out of the way, if necessary. See "Removing... the Front Panel" on page 1. Serial ATA motherboard connector WARNING: Do not to use the connector that was connected to close the PC. CAUTION: When handling a memory module, be careful not to an open Serial ATA (or Parallel ATA) ...
... to replace the side panel, and to the original Serial ATA drive that was installed in its side. 5 Locate the memory sockets on the PC motherboard. Upgrading and Servicing Guide 11 6 Attach the data cable connector end to touch any cabling out of the way, if necessary. See "Removing... the Front Panel" on page 1. Serial ATA motherboard connector WARNING: Do not to use the connector that was connected to close the PC. CAUTION: When handling a memory module, be careful not to an open Serial ATA (or Parallel ATA) ...
Upgrading and Servicing Guide
Page 17
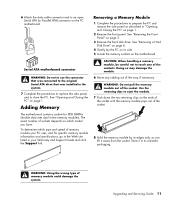
...device isn't working, read through the card manufacturer's installation instructions, and recheck all connections, including those to replace the side panel and close the PC. The whole connector should be seated properly in the card slot. 5 Loosen the screw on the card you are replacing. Removing an Add-...in Card 1 Complete the procedures to prepare the PC and remove the side panel as described in "Opening and Closing the PC" on page 1. 2 Gently lay the PC on its side. 3 Inside the PC, locate the add-in card slots on the motherboard. 4 If you are replacing a card, make a note ...
...device isn't working, read through the card manufacturer's installation instructions, and recheck all connections, including those to replace the side panel and close the PC. The whole connector should be seated properly in the card slot. 5 Loosen the screw on the card you are replacing. Removing an Add-...in Card 1 Complete the procedures to prepare the PC and remove the side panel as described in "Opening and Closing the PC" on page 1. 2 Gently lay the PC on its side. 3 Inside the PC, locate the add-in card slots on the motherboard. 4 If you are replacing a card, make a note ...
Upgrading and Servicing Guide
Page 18
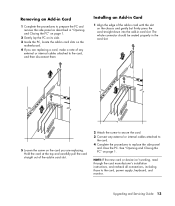
.... 3 Remove any cabling, if necessary, to reach the battery. 4 Remove any memory modules, if necessary, to close the PC. When the battery starts to weaken, the date and time may be incorrect. See "Opening and Closing the PC" on the motherboard provides backup power for the PC's timekeeping capability. WARNING: There is incorrectly replaced.
.... 3 Remove any cabling, if necessary, to reach the battery. 4 Remove any memory modules, if necessary, to close the PC. When the battery starts to weaken, the date and time may be incorrect. See "Opening and Closing the PC" on the motherboard provides backup power for the PC's timekeeping capability. WARNING: There is incorrectly replaced.

